Categories
DIY Gardening Lawns

Landscape Plan Drawing – Practice Rendering Symbols

Landscape Plan Drawing – Practice Rendering Symbols

by Carolyn Hasenfratz Winkelmann

Late last summer I was asked to take a list of plants that had been chosen for a client and to make a plan drawing to show where they should be installed. I’ve made lots of rough drawings over the years that only I have to understand. Since this was for a client, I consulted a landscaping drawing book and attempted to make one that was more professional and readable to other people. Here is the result.

Landscape drawing plan
Landscape plan drawing for a client – August, 2019

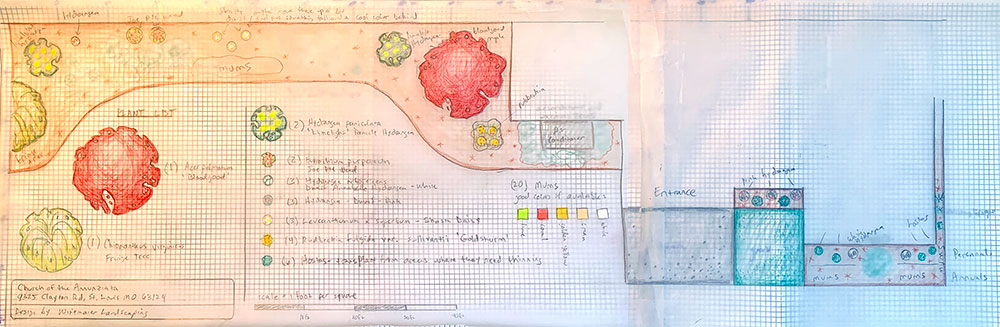
It got the job done, but it’s crude and I’d like to improve on my landscaping drawing skills. My art degree didn’t include landscaping drawing and there are certain conventions that make landscaping drawings more understandable for the client and for the installers. For planning my own projects and client projects in the the 2020 season, I’m making more detailed drawings of sections of my own yard first. To prepare for that I’m practicing how to draw the various elements individually before I combine them all together.

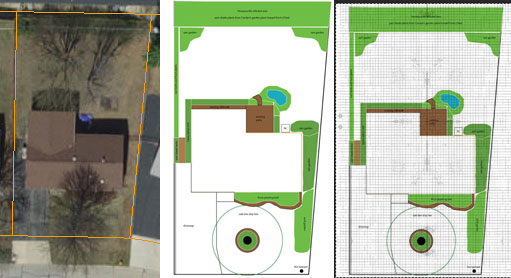
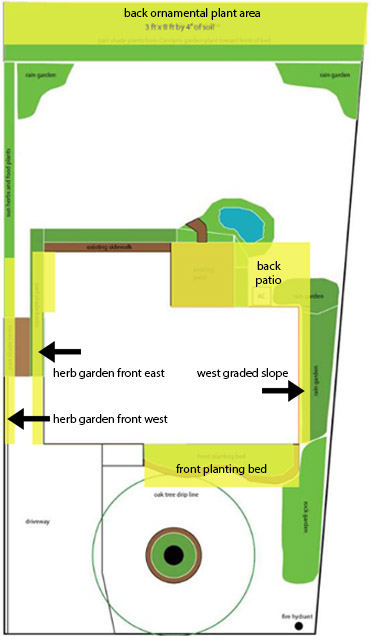
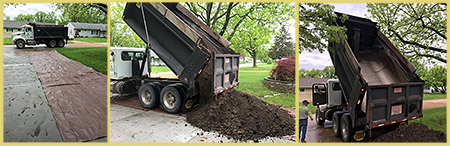
I don’t own any computer software that is specific to landscaping design. I frequently use Adobe Photoshop and Adobe Illustrator, which I used to prepare a diagram of my yard to start some basic planning and calculate the amount of dirt I wanted to buy for the new planting beds we have been putting in. Over the last few years I’ve also done a lot of adult coloring and art journaling and it’s been really satisfying to pick up the hand-drawing tools again after so many years of focusing mainly on computer graphics. I’m enlarging a version of my yard diagram to 1/4 inch to 1 foot graph paper, and I’m going to practice hand drawing sections in a more professional manner as I work on our garden plan.

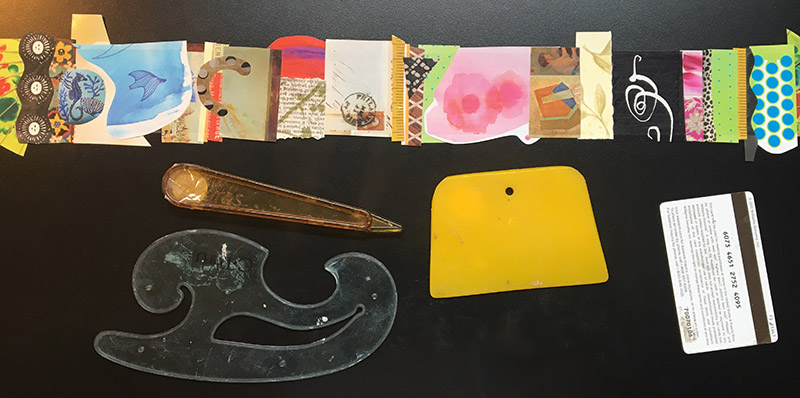
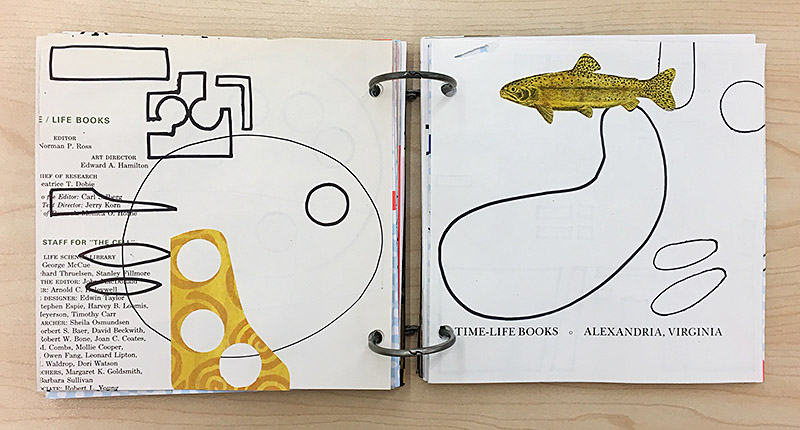
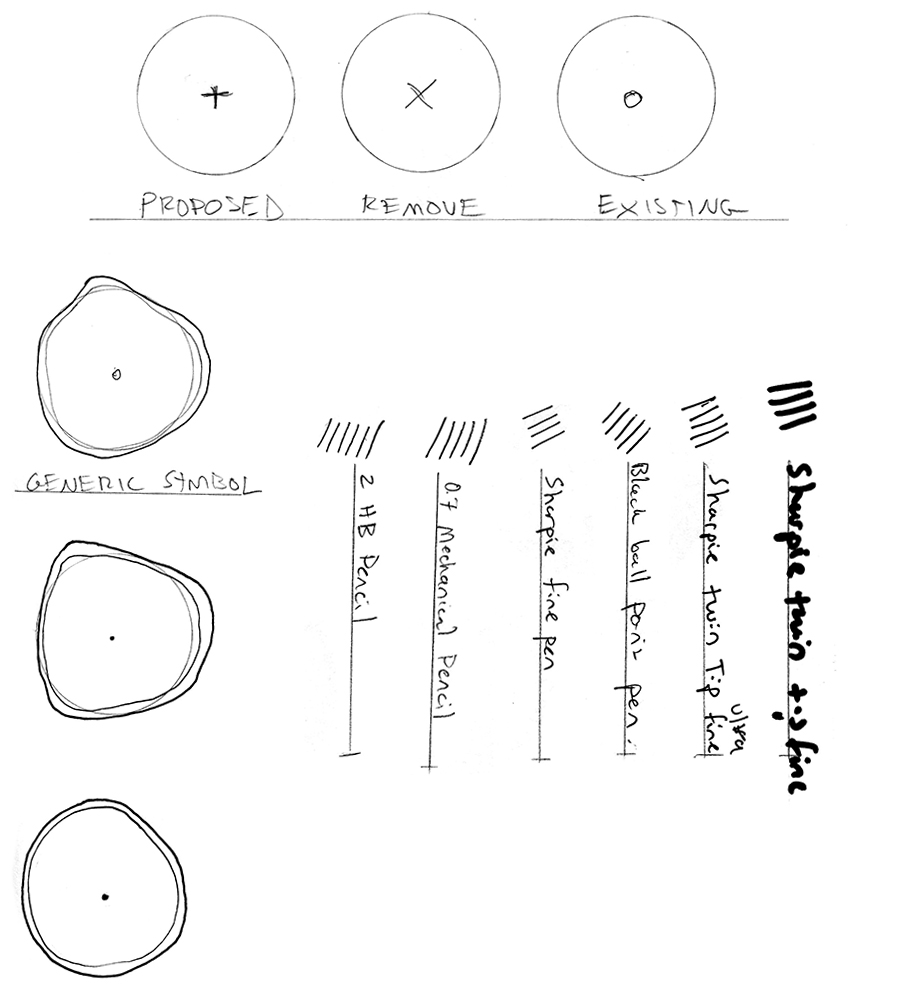
I consulted the book Plan Graphics for the Landscape Designer: 2nd Edition by Tony Bertauski and thought about how to adapt my drawing tools and methods to the techniques shown in the book. I took out my favorite drawing tools and did tests to decide what I would use for my thin line weight, my medium line weight, and my thick line weight. In any kind of art or design, varying the line weight adds a great deal to the liveliness and appeal of a rendering. Then I practiced drawing some generic symbols. Symbols indicate a plant and the dot in the middle shows where the center of the plant will be placed. The outer edge of the symbol represents the mature spread of the plant, so that you can anticipate how the plants will fill in the available space as they grow.

Practicing rendering generic symbols and testing line weights of drawing tools.
Drawing tool tests and generic symbols.

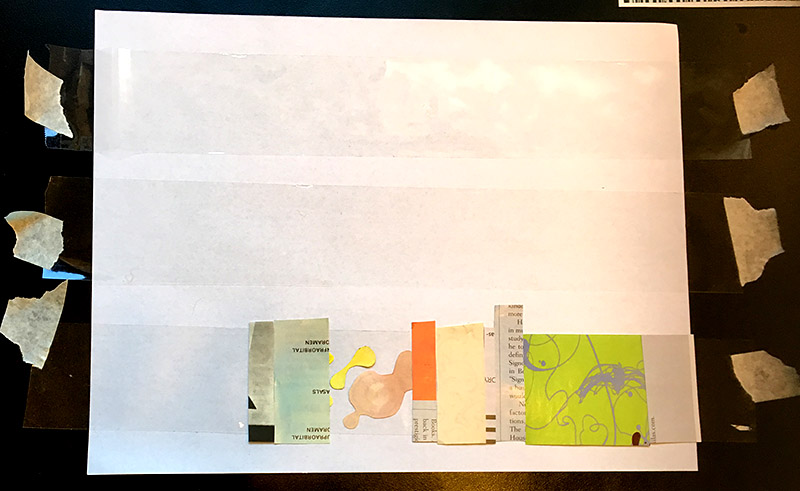
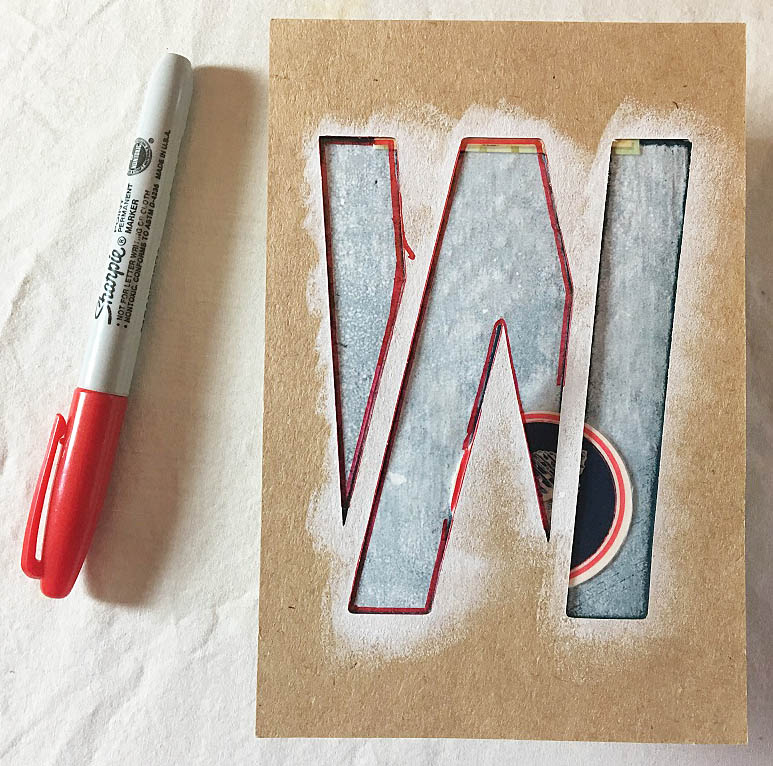
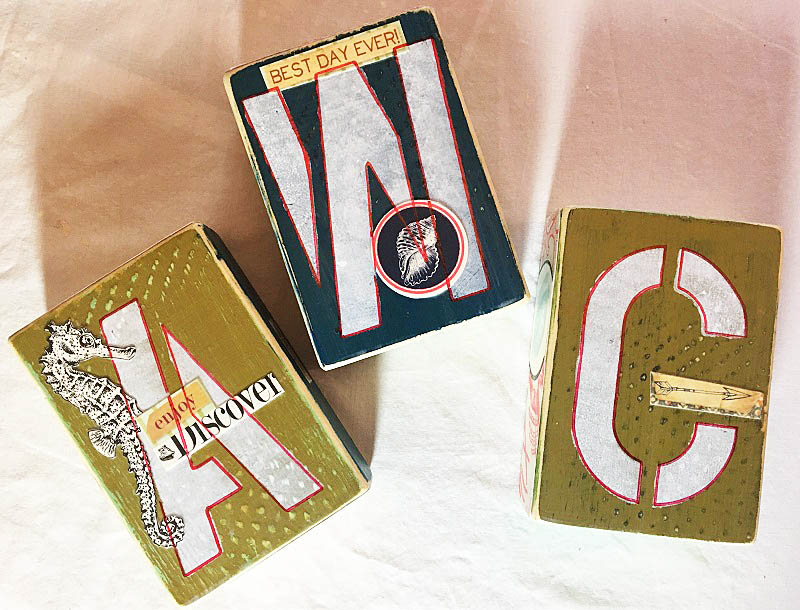
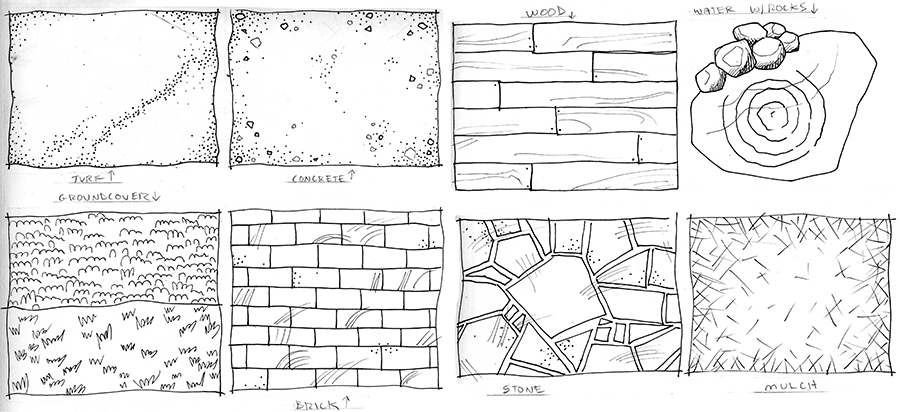
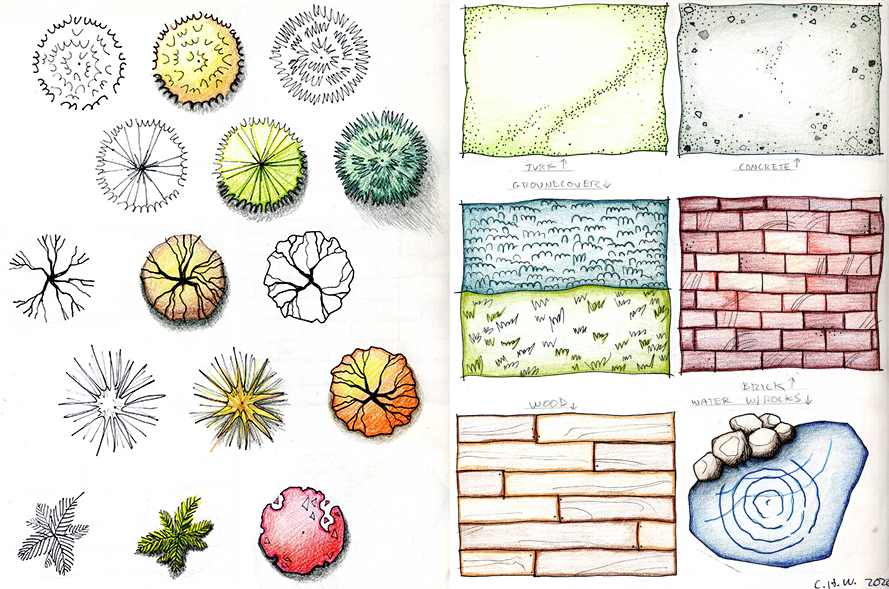
I also practiced drawing textures and non-plant symbols that represent surfaces and features that I anticipate will play a role in our new planting beds, patio and water features. Preliminary markings were made with pencil, then I drew over the pencil lines with two thicknesses of black Sharpie markers and erased the pencil lines. I used a circle template to pencil in accurate circles.

Practice drawing surfaces and landscaping symbols.

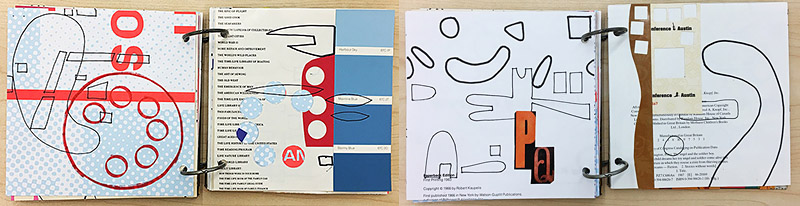
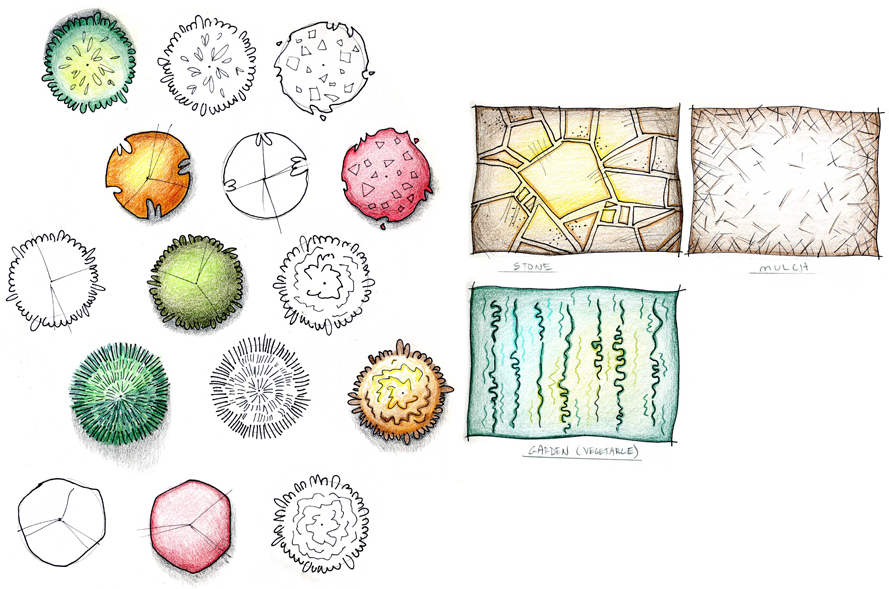
I made two black and white drawings of a variety of plant symbols, then colored one of each in with colored pencils. I’ll keep these sheets as a reference to get ideas for how to render types of plants as I work. Now that I’ve scanned these drawings to use in this article, I also have the option of importing them into Photoshop or Illustrator to use in computer based renderings I might make in the future. That will sure save a lot of drawing time later!

Practice coloring symbols and surfaces for landscape design.
Some plant symbol tests, and textures for stone, mulch, and vegetable garden patches.


Practice rendering landscaping symbols
More plant symbols, plus turf, concrete, ground cover, brick, wood and a little pond with rocks.

I’m going to practice adhering to many conventions of this style of drawing so that it will be understood by professionals in the industry. It’s also inevitable that some personal style characteristics will be made manifest and I hope at least some of the drawings will become works of art on some level as well as useful guides. These exercises have already had a positive influence on my other art work.

If you are interested in drawing some of your own garden plans, here are some resources I’ve found that might help you out on our Schnarr’s Pinterest site:
Garden and Landscape Planning

Categories
DIY Home Decor Storage and Organizing Ways With Wood

Make a Rustic Message Center

Make a Rustic Message Center

by Carolyn Hasenfratz Winkelmann

Make a Rustic Message Center from lath wood

For this message center to hang on a wall I deliberately used rough lath wood instead of smoother wood stock. I wanted to simulate the look of a utilitarian crate that is getting re-used for another purpose. I bought a bundle of new lath wood so that I would have enough for teaching and samples. You can use scrap wood that you have salvaged if you prefer. Salvaged lath wood often has bits of plaster clinging to it which is very interesting if you like the distressed look. A good source for salvaged lath wood is Perennial, a creative re-use studio where I occasionally teach. On the TV show “American Pickers”, they often pick up items for re-use that have “just the right amount of Stank on it” as they say. I know what they are talking about – it’s one of the reasons I love to work with salvaged materials mixed with new. I use a dust mask when sanding any wood, especially salvaged wood because you don’t know what’s in it or where it’s been!

Materials
Lath wood
*Small wire nails and tacks – some of them can be decorative if you choose. Recommended sizes – 19 x 1/2″ and 19 x 3/4″ (Quantity approx. eighteen 1/2″ and six 3/4″)
*Small wood screws – 4 x 1/2″ (Quantity six)
*Small washers – #6 (Quantity six)
*Chalkboard Paint
*Chalkboard Contact Paper
*Clipboard Clip (available at Schnarr’s Webster)
*Wood glue
Scrap cardboard
*Optional – White acrylic paint

Tools
*Sandpaper
*Saw
*Ruler
*Pencil
*Drill
*Tiny Drill Bit
*File
*Rags
*Paint water container
*Paint brushes
*Small clamps
Block of old wood for bracing wood while drilling and nailing
*Dust mask
*Squeegee or bone folder
*Utility knife, self healing cutting mat and *metal ruler, or paper cutter for cutting cardboard
*Phillips screwdriver
*Optional – small container for mixing paint wash
*indicates products available at Schnarr’s

Instructions

1. Cut 1 1/2 inch lath wood into the following lengths:

Four pieces – 15″
Five pieces – 6″
Two pieces – 1.5″

Use the pencil and ruler to measure and mark wood pieces, then cut.

Optional: Paint all the wood pieces on all sides with a wash of white acrylic paint and allow to dry.

Pieces cut from lath wood
You will need to cut eleven pieces of wood for this project.

2. Sand the rough edges off of your wood pieces. You are probably wondering why I placed the step of sanding the wood pieces after painting instead of the other way around. The reason is it brings out the rustic look more because you’ll be removing some paint as you remove the rough spots on the wood.

3. Lay the four 15″ long pieces down on your work surface. Place one of the 6 inch strips about an inch and a half from the top. Add another right at the bottom of what will become the back of the message center. If it is helpful, draw a pencil line lengthwise on the wood to help you line up your nail holes. Draw little dots to show where the nail holes will go.

4. Squeeze a little wood glue on the backs of the wood cross pieces and clamp in place if you have trouble with the wood sliding around while you’re trying to work on it. If any wood glue squeezes out just wipe the excess off with a rag. Drill a little pilot hole for each nail. You don’t want the drill hole to go through all the way, it only needs to go in far enough to help the nail stay in place and to keep the wood from splitting at the surface as the nail goes in.

Hardware I used in this project - wire nails, wood screws washers and Clipboard Clips
Hardware I used in this project – wire nails, wood screws washers and Clipboard Clips

5. Hammer in your 1/2″ nails. If any poke through the front, file off the sharp parts.

Nailing wood slats to back to hold vertical wood pieces together

6. Now start to assemble the tray that will be attached to the bottom front of the message center. Prop up one of the two small one and a half inch pieces of wood up against a piece of scrap wood. A small section of a 2 x 4 is the perfect size (2 x 4s are not really 2″ x 4″ as you can see.) Add a dab of wood glue and place a 6 inch cross piece on top, butting up the edges together. Drill a couple of pilot holes and nail in place. Repeat for the other end.

7. Add another 6″ piece to the bottom of the box and nail in place after dabbing with wood glue, then nail the whole assembly to the bottom front of the message center with 3/4″ inch long nails. It helps to prop up the other end with the 2 x 4 piece while you are nailing through the back.

Making tray for the bottom of the message center.

8. Next make a small chalkboard for the middle front. Cut out a 5 1/2″ x 9″ piece of scrap cardboard and cover with chalkboard Contact paper. Cut the Contact paper slightly larger than the cardboard so that you can fold the edges over for a neat look. Burnish the paper with a squeegee tool to make a nice tight seal. Paint the front of the chalkboard over with chalkboard paint. (Unfortunately the Contact paper does not really take the chalk well enough by itself, but it makes an excellent base for the paint.) Let paint dry.

Cover a piece of scrap cardboard with contact paper, then paint over with chalkboard paint

9. Nail the last 6″ wood strip across the top front of the message center and glue and nail in place. Place the clipboard clip where you want it and make little pencil marks to indicate where to drill two holes for the screws to hold the clip on.

10. Drill the pilot holes then thread a washer on two screws and drive the screws in place.

11. Use a screw and washer on each corner of the chalkboard to attach in the middle front of the message center. You are done!

Attach the clipboard clip and you are done!
Attach the clipboard clip and chalkboard and you are done!

Do you want some more ideas for for things to make out of wood? Here is the Pinterest Board I made awhile ago that was the inspiration for this article:
Rustic Spring Ideas – this project isn’t only for spring of course, but I started working on it in February.

There are also some ideas for fun wood projects here on the Schnarr’s Pinterest site:
Ways With Wood

Categories
DIY Home Decor Storage and Organizing Ways With Wood

Make a Wood Storage Crate

Make a Wood Storage Crate

by Carolyn Hasenfratz Winkelmann

Wood crate decorated with stencil designs

This project was inspired by a card box my husband Tom and I made for our nautical-themed wedding reception last summer. I made a lot of stuff for the wedding and I was literally working until the last minute at the church figuring out how to attach my homemade veil to my head! I finished my jewelry the day before! Two or three nights before the wedding I had set aside time to assemble this card box. I had already cut the pieces out but needed to nail it together and decorate it. I came down with what I thought was a terrible cold and I asked Tom to assemble the box for me. He came through and did a great job! I recovered quickly from whatever I had (if I actually really had anything other than stress) and was feeling fine the next day so I did the decoration in a hurry.

Card box we made for our wedding last summer with decoupage decoration

I painted the above crate-style card box with a wash of brown paint to “antique” after applying decoupage decoration. For the following storage crate project I’m going to experiment with applying a light colored paint wash on unsanded wood to be sanded, assembled and then decorated with stencils.

Materials
*Six pieces of lath wood (1 1/2″) cut to 12″ long
*Two pieces of 1/2″ thick wood cut to 4 1/4″ x 3 1/2″
*Tiny nails
*Paint rags
*Wood glue
*Acrylic paint
*Painters tape or masking tape

Tools
*Pencil
*Ruler
*Saw
*Paintbrush
*Paint water container and small paint mixing container
*Drill
*Tiny drill bit
*Hammer
Small sponges (or *large sponges cut up)
*Assorted stencils (available at Schnarr’s Webster)

*indicates items available at Schnarr’s

If you want a more refined look you can substitute lattice strips for lath wood, they are similar in size and thickness with a smoother surface and fewer irregularities.

Cut pieces of wood ready to paint, sand and assemble

Instructions

1. Paint your wood pieces with a wash of white acrylic paint. A wash is paint with water added to thin it out and make it semi-translucent.

2. After paint is dry, sand the rough spots with all-purpose sandpaper and sand the edges to bring out a little more of the natural wood color. The effect of sanding the edges is subtle but adds a lot of visual interest.

Wood slats taped down to work surface

3. Take three of the 12″ slats at a time and tape them down onto your work surface. Normally for stenciling projects I use painters tape or masking tape, but I was out of both so in the pictures you will see me using duct tape and drafting tape as substitutes.

4. Tape stencils in place on your work surface over the wood. Choose a light to medium color of paint and dab the paint through the stencil openings with a sponge.

5. Lift the stencils and let the paint dry. I rearranged my wood pieces on the work surface to see what they would look like if I turned every other piece around 180 degrees so that the stencil designs would be scrambled. I liked the effect!

6. Set the two end blocks on your work surface and position two side slats across them. Add a dab of wood glue at each point where the wood will connect for extra strength.

7. Drill two pilot holes at the end of each wood strip with the tiny drill bit. Hammer in nails and repeat until both wood strips are nailed securely to the end blocks. Repeat steps 6 and 7 for the other side, then for the bottom.

I only stenciled one side of these wood strips, so for the bottom of the crate I ended up turning them over so you could see the design if you looked down into the box. You could stencil both sides or have the design facing down while the box is in use if you prefer.

8. Next I stenciled onto each end of the crate. I set the crate on end on a chair to bring it to a more convenient work height. Tape the stencil down and if necessary, mask out the parts of the template you don’t want to use with tape. It’s easy to accidentally sponge into areas you didn’t intend.

Here is what one of the ends looks like after the final stencil. You can really change the look of the crate depending on what stencils and colors you choose to use. You can also make crates in different sizes to fit different needs. They make great baskets for gift giving too. Have fun!


Additional Resources

If you want some more home decor inspiration here are some additional resources:

Spring 2019 Mood Board – yes spring 2019 is done by now but a lot of these looks have been around for several years and should be good for inspiration for awhile yet. There is a lot of raw wood, tin, burlap and looks that you could easily recreate with hardware store items.

Summer 2019 Mood Board – wood, tin, twine, rope, seaglass, oh yeah!

Categories
DIY Gardening

Adventures in Buying Dirt

Adventures in Buying Dirt

by Carolyn Hasenfratz Winkelmann

Tom and I need a lot of dirt for the landscape design we’ve been working on. We need to regrade some areas and we need to add dirt to raised beds that I’m making. We’ve been buying a few bags of topsoil and potting soil here and there but to get the job done right we are going to have to order a truckload – or two?

In order to know how many cubic yards of dirt to order, I needed to calculate the area of several spots on the property where we wanted to add dirt. The more conventional way to do this is to use graph paper, tracing paper and special rulers to draw the areas to the right scale. Another way is to purchase a graphics kit such as this Patio and Outdoor Living Room Spacing Kit that I bought to experiment with. There is also landscaping computer software that is designed specifically for making landscape or home plans. I have a graphic design background and a subscription to the Adobe Creative Cloud so for our project I decided to start out with the tools I know best – my computer, a scanner, Abobe Illustrator and Adobe Photoshop.

Last year to begin our landscape plan I went to the St. Louis County real estate lookup web page and did a search for our house. I took a screenshot of the aerial photo and edited the image in Adobe Photoshop to cut out the areas I didn’t need. I imported the image into Adobe Illustrator and drew over the photo to produce the rudimentary diagram shown in this article.

Measuring the whole house and yard by hand to figure out the square footage of areas where we want to add dirt was an option but not a very appealing one! So as a shortcut I took a piece of graph paper from the Patio and Outdoor Living Room Spacing Kit and scanned it. I made that a layer in Photoshop. Then I imported my diagram as another layer and measured a part of the property that was a nice even number. The porch is 8 ft wide. The scale of the graph paper was 1/4 inch (one square) = 1 foot. I shrunk the graph paper image so that 8 squares on the graph paper lined up with the length of the porch. I duplicated the layer enough times for the grid pattern to cover the whole diagram. Now to find out the length and width anywhere on the property all I have to do is count the squares on the graph paper layer.

Still in Photoshop, I drew transparent yellow blocks over the areas for which we need dirt. For each block, I figured the length and width and multiplied them to get the square footage. I made a list of each distinct area and its square footage. Then I used the cubic yardage calculator on the St. Louis Composting web site to convert my numbers into a quantity of cubic yardage for each section. The calculator doesn’t require that you calculate the square footage but I wrote those numbers down just in case I need the information later for some other purpose such as calculating fertilizer or seed.

Here is an example:

Back Ornamental Plant Area:
8 ft x 73 ft = 584 square feet
4″ of soil = 10.81 cubic yards

I added up the cubic yardage for the entire project and came up with 28 cubic yards. St. Louis Composting’s dump truck (although quite large) only holds 13 cubic yards at a time so I ordered one truckload to start off. It was difficult for me to picture what 13 cubic yards of dirt looks like until I saw it – it turned out to be a good thing that they couldn’t haul all 28 yards at one time!

To prepare for the shipment I purchased a couple of 10 x 20 ft tarps from Schnarr’s and laid them on the driveway to receive the dirt. I covered the pile with other tarps I already owned and it was barely enough. It started raining about 10 minutes after the delivery and it’s taking us a couple of weeks to distribute this pile. We didn’t want our new dirt to get heavier than it needed to be or wash away in the rain so it was well worth the effort to cover it!

One of these days I’d like to learn the industry standard method of diagramming landscape plans. My goal is to do some practicing while I work on detail areas of our landscape plan. For now, I’m the only one who needs to understand this diagram but if you are handing off work to someone else you might need to hire a professional landscape designer to draw up a plan in the conventional way. Landscape design services might be included if you are getting work done. You can also hire a designer to draw up the plan for you to use with other firms doing the actual work or in the future.

Additional Resources

Here are some other applications that can help you out with measuring your property:

Categories
DIY Upcycling Ways With Wood

Tutorial – Image Transfers on Wood Jewelry

Tutorial – Image Transfers on Wood Jewelry

by Carolyn Hasenfratz Winkelmann

Materials

Thin wood scraps (about 1/8 – 1/4 inch thick)*
Gold acrylic paint*
White acrylic paint*
Large thin jump rings
Necklace chain with clasp
Cutout images from magazines or laser jet prints
Clear heavy-duty packing tape*
Scotch Magic Tape*
Clear-drying gel medium (several brands will work, including Modge Podge sold at the Schnarr’s Ladue store)
Paper towels*

Tools

Saw*
Drill with small drill bit*
Paint brushes*
Water container*
Sandpaper*
Clear plastic tote lid (or some other piece of rigid clear plastic like a piece of plexiglass)
Scissors*
Bone folder or burnisher
Basin for water*
Needle tool

* – indicates items sold at Schnarr’s

Instructions

1. Gather some thin wood scraps and cut them into pieces in the 3/4 inch to 2 3/4 inch range to make bases for wood pendants. Try different proportions and shapes so you can try out different design options.

2. Drill holes so the pendants can be strung onto a necklace later. You can also add extra holes for dangles if you want to. Sand the wood pieces smooth and wipe off with a damp rag.

3. Paint the wood pieces all over with gold acrylic paint. When the gold paint is dry, choose a spot on the front of your pendant and paint a white mark, such a stripe or a circle and let dry. When you start layering translucent images onto your pendant, the white spots will show through and help provide a focal point for your design. You can paint in a loose manner or make precise shapes or preferably experiment with both to see the effects.

4. Take some of your found images from magazines or laser prints and paint them with a layer of clear gel medium. Let dry, and apply a second coat with the brush strokes in the other direction. Let second layer dry, and apply a third coat in a diagonal direction. Let all layers dry for several hours.

5. Take strips of clear packing tape and use the Scotch Magic Tape to hold them down at the ends, sticky side up, on a rigid clear tote lid or piece of plexiglass. Cut or tear found images and press onto the tape pieces with the sides you want to show facing downward. As you layer on images, you can check your work by picking up the clear tote lid and peering from underneath to see what your work looks like.

The backs of packing tape pieces all filled with images.
The underside of the plastic lid showing tape pieces from the front.

6. After the tape is completely filled, remove from the lid and tape face down on a clean rigid surface like a desk top or table top. Rub well in several directions with a burnisher or bone folder.

Here are some tools you can use to burnish the images firmly onto the tape - bone folder, squeegee, French curve, old gift card.
Here are some tools you can use to burnish the images firmly onto the tape – bone folder, squeegee, French curve, old gift card.

7. After the tape strips are thoroughly burnished, soak them in water. Add the images that you coated with gel medium also. When the paper on the back gets soft, gently rub it until it peels away. You will probably have to change the water and rub multiple times to get all the paper off. When you are done, only the ink will be left on the tape. Dry the tape and gel pieces back/sticky side up on paper towels.

Tip – to avoid clogging your drain, dump the water with paper pulp in it outside instead of putting it down the drain.

8. Take one of your images on tape and hold it over your pendant piece until you find a composition you like. Loosely trim the tape piece and coat the front of the pendant with gel medium. Press the tape onto the front of your pendant and push any extra glue out and wipe off. Let dry, then trim around with a scissors. Use a crafting heat tool to speed the drying if necessary.

9. If your first image layer does not quite look finished as is, cut sections out of some of your gel-coated pieces and use the gel medium to glue them on top of your tape layer for extra interest. Top off with a final coat of gel medium and let dry.

10. Re-pierce your hole or holes with a needle tool, and put a jump ring in your hanging hole. If your pendant has multiple holes for dangles, put a jump ring in each hole and attach dangles to the jump rings. Run a jewelry chain with a clasp through the hanging jump ring. You are done!

More information

Here is another tutorial I wrote that makes use of image transfers:
Art Journaling With Stencils and Image Transfers

I have a Pinterest board for Image Transfer ideas and inspiration to help you explore further:
https://www.pinterest.com/chasenfratz/image-transfers/

If you would like to see what other classes and events I have coming up, please see this page on my blog:
http://www.chasenfratz.com/wp/about/classes-and-events/

Categories
DIY Upcycling Ways With Wood

Class at Schnarr’s Hardware this Thursday – Image Transfers on Wood Jewelry

Class at Schnarr’s Hardware this Thursday – Image Transfers on Wood Jewelry

by Carolyn Hasenfratz Winkelmann

 Image Transfers on Wood Jewelry
Class by Carolyn Hasenfratz Winkelmann – Image Transfers on Wood Jewelry

Date:
April 25, 2019

Time:
5:30-7:30 PM

Place:
Schnarr’s Hardware, 40 East Lockwood, Webster Groves, MO 63119

Schnarr’s employee Carolyn Hasenfratz Winkelmann is teaching this class again for the first time in three years, and for the first time at Schnarr’s. Make amazing lightweight pendants by transferring found images onto wood. You will be supplied with the materials to make a necklace for wearing your pendants. You will learn the basics of transferring images with tape and gel medium and attaching a clasp to a cord necklace. I will have a selection of transferred images on hand for you to use at the beginning of the class, then while your pendant or pendants are drying, I’ll show you two different techniques for converting found images into beautiful embellishments to add to wood pendants and other art and craft items.

Each class attendee will receive a printout with a written tutorial for that class so if you forget anything we learned you can refer back to it later. Jewelry tools will be available to borrow during the class and some tools and supplies will be available to purchase if you want to continue working on your own.

At each class, there will be at least one door prize randomly awarded to an attendee – probably a craft supply item of some type that relates to the theme of the class. Past prizes have included a necklace kit, a polymer clay frame kit and a craft stencil. That’s my way of saying thank you for coming!

What to Bring
It’s not necessary to bring anything but it’s a good idea to wear old clothes in case there is a glue mishap. If you have found images on glossy papers like magazine or catalog cutouts, or laser printed copies, you can bring those as a source for images.

What’s Provided
I will provide wood pendant blanks, gel medium, images, packing tape, findings and parts for at least one necklace. I will have tools to borrow during class.

Only 20.00 per person!

LINK TO GET TICKETS:
https://dabble.co/rc/carolyn-hasenfratz-winkelmann

Categories
DIY Upcycling

Art Journaling With Stencils and Image Transfers

Art Journaling With Stencils and Image Transfers

by Carolyn Hasenfratz Winkelmann

Materials (* = items that are available at Schnarr’s)
Scrap mat board or chipboard
Book binding rings* available at Schnarr’s Webster Groves Location
Clean scrap paper
Tracing paper
Clear packing tape – wider strips are the most versatile
An assortment of found papers (pages from old books, magazine pictures, catalog pictures, laserprint copies, paint samples, etc.)
Assorted papers to use as pages – can be drawing papers, art papers or found papers from various sources.
Paper towels*

Tools
Paper cutter
Art stencils* available at Schnarr’s Webster Groves Location
Permanent* and other markers
Colored pencils
Gel pens
Glue sticks*
Hole punch
Scissors*
Pencil*
Ruler*
Masking tape* or painter’s tape* for holding papers and stencils in place while tracing and stenciling
Bone folder, burnishing tool or squeegee*
Basin* filled with water
Clear packing tape*

In case you missed my in-store demo during the Webster Groves Fall Art Walk in October 2018, this art journal book is what I was working on. I chose to work with a lot of abstract designs and random images to have fun with shapes and colors and not worry too much about content. When I was working on my demo, a customer asked what I was doing and I told him. He responded by saying, “I don’t have any kids”. Kids could do a book like this, but it’s fun for a person of any age who likes to experiment with visual media. I’m 51 and I can play with this stuff for hours! Coloring and playing is healthy for anyone to do.

Instructions:

To make the cover, cut two pieces of scrap mat board or chip board into 6″ by 6″ squares.

Punch two holes in each piece along one edge and link with binding rings.

From an assortment of your found papers, cut several pages 6″ x 6″. Using the cover piece as a template, trace circles on your inner pages to indicate where to punch the holes for the binding rings.

Here is a selection of potential pages cut from old books, posters and magazine ads.
Here is a selection of potential pages cut from old books, posters and magazine ads. You can use blank sheets of paper in your book, but it can be intimidating to start with a blank page. When you’re making altered art you can just build on what is there.

Using permanent markers, draw through some stencils to start some compositions on your pages. The stencils shown in the above sample are stencils that I cut myself. You can cut your own stencils or use pre-cut art stencils. It helps make your work more interesting if you vary the line weight of the markers. Add bits and pieces of collage papers if you are inspired to do so. Glue them down with a glue stick.

Here are a few more examples of two page spreads in progress.
Here are a few more examples of two page spreads in progress. I added paint sample strips to some of the pages to remind me to have fun with color.

Next start making some image transfers to add to your pages from packing tape. Use masking tape to hold strips of packing tape flat on your work surface, sticky side up. Start sticking papers you like to the tape, keeping in mind that the side that connects with the sticky side and faces down is the one that will show. The recommended sources of good papers for image transfers are glossy images from catalogs and magazines, and black and white or color images from a copier or laser printer. Areas that are white on the paper may turn out to be mostly clear or translucent depending on how much ink and clays and minerals are in the paper.

When you have covered the tape with images, turn the tape over and burnish well with a bone folder or squeegee. Burnish in at least three different directions and press hard to make sure all the paper areas make contact with the sticky tape. In the image below, the tape pieces in the center have had the paper removed already, and the strips on the sides still have the paper on the back.

After the tape strips are thoroughly burnished, soak them in water. When the paper on the back gets soft, gently rub it until it peels away. You will probably have to change the water and rub multiple times to get all the paper off. When you are done, only the ink will be left on the tape. Dry the tape pieces sticky side up on paper towels.

When your tape strips are dry, you can apply a glue stick to the sticky side and paste them in your book where you think they’ll harmonize with what you’ve already started. Continue to develop your pages further with coloring implements of your choice and more stenciling and collage if you choose. These little books make a great portable art activity if you carry them around with a selection of your favorite drawing and coloring tools. Here are some of my pages in various stages of completion.

Open the binding rings to insert your pages inside the covers in any order that you like. Decorate the book cover if you want. If you ever want to add new pages, you can just open the rings and insert them where you want them. I put a date on my pages when I consider them complete, and if I am really pleased with them I upload them to my Art Journaling Pinterest board. Have fun!

Categories
DIY Upcycling

Making Signage From Letter Stencils: Part 2

Making Signage From Letter Stencils: Part 2

by Carolyn Hasenfratz

Tools and Materials
*Indicates items available at Schnarr’s
Assorted scrap cardstock
X-Acto Knife and Blades
Self-healing cutting mat
*Letter stencils
*Pencil
*Acrylic paint
*Paintbrushes
Acrylic medium
Paint mixing containers
Foamcore
Architextures™ Parchment Rub-Ons by Canvas Corp – Build
Assorted decorative papers with hardware related motifs
Bone folder or burnisher
*Modge Podge (available at our Ladue store)
Scrap corrugated cardboard
*Burlap
Fabric scissors
Paper cutter
*Nuts and bolts
*Brads
*Washers
Old wood yardsticks
*Awl
Metal ruler
*Masking tape
*Mounting tape
*Wrenches

My design for in-store signage for use on an endcap at Schnarr’s Hardware store in Webster Groves, MO was influenced greatly by my love of stencils. I had recently used stencils to make signs for another store. I was happy with the results and eager to try similar lettering techniques with a different look.

I took a set of chipboard reusable letter stencils that I got from Schnarr’s and used them to trace letters for the words “DIY Classes” on pieces of scrap cardstock and thin chipboard. I cut out each letter by hand using an X-acto knife, metal ruler and self-healing cutting mat.

My next step was to give each letter piece a wash of white paint mixed with matte medium and water. After the paint was dry I used some rub-ons burnished with a bone folder to add hardware and building imagery over the white paint wash around the cutout letters. Then with a small brush I outlined the letters and edges with a painted-on line of non-watered down white paint.

I cut out pieces of black cardstock slightly larger than my letter pieces and placed one behind each to add a frame and make the letters stand out. With an awl I poked holes in the four corners of each letter piece and fastened the layers of paper together with brads, using a variety of washers from my stash here and there with some the brads for extra variety and interest.

After making my letters, I measured the space available for my sign and took stock of what materials I had on hand. I knew I wanted a lightweight sign that would harmonize with the vintage imagery in the rub-ons, look good with the store’s color scheme and suggest the types of mixed media techniques I teach in the DIY Classes I’m promoting.

I decided to decoupage paper imagery all over a piece of foamcore and paint over the paper pieces with a wash of red-brown paint so that the designs on the papers would show through and not be too dominant. Most of the paper I chose was by the company DCWV. I looked for paper designs with things on them like vintage letters and numbers, rulers, keys, hardware, aged wood and brick, clock faces, vintage machinery and the like. I used Modge Podge to glue the papers over the foamcore and I mixed matte medium with the paint to make a translucent wash.

The finished foamcore panel was a bit smaller than the space I needed to cover so I made a frame out of cardboard covered with burlap to mount it on. First I cut out 8 pieces of corrugated cardboard, 2 for each side of the frame for extra strength. I bound the pieces of cardboard together with masking tape then I covered the cardboard frame sides with burlap, securing the burlap with tape on the back side. I poked holes in the burlap covered pieces and in the front foamcore piece with an awl and I used nuts and bolts with washers to attach the layers together.

I laid out my letters on top of the cardboard/burlap/foamcore assembly and saw that the second line, “Classes” was a bit too wide to fit onto the foamcore and was going to have to overlap the burlap edges to fit. I decided to bolt on a couple of old yardsticks to provide a surface for attaching the second row of letters. This emergency adaptation turned out to be a happy accident because in my opinion the rulers added great interest to the design and looked terrific with the images and colors I was using.

My last step was to attach the letters to the sign with mounting tape. I love this stuff!

Stop by Schnarr’s Webster to see the finished sign. On the endcap below it you’ll find samples of projects for future classes I’ll be teaching along with assorted art and craft supplies, some offered at clearance prices!

Categories
DIY Home Decor Ways With Wood

Stenciled Letter Blocks

Tools and Materials
*indicates available at Schnarr’s
*Wood blocks – 5″ x 3.5″ x 1.5″
*Water based paint in assorted colors
Old lids from cleaned food containers
*Letter Stencils
*Sponge
Scrapbooking or decorative paper
*Scissors
*Modge Podge matte finish (available at the Ladue Schnarr’s store)
*Paintbrushes
*Water container
*Sandpaper
*Painter’s tape or masking tape
Squeegee tool
*Rags
*Pencil
Sharpie Markers

Optional if using metal letters:
*Metal letters
*Hammer
*Nails or tacks

Cut blocks of wood into 5″ x 3.5″ x 1.5″ pieces (two-by-fours cut into 5″ lengths). Make as many pieces as you want letters. For example, if you want to display someone’s initials, cut two or three blocks. To spell out the word “holiday” cut 7 blocks.

Paint all sides of the wood blocks with holiday colors, beachy colors, or any color scheme of your choice. Let dry.

Sand the blocks to bare the corners and get rid of any painting mistakes. I’m fond of the distressed look so I don’t mind the sanded spots giving an aged and worn appearance to the wood. The distressed look is even better if your wood pieces have bumps, knots or other flaws in them.

I worked on several blocks at a time so I wanted to experiment with different layering effects. One some of the darker colored sides, I stenciled a letter with white paint.

Cut some shapes out of decorative papers and use Modge Podge to adhere them to some of the painted wood surfaces. You might want to use shapes that are related to the theme of your project, such as ornament shapes or trees for Christmas, fish for beachy, trees or deer for woodsy, etc. Possible sources of shapes to trace are stencils or cookie cutters. Let dry. You can also cover an entire side of the block with paper if you want.

Since I was working on several blocks at a time, I labeled the backs of my paper pieces and the spots where I wanted to put them with corresponding letters so I could match them up later.

Here is the method I use to apply paper with Modge Podge or other glue without the paper wrinkling.

  1. Paint one side of the paper pieces you want to glue with Modge Podge and let dry.
  2. Paint the other side and let dry.
  3. When ready to apply, paint a thin (but not watered down) layer of Modge Podge on the back of the paper and on the surface you’re gluing it to.
  4. Press paper in place and burnish with the squeegee tool to get a flat seal and push out excess glue. Wipe glue away.

To help me decide where to place paper pieces, I outlined in pencil where my stenciled on and metal letters would go.

Here are the fronts and backs of my blocks with the paper pieces glued on.

Mix up some white or off-white paint with water to make a light wash. Paint your wood blocks with the wash and let dry.

Use painter’s tape or masking tape to hold a letter stencil where you want it on a wood block. Sponge paint through the stencil. Remove stencil and let block dry. Repeat for each block until all your letters are done.

If you think your letters need a little more emphasis, you can place your stencil over the letter again and use it as a guide to draw an outline with a Sharpie Marker. You’re done!

Categories
DIY Home Decor Ways With Wood

Upcoming DIY Class at Schnarr’s – Stenciled Letter Blocks July 19, 2018

Upcoming DIY Class at Schnarr’s – Stenciled Letter Blocks July 19, 2018

Stenciled Letter Blocks – $20.00 Class

Join us at Schnarr’s Hardware in Webster Groves to decorate wood blocks with paint, stencils and mixed media to create fun home decor. Spell out words, make initial blocks. house numbers or dates to enhance a festive occasion. All supplies included.

CLASS DETAILS
Thursday, Jul 19 2018
05:30:00 PM
Price: $20.00

For More Class information or to Sign Up – Click here