Type of Mulch – Compost
Reasons to Use It – Breaks down and puts organic matter in the soil and keeps the weeds out if it is applied 3″ thick. May prevent plant diseases. You can make your own if you know how.
Possible contraindications – Not long-lasting.
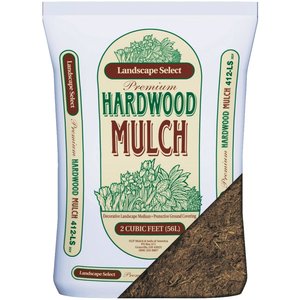
Type of Mulch – Hardwood Mulch
Reasons to Use It – Long lasting and looks attractive. Smothers weeds well.
Possible contraindications – Applying too much can smother plants.
Type of Mulch – Shredded Bark
Reasons to Use It – Breaks down in a season or two and contributes to soil health by increasing organic matter and aiding beneficial soil organisms. Attractive and weed free. May help smother small weeds.
Mulches To Avoid
Type of Mulch – Dyed
Reasons Not to Use It – It is poor as an organic matter additive – it breaks down slowly and can rob growing plants of nitrogen. Often contains nails and other debris from ground-up trash wood which can be from pallets, old decking, demolished buildings or pressure treated lumber. May contain Chromium, Copper and Arsenic.
Type of Mulch – Cypress and Cedar
Reasons Not to Use It – Poor as weed control, over-rated. Possible source of insect contamination from the Southern states. We will already have enough insect problems because of the warm winter – no reason to risk bringing in more.
Type of Mulch – Hot
Reasons Not to Use It – It’s still breaking down and the temperature can get too hot for plants if spread during warm weather. Allow to cool off before applying.
Type of Mulch – Rubber
Reasons Not to Use It – Collects too much heat for plants because it’s made out of tires. It is useful for kid’s playgrounds however.
Now is the time to start many outdoor plants from seed in indoor containers. The seed packets should tell you how long before the average last frost date to start germinating your seeds. In Missouri that date is approximately April 15. I’m going to be trying many colors and sizes of Sunflower varieties this year in test dirt plots in my backyard. The price is right – seeds are very inexpensive! Another resource for St. Louis area planting times is the calendar on the Schnarr’s blog.
Garden centers are not as busy right now with servicing customers… take the opportunity to ask questions of employees before the spring rush.
Dividing mature perennial plants
As plants mature they increase in diameter and quantity of leaves. There is a quick rhyme that explains this concept for perennial plants – sleep, creep, and leap. Here is an explanation of the rhyme.
First year in the soil, the plant sleeps (just maintains – does not improve)
Second year the plant creeps (improves a little bit)
The third year is leap (a very noticeable improvement)
Editor’s note: having noticed many of my perennials flowering for the first time in the third year, this rhyme makes a lot of sense to me!
Five to ten years after initial planting, the plant often looks overgrown or encroaches onto adjacent plant “space”. This is noticeable on commercial properties and public land near roads and highways.
My introduction to dividing plants was happenstance. I had a lot of time on my hands. For inquiring minds, I was laid off from my job – the company moved out of state. The previous owner of our residential property had many Hostas in various locations. The variety was Lancifollia (very common – everybody’s grandma has a ton of them). I divided them up and put them in new places. If there was failure, I would not mind because of the many plants remaining. The success rate was very high even in dividing in the “not recommended” months. This was the beginning of my “hands on” horticulture interest. It is fun to divide plants and share with other people (accumulating positive karma in the horticulture world). And you still have the remainder of the original plant to enjoy.
When dividing plants, try making different size portions. You will learn by trial and error the minimum size of root mass to succeed in growing a new division. If you take off a large portion because you want the new division in a new location to look robust right from the beginning you will have to water more.
I have divided good size clumps of grasses in Missouri’s July and August heat while watering aggressively with a garden hose. Editor’s note: I too have transplanted in the “wrong” months and have often gotten away with it by watering a lot.
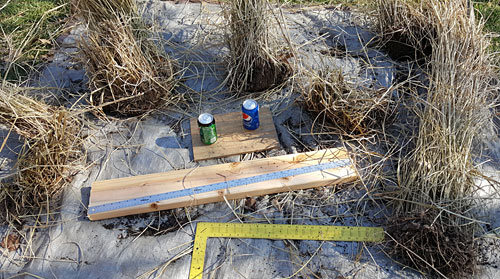
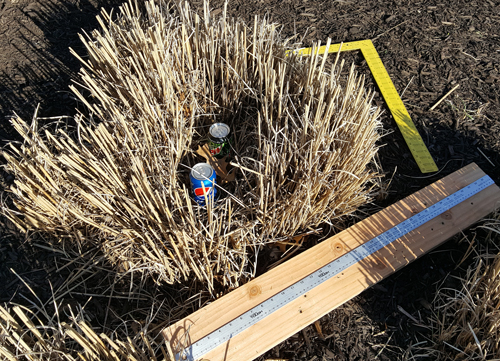
NOTE: For scale, the following pictures include two 12 oz cans of pop, a one inch wide silver yardstick on a 36 inch two by six wood piece, and a yellow carpenter’s framing square that is 16 inches on the short leg by 24 inches on the long leg.
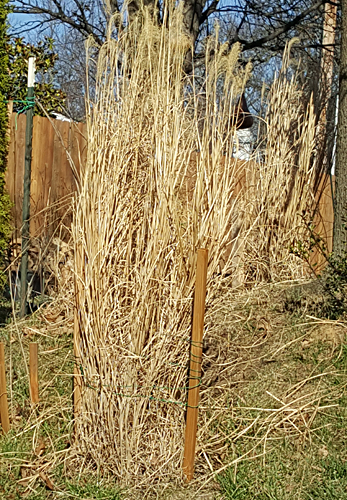
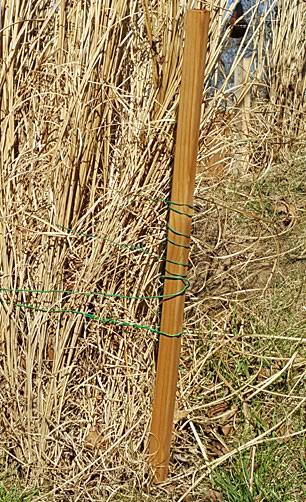
I used “moderately beefy” stakes…
… and green coated electrician’s wire (blends in with green grass color) to support the tall grasses after planting. You can also buy green twine at Schnarr’s.
NOTE: The two previous pictures are same plant. I did this in an obscure corner in the back yard (if there was marginal results – the grass would not be in a prominent location) and the results were excellent. The next year’s growth should be “creep” (from the rhyme).
NOTE: Some root systems are dense and very “anchored” in the soil. I have used a six foot digging shovel and jumped on the shovel (to create more force) to shear through the root system. People have used a wood axe and a chain saw to cut through roots. A Sawz-all power tool, with a pruning blade available at Schnarr’s, also known as reciprocating saw, is a good choice.
Another way to explain root system density is that it is similar to root bound plants in containers. It is important to cut away very dense excess root growth that develops when the roots follow the shape of a container instead of spreading outward like they are supposed to.
Gardener’s Mantra… dig a hole… roots go in first. That is all people need to know! Don’t let the Master Gardener’s detailed instructions intimidate you! Experiment – have fun with it – enjoy the warming weather!
Now is a good time to go after cool season weeds in your beds, mainly Henbit and Chickweed. These weeds can take over bare spots of ground. In the warm season, these weeds will die then reappear in the fall.
You can remove weeds by mechanical means such as a garden hoe, or use a chemical. Non-chemical treatments of weeds can work but sometimes are not practical considering the labor needed to treat the area affected. I recommend Roundup Pro because it includes a surfactant that helps the herbicide stick to the weed. You can mix an herbicide using Dawn as surfactant also.
Moles in your lawn are slowed down by pre-emergent herbicides and fertilizer. They don’t like the smell and the chemical odors will deter their mating for awhile. Moles have a very keen sense of smell. For a more permanent mole solution I recommend spring-loaded mole traps.
Milorganite fertilizer has a bonus effect – the smell repels rabbits and deer for awhile.
You can probably reseed lawns earlier than normal this year but it’s still a little early. Wait until the ground temperature is 50 degrees or above through the night. If you have no choice but to seed now, use a rye grass. If you have used any pre-emergent herbicide, wait three weeks to seed or your seed may not come up.
The intermittent warm temperatures may tempt you to accelerate some spring tasks but you still have to be vigilant about the possibility of more freezing temperatures.
Keep an eye out for plants that did not survive the dry winter or have salt damage.
Late winter and early spring are good seasons to attract desirable bird species to your yard. Birds are not brooding eggs yet because they need to wait until later in spring when there is enough insect food to feed their young. However, they are now engaged in, well, getting engaged! In other words many birds are scouting out nest sites and selecting mates if they haven’t done that already.
You can entice birds to think your property is a good place to raise families by managing it with good bird habitat in mind – some ideas are in my previous article “Gardening for the Birds”. Some of the most sought-after backyard bird species are heavy insect eaters. Many dried and live mealworms are purchased to attract Eastern Bluebirds. Although they tend to be rare in urban and suburban areas, I saw one at the Litzinger Road Ecology Center a couple of weeks ago, so I know they are present in Ladue in places where the habitat is suitable.
Dried mealworms, which can be purchased at Schnarr’s, are more convenient than live mealworms and possibly more acceptable to those who are squeamish. If you would like to try raising your own however, I’ll tell you how. It’s so easy, I started raising mealworms by accident! For years I’ve raised plenty for my pet birds, newt and fish and there are enough left over to share with the outdoor birds also.
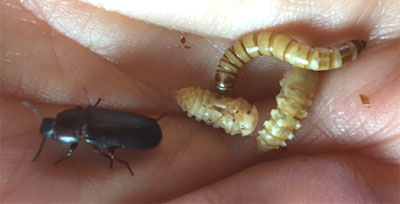
Life stages of the mealworm beetle in my hand – one larva, two pupae and one adult
Mealworms are not actually worms. They are larvae of a species of beetle, usually Tenebrio molitor L. My indoor and outdoor birds will happily consume all three forms of the beetle – adult, pupae, and larvae. When you purchase live mealworms in a store, they are usually larvae only and they are refrigerated to slow down their development into pupae and adults. To get adults who will lay eggs and make more mealworms, you need only to store the larvae at room temperature and give them food and a little moisture!
To begin, acquire a container that is steep sided so the adult beetles can’t escape. An unused 10-gallon aquarium is ideal. Place an inch or so of some kind of “meal” product on the floor of the aquarium. I use a combination of oatmeal, chicken food, and flaxseed meal. These creatures are not that picky so you can use what is cheap and available – I’ve seen an exhibit at the zoo of mealworm beetles consuming styrofoam!
Place a couple of pieces of bark or wood on top of the meal for hiding places. You don’t need a light, they don’t like it. I only use a light to see when it’s time to harvest some larvae. Nor do you need a lid because the adult beetles don’t fly. Buy a container of live mealworms and dump the contents into your mealworm container. Every couple of days, add a little more food and something with moisture that the larvae can “drink” from. Good choices are a piece of carrot or potato, or leftover pieces and rinds from fruits and vegetables that aren’t too odoriferous. You can also buy a special gelatin-like product that is designed for “watering” crickets. Avoid a dish of water because the insects might fall in and drown. If the substrate gets wet and moldy, replace with dry substrate.
When nutritious foods are fed to a prey animal like mealworms and crickets, that is called “gut loading”. In theory, the better you feed your mealworms the more nutrition you’ll be passing along to the eventual bird consumers. Cat food contains protein and amino acids that are very good for insectivorous and omnivorous birds. My two pet European Starlings’ staple food is made from 1/3 chicken food and 2/3 cat food. They are picky about what size food particles they will eat so there are always lots of leftovers that are given to my mealworms and quickly devoured.
Eventually the larvae will develop into adult beetles that will lay eggs. Lift up the wood pieces periodically to see how many insects are hiding under there. When you think you have a high enough population to start harvesting, go ahead and take some. You will get a feel for how many you can take and how often over time.
If you get a fruit fly infestation, try moving the mealworm container to place where a few tiny flies are not that bothersome, like a garage. You can also set up a fruit fly trap (available at Schnarr’s) near the mealworms to catch the flies.
Raising mealworms may seem “gross” at first but it’s a great way to see and teach the life cycle of insects. If you have young family members they might be intrigued by this activity and develop an interest in animals and science. I started aquarium keeping when I was eight years old and I already liked bugs at that age. Besides fish I loved to keep lizards, toads and praying mantises. Seeing the mealworms I bought for my pets turn into pupae was really interesting! If you give a little squeeze to a pupa that is alive it will wiggle, which is an amazing thing for a kid to see!
Supplies
Candle scraps and stubs – such as taper candles, partially filled votive candles, old pillar candles Gulf Wax*
Candle holders – empty glass candle holders, Mason jars*
Votive candle wicks
Roll of wicking string
Metal washers* – if using wicking string
Essential oils – optional
Candle coloring dyes – optional
Tools Hot plate* or stove top
Shallow pan that can take heat from burner Cutting board*
Thin non-serrated sturdy knife – best if somewhat sharp but not extremely so for safety
Assorted sizes of foil pie plates
Pot holders and oven mitts Pyrex glass measuring cups* Jar lifter*
Pliers* Clothes pins*
Metal spoons Fire extinguisher*
Metal lid that fits over your melting setup
Trivets and hot pot pads Thermometer*
* indicates available at Schnarr’s
Before beginning, please read and heed these wax melting safety precautions:
1. Do not allow pets or young children around the wax melting area. If you choose to allow older children to participate, supervise them closely.
2. Keep a fire extinguisher and a metal lid that will fit over your melting setup nearby. In the unlikely event that a wax fire occurs, you can try to smother the fire with the lid and if that doesn’t work, use the fire extinguisher. Make sure you have read the instructions for an oil or grease fire beforehand because a wax fire is similar. You should not use water on a wax fire.
3. Do not leave the melting wax unattended. Do not allow the water pan to go dry.
4. Replace the water in the boiling pan when it gets lower. Pyrex glass measuring cups will withstand the infusion of cooler water without cracking but empty glass holders of unknown origin may not be able to take rapid temperature changes. To prevent cracking, remove non-heat resistant glass containers from the boiling pan when adding new cooler water.
5. A jar lifter is a good tool for lifting jars from the boiling pan safely, but some containers may be too small for the jar lifter tool. I’ve made do with pliers in a pinch. If you choose to pick up a glass container by the edge with pliers, be aware that thin glass containers may crack under the stress. This has not happened to me, but be ready just in case by holding the container away from you so you don’t get splashed with hot wax.
6. Observe normal cooking precautions. Keep long hair tied up and avoid loose clothing that could catch fire or things that may catch on pot handles and the like. If using an extension cord for a hot plate, tape it down and deal with any other tripping hazards you might find. Wax cools off rapidly but until it does it clings and can cause serious burns.
7. Protect your work surface from hot containers with trivets and hot pot pads.
8. Monitor the wax temperature with a thermometer and make sure the wax does not exceed 250 degrees F.
9. Wear old clothes because wax is difficult to get out of fabrics.
10. Do not leave burning candles unattended.
Ok, now that I’ve scared the heck out of you, it’s time to have some fun!
First I’ll demonstrate a couple of ways to refill votive candle holders.
A really easy way to refill a votive candle holder is to take an old taper candle or long tall candle and cut it into a section short enough to fit the candle holder. If there are any gaps between the candle and the sides of the container, melt some wax and pour it in between to fill it in. I don’t know what will happen if you attempt to mix soy wax with paraffin wax – the experiments in this article were all done with paraffin wax.
Tops of longer candles trimmed down to the height of a votive candle holder
This picture shows three tops of long tall pillar candles that have been cut down to votive candle height. After trimming these stubs, I cut up some chunks of Gulf Wax for melting. I was making these votives for a support group I belong to that has a member with allergies, so I chose unscented stubs and avoided adding fragrances or color to the melted portion.
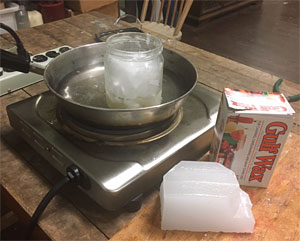
Here is one example of a double boiler setup at Perennial, a community studio where I do some of my work. Placing your melting container in water rather than directly on a burner decreases the risk of fire, produces more even heat and prevents scorching of the wax. I brought a pan of water to the simmering point with the glass jar of wax pieces in it. As you know from reading the safety precautions above, there is some risk in using a random jar and not a Pyrex measuring cup for this, but most of the time it will work if you don’t shock the glass with sudden temperature changes. I forgot to bring my Pyrex with me on this occasion so I made do with what was there.
Melting paraffin wax using the double-boiler method
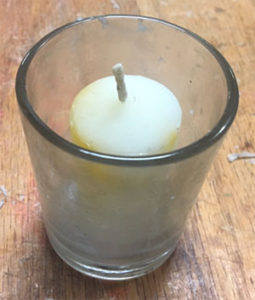
When my wax was melted, I dipped the bottom end of the candle stub in wax and pressed it into the empty votive candle holder. This held the stub in place long enough to pour wax around it. To pour, I picked up the glass jar with a jar lifter tool, being careful to hold it away from me in case I dropped it or the glass broke.
Here is a candle with some fresh new Gulf wax poured around it. I poured just up to where the wick emerges from the candle stub.
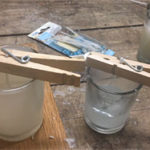
If you don’t have candle stubs available, you can refill votive candles with melted wax poured around purchased votive candle wicks, available at craft stores. Melt the wax as before and hold the wicks in place with clothespins as shown in the picture. Leave the clothespins in place until the wax is solid so that your wicks don’t migrate from the center. Your candles will burn better and more safely if the wick is centered.
I came back to Perennial later to make more candles, this time intending to experiment with fragrances and colors. I brought my Dad with me – he’s the one who had turned me on to candle burning when I was very young. We used to sit around the dinner table and watch pillar candles burn after eating. Dad used to let me put metallic crayons in them so I could watch the little mica flakes swirl around the base of the flame. Now I know that crayons are not good for candles because they clog the wick, but wow that was fun!
Dad and I brought to the workshop all the candle stubs and partially filled glass candle holders that we had lying around from our homes. Combined with a new package of Gulf Wax that I bought and the donated old candles and wax chunks available at Perennial, we had enough for hours of fun.
Dad had some tall glass candle holders he wanted to refill. To fill each candle, he tied a piece of wick to a washer to weigh it down and suspended the top of the wick over the mouth of the candle holder with a clothespin. He filled his candles with many layers of different colors in a sort of ombre effect. While he worked on that I experimented with colored chunks around taper candle pieces.
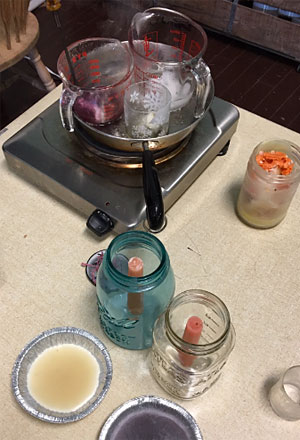
As you can see from the photo, I remembered to bring my Pyrex glass measuring cups this time. If you set the cups so that the handles are toward the outside edge of your pan, they may be cool enough to pick up with your bare hand but if they are not use a pot holder or oven mitt.
My first step was to get the wax out of a bunch of half melted container candles in glass. I set the partly filled containers in the double boiler before turning up the heat to avoid shocking the glass. When the wax was melted, I pulled out the old candle wick and metal pieces with pliers and then poured the wax into small pie plates. I kept the wax sorted by color and fragrance so that the colors and fragrances in my new candles could be coordinated and not clash too much. Perennial has a refrigerator so I put the wax into the freezer to speed up hardening so I could cut it later.
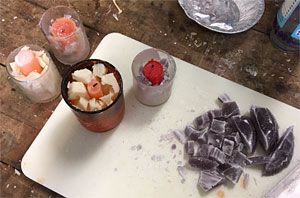
I had a few small glass container candles to fill so I repeated my technique of using sections of tapers cut down to the container height. Then I filled in around them with cut up wax chunks in preparation for filling in the spaces with a matrix of a contrasting wax color. The creamy white chunks shown had a fragrance already in them that was tobacco and vanilla. To my freshly poured wax portion I added Sweetgrass and Woodsmoke fragrances that I thought would blend well.
The purple chunks are from lavender scented candles, so to the matrix wax I added my own blend of relaxing essential oils that already includes lavender. For some of my favorite essential oil blends, see this web page of mine that contains a lot of information about my experiments with essential and fragrance oils.
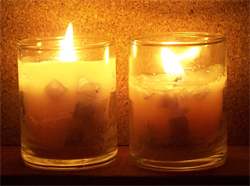
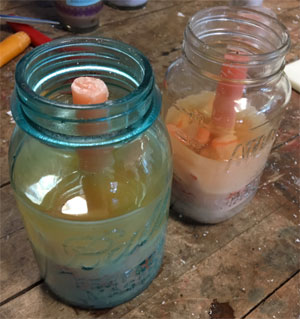
I decided to also make a couple of large candles out of old Mason jars to use as insect repelling candles outdoors. I dipped two taper candles cut to the right length in melted wax then pressed them into the bottoms of the Mason jars. I poured a little melted wax around the tapers for extra hold.
I un-molded more of my colored melted wax pieces and cut them into chunks. Then I distributed them between the two Mason jar candles around the central taper. I melted more wax and poured it to fill in between the chunks. Right before pouring, I added an insect-repelling essential oil blend to the off white wax to make these into insect repelling candles for the patio or the summer camp site. As these candles burn down, the colored chunks will create a pleasing decorative effect. I didn’t add any additional dyes to the wax for the projects shown, I just used what colors of scrap wax were on hand, but if you want to add colors use candle wax dye colors purchased from a craft store.
To clean out your containers, pour the extra wax out into one of your pie plates, then wipe out with a rag or paper towel. Discard rag or paper towel. Clean containers with alcohol if a more thorough cleaning is needed.
If you’d rather buy ready-made candles, Colonial Candles are sold at Schnarr’s Hardware in Webster Groves!
In the spring it’s fun to see how many of your herbaceous perennials from last year are coming back. Maybe you need to thin or divide some and trade your extras with friends and neighbors, or move some of them to a better spot, or buy some new plants. It’s likely transplanting will be part of your spring gardening activities. Here is how to successfully transplant herbaceous plants.
1. First test the soil drainage in the new planting spot. Dig a hole 10-12 inches deep and fill with water. If the water does not drain away in several hours, consider adding organic matter to the soil or building a raised bed, unless you are planting bog plants which won’t mind sitting in water.
2. Test your soil if you want precise information about what fertilizer to add. Here is an article on how to get your soil tested. In some cases, excess fertilizer can do more harm than good so it’s best to know if you really need it.
3. If you have purchased plants or grown them indoors, harden them off gradually for a few days before planting in the ground.
4. Select a cloudy day for transplanting. If plants are in containers, water well.
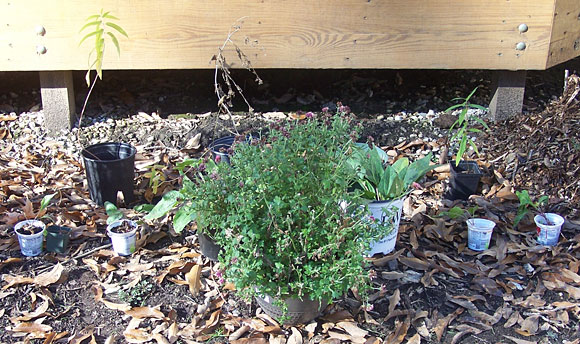
5. If you’re transplanting a group of plants, if you haven’t worked out the positions of the plants in advance on paper, it’s helpful to set the pots on the ground where they will go to help you visualize the arrangement.
My arrangement might look a little strange because the front plant looks bigger, but I was taking into account the mature sizes of the plants and not the current size.
6. Turn the pot over and slide the plant out, catching it around the crown with your other hand. Tap or push the bottom of the container to help the root ball out if needed. Inspect the roots to make sure they are not circling around the pot. If they are, untangle and spread out the roots so that they don’t continue to grow in a circle.
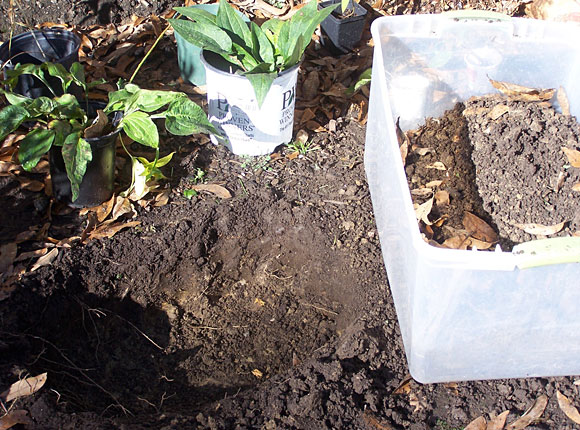
7. Dig a hole that is as deep as the root ball, but several times wider if possible. If the roots are loose, make a mound in the middle of the hole and drape roots around it to raise the crown of the plant to be even with the soil surface around your hole and to encourage the roots to grow outward. For an extra good start you can dust the plant roots with a Mycorrhizal Fungi inoculant. Mycorrhizal Fungi work with the plant’s roots to help them better absorb water and nutrients. Some soil mixes such as Pro Mix already include the fungi. Learn more about this symbiosis here – Mycorrhizal Fungi: The Amazing Underground Secret to a Better Garden.
8. Fill hole in with dirt and water well. Add more dirt if the water makes it settle too much. The crown of the plant should end up level with the soil line.
9. Apply mulch around plant to conserve moisture in soil and suppress weeds and diseases.
10. Check and water plants more frequently when newly transplanted.
 Mulches I Recommend