Categories
Backyard Wildlife Gardening Sustainability

Black Soldier Flies Are Powerful Allies For Humans

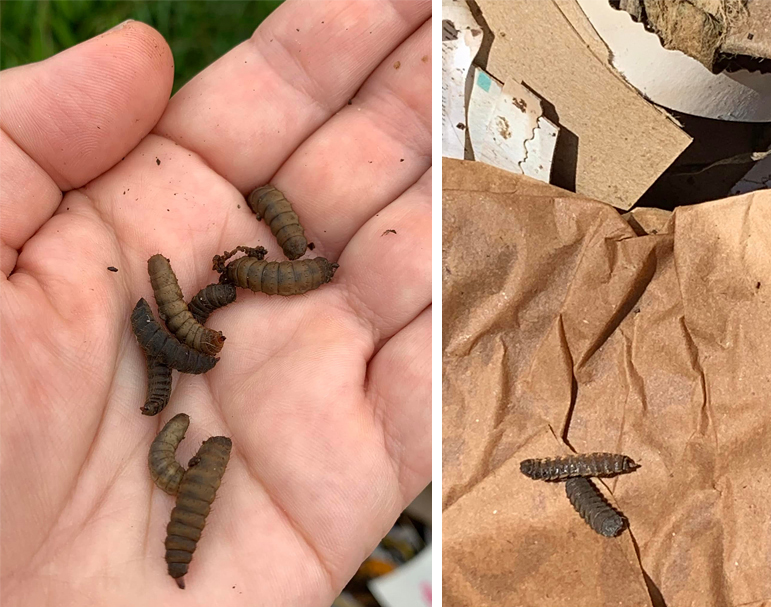
Black Soldier Fly larvae

On one memorable day several years ago, I went out to my deck to put some food waste in the worm composting bucket I kept out there. I lifted the lid, then my stomach kind of churned and puckered a little as I saw that the substrate surface was – MOVING. Had I really managed to raise enough red wriggler worms in a short time to make the surface undulate like that? That didn’t seem likely. A closer look revealed that the movement was caused by something I initially thought was far more gross than worms – my worm bin had been invaded by MAGGOTS. Yes maggots, the “disgusting” larvae of flies. But wait – these didn’t look like House fly larvae. They were darker, larger, and tougher looking. I picked one up to get a good look then did an internet search to see what kind of fly they belonged to. I identified the larvae as Black Soldier Fly (Hermetia illucens), and as I learned about these flies my alarm quickly turned to delight! I had accidentally attracted one of the most beneficial insects I’d ever heard of.

What are some of the many virtues of Black Soldier Flies?

    • They are harmless to humans, in both adult and larval forms (Bader 223). Unlike many other flies known to frequent homes, gardens and farms, such as Black Flies, Deer Flies, Face Flies and Stable Flies, adult BSF do not need to bite you or cut you or your animals to get a meal of blood, mucous or meat juices (Bader 206, 210, 212, 224). As adults BSF lack the mouth parts or digestive systems to bite or consume food (Park 8). In a way, as adults they are actually less gross than butterflies – in addition to nectar, many adult butterflies love manure, bird droppings and carrion juices (Roth 73-74).
    • Black Soldier Fly larvae are known to predate on or discourage the presence of some other noxious fly species such as House flies (Bader 223, Park 4).
    • They are voracious eaters and can quickly consume large amounts of waste (Park 4).
    • The larvae are great sources of protein and theoretically could be fed as part of the diet to omnivorous pets and livestock (Park 10). If the livestock is to be consumed however, caution must be used and US law might restrict the use of BSF as feed unless their own feed is food grade and not derived from waste (Wang and Shelomi 2.5).
    • Black Soldier Flies do not transmit diseases as adults, and as larvae they assist with sanitation in a similar way to vultures – they consume waste products quickly that might otherwise become disease sources (Wang and Shelomi 1).
    • They are native to our area, so you can allow them to breed freely without concern that you are hosting an invasive species (Wang and Shelomi 1).
    • Even though at first glance the adults might resemble wasps more than flies, they don’t have stingers and cannot sting or bite.
Black Soldier Fly adults

My husband and I currently have two compost areas going in our backyard. One group of small piles is behind the little berm we built for our pond waterfall. We know we will be adding to this berm for a long time, so we just pile up yard trimmings there. When a pile is big enough we put dirt on top and plant on top of it. The other is in a black 55 gallon drum with holes in the bottom. The drum makes a useful composter, in part because the black surface heats up from the sun and helps accelerate the decomposition process. There are quicker and more efficient ways to compost of course, methods that involve turning and aeration, but so far we are doing well with removing the contents every so often and starting over if the drum gets too full. The top levels of the compost are normally not finished when harvested. We don’t mind – we have plenty of planting beds we can add it to in our own yard and at volunteer community garden sites. If enough dirt or planting medium is put on it, unfinished compost is fine to plant over. Something in the soil will eventually consume it.

The compost in the drum rots down quickly enough in the warm months that it’s usually possible to see daily progress as the level goes down. In the winter when things freeze, the process halts for awhile and sometimes we have to start a new bin until the drum starts to warm up again. Last week I noticed dramatic progress – the compost level dropped about six inches in a day or two! It wasn’t solely because things were thawing out and we’ve been having slow steady rain, although those factors helped. My heroes, the Black Soldier Fly larvae, were active again! I found a few in my pond when cleaning out leaves – they must have fallen in when looking for a place to pupate.

People all over the world are experimenting with efficient ways to raise Black Soldier Flies to possibly provide food for livestock and humans. For home gardeners who just want a little help breaking down waste, you might get Black Soldier Flies by accident – some food waste and a few pieces of cardboard for shelter on your compost pile could possibly attract them with no further effort on your part. If you find some, I hope you enjoy and appreciate their services! They are also available for purchase if you want some and don’t happen to attract any.

Sources for More Information

Bader, Dr. Myles H. Dr. Bader’s Pest Cures: Natural Solutions to Things That Bug You! Dr. Myles H. Bader, 2012.

Park, Haeree H. Black Soldier Fly Larvae Manual. University of Massachusetts Amherst, 2016. scholarworks.umass.edu/cgi/viewcontent.cgi?article=1015&context=sustainableumass_studentshowcase/. Accessed 25 March 2022.

Roth, Sally. Attracting Butterflies & Hummingbirds to Your Backyard. Rodale, 2001.

Wang, Yu-Shiang, and Matan Shelomi. “Review of Black Soldier Fly (Hermetia illucens) as Animal Feed and Human Food.” Foods (Basel, Switzerland) vol. 6,10 91. 18 Oct. 2017, doi:10.3390/foods6100091. www.ncbi.nlm.nih.gov/pmc/articles/PMC5664030/. Accessed 25 March 2022.
Categories
Backyard Wildlife Gardening

Why Grow Oats?

It will most likely be gone by the time anyone reads this article, but right now my garden is covered with a couple of inches of fresh snow. I haven’t put out any purchased bird seed yet this morning, but in the meantime there are plenty of birds in my yard nibbling on the seed heads of many plants that I have left standing as sources of winter food. Some of the seeds being consumed are from native wildflowers which I grow in order to enhance the utility of our garden as a habitat for beneficial insects and birds. Other seeds are from useful plants that I grow for different purposes, one of which is Oats, Avena sativa.

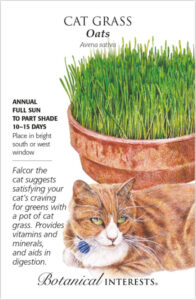
Cat Grass, aka Common Oat, Wild Oat

At Schnarr’s we sell Botanical Interests brand seeds which packages Oats as “Cat Grass”. In the past I have made extensive use of Oats as a cover crop. I was able to order from Schnarr’s a large sack packaged as “Race Horse Oats”. The Oats contained within were viable seeds and grew very well for me as a cool-season cover crop. As the Oat plants matured and produced seed, I noticed their popularity with wild birds and enjoyed the extra benefit of attracting more winged visitors in my garden.

Oats are often green at times of the year when you need something besides brown in the garden (“Cat Grass…”), so they are useful to keep in mind as an option when planning the seasonal succession of plants in your garden. However, they might not be suited to every garden. In some regions they have been reported as invasive (“Cat Grass…”) and although the dried stalks are very pretty as they arch over the garden with a full head of golden seeds, animals quickly rough up the patch trying to get at them so unfortunately the plants don’t stay pretty for very long once they are ripe.

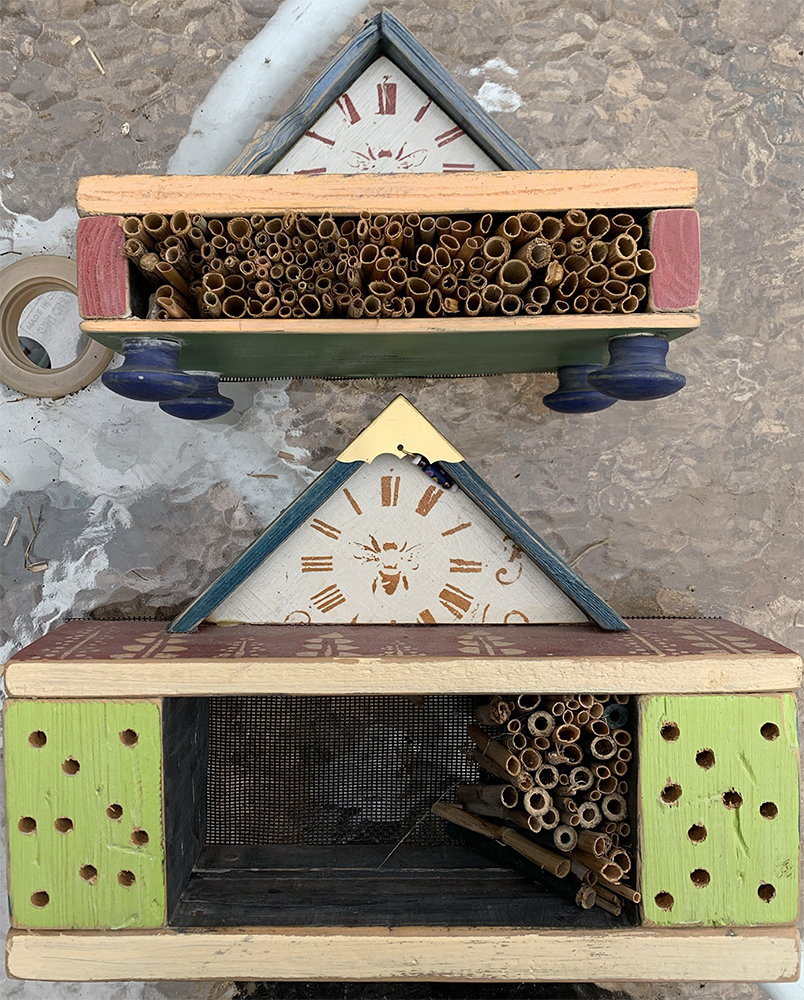
When Oat plants finish their life cycles, they dry out and produce straw. Straw potentially has many uses in the garden such as mulch, a soil amendment, or if it’s made into bales, a growing medium. The hollow straw Oats produce is also a great material for filling houses designed as nesting sites for pollinating peaceful native bees.

Pollinator houses with straw
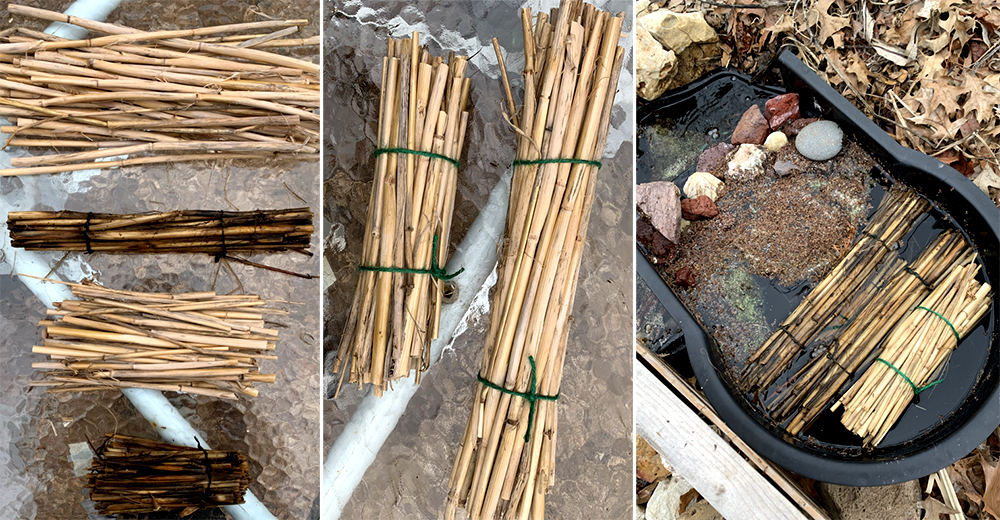
Pollinator houses with oat straw. The lower house is being filled with alternating straw and bamboo lengths to provide a variety of nest hole sizes.

Last summer my husband and I installed a small pond. We’re still working on parts of the system, especially the aesthetics, but the filters and waterfall have been functional for many months now. We’ve had a pretty mild winter overall, so on many days when it’s not freezing I’m able to run one of the filters that directs its outflow water to our small waterfall where it is further filtered with lava rock and, in season, plants as the flow trickles back down to the main section of the pond system.

In that short video above, you can see that I have bundles of floating straw in the filter. Many people are familiar with the use of Barley straw in ponds to prevent excess algae growth. I did a little research to find out if I could use Oat straw as a substitute, and although it may not be quite as effective as Barley, Oats can indeed be used as an algae treatment (Poole).

Forming straw bundles for pond filter.
Forming oat straw bundles for pond filter, sized to fit.

The straw algae treatment is more effective as a prevention than as a cure, so adding it before there is a visible algae problem is an advantage. If you have Oat straw or other straw available, try tying it in bundles to add to your pond – right now is a great time, if you’re looking for a winter task you can do for your garden. The straw looses effectiveness after a few months, so you can also use some of your winter gardening “down time” to make extra bundles for use later in the season.

Works Cited and Further Reading

Avena sativa L.” United States Department of Agriculture, 2021, plants.usda.gov/core/profile?symbol=AVSA. Accessed 28 January 2021.

“Cat Grass, Common Oat, Wild Oat.” Dave’s Garden, 2021, davesgarden.com/guides/pf/go/62227/. Accessed 28 January 2021.

Poole, Terri. “Controlling Pond Algae With Straw.” Turfgrass Matters, May 5, 1996 p. 5. archive.lib.msu.edu/tic/matnl/article/1996may5.pdf. Accessed 28 January 2021.

Rust, Kenneth. “Spring Pond Algae Invasion.” Ogden Publications, Inc., 2014, www.motherearthnews.com/homesteading-and-livestock/pond-spring-algae-invasion-zbcz1404. Accessed 28 January 2021.

Winkelmann, Carolyn Hasenfratz. “Help – My Pond is Full of Algae!” Schnarr’s Hardware Company, 2017, schnarrsblog.com/help-my-pond-is-full-of-algae/. Accessed 28 January 2021.

Categories
Gardening Outdoor Fun

Start Your Garden Now For Health

We are often told that gardening is good for our health both mentally and physically. It is widely believed that spending time with nature, having house plants, access to windows with views of natural scenes, real and facsimile floral arrangements in our living and working spaces and even pictures of plants and flowers have the power to make people feel better. I was gifted five books on horticultural therapy for Christmas, and I now have the proof right in my hands (if I needed it) that all of these assertions are true!

Some of the physical benefits of participating in indoor or outdoor horticultural activities, and in some cases merely viewing plants or landscapes, include improved mobility, coordination, endurance, muscle conditioning, blood pressure, heart rates and respiration (Doherty 21-22, 27-28). The mind and it’s functions also respond positively to horticultural activities and subjects. Clients of horticultural therapy and people exposed to plants and aesthetic representations of plants have been known to show improvements in memory, social development, psychological development, cognitive development, relaxation and positive attitudes (Doherty 21-22, 27-28).

As I work my way through this new mini library I have been fortunate to acquire, I will learn more about why horticulture benefits us in so many ways and how to leverage the effects to the best of my ability in my own gardens, and any others that I may be asked to work on in the future. I’m currently in graduate school for Advertising and Marketing Communications at Webster University while I work part-time for Schnarr’s and don’t know what direction my life will take when the course of study is done. What I do know is that gardening will be part of my life as long as I have sufficient life in me and that any human being can benefit greatly from activities involving horticulture and plants (Doherty 24).

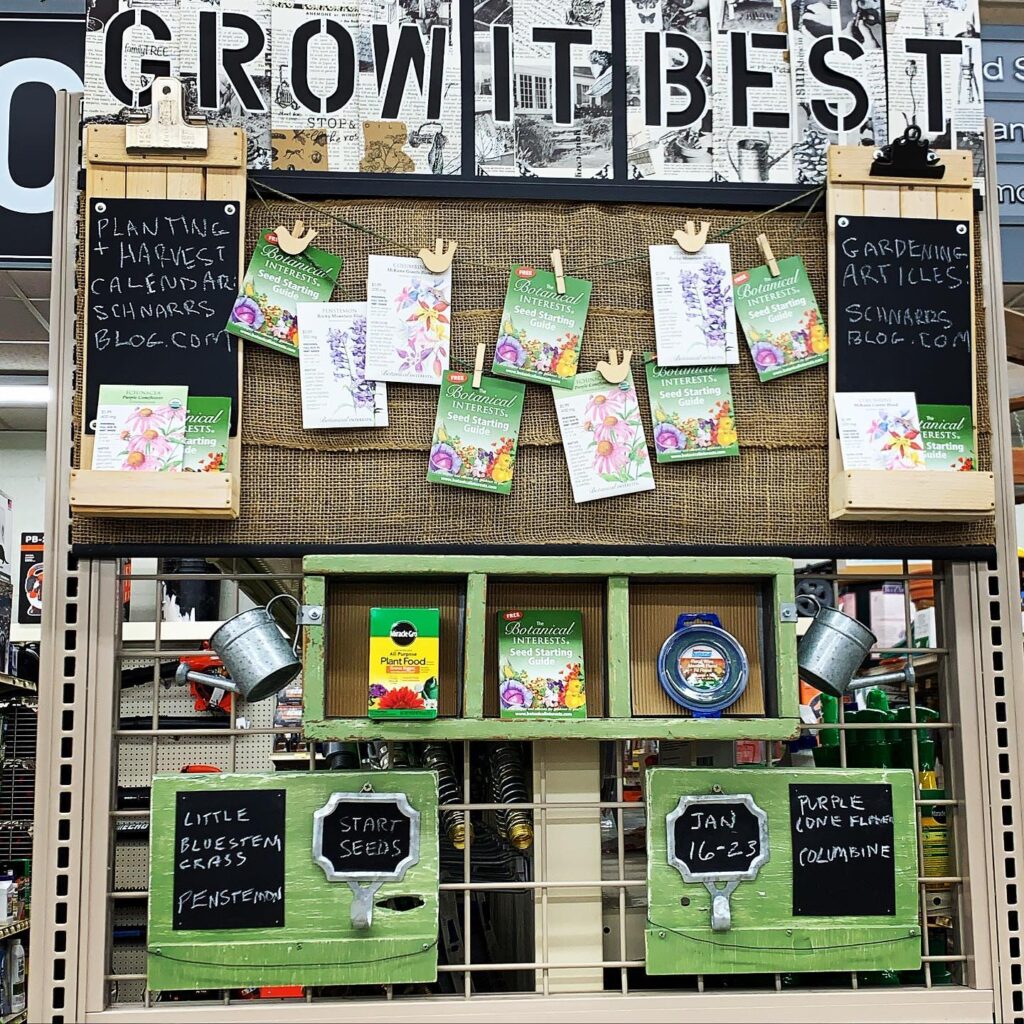
Seed starting display at Schnarr's Hardware.
Seed starting display at Schnarr’s Hardware on January 20, 2021.

In our Lawn and Garden department at Schnarr’s Webster, we’ve endeavored to make it a little easier to start your garden this year by suggesting plants that you can start from seed, and later in the season transplant and harvest, right at the time you visit the store. Each week as I change the display I hope you enjoy the new information.

You can also view the calendar we have provided on this blog that includes St. Louis area based suggestions for seed starting, transplanting outdoors and harvesting dates for various popular plants. In addition, when we hear about educational classes and events that we think sound worthwhile and have the potential to increase the value you get from your garden, we will include those on the calendar also.


Works Cited and Bibliography

Doherty, Janice Hoetker. A Calendar Year of Horticultural Therapy. Lilyflower Publishing, Inc., 2009.

Marcus, Clare Cooper and Naomi A. Sachs. Therapeutic Landscapes: An Evidence-Based Approach to Designing Healing Gardens and Restorative Outdoor Spaces. Wiley, 2014.

Simson, Sharon P, PhD and Marha C. Strauss, HTM, Editors. Horticulture as Therapy: Principles and Practice. CRC Press, 1998.

Wells, Suzanne E. MS, Editor. Horticultural Therapy and the Older Adult Population. The Haworth Press, Inc., 1997.

Winterbottom, Daniel and Amy Wagenfeld. Therapeutic Gardens: Design for Healing Spaces. Timber Press, 2015.

Categories
Good Eating

Collards Taste Great in Quiche

Collards Taste Great in Quiche

by Carolyn Hasenfratz Winkelmann

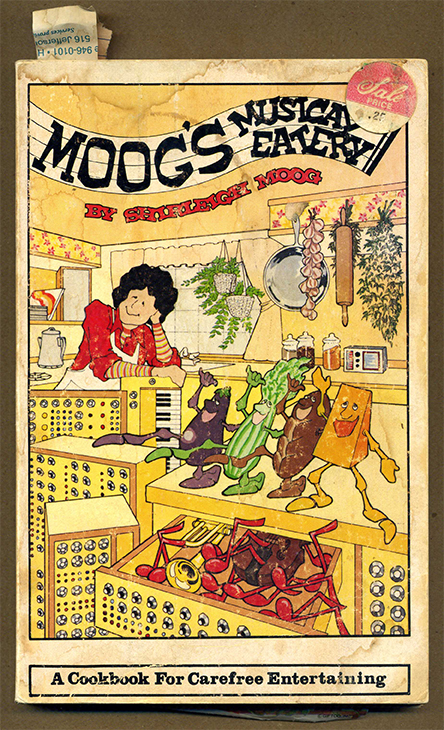
Moog's Musical Eatery Cookbook
“Moog’s Musical Eatery” Cookbook

My Mom was a prize-winning cook and I grew up in a house with an extensive cookbook and recipe collection. “Moog’s Musical Eatery”, the cookbook pictured at the right, was the first cookbook I remember purchasing for myself. I found it at the college bookstore and by then it had been on the shelf long enough to be on sale for $0.25. The main reason I bought it was to get-delicious sounding recipes for a low price. It was an even better deal than I knew because upon reading it I learned that it has a lot of good tips on entertaining, menu planning and getting the most out of ingredients by learning how to choose and evaluate them. The author, Shirleigh Moog, wrote the book based on entertaining the friends and colleagues of herself and her husband, who was the inventor of the Moog synthesizer. First published in 1978 and purchased by me in the second half of the 1980s, it was one of my first introductions to some flavors that are well-known now in our culture but fairly exotic at the time, such as Tahini, Sangria, or Gazpacho. This book has been out of print a long time but there are still a few pre-owned copies available for sale online. My copy is well-used as you can see!

The recipe in this book that I have probably made the most times is the Onion Quiche. I have varied the filling ingredients a lot over the years and have never found a reason to look for another base quiche recipe. Currently I have an abundance of collards coming from my garden. A couple of times this summer I included them as one of my Quiche ingredients with wonderful results. First I’m going to describe how I harvest and cook the collards to get them ready to use as Quiche filling, then I’m going to provide Shirleigh Moog’s Quiche recipe with added notations where I normally change things up. Moog’s version included a crust recipe that I’m not going to post here because I’ve always used pre-made crusts to save time and I don’t think I’ve ever made it with scratch crust.

Harvesting and Preparing the Collards

Collard leaves and container of frozen broth

Before I go out to harvest collards or any kind of greens, I get out a large lightweight bowl that I use as my collecting bowl. I keep a container of homemade broth in the freezer to use when I want to simmer something in broth, cook rice or grains with broth, make soup, or something of that nature. I needed a half cup or so of broth to simmer the greens in, so I set my broth container out to thaw while I worked on other preparations.

When I fill the bowl with produce from the garden, I get a colander ready for draining. I let the bowl with produce fill with water as I clean and shake off the leaves before transferring to the colander to drain. Since I’m an organic gardener and don’t use pesticides, there are sometimes a few “bugs” on the leaves. Letting the leaves soak as I clean and inspect makes most invertebrates, if there are any, float out for easy removal. If they are pests, I feed them to my pet starlings who are always eager to consume such a nutritious tidbit. If they are beneficial insects, I put them back outside. I only found one “bug” in this bowl so that was not bad.

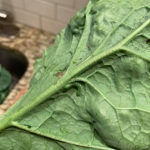
Close up of underside of leaf with caterpillar.

Right below one of the ribs on the underside of this collard leaf was a little green caterpillar. When you harvest leafy greens like this be sure to look at the underside and look for caterpillars near the leaf ribs or stems. They like to tuck themselves there to blend in and avoid predators. Some of them are very good at disguising themselves as another stem or rib!

If any parts of the leaves are yellowed or too chewed up, I put those parts in the compost bin. I cut out any thick stems that might be too tough and compost them also.


Chiffonade cut collardsWhen the leaves are cleaned and drained, I roll them tightly into a quasi-cylinder shape and diagonally slice them thinly. This is called the chiffonade cut.

My husband requires a relatively low-salt diet and I’ve been cooking with minimal added salt for many years so that I become accustomed to less salt just in case! One way I get flavor into foods so that they don’t need added salt is to cook them in pan juices from something else. Even if I don’t plan to use meats in the recipe I’m about to make, I often like to add flavor and some salt by cooking things like ham, turkey bacon or turkey kielbasa (as shown here) in the pan first, with a little grapeseed oil or olive oil. Processed and cured meats will have some salt in them but cooking and caramelizing some of these ingredients adds enough flavor that it’s usually plenty of salt for the whole recipe.

Cooking collards in pan juices from meat and onions.I then set the meat aside then cook some onions in the pan juices until they are caramelized. Any onions I have on hand I’ll use, but it’s hard to beat sweet yellow onions. I set the onions aside then cook the collards in what pan juices are left over plus a little broth to simmer them in and keep them from burning. At this point I have pre-heated the oven and am filling the pie shells with the cooked collards, also adding in some of the cooked turkey kielbasa and onions. As you can see there are some delicious pan juices left over. The pan juices were strained out and added to my broth bowl for other uses. Too many juices in the quiches might make them watery.
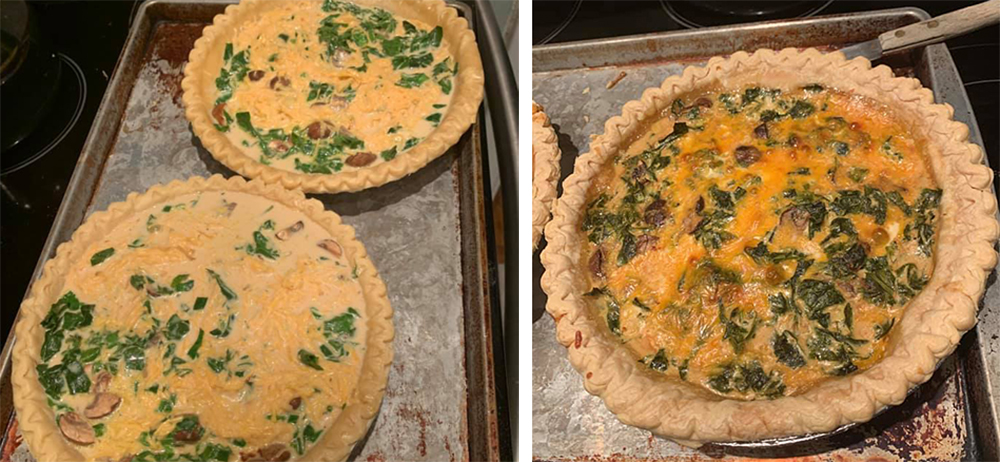
You will notice that the recipe from Shirleigh Moog that I’m going to reproduce here was originally written to make one quiche. I have found that if I loosely fill two pie shells to the top with vegetables and meat tidbits, the recipe makes two quiches from two pre-made shells.


Onion Quiche
From “Moog’s Musical Eatery”, page 88. Copyright 1978 by Shirleigh Moog. My additional notes are in italics.

6 slices bacon (as noted above, sometimes I substitute ham, turkey bacon, or turkey kielbasa.)
3 onions, sliced thin
4 eggs
1 tall can evaporated milk (1 2/3 cups) or heavy cream
2/3 cup water (I have substituted my homemade broth also with great results)
3/4 t salt (I rarely need this)
1 t dry mustard
a dash of Tabasco sauce
1/2 t Hungarian paprika (smoked paprika good too)
1 t soy sauce
1 cup grated cheddar cheese
1 clove garlic, minced (If I’m putting in garlic, I cook it at the stage where I cook the collards with broth so that the garlic pieces don’t burn, I find them too bitter if burned)
1 9″ pie shell (as noted above, I use 2 pre-made pie shells because I normally add vegetables, such as collards, spinach, broccoli, mushrooms, bell pepper, dandelion greens, etc.)

  1. Cook the bacon and, when there is plenty of bacon fat in the pan, add the onion and garlic. Cook until the bacon is done and the onions are golden. Crumble the bacon.
  2. Combine the eggs, evaporated milk, water, salt, dry mustard, soy sauce, Tabasco and paprika. Beat with a rotary beater just long enough to mix thoroughly. (I normally just use a whisk with good results.)
  3. Sprinkle the pie shell with the crumbled bacon, the onion, garlic, Cheddar cheese and any remaining bacon grease. Sauteed mushrooms and bits of ham may also be added. Pour the egg and milk mixture in also.
  4. Bake in a preheated oven at 325 degrees F for one hour, or until the point of a knife inserted in the center of the quiche comes out clean. (I like to put the pie shells on old baking pans to prevent bubbling over, which normally does not happen. The baking time and temperature Moog suggests is spot on – I like to set the alarm for 45 minutes, check just in case, put back in, and the knife comes out clean at the one hour mark with the crust perfectly golden and flaky. I would hate to burn it or undercook it though, so I do the 45 minute test each time as a precaution.)

Unbaked and baked quiche


Categories
Uncategorized

A note from the owners of Schnarr’s, regarding COVID-19

A note from the owners of Schnarr’s, regarding COVID-19

To Our Valued Customers,

The health and well-being of our customers, employees, and communities is our top priority.  We understand the growing concerns and uncertainty surrounding novel coronavirus (COVID-19)  and our hearts go out to all who’ve been impacted.  We are committed to being responsive to your needs as this situation evolves.

We are Open!

We’ve always been proud of the cleanliness of our stores, but considering the current situation, we have intensified our cleaning regimen.  We care about preventing illness and we are keeping all public surfaces as germ-free as possible.

We are here for you!

We will continue to offer several ways to shop at Schnarr’s Hardware:

Shop at the store with expert help and customer service to get what you need and get you on your way.

Shop at: schnarrs.com for over 70,000 items that can be shipped to our store within a few days.

You can also call in your order and we will be happy to bring it to you in your car when you drive up.  We want to make it as convenient as possible to get the products you need when you need it.

From our family we offer our deepest sympathies to those who have already been affected.  Schnarr’s Hardware is here to serve you.  Our sole purpose is simple – we exist to help others throughout the community.


Frank & Kathy Blair

Owners of Schnarr’s Hardware


Update

We have temporarily altered our store hours to allow team members to self-isolate if they wish. Until further notice, both stores will be open from 9am-5pm Monday-Saturday. The Ladue store will be closed on Sundays. Webster will remain open on Sunday from 11am-4pm.

Both stores are offering order pickup. for more information, call us or go to www.schnarrs.com/order-pickup

We value your continued support as this situation evolves.

Categories
DIY Gardening Lawns

Landscape Plan Drawing – Practice Rendering Symbols

Landscape Plan Drawing – Practice Rendering Symbols

by Carolyn Hasenfratz Winkelmann

Late last summer I was asked to take a list of plants that had been chosen for a client and to make a plan drawing to show where they should be installed. I’ve made lots of rough drawings over the years that only I have to understand. Since this was for a client, I consulted a landscaping drawing book and attempted to make one that was more professional and readable to other people. Here is the result.

Landscape drawing plan
Landscape plan drawing for a client – August, 2019

It got the job done, but it’s crude and I’d like to improve on my landscaping drawing skills. My art degree didn’t include landscaping drawing and there are certain conventions that make landscaping drawings more understandable for the client and for the installers. For planning my own projects and client projects in the the 2020 season, I’m making more detailed drawings of sections of my own yard first. To prepare for that I’m practicing how to draw the various elements individually before I combine them all together.

I don’t own any computer software that is specific to landscaping design. I frequently use Adobe Photoshop and Adobe Illustrator, which I used to prepare a diagram of my yard to start some basic planning and calculate the amount of dirt I wanted to buy for the new planting beds we have been putting in. Over the last few years I’ve also done a lot of adult coloring and art journaling and it’s been really satisfying to pick up the hand-drawing tools again after so many years of focusing mainly on computer graphics. I’m enlarging a version of my yard diagram to 1/4 inch to 1 foot graph paper, and I’m going to practice hand drawing sections in a more professional manner as I work on our garden plan.

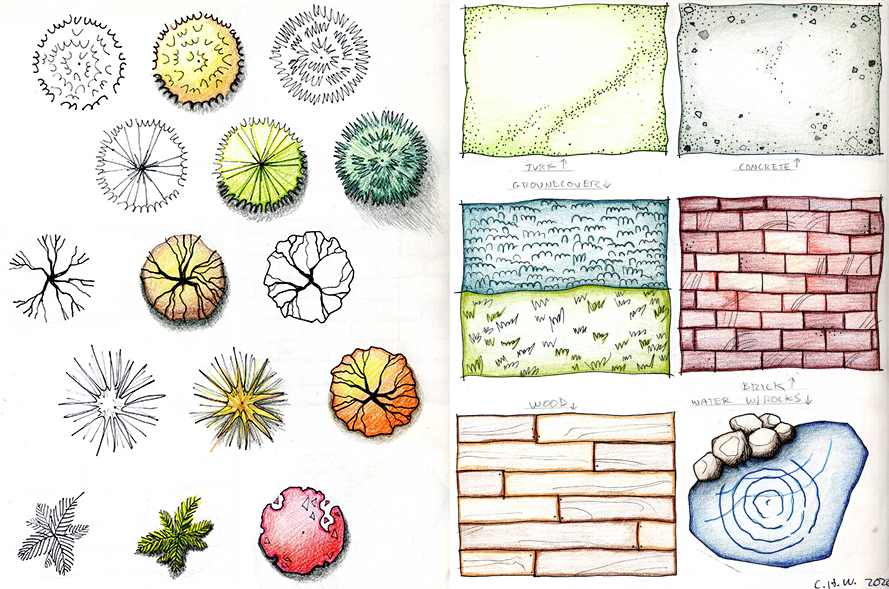
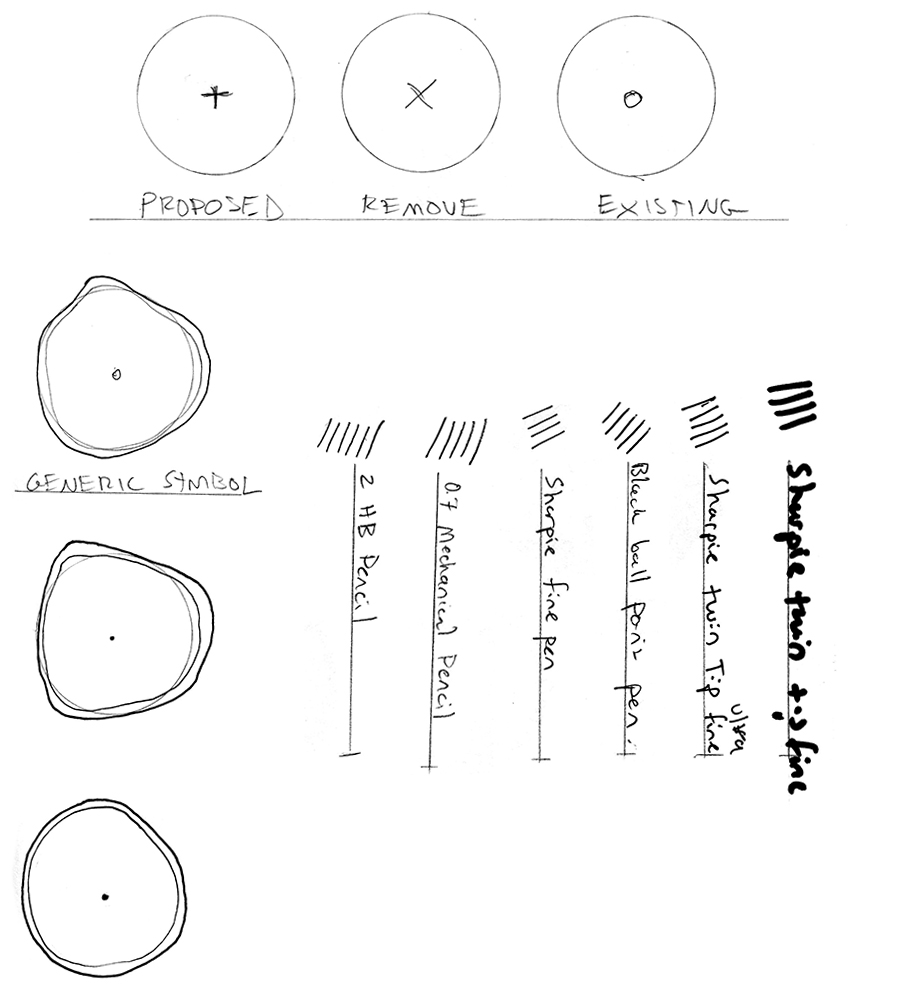
I consulted the book Plan Graphics for the Landscape Designer: 2nd Edition by Tony Bertauski and thought about how to adapt my drawing tools and methods to the techniques shown in the book. I took out my favorite drawing tools and did tests to decide what I would use for my thin line weight, my medium line weight, and my thick line weight. In any kind of art or design, varying the line weight adds a great deal to the liveliness and appeal of a rendering. Then I practiced drawing some generic symbols. Symbols indicate a plant and the dot in the middle shows where the center of the plant will be placed. The outer edge of the symbol represents the mature spread of the plant, so that you can anticipate how the plants will fill in the available space as they grow.

Practicing rendering generic symbols and testing line weights of drawing tools.
Drawing tool tests and generic symbols.

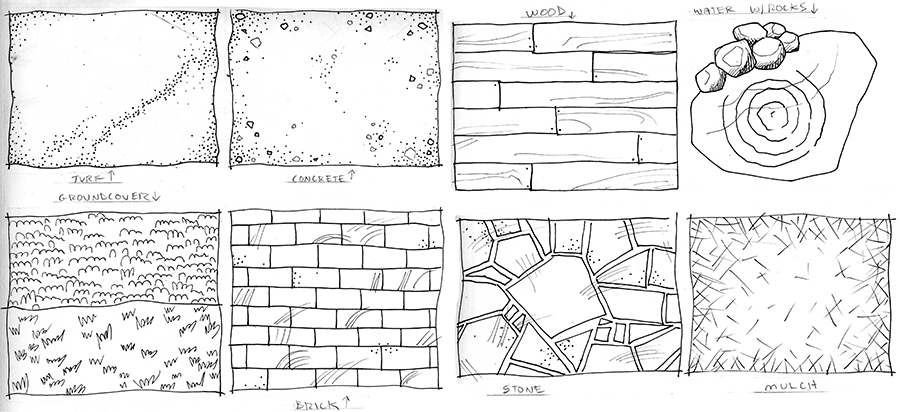
I also practiced drawing textures and non-plant symbols that represent surfaces and features that I anticipate will play a role in our new planting beds, patio and water features. Preliminary markings were made with pencil, then I drew over the pencil lines with two thicknesses of black Sharpie markers and erased the pencil lines. I used a circle template to pencil in accurate circles.

Practice drawing surfaces and landscaping symbols.

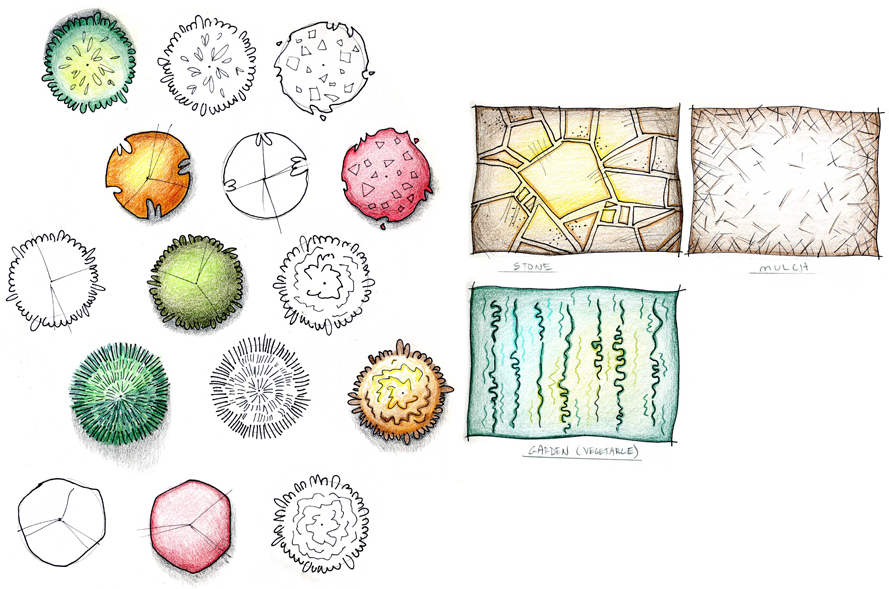
I made two black and white drawings of a variety of plant symbols, then colored one of each in with colored pencils. I’ll keep these sheets as a reference to get ideas for how to render types of plants as I work. Now that I’ve scanned these drawings to use in this article, I also have the option of importing them into Photoshop or Illustrator to use in computer based renderings I might make in the future. That will sure save a lot of drawing time later!

Practice coloring symbols and surfaces for landscape design.
Some plant symbol tests, and textures for stone, mulch, and vegetable garden patches.


Practice rendering landscaping symbols
More plant symbols, plus turf, concrete, ground cover, brick, wood and a little pond with rocks.

I’m going to practice adhering to many conventions of this style of drawing so that it will be understood by professionals in the industry. It’s also inevitable that some personal style characteristics will be made manifest and I hope at least some of the drawings will become works of art on some level as well as useful guides. These exercises have already had a positive influence on my other art work.

If you are interested in drawing some of your own garden plans, here are some resources I’ve found that might help you out on our Schnarr’s Pinterest site:
Garden and Landscape Planning

Categories
Backyard Wildlife Gardening Good Eating Sustainability

What is Eating My Mustard Greens?

What is Eating My Mustard Greens?

by Carolyn Hasenfratz Winkelmann

At my old garden, I was only allowed to grow vegetables on my small deck – I lived in a condo. My deck was in part shade so between lack of space and lack of sun I could only manage to grow a small amount of cherry tomatoes and a sad number of potatoes. Otherwise I stuck to ornamentals, herbs and wildflowers which I could get away with planting in the ground while enjoying a reasonable selection of plants that would grow in part shade.

When I got married and moved into a house in 2018, I started collecting vegetable seeds at seed swaps for my new garden which has plenty of sun. I had to do a lot of planting in a hurry so I just planted the seeds I had in the hopes that I would get a few vegetables and save a few seeds for the following year.

Lots of cherry tomatoes I’ve been having really good luck again with cherry tomatoes and I’m now addicted to growing leafy green vegetables so I can have fresh tasty salads that I pick myself. A few of the plants have really been chewed on by pests which is not a surprise because I don’t use pesticides. In my haste I made no effort to try companion planting to chase some of the pests away. Most herbs are not bothered much by pests so since I’m pretty new to growing vegetables I’m seeing a lot of creatures that I haven’t seen before.
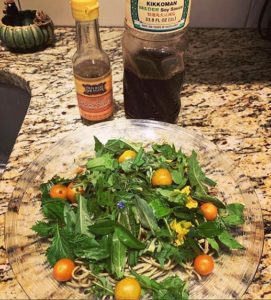
Fresh picked salad with cherry tomatoes, dill, arugula, chives, romaine, mustard greens, edible flowers and wild greens.
Fresh picked salad from the backyard with cherry tomatoes, dill, arugula, chives, romaine, mustard greens, edible flowers and wild greens.

I had some Evergestis rimosalis (Cross-striped cabbageworm) on my mustard greens and some Pieris rapae (Imported cabbageworm) on my collards. I’m interested in invertebrate conservation and providing food to wild birds, so in the quest to get some vegetables I can eat I’m not going to apply poisons. I might start an additional bed of these vegetables in my fall garden and protect them with a row cover and some companion planting.

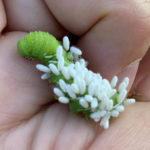
Hornworm caterpillar with parasitic wasp cocoons.I’m familiar with these little white blobs on this tomato or tobacco hornworm – those are the cocoons of tiny parasitic wasps that feed on caterpillars. The lifestyle of some of these tiny wasps is pretty horrific, and I’m saying that as a big fan of invertebrates in general! Some of them use plants as a host and some use other insects. Tiny parasitic wasps lay eggs on the bodies of caterpillars. When the tiny wasp larvae hatch, they feed on the caterpillar while it’s still alive. When they emerge they weave white cocoons where they stay until they hatch into adult wasps. The caterpillar they have been feeding on is eventually doomed though it might not die right away.

Even though their lifestyle kind of turns my stomach, these wasps are beneficial so I’m going to put this caterpillar back out in the garden. When the adults emerge they can continue their work of preying on garden pests. If you are going to destroy any caterpillars, it’s recommended that you leave the parasite-infested ones in the garden to add to nature’s arsenal of natural controls. The adult wasps of this type are not social and they do not sting. Some of the adults are so small I’m not even sure what kind I have in the garden. I have swarms of tiny and medium sized insects all over my masses of herbs that are in flower, such as Dill, Garlic Chives, Peppermint, Bronze Fennel and more. Herbs that get clusters of small flowers are worth growing just to get into your garden all the beneficial insects that are attracted to them.

Categories
DIY Home Decor Storage and Organizing Ways With Wood

Make a Rustic Message Center

Make a Rustic Message Center

by Carolyn Hasenfratz Winkelmann

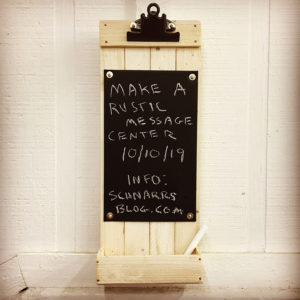
Make a Rustic Message Center from lath wood

For this message center to hang on a wall I deliberately used rough lath wood instead of smoother wood stock. I wanted to simulate the look of a utilitarian crate that is getting re-used for another purpose. I bought a bundle of new lath wood so that I would have enough for teaching and samples. You can use scrap wood that you have salvaged if you prefer. Salvaged lath wood often has bits of plaster clinging to it which is very interesting if you like the distressed look. A good source for salvaged lath wood is Perennial, a creative re-use studio where I occasionally teach. On the TV show “American Pickers”, they often pick up items for re-use that have “just the right amount of Stank on it” as they say. I know what they are talking about – it’s one of the reasons I love to work with salvaged materials mixed with new. I use a dust mask when sanding any wood, especially salvaged wood because you don’t know what’s in it or where it’s been!

Materials
Lath wood
*Small wire nails and tacks – some of them can be decorative if you choose. Recommended sizes – 19 x 1/2″ and 19 x 3/4″ (Quantity approx. eighteen 1/2″ and six 3/4″)
*Small wood screws – 4 x 1/2″ (Quantity six)
*Small washers – #6 (Quantity six)
*Chalkboard Paint
*Chalkboard Contact Paper
*Clipboard Clip (available at Schnarr’s Webster)
*Wood glue
Scrap cardboard
*Optional – White acrylic paint

Tools
*Sandpaper
*Saw
*Ruler
*Pencil
*Drill
*Tiny Drill Bit
*File
*Rags
*Paint water container
*Paint brushes
*Small clamps
Block of old wood for bracing wood while drilling and nailing
*Dust mask
*Squeegee or bone folder
*Utility knife, self healing cutting mat and *metal ruler, or paper cutter for cutting cardboard
*Phillips screwdriver
*Optional – small container for mixing paint wash
*indicates products available at Schnarr’s

Instructions

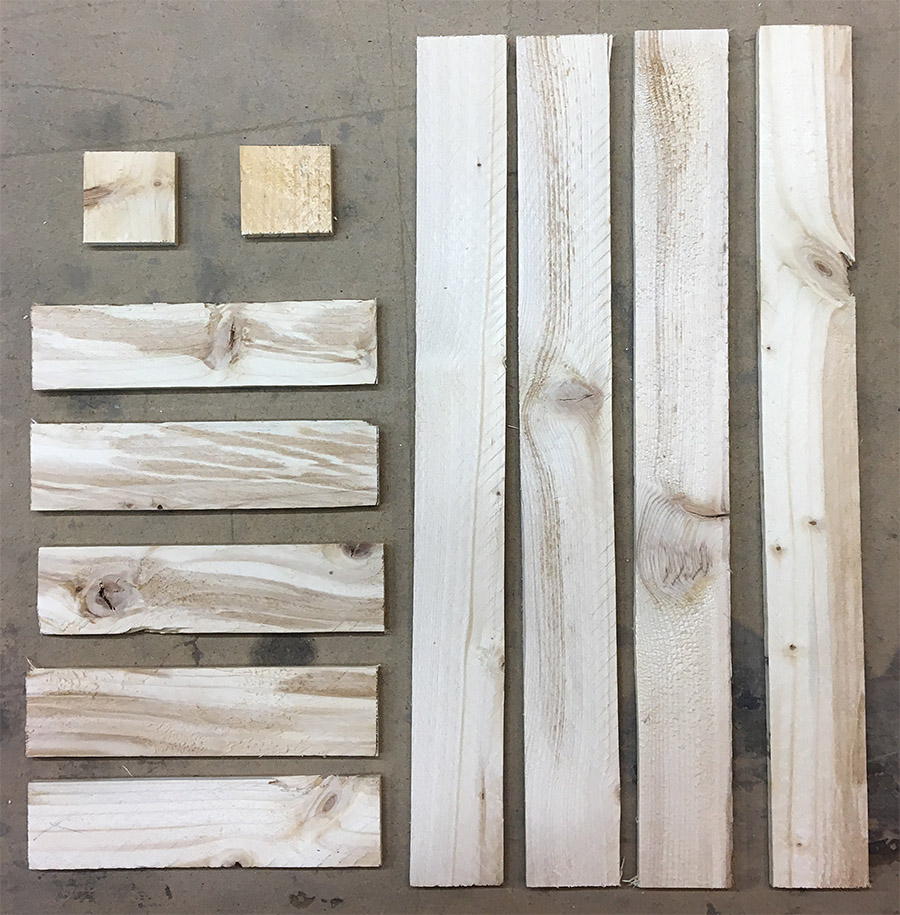
1. Cut 1 1/2 inch lath wood into the following lengths:

Four pieces – 15″
Five pieces – 6″
Two pieces – 1.5″

Use the pencil and ruler to measure and mark wood pieces, then cut.

Optional: Paint all the wood pieces on all sides with a wash of white acrylic paint and allow to dry.

Pieces cut from lath wood
You will need to cut eleven pieces of wood for this project.

2. Sand the rough edges off of your wood pieces. You are probably wondering why I placed the step of sanding the wood pieces after painting instead of the other way around. The reason is it brings out the rustic look more because you’ll be removing some paint as you remove the rough spots on the wood.

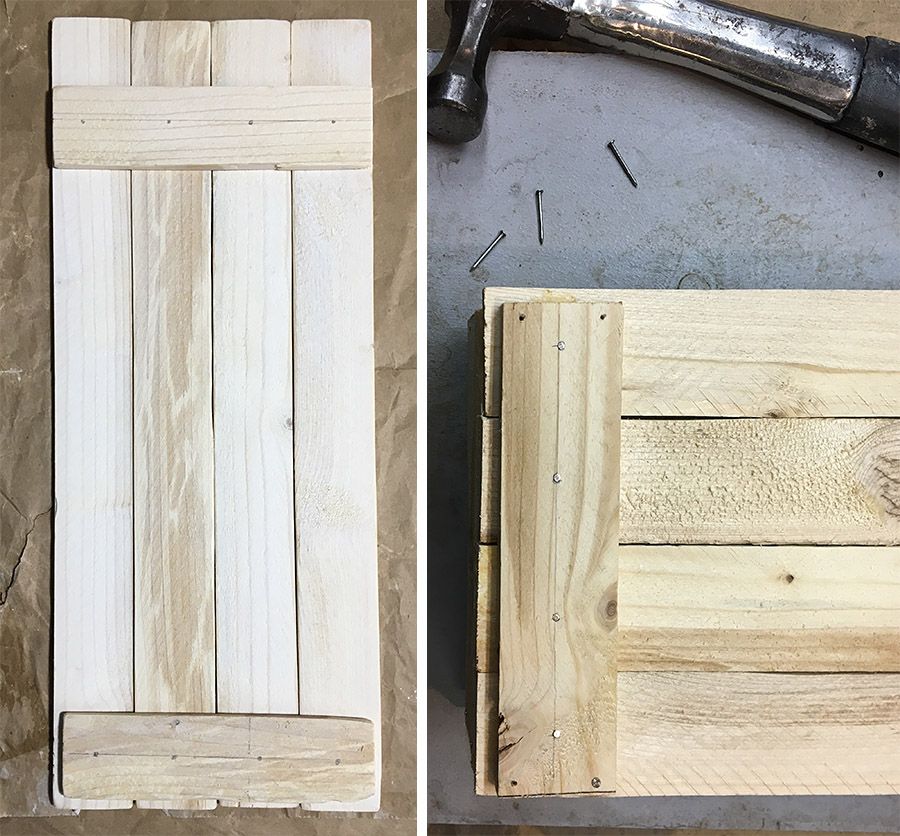
3. Lay the four 15″ long pieces down on your work surface. Place one of the 6 inch strips about an inch and a half from the top. Add another right at the bottom of what will become the back of the message center. If it is helpful, draw a pencil line lengthwise on the wood to help you line up your nail holes. Draw little dots to show where the nail holes will go.

4. Squeeze a little wood glue on the backs of the wood cross pieces and clamp in place if you have trouble with the wood sliding around while you’re trying to work on it. If any wood glue squeezes out just wipe the excess off with a rag. Drill a little pilot hole for each nail. You don’t want the drill hole to go through all the way, it only needs to go in far enough to help the nail stay in place and to keep the wood from splitting at the surface as the nail goes in.

Hardware I used in this project - wire nails, wood screws washers and Clipboard Clips
Hardware I used in this project – wire nails, wood screws washers and Clipboard Clips

5. Hammer in your 1/2″ nails. If any poke through the front, file off the sharp parts.

Nailing wood slats to back to hold vertical wood pieces together

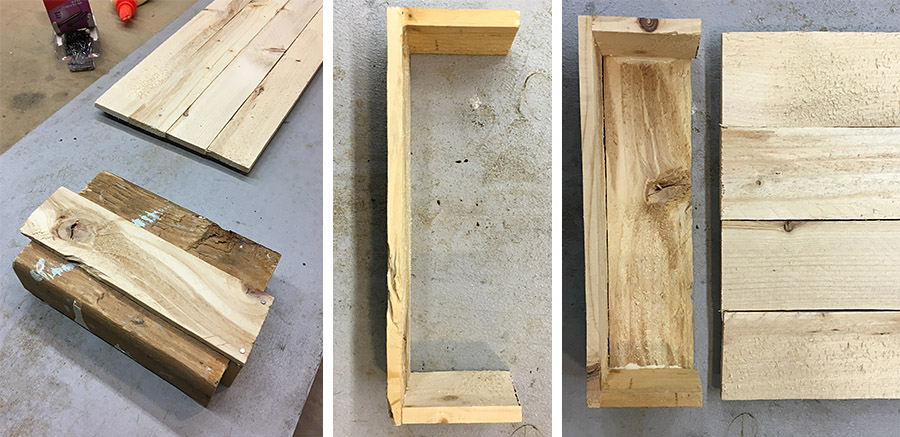
6. Now start to assemble the tray that will be attached to the bottom front of the message center. Prop up one of the two small one and a half inch pieces of wood up against a piece of scrap wood. A small section of a 2 x 4 is the perfect size (2 x 4s are not really 2″ x 4″ as you can see.) Add a dab of wood glue and place a 6 inch cross piece on top, butting up the edges together. Drill a couple of pilot holes and nail in place. Repeat for the other end.

7. Add another 6″ piece to the bottom of the box and nail in place after dabbing with wood glue, then nail the whole assembly to the bottom front of the message center with 3/4″ inch long nails. It helps to prop up the other end with the 2 x 4 piece while you are nailing through the back.

Making tray for the bottom of the message center.

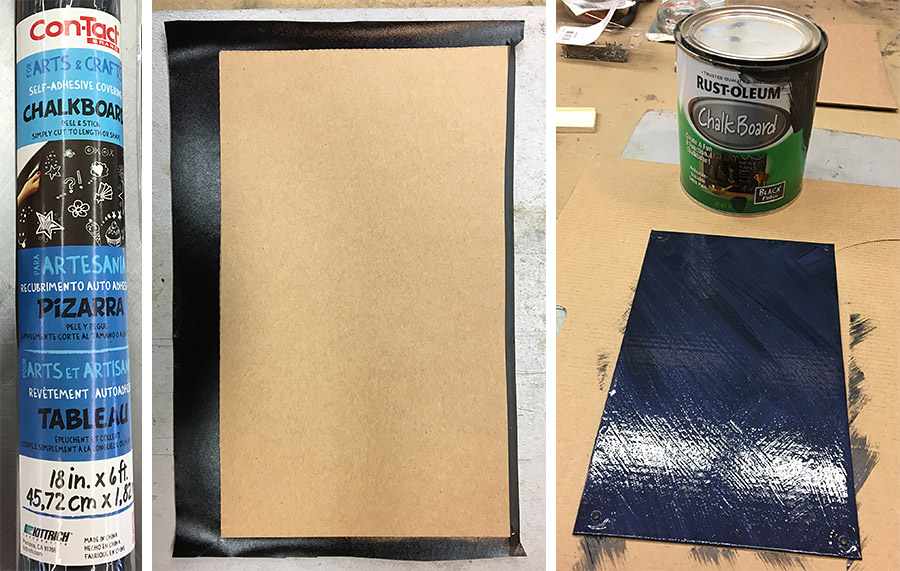
8. Next make a small chalkboard for the middle front. Cut out a 5 1/2″ x 9″ piece of scrap cardboard and cover with chalkboard Contact paper. Cut the Contact paper slightly larger than the cardboard so that you can fold the edges over for a neat look. Burnish the paper with a squeegee tool to make a nice tight seal. Paint the front of the chalkboard over with chalkboard paint. (Unfortunately the Contact paper does not really take the chalk well enough by itself, but it makes an excellent base for the paint.) Let paint dry.

Cover a piece of scrap cardboard with contact paper, then paint over with chalkboard paint

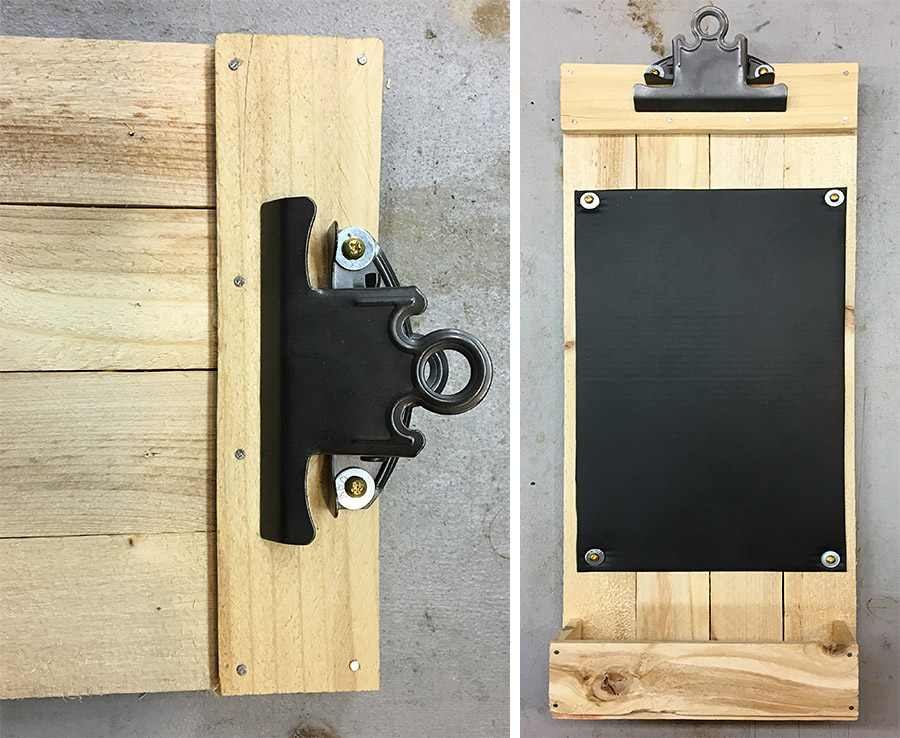
9. Nail the last 6″ wood strip across the top front of the message center and glue and nail in place. Place the clipboard clip where you want it and make little pencil marks to indicate where to drill two holes for the screws to hold the clip on.

10. Drill the pilot holes then thread a washer on two screws and drive the screws in place.

11. Use a screw and washer on each corner of the chalkboard to attach in the middle front of the message center. You are done!

Attach the clipboard clip and you are done!
Attach the clipboard clip and chalkboard and you are done!

Do you want some more ideas for for things to make out of wood? Here is the Pinterest Board I made awhile ago that was the inspiration for this article:
Rustic Spring Ideas – this project isn’t only for spring of course, but I started working on it in February.

There are also some ideas for fun wood projects here on the Schnarr’s Pinterest site:
Ways With Wood

Categories
DIY Home Decor Storage and Organizing Ways With Wood

Make a Wood Storage Crate

Make a Wood Storage Crate

by Carolyn Hasenfratz Winkelmann

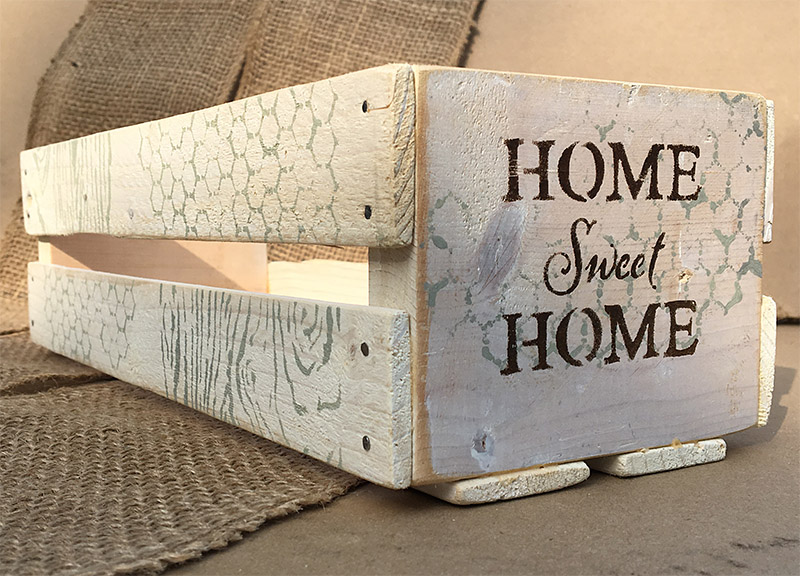
Wood crate decorated with stencil designs

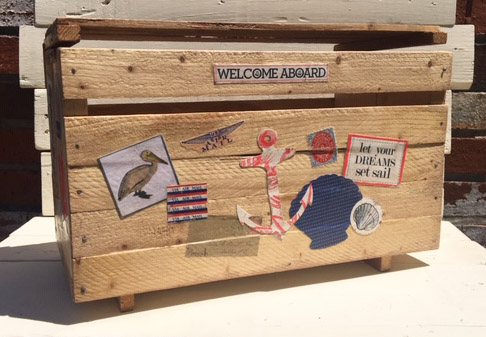
This project was inspired by a card box my husband Tom and I made for our nautical-themed wedding reception last summer. I made a lot of stuff for the wedding and I was literally working until the last minute at the church figuring out how to attach my homemade veil to my head! I finished my jewelry the day before! Two or three nights before the wedding I had set aside time to assemble this card box. I had already cut the pieces out but needed to nail it together and decorate it. I came down with what I thought was a terrible cold and I asked Tom to assemble the box for me. He came through and did a great job! I recovered quickly from whatever I had (if I actually really had anything other than stress) and was feeling fine the next day so I did the decoration in a hurry.

Card box we made for our wedding last summer with decoupage decoration

I painted the above crate-style card box with a wash of brown paint to “antique” after applying decoupage decoration. For the following storage crate project I’m going to experiment with applying a light colored paint wash on unsanded wood to be sanded, assembled and then decorated with stencils.

Materials
*Six pieces of lath wood (1 1/2″) cut to 12″ long
*Two pieces of 1/2″ thick wood cut to 4 1/4″ x 3 1/2″
*Tiny nails
*Paint rags
*Wood glue
*Acrylic paint
*Painters tape or masking tape

Tools
*Pencil
*Ruler
*Saw
*Paintbrush
*Paint water container and small paint mixing container
*Drill
*Tiny drill bit
*Hammer
Small sponges (or *large sponges cut up)
*Assorted stencils (available at Schnarr’s Webster)

*indicates items available at Schnarr’s

If you want a more refined look you can substitute lattice strips for lath wood, they are similar in size and thickness with a smoother surface and fewer irregularities.

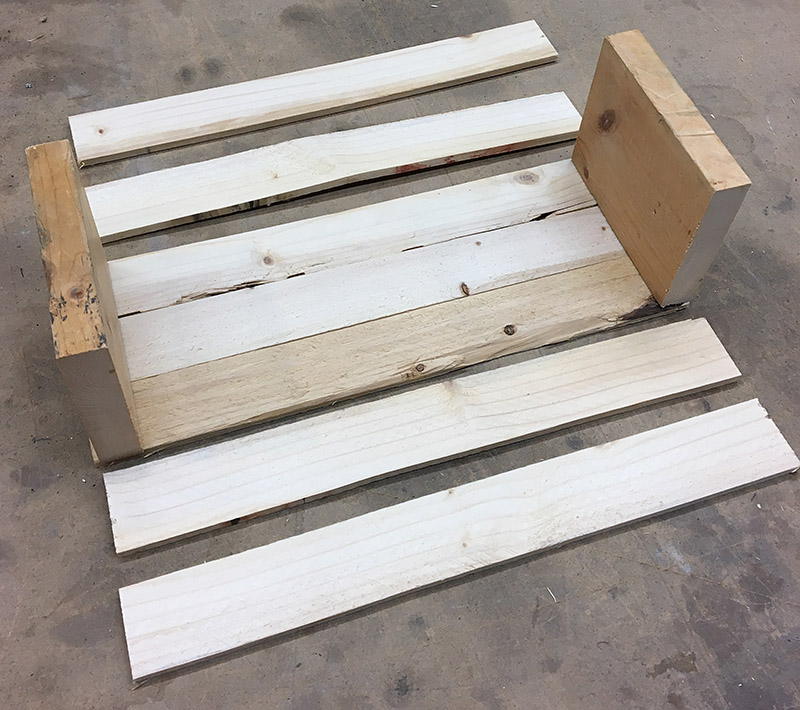
Cut pieces of wood ready to paint, sand and assemble

Instructions

1. Paint your wood pieces with a wash of white acrylic paint. A wash is paint with water added to thin it out and make it semi-translucent.

2. After paint is dry, sand the rough spots with all-purpose sandpaper and sand the edges to bring out a little more of the natural wood color. The effect of sanding the edges is subtle but adds a lot of visual interest.

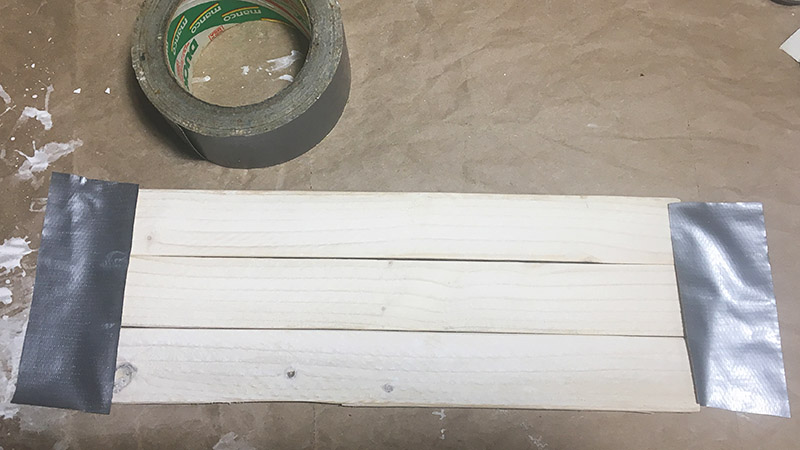
Wood slats taped down to work surface

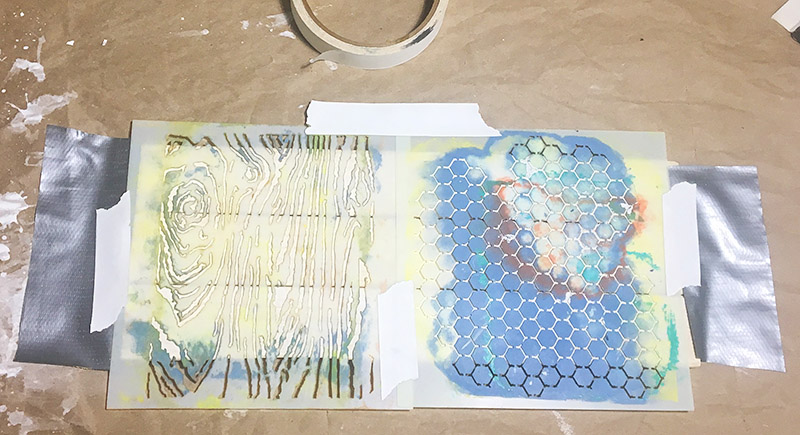
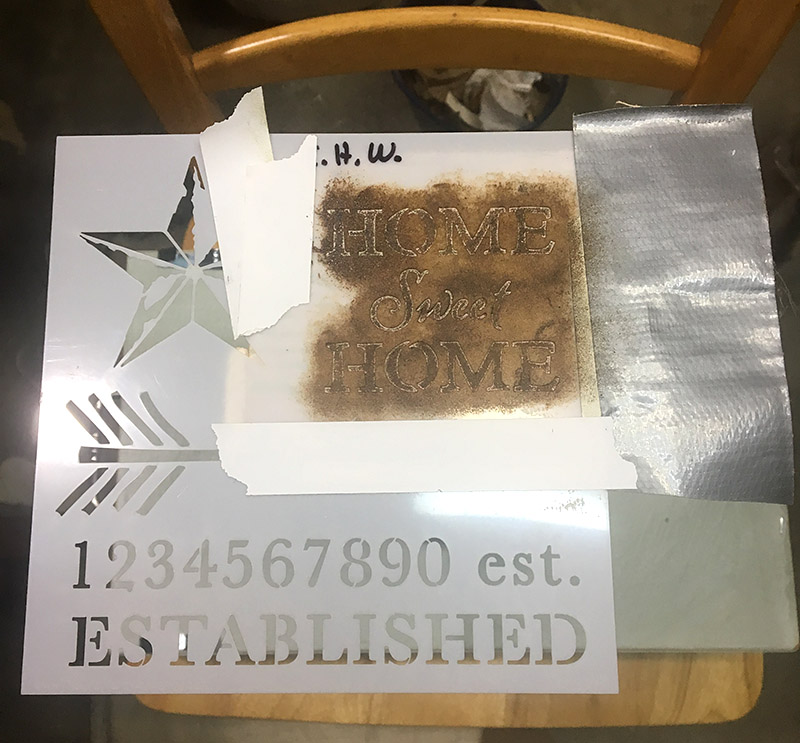
3. Take three of the 12″ slats at a time and tape them down onto your work surface. Normally for stenciling projects I use painters tape or masking tape, but I was out of both so in the pictures you will see me using duct tape and drafting tape as substitutes.

4. Tape stencils in place on your work surface over the wood. Choose a light to medium color of paint and dab the paint through the stencil openings with a sponge.

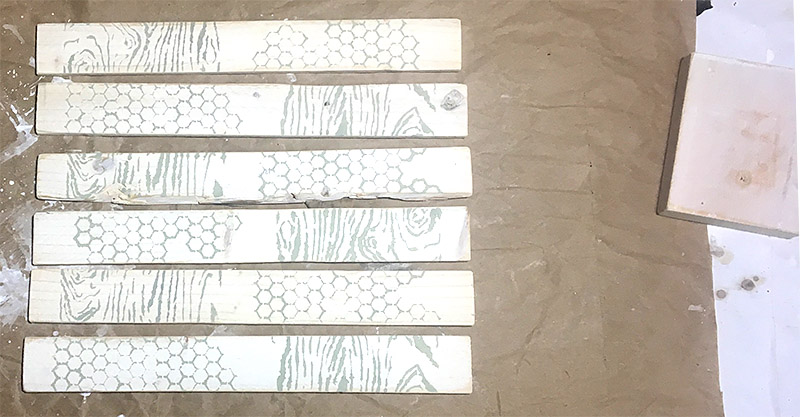
5. Lift the stencils and let the paint dry. I rearranged my wood pieces on the work surface to see what they would look like if I turned every other piece around 180 degrees so that the stencil designs would be scrambled. I liked the effect!

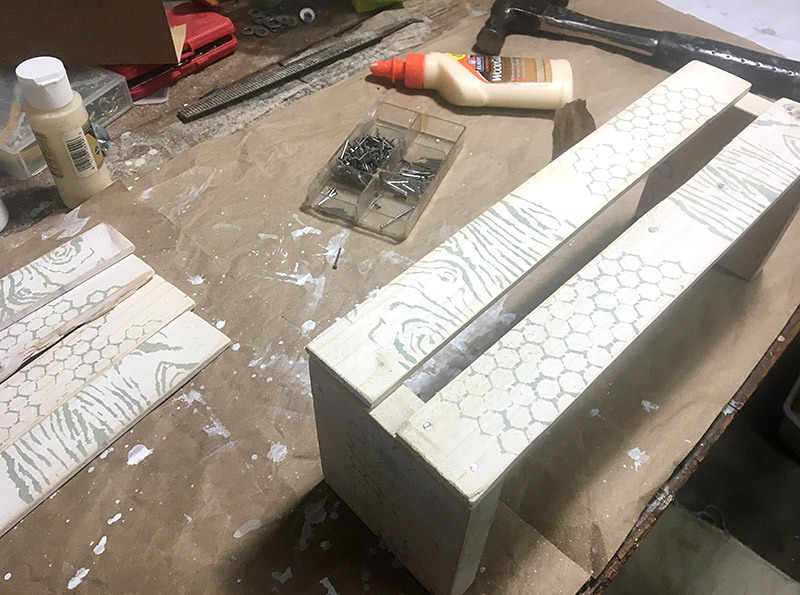
6. Set the two end blocks on your work surface and position two side slats across them. Add a dab of wood glue at each point where the wood will connect for extra strength.

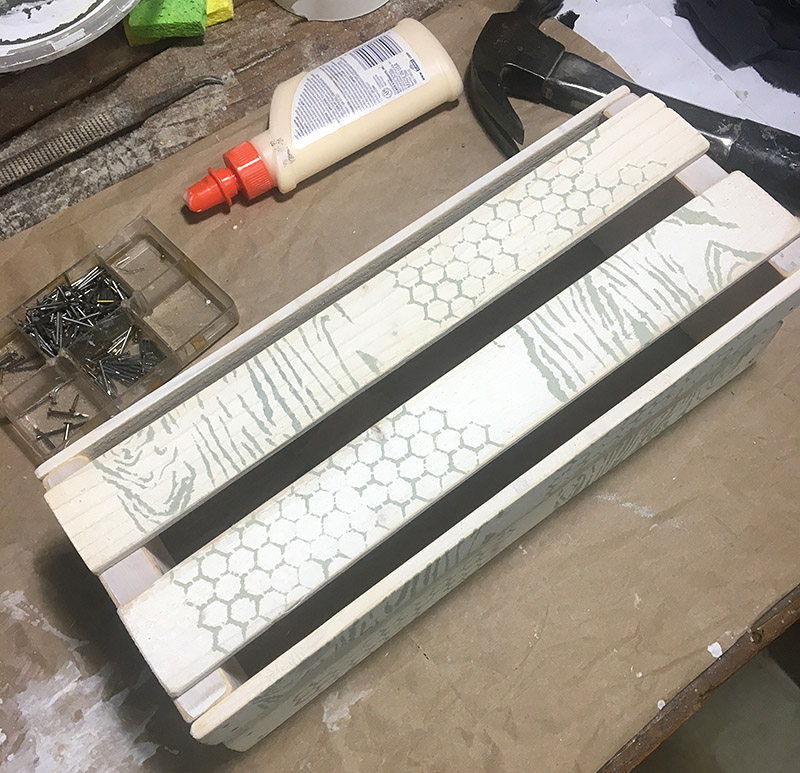
7. Drill two pilot holes at the end of each wood strip with the tiny drill bit. Hammer in nails and repeat until both wood strips are nailed securely to the end blocks. Repeat steps 6 and 7 for the other side, then for the bottom.

I only stenciled one side of these wood strips, so for the bottom of the crate I ended up turning them over so you could see the design if you looked down into the box. You could stencil both sides or have the design facing down while the box is in use if you prefer.

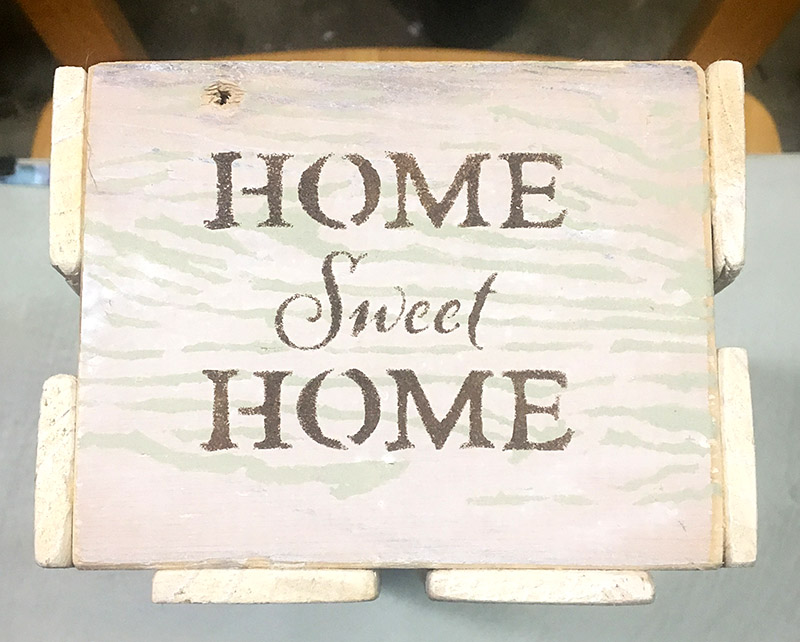
8. Next I stenciled onto each end of the crate. I set the crate on end on a chair to bring it to a more convenient work height. Tape the stencil down and if necessary, mask out the parts of the template you don’t want to use with tape. It’s easy to accidentally sponge into areas you didn’t intend.

Here is what one of the ends looks like after the final stencil. You can really change the look of the crate depending on what stencils and colors you choose to use. You can also make crates in different sizes to fit different needs. They make great baskets for gift giving too. Have fun!


Additional Resources

If you want some more home decor inspiration here are some additional resources:

Spring 2019 Mood Board – yes spring 2019 is done by now but a lot of these looks have been around for several years and should be good for inspiration for awhile yet. There is a lot of raw wood, tin, burlap and looks that you could easily recreate with hardware store items.

Summer 2019 Mood Board – wood, tin, twine, rope, seaglass, oh yeah!

Categories
Gardening

“Is That a Weed?”

“Is that a weed?”

by Carolyn Hasenfratz Winkelmann

A client asked me that question once while we were looking at a wild spot in her yard that she wanted to convert into a garden. We were brainstorming and I was trying to get an idea of what style of garden the client might want. She asked me if a tall yellow-flowering wildflower prominent in the proposed new garden spot was a weed. A weed is a plant where you don’t want it, not a particular species, so that isn’t always an easy question to answer. In certain styles of garden that plant would have been a weed, in others it would have been appropriate. So I told her in so many words, “You get to decide whether it’s a weed or not. It may or may not look good in your new garden depending on the style”. It would have been lovely for example in a wildflower meadow or bird garden but problematic as part of a garden that depends on a manicured look.

I volunteer at Litzinger Road Ecology Center and even though they specialize in growing native wildflowers, they had too much Fleabane on the patio where they didn’t want it, so in that particular spot it was a weed. I moved some to my new rock garden and I think it looks very appropriate there. It should look even better when this rock garden gets a chance to fill in a little. My husband Tom even complimented me on this plant completely unprompted! As this rock garden expands, I’m planning on planting around the tufts of moss that grow on this slope rather than removing them. I love moss and I want it in my rock garden. When this area was formerly supposed to be turf grass, moss was a problem.


Some plants have “weed” in the name which gives you a clue about how it is sometimes regarded. This Swamp Milkweed that I just planted in part of our new rain garden could get “weedy” because it reproduces like crazy at my condo, which is where I obtained these transplants. There are many more still to bring over! These get to be large plants and when I run out of space they might become “weeds”. For now, they are a critical part of my landscape plan and I’m overjoyed to see lots of seedlings. I can welcome many more before there are too many. I’m going to try to grow multiple milkweed species because they provide critical Monarch caterpillar food.


Pokeweed is another plant with weed in the name that can get “weedy”. In a wildflower garden you might want to leave one or two. It is native to Missouri and provides bird food. It is also quite pretty. I’m used to getting rid of it entirely on client sites but when weeding a wildflower garden at Litzinger Road Ecology Center the other day I asked first about each plant before removing it because I know the purposes of gardens there are much different than on most client sites. I was asked to leave one Poke plant in this case (it’s behind the native Columbine). That’s exactly what I recommended a few years ago for my Dad’s garden which was designed as a wildflower garden that is friendly to birds and pollinators. A few Poke plants are nice in a wildflower garden but too many could be a problem because they really spread a lot.


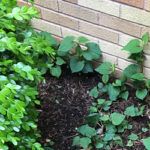
My mother-in-law has Wild Ginger that she considers weedy because her garden style doesn’t call for continuous ground cover. We associate Boxwood as shown at left of this picture with manicured garden styles so when we see it with something that looks wild or naturalized it just looks overgrown to our eye, not harmonious. My gardens are very informal though, and I’ve been digging some of this up to replace at least some of the Vinca minor at my condo. Wild Ginger is native and Vinca minor is invasive, so I’d much rather have the Wild Ginger. My mother-in-law is finding it hard to believe I want this but I’m really delighted to have it – it’s been on my wish list for years! In the right garden this could be beautiful – in the wrong one, a major maintenance headache. At one time I deliberately planted the Vinca minor because I love the flowers and it took me years to get it established, but now I have too much and it has passed into “weediness” for me.


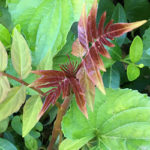
This reddish seedling came up in the garden at the condo. I like to find out what a volunteer plant is before I pull it if at all possible in case it could be interesting or useful to grow somewhere. I showed the photo to the folks at Litzinger Road Ecology Center and they said it was an invasive Tree of Heaven and to destroy it! I was hoping it was a native Sumac that I could move to our house but sadly not, it has to go.


The Importance of Plant Identification

I wrote about the previous examples of how I’m dealing with “weeds” so that you can get ideas for how to treat any volunteer plants that you didn’t expect or are not sure you want to keep. It is necessary to identify the plants so that you can get information to make an informed decision. I need to write more about plant identification but in the meantime this previous article I wrote for Schnarr’s has some identification tips in it that could help: How to Diagnose Plant Problems.

Here is a Pinterest board I started to help identify, treat and prevent weeds: Weeds

Here are some applications that can help you out with identifying plants: