Categories
DIY Home Decor Upcycling Ways With Wood

Make a Shadow Box from an Old Drawer

Make a Shadow Box from an Old Drawer

by Carolyn Hasenfratz

Tools and Materials
*indicates available at Schnarr’s Hardware
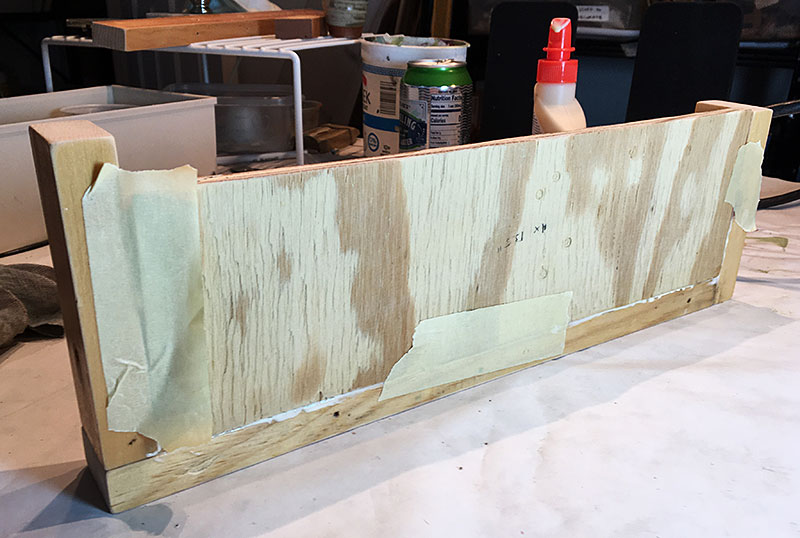
Salvaged old drawer
*Screwdrivers
*Sandpaper
*Dust Mask
*Rags
*Wood filler (optional)
*Burlap, canvas or other solid color fabric
*Corrugated cardboard
*Glue gun
*Hot glue sticks
*Paint
*Paint brushes
*Water and mixing containers for paint
Metal ruler
Self-healing cutting mat
*Utility knife and sharp blades
Pencil
*Hanging hardware
*Small nails
*Hammer
Strong masking tape
Fabric Scissors
*Modge Podge
Squeegee tool
Decorative paper
Memorabilia, collectibles or decorations to display in the box
Optional – heat tool to speed up drying

Instructions:

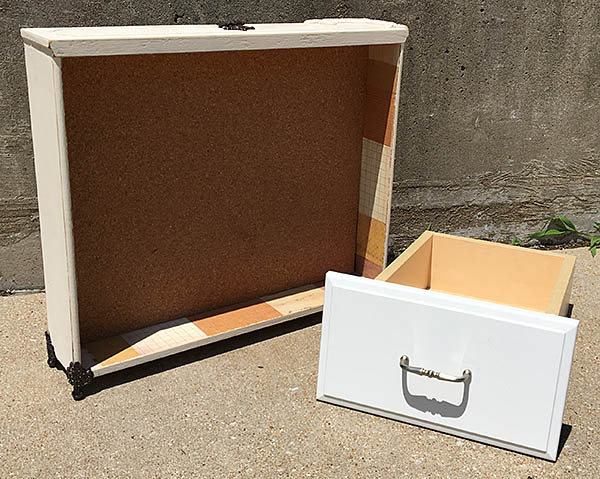
1. Remove the old hardware from the drawer. You may or may not want to put some of it back on the box later so set the aside for now.

2. Sand the drawer inside and out. This is to give the surface a good “tooth” for paint and glue to adhere to. Wear a dust mask while sanding because you never know what is in old, reused wood. Wipe off the dust with a damp rag.

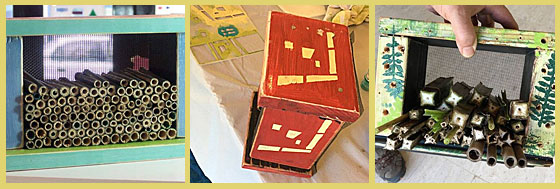
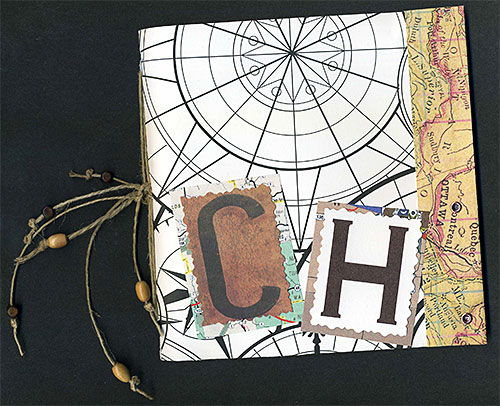
3. Now it’s time to take a look at your box and think about what you want to display in it. Do you want to set it on a table top or hang it on the wall? What is the look of the room it’s going to be in? Do you want to match the colors or decor in the room? When you have the answers to those questions you can start designing. Here are some pictures of past shadow boxes I have made with descriptions of what I did to give you ideas: Crafts By Carolyn: Shadow Boxes.

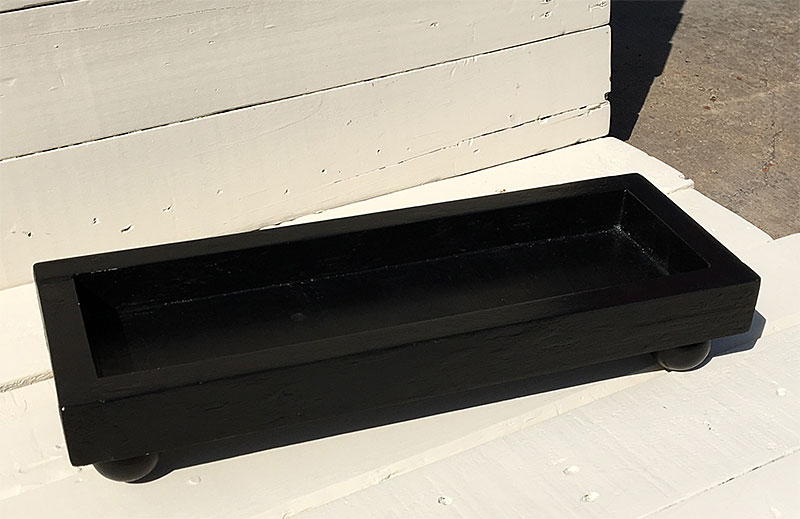
I’m going to use my sample shadow box as table decor for my upcoming wedding reception and later I’ll hang it on a wall. So I’m going to give mine a base to stand on as well as hanging hardware on the back. I’m going to paint the inside and the outside of the box to go with my color scheme (navy, coral, lime green and white), add a padded background for pinning small photos, add paper accents to the outside edges of the box with decoupage.

4. If the hardware you removed from your drawer left holes or if there are any other holes or uneven spots in the wood that bother you, if you want you can use wood filler to disguise them before you paint. In my case I like the distressed look and it goes well with the casual nautical theme I’m using so I chose not to fill in any holes in my sample box.

5. Paint your box on all sides and all edges with the exception of the inside back which will be covered. If you are hanging the box on the wall you can also skip painting the back. I’m going to display mine in the round first so I will paint the back.

There are some good painting tips for a distressed piece of wood in my previous article Stencil a Sofa Shelf Made From Distressed Wood.

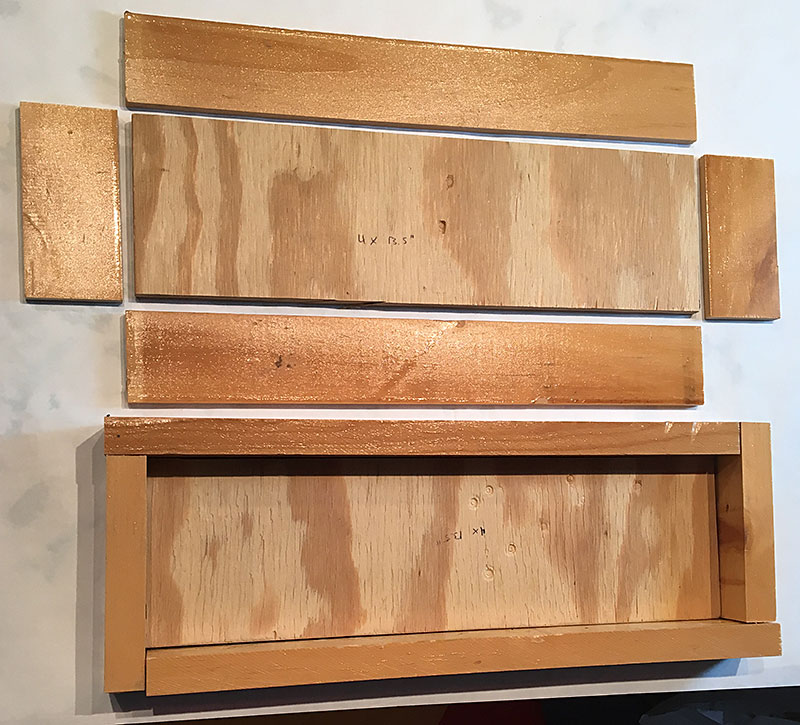
6. While your paint is drying, you can start to work on your cardboard and fabric background. First measure the opening in your box. Then cut two pieces of corrugated cardboard to that size using a metal ruler, utility knife and self healing cutting mat.

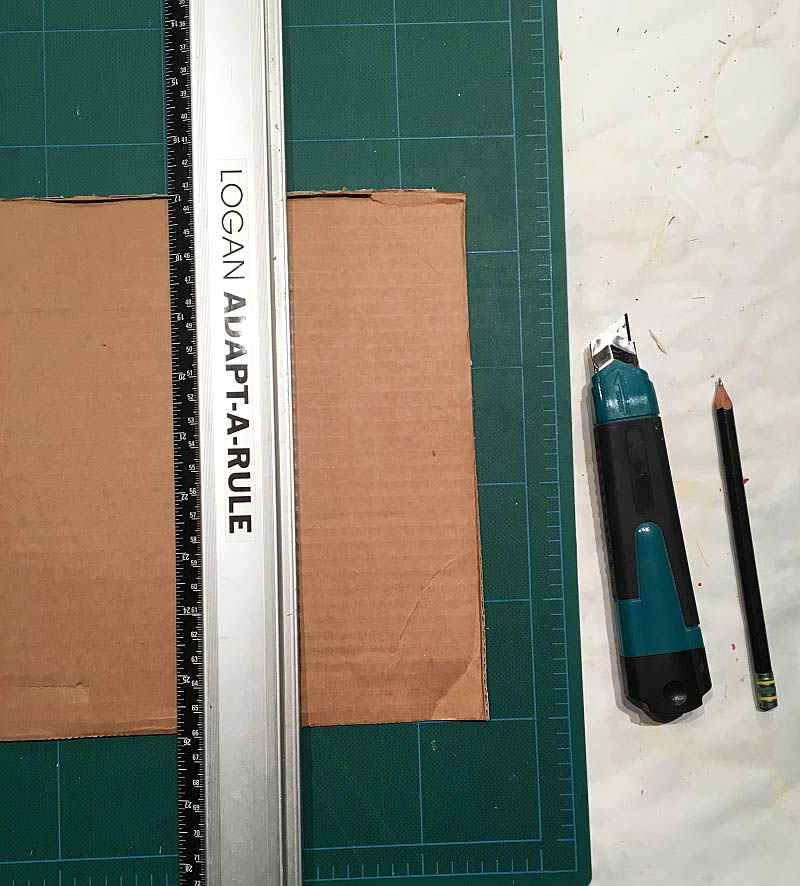
There are some good cutting safety tips in my previous article Introduction to Letterboxing – Part II – Making a Personal Logbook.

Make sure your paint is dry enough to handle, then slip your cardboard pieces into the box and press them to the back to make sure they fit ok. If they are a little too large, cut them down bit by bit until they fit. Allow for a tiny bit of extra room around the edge to accommodate the fabric wrapping.

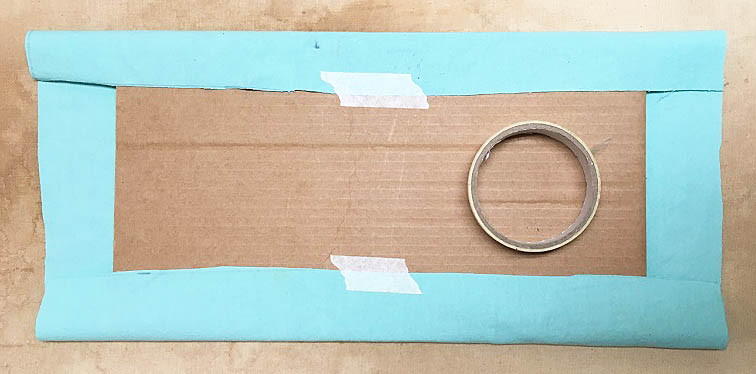
7. Select a piece of fabric to wrap the front of your cardboard pieces. Lay one of the cardboard pieces down on the fabric and draw around it with pencil. Add another two inches allowance to each side and draw lines. This is so you have enough fabric to grab onto, pull, and tape. Cut out your fabric along the outer line you just drew.

8. Heat up your glue gun and get your masking tape ready. Put a few dots of hot glue between your two pieces of cardboard and press together. If any sides of your cardboard have printing on them, make sure the printing is toward the inside or the back or it might show through the fabric.

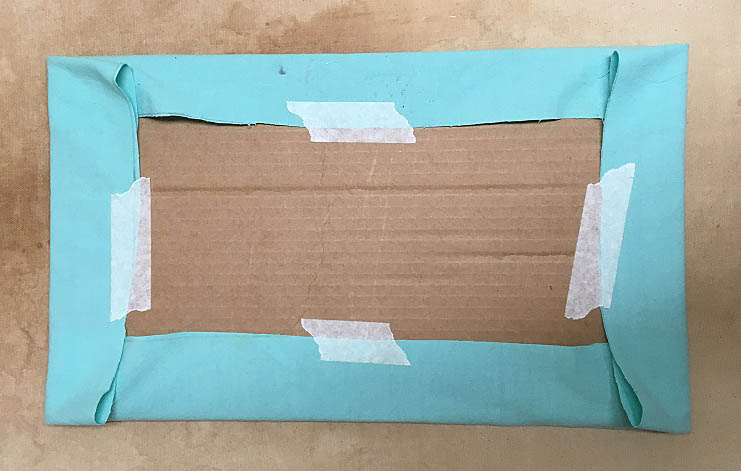
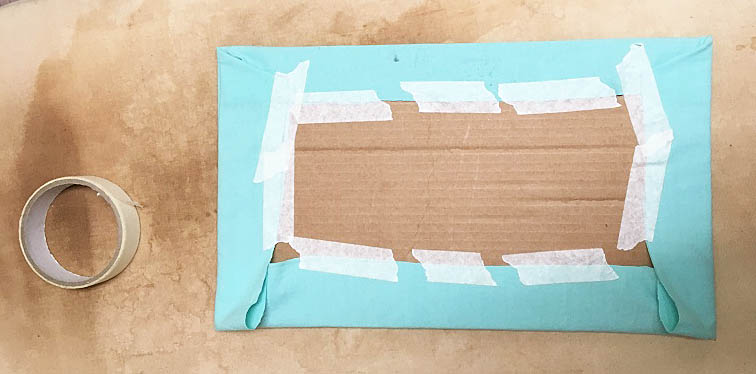
9. If I were not applying hot glue to join this back to the inside back of the box, I would not expect the masking tape to be able to do all of the heavy lifting here in keeping this fabric on the board in the long term, but along with a generous application of the hot glue it will be adequate.

Fold fabric over the back and tape down. Start in the middle of each side and pull in the opposite side as you go and work your way out, pulling tight as you go.

10. You’ll want your hot glue gun nice and hot for this next step so a lot comes out. Apply a generous amount of hot glue around the inside back edge of the box and a little bit in the middle. Press the fabric-wrapped cardboard in good side up and hold for several seconds until the hot glue is holding it flat.

11. Apply decoupage decoration to the outside edges of the box if desired.

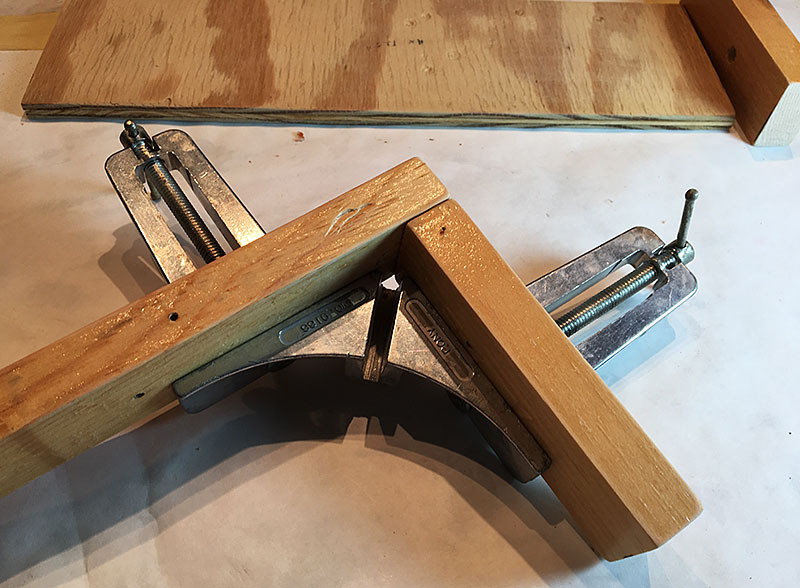
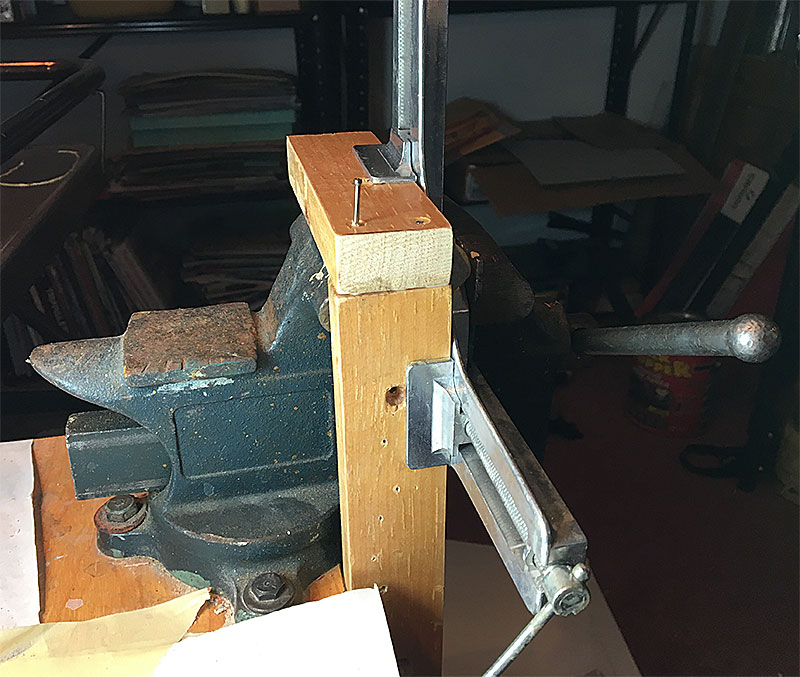
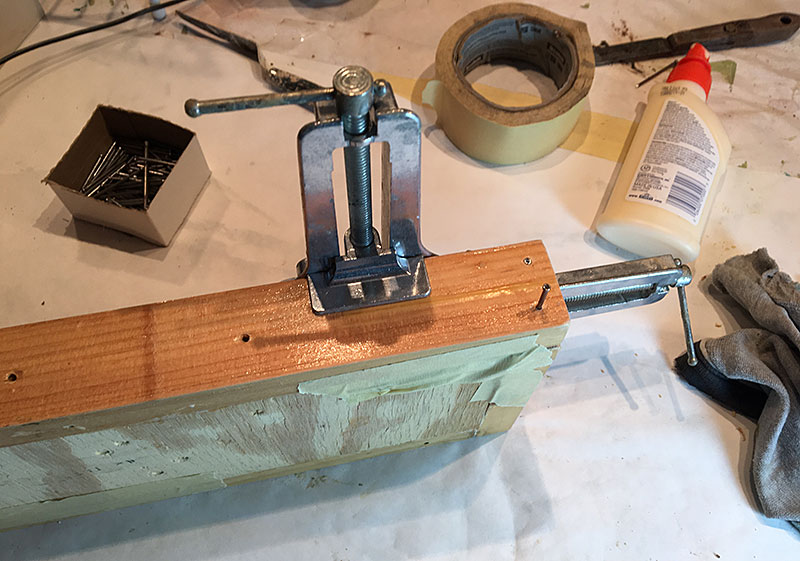
12. Attach hanging hardware or feet to the box with small nails.

Watch video of this project at Schnarr’s Hardware in Webster Groves:

Make a Shadow Box from an Old Drawer Part 1:

Make a Shadow Box from an Old Drawer Part 2:

Categories
DIY Home Decor Upcycling Ways With Wood

Upcoming Class at Schnarr’s: DIY Shadow Box on June 21

Upcoming Class at Schnarr’s: DIY Shadow Box on June 21

by Carolyn Hasenfratz

Learn how to make a shadow box from an old drawer

It’s easy to turn an old drawer from an unloved piece of furniture into an attractive and functional shadow box that fits your decor. Learn how from artist and designer Carolyn Hasenfratz at Schnarr’s Hardware in Webster Groves. Most materials are included, including the drawer. If you want metal feet on your box we have some along with some extra decorative hardware available for purchase.

What’s Provided
Drawers, fabric and board for backing, paint, essential hardware, glue, sandpaper, decorative papers

What You Can Expect

  • Learn how to make a functional background for tacking
  • Learn how to attach feet or hangers to your box for display
  • Get decorating and mounting ideas for your favorite keepsakes

Location
Schnarr’s Hardware – Webster Groves
40 East Lockwood Ave.,
St. Louis , MO , 63119

REGISTER HERE

Categories
Backyard Wildlife DIY Gardening Sustainability Upcycling Ways With Wood

Upcoming DIY Class at Schnarr’s: Build a Pollinator House on May 17


Three wood pollinator houses with stenciled decoration


Pollinator houses on display on endcap

As part of the series of DIY Classes at Schnarr’s Hardware in Webster Groves, Carolyn Hasenfratz will be teaching you how to make, decorate and fill a Pollinator House for your garden. Such houses are sometimes called Bee Houses or Bug Houses. They provide nesting and hibernating space for beneficial insects that bring life, color, pollinating services and natural pest control for your garden. We’ll have paint and stencils available for you to play with so you can give your house a personal touch.

Space in this class is limited to four people and the cost is only $20 per person including materials. Class time is 5:30 pm on May 17, 2018. Register now at this link:
Build a Pollinator House

If you can’t make it to the class, we have instructions for making two styles of pollinator houses published on the Schnarr’s blog:
Making a Pollinator House – Part 1
Making a Pollinator House – Part 2

Stop by Schnarr’s in Webster to see some of Carolyn’s prototype pollinator houses on display. These samples are for sale in case you’d prefer to buy one rather than make your own.

Categories
DIY Gardening Lawns

A New Beginning in a New Garden

A New Beginning in a New Garden

by Carolyn Hasenfratz

It’s always a thrill in spring to see what comes up again in an established garden, but I have to say I get even more excited at the prospect of planning a new garden. I am getting married in August and I will be moving into my fiance’s house at that time. His yard has minimal plantings so there is a lot of potential. I will be able to expand my horizons a lot because there will be more sun and fewer restrictions on what I can do.

I will be renting out my condo after moving instead of selling it so there is no need to move all of my current garden plants right away. Even so, I have already started moving some of them because it’s a huge job and is too overwhelming to tackle all at once. Also, the future home has some issues with water leaking in the basement and I want to get an early start on using plants to reduce this problem. As I move my plants, I need to know right now where is the best place to put them. I have need of a thorough yard and garden plan so I that I put plants in the right place the first time to save money and labor in the long term. It’s kind of crude, but one of my favorite motivational sayings in any kind of work that I do is “Proper Planning Prevents Pi** Poor Performance”.

To begin my garden plan, I made a personal wish list for what I would like to do. Then I asked my fiance Tom what were his areas of dissatisfaction with the current landscaping. Next I made an appointment with Tim Wittmaier of Wittmaier Landscaping for a consultation. Here are some of the existing issues Tim and I discussed.

Moss in front lawn
This is a major problem in the front yard and one that many Schnarr’s customers are also dealing with. Tim informed me that most of the soil in this front yard is so played out that planting any more grass seed without major renovation is a waste.


Moss growing in a lawn


Oak tree in front has a ring of soil around the base


planting ring around an oak tree

A planting ring around the base of tree like this is a disaster because it will slowly cause the bark to rot at the base and possibly kill the tree. It may take many years for damage to be apparent. This is a long-lived valuable tree so it’s worth trying to save.


Problems around the foundation
There is poorly located and executed pavement directing water toward the basement. Some of the grading around the foundation is sloping the wrong way adding to basement leak issues.


concrete directing water at the foundation

The existing patio is unattractive and also slopes the wrong way, directing water toward the foundation. It’s helping cause the basement to be “jacked up” so it needs to be literally jacked up with a jackhammer and replaced!


Invasive honeysuckle under power lines:


A volunteer hedge of invasive plants

Until we can replace the honeysuckle, I’m adding part-shade loving plants from my existing garden to the front of this border that birds made.


A row of invasive honeysuckle has grown underneath power lines at the back of the property where birds perch. Have you heard of the technique of stringing a line for birds to perch on to get a free hedgerow? It works because the birds transfer seeds with their droppings. This particular “volunteer” hedge is actually very functional because it partially screens a view of the back of an apartment complex and provides a bit of privacy for us and them. However since this row mostly consists of invasive, non-native plants I want to gradually replace the honeysuckle with something more eco-friendly.

In addition to fixing problems, I have an extensive “wish list”. Some items are short term goals, some are long-term. I created a draft of a garden plan that includes the most realistic items from my wish list – roughly things that might be possible in the first three years. Later I will make another version that includes some longer term plans so that when I work on the short term items they are not in conflict with any long-term items that we might be able to do in the future.

What are your goals for your property?

When you make your own garden plan, keep in mind how your garden can solve problems as well as help you meet your personal goals for the use of your property. For example items on my wish list promote my highest priority garden goals which include in no particular order:

  • Wildlife habitat
  • Harvesting herbs and maybe someday food plants for personal use
  • Healthy and beautiful outdoor space to promote mental and physical wellness
  • Horticultural experiments and learning
  • Propagate and preserve heirloom plants and native plants
  • Learn and teach sustainable practices
  • Increase skills to help clients and customers meet their goals
  • Maintain Master Gardener certification

Examples of goals that have been high on clients’ priority lists:

  • Great looking lawns
  • Reduce maintenance costs
  • Reduce water use
  • Increase visual appeal of property for sale, customers, entertaining and personal use
  • Maintain neighborhood standards
  • Noise abatement
  • Reduce energy costs
  • Pest management
  • Garden maintenance
  • Improve water quality in water features
  • Bird watching

There are probably as many reasons to garden and landscape as there are people. If you keep in mind what your own goals are, your decisions will be easier.

Create a Plan

Once I know what my goals are, I can start to work on a plan. Here are the steps I’m plan to follow.


1. Review ordinances and rules for the neighborhood.

Find out what the governing body is and read the rules before you plan. For example, the property in my plan is in unincorporated St. Louis County, that means there is no level of government between me and St. Louis County. I have read the county code to see what I’m allowed to do and what requires a permit. You might have a neighborhood association and/or a municipality to conform to like I have at my current condo. It’s tempting to to try to slide something by but I personally don’t recommend investing time and money in work you might have to undo later. We live in a “gotcha” culture and someone will be looking for reasons to pick on you. Don’t give them any ammunition!

2. Prepare a diagram of the property with the information you need included.


My first draft of garden plans for my new home

My first draft of garden plans for my future home

My first draft is missing some of these items and I need to add them. What is necessary information for you will vary by what your goals are. I recommend starting with:

  • Property boundaries
  • Power lines
  • Direction of North
  • House and outbuilding outline
  • Trees and shrubs
  • Paved and hardscaped areas – sidewalk, driveway, patio, walls, paths, etc.
  • Special features – play area, pool, dog house, chicken coop, compost pile, hot tub, fire pit, trellis, vegetable garden, fountain, patio furniture, grill, electrical outlets, etc.
  • Things that need to be accessible – utility panels, windows, doors, gates, air condtioners, pool filter, fire hydrant, etc.
  • If there is one, location of irrigation system and components.
  • Locations of outdoor faucets for hoses – for example will you need to hook three or four hoses together to reach a bed that needs a lot of water? Do you really want to do that on a regular basis? Three or four hoses hooked together are HEAVY (ask me how I know!).
  • Plantings that are going to stay as is.
  • Call 1-800-DIG-RITE and have them mark underground utilities for you. Put these on your diagram.
  • Areas of sun and shade.
  • Areas that tend to collect water.
  • Sight lines from parts of the yard and house that you use a lot.
  • Routes that machinery such as lawn mowers will take during maintenance. For example at Tom’s house the lawn mower needs a path through the planned herb garden from the garage to the front and back yards.
  • Paths that you will walk on to perform maintenance in the beds. Plan for mulch or more permanent paths so you don’t have to walk in the planting beds themselves.
  • Heavily used natural walking routes – for example, I’ve had a client whose mailman was wearing a path in the front lawn. That would be a good place to add a path with planting beds on either side so I put that in the drawing I made for the client. I don’t know if my plan got used or not, but paths help make gardens so appealing that I use any opportunity I can to suggest them!

You might consider drawing an overlay on tracing paper of what you would like to add or change, that’s a great way to visualize your plan and make sure it is workable with what is already there.

3. Get a soil test before making a big investment in time or money:

For example, a dying lawn filled with moss is a problem with our front yard and the yards of many customers right now. The moss did not kill the grass, the moss grew opportunistically after the grass died. It’s always safe to add organic fertilizer and compost – but please get a soil test and diagnose the problem before you do anything else. The soil test may give you all the answers you need or just be data that you use to lead to another diagnosis. Tim from Wittmaier Landscaping suspects that Tom’s lawn was killed by too much fertilizer. We don’t know for sure but it’s a common problem. If your grass does not need conventional fertilizer, adding it does not help and may hurt. If your lawn does not need lime, it’s useless and maybe destructive to add it. You might make a lucky guess, or you might cause a big problem that will take a lot of money and time to fix. What if your grass died from soil compaction, salt damage, a disease, a pest, too much shade or too much or too little water? It’s easy to add things like fertilzer and lime, but the actual remedy might be something else entirely.

Here is how and where to get a soil test: Test your soil now to assess your fertilizer needs

After I have made a good plan, I can start to break it down into individual projects. Stay tuned!

Categories
DIY Gardening Home Decor Upcycling Ways With Wood

Make a Wood Plant Tray

Make a Wood Plant Tray

by Carolyn Hasenfratz

Materials
*Indicates items available at Schnarr’s
*Piece of 1/2 inch thick wood cut to 4 inches by 13.5 inches (or other size of your choice)
*Wood for the sides of your planter (I used a variety of widths and thicknesses from my scrap pile plus the Schnarr’s scrap pile)
*Wood glue
*Nails
*Water putty
*Masking tape
*Paint
*3/16″ dowel rod
Ball knobs or drawer pulls with 3/16″ holes
*Disposable plastic gloves
*Dust mask for sanding

Tools
*Saw
*Pencil
*Ruler
*Hammer
*Putty knife
*Sandpaper
*Containers for water and mixing
*Paint brushes
Miter clamp
*Drill
*Small drill bit for pilot holes
*3/16″ drill bit
*Hand pruners
Old credit cards

Step 1: Cut a piece of wood that is 1/2 thick to 4 inches by 13.5 inches or to whatever size you want for the bottom piece of your plant tray. I actually used 1/4 inch thick wood in my sample because I had some lying around but you will have an easier time nailing it together if you use 1/2 inch thick wood.

Step 2: Decide where to cut the wood for the sides of the plant tray and mark the pieces with pencil. I made butt joints at the corners for this project so your wood pieces should be as long as the sides of the tray plus the thickness of the wood.

Parts for two wood plant trays

Step 3: Cut the side wood pieces to size and sand the rough edges.

Step 4: Dab on a little wood glue for extra hold as you arrange one of your butt joints in a miter clamp. We’re going to hammer a couple of nails in from the end to give more strength to the joint. Brace the clamped pieces in a vise as shown in my sample or on top of something like a large block of scrap wood. Drill a couple of pilot holes with a small drill bit. The pilot holes help the nail go in straighter and prevent the wood from splitting. Drive in a couple of nails and repeat until you have a three-sided frame assembled with one side open.

Wood pieces in a miter clamp


Miter clamp in a vise

Step 5: Now we are going to put the bottom in our tray. Squirt some wood glue on the edges of your bottom piece and slide it into the frame. You can temporarily hold it in place with masking tape as you work. Put the last side on the frame and glue and nail the last two corners.

Step 6: Reinforce the bottom by driving a few nails into each side after drilling pilot holes.

Step 7: Next we’ll fill any cracks or holes with water putty. Since I tend to use a lot of scrap wood that has holes in it for my projects, I often patch the wood with spackling paste, water putty or wood filler. Then I can cover up the patches with paint, decoupage or some other surface treatment. I’m using water putty this time because I want my tray to be leak proof. Water putty dries really hard. In my sample I applied the water putty to the bottom of the tray as well as in the inside seams and anywhere else there were holes in the wood.

Mix a little but of water putty at a time with water until it’s a workable consistency. Put on disposable gloves and smear the putty it into the cracks and crevices you want to fill. Water putty is fairly hard to sand off so before it dries do a really good job of flattening and cleaning up the patches to reduce the amount of sanding you’ll have to do later. Old credit cards are a good tool for scraping away excess putty.

Step 8: After the putty sets up, sand your piece to get rid of rough edges. Wear a dust mask while sanding so you don’t breathe in the particles.

Step 9: Place your feet where you want them on the bottom of the tray and trace around them with pencil. I like to use ball knobs and drawer pulls with 3/16″ holes as feet on a variety of wood pieces. I keep a supply on hand along with 3/16″ pieces of dowel rod to use in joining the feet to the wood. After tracing, set the feet aside and drill a 3/16″ hole where each foot will go.

Step 10: Cut pieces of dowel rod to size so that they fit into the hole in the feet and into the holes you drilled in the bottom of the tray without leaving gaps. If you have a pair of hand pruners, I’ve found they do a quick and easy job cutting the dowel rod pieces to size. Put a dab of wood glue into each hole, push the dowel rod piece into the feet and then push the feet into the drilled holes.

Attaching the feet with wood pegs

When the putty is dry enough, your tray is ready to paint and decorate. Add some extra varnish to the inside of the tray to help make it waterproof for plant pots.

Categories
DIY Outdoor Fun

Introduction to Letterboxing – Part II – Making a Personal Logbook

Introduction to Letterboxing – Part II – Making a Personal Logbook

by Carolyn Hasenfratz

Materials
*indicates items that are available at Schnarr’s
Text weight plain paper – 12 8.5 x 11 sheets
Decorative scrapbooking paper for end papers and accents
Decorative paper with letters printed on it
Heavy scrapbooking paper with a decorative design on it for the cover – 1 12 x 12 or 8.5 x 11 inch piece
*Thread or twine about the thickness of baker’s twine, kite string, 1mm hemp cord or something similar
Assortment of small beads
Metal eyelets

Tools
*Pencil
*X-Acto knife and blades
Needle tool
Large sewing needle
*Old block of scrap wood
Paper trimmer
*Scissors
*Glue stick
Squeegee or bone folder
Scrap paper
*Metal ruler
*Utility knife with new blade
Self healing cutting mat
Eyelet setter
*Hammer
Small hole punch
*Pliers

Part 2: Making the logbook

1. Take your 12 sheets of text weight paper and cut them down to 11 x 5 5/8 inches. Fold them in half.

2. To make interesting endpapers for your book, take a lightweight piece of decorative paper with a map or other design on it and cut it down to 11 x 5 5/8 inches. Fold it in half as in the step above. Nest the text paper inside the endpaper piece.

5. When you push all the nested paper pieces together at the spine, you’ll notice that the inner pages stick out at the fore edge. For a finished look, trim off the paper that sticks out using a metal ruler and a sturdy utility knife. A paper trimmer probably will not cut through all the layers cleanly on the first try and an X-acto knife might be a little too narrow and wobbly to make the cut safely. Something robust and sharp enough to cut through all the layers without having to press too hard will give you the neatest and safest results.

Before and after trimming the fore edge of the handmade journal..
Before and after trimming the fore edge. (In case you are wondering, the green dot on my ruler is there so I don’t get it mixed up with student tools when I’m teaching.)

Tip: If your metal ruler is not sold with a cork backing already on it, add a strip of cork to the back of yours to prevent slippage of your ruler while cutting. This extra bit of effort will pay off by possibly preventing injuries. If you shave off the side of your finger with a utility knife or craft knife you will never neglect to do this again! (Ask me how I know!)

4. Select a piece of decorative paper that is heavier in weight, like light cardstock, to use for the cover. Cut it down to 8 1/2 x 11 inches. From the bottom long edge, make pencil marks 2 3/4 inches up on the inner facing side.

5. Fold up at markings to make built-in pockets for the inside front and back covers. Fold cover in half and nest other papers inside.

The book is starting to come together!

6. Place a piece of scrap wood on your work surface. Go to the middle of your book and spread it open. Place the book with the inside facing up and with the needle tool poke four holes through all the layers of paper, one near the top, one near the bottom, and two close together in the middle.

7. Cut a piece of heavy thread or cord up to 1 mm thick to a length of 34 inches and thread a sharp, sturdy needle with it. Starting on the outside of your book at the middle hole, bring the thread in, leaving about 7″ trailing on the outside of the book. Bring the thread out again at the bottom, in again at the middle through one of the two holes, out again at the top and in again at the middle, making a figure 8 pattern. If the needle is difficult to pull through the holes pulling with pliers can help you get it through. Tie off your cord at the spine and if there is any excess cord left tie it at the middle also and let the ends trail.

8. String beads onto the ends of your cords as accents and tie double or triple knots as needed at the ends of your cords to hold them on.

9. Cut two 2 inch x 6 inch pieces from another pattern of decorative cardstock. Fold them in half lengthwise. Apply glue from a glue stick to the inside of the folded piece and press in place over the fore edge. Burnish your glue job well between pieces of clean scrap paper.

10. Punch two holes at each pocket with the small hole punch. Use an eyelet setter and hammer to spread the back of the eyelet out to fasten the sides of the pockets securely.

11. Cut two initial letters from letter printed cardstock or paper and mount on pieces of slightly larger decorative paper to give them a border. Glue to the front of the book and burnish.

Look for Letterboxes

Go to either the Atlasquest web site or the Letterboxing North America web site and create a profile for yourself. Search for letterboxes near you. I like to print out the clues and then keep them in a three-ring binder. I also keep in this binder maps and other information about the places I’m interested in searching. I search for a lot more letterboxes than I actually find so it’s not uncommon for me to make multiple attempts on a letterbox.

If you have a smartphone, look for an application called Clue Tracker. You can use this app to search the databases of either Atlas Quest or Letterboxing North America to find boxes near you while you’re on the go.

Have fun out there!

Categories
DIY Outdoor Fun

Introduction to Letterboxing – Part I – Carving a Personal Stamp

Introduction to Letterboxing – Part I – Carving a Personal Stamp

by Carolyn Hasenfratz

What is Letterboxing? It’s a fun outdoor hobby that is kind of like a lower-tech version of Geocaching. Letterboxers hide small, weatherproof boxes in publicly accessible places (like parks) and distribute clues to finding the box in printed catalogs, on one of several web sites, or by word of mouth. Individual letterboxes contain a notebook and a rubber stamp, preferably hand carved or custom made. Finders make an imprint of the letterbox’s stamp in their personal notebook, and leave an impression of their personal signature stamp on the letterbox’s “visitors’ book” or “logbook” — as proof of having found the box and letting other letterboxers know who has visited. Many letterboxers keep careful track of their “find count”.

To begin looking for letterboxes, you need a simple toolkit – a personal signature stamp, a stamping ink pad to carry with you, a personal logbook to carry with you and some hunting clues. In this class I will show you how to make the signature stamp and in the next segment you’ll learn how to make the logbook. You can buy the stamping ink pad from a craft supplier. Clues are available on web sites and at least one mobile app.

Materials
*indicates items that are available at Schnarr’s
*Tape
Tracing paper
Rubber carving material
Rubber stamping ink pad
*Ziploc bags

Tools
Pencil
Ball point pen
*X-Acto knife and blades
Carving tool with interchangeable tips with v-gouges and u-gouges in different sizes
*Scissors
Squeegee or bone folder
Scrap paper
*Metal ruler

Part 1: Making the stamp

Letterboxers choose a trail name and typically carve a personal rubber stamp that incorporates their trail name or relates to their trail name. Here is what my personal stamp looks like.

I intended to use the trail name “Jeep Girl” because that was my CB handle in my Route 66 club. I carved my stamp before I checked one of the letterboxing web sites and discovered that “Jeep Girl” was already taken, so I changed my letterboxing trail name to “Jeep Girl 66”. I recommend that when you are considering trail names to check to see if the one you want is already taken. Here are the web sites to perform those searches:
Atlasquesthttps://www.atlasquest.com
Letterboxing North Americahttp://letterboxing.org

1. Once you know what your trail name is going to be, create a stamp design to complement it. You can draw your design by hand or on a computer if you have access to computer graphics software. My fiance Tom needed a stamp to go along with his trail name “fordboy66” so here is a design I came up with using computer graphics tools inspired by the Ford logo from 1912.

While you are designing your stamp, keep in mind what size your carving is going to be. My stamp is pretty big so that the details were easy to carve. Draw or print out your design at the actual size that you want your stamp to be.

2. Next tape a piece of tracing paper over your design and trace using a relatively soft pencil that’s been sharpened really well. You want to be able to capture detail but use soft graphite if you can so that the design will be easy to transfer to the rubber.

3. Lay your tracing graphite side down onto your rubber carving material and tape in place. Draw over your lines again from the other side with the pencil to transfer your drawing to the rubber. Lift a portion of the tracing paper to see how well the design has transferred before you move it. You can also rub all over the paper with a squeegee or bone folder to make sure you went over all the lines.

4. Remove your tracing and set aside. Go over the pencil lines on the rubber one more time with a ball point pen so that when you are working your design won’t be rubbed off. If possible, choose an ink color that is close to the color you’ll be stamping because for the first few printings a little ball point pen ink is probably going to get into your stamp print. The pen ink will wear off in time.

With so many redrawings needed to get your design transferred, some imperfections will creep in. Part of the charm of Letterboxing is the hand-carved quality of the stamps, so please don’t see this as a defect. Fun and adventure are what is important – high quality carvings are appreciated but not a requirement. People of all skill levels can make a carving that is good enough for the job.

If you have any text in your stamp design, the words should look backwards on the rubber before you start cutting. Double check before you start to make sure your text will print the right way when you use the stamp.

5. Cut away the negative portions of your design (the “white” space) and leave the positive areas, the parts you want to print (or the “black” lines). I find the easiest way to carve is to outline by cutting around the design elements with an X-acto knife, then making another cut a little further out with the knife forming a channel that is shaped like a “V”.

Design elements of the stamp have been outlined with an X-acto knife.

Then I cut away large areas with a v-gouge, one of the tips included in a linoleum cutter tool set.

I’ve written a very detailed tutorial on rubber stamp carving if you need more information. http://www.limegreennews.com/howcarv.html

If your carving material is thin, you might need to mount it on a piece of clear acrylic block to stiffen it and get a good print. You can temporarily attach the rubber to the acrylic block with double-sided tape.

6. Wash and dry your stamp. Test your stamp by pressing it on your ink pad and then onto paper. Once you are satisfied with your carving, you can store it in a Ziploc bag along with your ink pad to keep ink from getting on you when you carry it around.

Here is what the new stamp looks like when printed with blue stamping ink.

Stay tuned for Part II – Making a Personal Logbook!

Categories
Backyard Wildlife DIY

Make Suet Cakes for Outdoor Birds

Make Suet Cakes for Outdoor Birds

by Carolyn Hasenfratz

What you will need
*indicates items available at Schnarr’s
Suet or some other kind of food grade fat that gets solid
*Bird seed
Dried fruits (optional)
Chopped nuts (optional)
Grains (optional)
Leftover bread, cereal and crackers (optional)
*Dried mealworms
*Twine
*Scissors
Long thin knife (doesn’t have to be very sharp – could be something like a fettling knife for ceramics or something similar)
Clean food containers for molding
*Spatula and *mixing spoon
*Mixing bowl
Double boiler setup – *saucepan, *temperature resistant glass measuring cup
*Hot pot pad, *oven mitt, *jar lifter or other tool for lifting hot containers safely

I am a member of the St. Louis Master Gardener program and I do some of my volunteer work at Litzinger Road Ecology Center. LREC offers enrichment and training sessions for volunteers to increase our knowledge. Sometimes we get to take part in fun “crafty” activities that have an ecological benefit. We made bird suet cakes one day at LREC and later I also experimented with making some at home.

Feeding birds in our backyards is a way to get a good look at birds up close while providing them with a nutritional food bonus to make their lives a little easier. Suet and fats are good foods for many birds when it is late winter and natural food sources are low – fats are also most likely to attract birds who eat a lot of insects, the kind of birds you particulary want in your yard to provide free pest control services. At the time I am writing this we may be done with freezing temperatures during the day but we may still have some below freezing temperatures at night. You know how our weather is in the St. Louis area – it could be 85 degrees or 25 degrees tomorrow (or both) and no one would be shocked! Suet and fats can melt and turn rancid in warm weather but if you double-render the fat you can place suet outdoors in temperatures over 70 degrees F, according to the book “The All-Season Backyard Birdwatcher” by Marcus H. Schneck.

Before beginning to heat the fat, please read the safety precautions in my article Make Old Wax Candles Into New Candles. Any safety issues that might come up while melting fat are pretty much the same as with wax. I’m not sure if the melting temperatures are the same. Keep a close watch on your fat to make sure it doesn’t overheat. If you’ve ever had an unexpected flare-up from hot bacon grease you know hot fat is something to treat with care!

In my example I used bacon fat and some beef fat trimmings that the butcher at Whole Foods gave to me. I had gone to Whole Foods with the intent of buying some suet but they didn’t have any. Suet is a type of fat that comes from around the kidneys. Just plain beef fat will work too.


Melting beef fat to make suet cakes

I experimented with a couple of different ways of rendering the beef fat. First I chopped it into smaller pieces then I put some of it in a food processor to partially grind. A meat grinder would be better for this but I don’t have one. I put the ground fat in the double boiler to melt down. A double boiler is used to heat things that scorch or burn easily. At home many of us use such a setup to melt things like wax and candy. Place a saucepan on top of the stove and partly fill it with water. Set a glass heat-resistant measuring cup containing the fat in the pan of water and slowly heat the water until the fat melts.

I also experimented with putting some fat pieces into a glass temperature-resistant measuring cup and microwaving the pieces for about a minute to a minute and a half at a time. Either way the fat melted fine and I strained out and discarded the tough pieces and little meat pieces that were left behind and poured the fat into a glass dish to harden.

I let the fat cool until it was hard, then I re-melted it. The hardening and remelting makes it double-rendered and ready for warmer spring temperatures.


Molding the suet cakes and adding twine for hanging

After the fat is melted, you can mix things in it that are tasty treats for birds – leftover baked goods, grains, nuts, chopped dried fruits, cereal, dried mealworms, and of course, bird seed. I molded my cakes in cleaned used food containers and popped them out after they were hard. You can buy pre-made suet cakes (at Schnarr’s!) that are made to go into a pre-made metal mesh holder with a hanger. When you make your own suet cakes, you have to work out a way to hang them. I drilled holes through the middles with a long thin knife and threaded twine through the holes to tie the cakes in place outdoors.

The remaining photos were taken at Litzinger Road Ecology Center on the day we made suet cakes. We were all asked to bring in stuff from our pantries to add to the bird food mixture.


Additives for bird suet cakes

At LREC, we had a quantity of donated food containers to use so we made holes in the sides of them to accomodate a hanging string.


Making holes in plastic food containers with a hot nail

You can easily make holes in plastic by heating a nail in a candle flame. Hold the nail in a pair of pliers to keep from burning your hands and be careful around open flames!


Hanging string for bird suet cake

We made knots in the strings to keep them from slipping through the hole. Before filling the containers with food mixture, for extra security we pulled the stings in slightly so the fat mixture would harden around the string and help hold it in place.


Bird food mixture in a plastic food container

After filling with food mixture, all we had to do was wait for the fat to harden. Then our suet feeders were ready to hang outdoors!

Categories
DIY Home Decor Upcycling Ways With Wood

Make a picture frame from scrap wood

Make a picture frame from scrap wood

by Carolyn Hasenfratz

Have you taken down an old fence or pulled up an old wood floor? Are you getting some remodeling done or have access to scrap wood? It’s fun to make reclaimed wood pieces into unique picture frames. For my sample I purposefully chose scrap wood with a rustic and weathered appearance, welcoming flaws that don’t compromise the wood’s structural integrity such as saw marks, knots, plaster stains and nail holes. This project is designed to exploit the unique qualities of scrap wood – the flaws in the wood are part of the “decoration”. If you like you can choose new wood and give the surface whatever treatment that fits your decor. You can even buy wood made specifically for picture framing if you want a more conventional style of frame. I made this frame the size of an 8 1/2 by 11″ award certificate because this is a common size that a lot of people need.

Watch Video of Carolyn Teaching this Class at Schnarr’s Hardware in Webster Groves:
Part 1
Part 2

Materials needed:
Scrap wood approximately the size of lattice strips – 1 1/2″ wide by 2/8″ thick. For my sample I used wood lath salvaged from a demolished building. You can purchase new lattice strips if you don’t have access to the right size scrap wood.
Scrap wood strips – 2/8 – 3/8″ thick by 1/2 – 3/4″ wide. I obtained my strips from the scrap stashes available to me. You can buy such wood new if you need to where molding is sold.
Small washers
Staples for staple gun
Sandpaper
Aluminum flashing
Small nails – long enough to go through both layers of wood but not long enough to penetrate to the front of the frame
8 1/2″ piece of plexiglass, clear acetate or glass
8 1/2″ piece of chipboard, cardboard or mat board
Wire
Wood glue

Tools needed:
Mitre saw
Eye protection
Staple gun
Dust mask
Drill with tiny drill bit
Ruler
Pencil
Permanent marker
Sturdy scissors
Wire cutter
Large nail
Scrap block of wood
Hammer
Staple gun

Click the diagram above to download a PDF copy to print out

1. The inside edge of the opening for your framed picture will be 8″ x 10 1/2″. When finished the frame will overlap the framed image about 1/4″ all the way around. Mark with a ruler and pencil on the wood where the cuts will be. You might find it helpful to draw a rough diagram on paper to help visualize the cuts. Using a miter saw, cut four wood pieces with 45 degree angles at the ends. Wear eye protection when sawing and drilling.

2. Sand the cut ends of the wood. I did not give my wood any other treatment or finish. This is partly because I like the way it looks as it is. Another reason is that this wood was salvaged from a historic building that has great personal significance to me. I did not want to alter the historic integrity of the wood beyond cutting it to size. There are saw marks on the wood from the 1920s which I think are cool! Salvaged lath wood that has been separated from its original historic context is often available for purchase at Perennial, an art studio that promotes the reuse of materials. If you want you can give your scrap or new wood further treatments such as sanding, painting or staining for a variety of decorative effects. Wear a dust mask while sanding – it’s never good to breathe dust and old wood may have mold spores or contaminants.

3. With a staple gun, shoot two or three staples into the back of the frame across each mitered corner. The staples will help tack your work in place until you can get some bracing installed on the back of the frame to make it more sturdy. Tap the staples with a hammer if they need a little extra help going all the way into the wood.

4. On the back of the frame, center an 8.5 x 11 piece of chipboard, cardboard or matt board and trace around it as a guide for placing narrow wood strips on the back for holding your protective layer (plexiglass, clear acetate or glass) and artwork.

5. To make the bracing, cut four pieces from the wood strips that are approximately 2/8 x 3/8 inches thick and 3/4 to 1/2 inches wide. The lengths you cut from with wood will be slightly different depending on how wide the strips are. Cut them so that the inside edge opening is 8 1/2 by 11. Make the lengths 9 inches for the short side and 11 1/2 inches for the long sides if using 1/2″ wide wood. If using 3/4 inch wide wood use 2 9 1/4″ pieces and 2 11 3/4″ pieces. If you are using wood in different dimensions just cut them so that the opening id 8 1/2 x 11″. Since you’ll be attaching these pieces to the back of the frame, if the pieces don’t all match or don’t line up perfectly it doesn’t matter, they won’t be visible. Sand pieces smooth.

6. Apply a line of wood glue on the back of each wood strip then press in place on the back of the frame. Drill small pilot holes, about three per strip, then nail the strips to the frame.

7. Next make some metal tabs to hold the artwork into the frame. These tabs are designed to swivel in and out so that you can easily take out or put in artwork. Draw four rectangles with permanent marker, 1 3/4 by 2 1/2 inches each, onto aluminum flashing. The flashing we sell has both a silver colored side and a brass colored side. These tabs won’t be visible when the frame is on the wall but if you have a preference for one side or the other keep that in mind. Using a sturdy pair of scissors cut out four pieces and round the corners to avoid sharp points. Sand or file the metal peices to get sharp edges off if necessary. On two of the pieces drill or punch one hole toward one end, on the two other pieces drill or punch a hole in each end. An easy way to punch a hole is to place the flashing on a scrap wood block and hammer in a large nail where you want the hole.

8. Attach the four flashing pieces to the back of your frame as shown on the diagram. Place a small washer under each nail head.

9. You are now ready to add artwork to the frame. First put in your clear protective layer (the glass, acetate or plexiglass), the display item, then a stiff layer of chipboard, cardboard or mat board to protect the artwork from the back and keep it from falling out. Rotate the tabs inward.

10. String a piece of wire from inner holes on the two-hole tabs from one side to the other for hanging. You’re done!

Here is how my frame looks with a certificate displayed in it:

Suggestions For Sources of Scrap Wood
Ask home improvement stores for scraps.
Volunteer to clean out someone’s garage or workshop in exchange for keeping some interesting wood pieces.
Make inquiries of people you know who are doing home improvements.
Look in thrift stores for picture frames or cheap pictures in frames that you can get parts from.
Make a request for wood pieces from the Freecycle community – freecycle.org
Walk your neighborhood on trash day – I’ve found so much usable wood that way.
Purchase salvaged supplies from a non-profit studio that specializes in reclaimed materials such as Perennial or Leftovers, Etc..

Categories
DIY Home Decor Ways With Wood

Schnarr’s Hardware is now offering DIY Classes!

Schnarr’s Hardware is now offering DIY Classes!

by Carolyn Hasenfratz

I hope you can join us for our first class at Schnarr’s Hardware in Webster Groves – Make a Picture Frame from Scrap Wood!

make a picture frame from scrap wood

Schnarr’s employee Carolyn Hasenfratz will show you how to use reclaimed wood pieces to make a frame that fits an 8 1/2 x 11-inch picture. This size frame is a good size for award certificates and other common documents that you might want to display. Tools and materials will be provided. You will learn techniques that you can use to design and build your own frames from your choice of wood scraps. Save a ton of money by gaining skills you can use by making your own unique frames for your home decor while gaining the satisfaction of saving materials from the landfill.

Class with Carolyn Hasenfratz – Make a Picture Frame from Scrap Wood
Date: February 22, 2018
Time: 5:30 pm – 7:30 pm
Location: Schnarr’s Hardware in Webster Groves, 40 East Lockwood, St. Louis MO, 63144

The cost of the class is $20. To register please go to this url: https://dabble.co/rc/carolynhasenfratz10

What’s Provided
Wood, tools, metal, chipboard, hardware

What You Can Expect
Learn to build simple picture frames
Learn to design frames from reclaimed wood
Learn to fabricate hardware for the back of the frame using simple tools
Learn how to recycle wood pieces
Learn about sources of low cost reclaimed materials for your DIY projects

For Carolyn’s complete teaching schedule, please go to:
http://www.chasenfratz.com/wp/about/classes-and-events/