Categories
Backyard Wildlife DIY Gardening Sustainability Upcycling Ways With Wood

Upcoming DIY Class at Schnarr’s: Build a Pollinator House on May 17


Three wood pollinator houses with stenciled decoration


Pollinator houses on display on endcap

As part of the series of DIY Classes at Schnarr’s Hardware in Webster Groves, Carolyn Hasenfratz will be teaching you how to make, decorate and fill a Pollinator House for your garden. Such houses are sometimes called Bee Houses or Bug Houses. They provide nesting and hibernating space for beneficial insects that bring life, color, pollinating services and natural pest control for your garden. We’ll have paint and stencils available for you to play with so you can give your house a personal touch.

Space in this class is limited to four people and the cost is only $20 per person including materials. Class time is 5:30 pm on May 17, 2018. Register now at this link:
Build a Pollinator House

If you can’t make it to the class, we have instructions for making two styles of pollinator houses published on the Schnarr’s blog:
Making a Pollinator House – Part 1
Making a Pollinator House – Part 2

Stop by Schnarr’s in Webster to see some of Carolyn’s prototype pollinator houses on display. These samples are for sale in case you’d prefer to buy one rather than make your own.

Categories
Backyard Wildlife DIY Gardening Sustainability Upcycling

Making a Pollinator House – Part 1

Making a Pollinator House – Part 1

by Carolyn Hasenfratz


It’s becoming increasingly common to see structures called “Bug Houses” or “Insect Hotels” in gardens. Some people get squeamish at the mention of bugs or insects so perhaps the most appealing way to label such a structure is “Pollinator House”. Such structures are provided as a nesting and sheltering area for beneficial insects.

Most people are familiar with the pollinating actions of honeybees, bumblebees and wasps. Social bees and wasps are beneficial to the garden in many ways, not only by pollinating but in the case of wasps eating garden pests.

It’s understandable to be nervous about the idea of having colonies of stinging insects living in your garden because some of these species are very aggressive about defending their homes. If you want more pollinators in your garden fortunately there are other bees and wasps that are easier to co-exist with peacefully. If you fear you have attracted the wrong kind of bee or wasp to your garden, I recommend getting help from an expert before deciding how or if to deal with them.

I don’t mind bees and wasps because I can identify them and know how close I can safely get to them. I also don’t have any serious allergic reactions to stings. I work in the garden alongside Honeybees, Carpenter Bees, Bumblebees, Cicada Killers, Mud Daubers, Potter Wasps and others with little apprehension. Honeybees often land on me and I just stay still until they fly away. I steer clear of Yellow Jackets because I know from experience they will sting if you inadvertently disturb their nest (happened last summer in a client’s garden). I don’t attempt to eliminate them unless they are really in the way or other people are in danger. Even though I’m in the garden a lot I only get stung once every several years or so. The consequences for me are some brief anger, localized soreness and itching for a few days. The consequences for others could be far more serious and even deadly so use your best judgement.

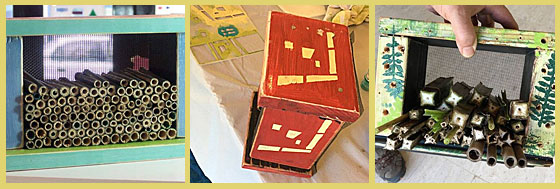
Many of the solitary species of bees such as Mason and Leafcutter Bees like to nest in hollow plant stalks or holes in old wood. We take away many of these potential nesting sites by cleaning dead plants and old wood out of the garden. Some amount of cleanup is necessary for human safety, aesthetics and homeowners associations but we can mitigate the effects of a too-clean garden by building a Pollinator House. As an added benefit you may get other desirable insects such as ground beetles and butterflies hibernating in the structure.


Insect Hotel at Missouri Botanical Garden
Here are some suggestions about what materials to use:

  • Stones and bricks
  • Dead leaves
  • Twigs or twig bundles
  • Corrugated cardboard rolls
  • Dried seed pods
  • Paper straws
  • Hollow reeds – preferably 6-8 inches long, closed on one end
  • Drilled pieces of wood – variety of hole diameters, 3-6″ deep

The structure should be sturdily built to avoid toppling.

Where to place the house:

  • Protected from high winds
  • Partly in sun and partly in shade to meet a variety of species preferences
  • If possible near water and mud for drinking and nest building

Dad's fence is falling down
You can have a lot of fun designing your Pollinator House by creatively using materials, limited only by your imagination. I started a simple one for my Dad’s garden, custom designed to solve two problems for him.

Problem 1 – Decorative garden fence is falling apart and sagging
Problem 2 – Lots of sticks lying around from deadfall and pruning


Propping up fence with cinder blocks
Solution
I bought 12 cinder blocks and used them to prop up the ailing fence. Then I filled some of the spaces with twigs and short segments of hollow, dead plant parts from the garden. I drilled some holes in some pieces of scrap wood. A variety of hole sizes and depths are good for different species. As we get more material we’ll keep filling in the spaces in the blocks.


Filling the blocks with nesting material
The result is practical and may not score high marks in the aesthetics department. However the fence is located in the middle of a mint patch (also a superb beneficial insect attractor) and it will be partially concealed by vegetation for much of the year. If Dad agrees I think I will add shelving to the top for containers of trailing plants which will help disguise the blocks. I will probably have to work on the bases of the cinder block towers to make them straighter since the ground here is soft and did some settling after I stacked the blocks.

Dad is pleased that his fence is at least upright again and he’s happy to do his part for invertebrate conservation. Dad’s garden was designed with wildlife in mind and already supports an abundant population of beneficial insects.

Hopefully my condo association will approve a Pollinator House in my garden. I don’t know what my chances are but I do know that my Pollinator House is going to have to be pretty to even have a prayer of getting approved. I guess I will have to make it portable so I can sell it if they say no! They have previously said yes to a bird house but a bug house might be a harder sell. Stay tuned for a more aesthetically pleasing Pollinator House plan in a future newsletter!

More information about bees, wasps and insect shelters:

Categories
Backyard Wildlife DIY Gardening Sustainability Upcycling

Upcycled Butterfly Feeder

Upcycled Butterfly Feeder

This project was so easy that I worked on it up at the Schnarr’s cash register between customers!

When I got a new dishwasher this spring, I decided to get rid of my broken garbage disposal rather than purchase a new one. When it was working, I rarely used it anyway since I composted almost anything that would normally go down it. In a way it’s kind of a bad habit because I already have more than enough stuff but I do enjoy saving odds and ends of things I might be able to re-use and seeing if I can make them into something useful. My Dad installed my new dishwasher for me and removed the old garbage disposal and he gave me several ringlike parts that he thought I might be able to use for something. One of them fits perfectly a glass part of a broken fountain/mister that someone else gave me.

Ring from garbage disposal and glass dish
Ring from garbage disposal and glass dish.

The glass bowl-like object rests nicely in the ring, so I decided to make a butterfly feeder out of it. The ring has three rolled tabs protruding around the outside edge. It was an easy matter to thread some chain through these tabs to suspend the feeder. From Schnarr’s I purchased some chain of a suitable guage and some small s-hooks to link the chain pieces together.

First I made three short equal lengths of chain. I pulled chain links apart with pliers to separate.

Short lengths of chain
Short lengths of chain.

Next I threaded the small chain pieces through the rolled tabs to make loops, securing each with a small s-hook that I pinched closed.

Connecting chain pieces to ring tabs with s-hooks
Connecting chain pieces to ring tabs with s-hooks.

Next I cut three equal longer lengths of chain and secured them to each small loop by pinching closed the other end of each s-hook. Then I gathered the three chain lengths together and the top and secured them with another s-hook which can be used to suspend the feeder from a beam, tree branch or stand.

With longer pieces of chain added for hanging
With longer pieces of chain added for hanging.
Finished butterfly feeder hanging from a beam above my deck
Finished butterfly feeder hanging from a beam above my deck.


At right is how the finished butterfly feeder turned out.

What food should one put in a butterfly feeder? If you have visited the Sophia M. Sachs Butterfly House in Faust Park you have probably seen plate feeders stocked with fruit in the conservatory. Butterflies like to sip juices from the fruit and according to Sally Roth, author of one of my all-time favorite gardening books “Attracting Butterflies & Hummingbirds to Your Backyard”, they like it even better if it’s fermenting. That’s a good way to get use out of fruit that has gone bad.


Butterflies feeding on overripe bananas
Butterflies feeding on overripe bananas at the Sophia M. Sachs Butterfly House.

Other foods that Roth suggests offering in butterfly feeders:

  • A clean chemical-free sponge or kitchen scrubber soaked in sugar water
  • Meat and fish scraps – especially if they are juicy
  • Fungi – if you don’t like to leave the fungal growths that pop up spontaneously in the garden in place, you could add them to the butterfly feeder – the butterflies will appreciate it!

It is evident that some foods that butterflies like are not attractive to humans. What you choose to add to the feeder may depend on your tolerance for odors or the possibility of attracting other wildlife. If you do not want other insects such as wasps and bees to access the food, you can make a cover from window screen or wire mesh that will allow the butterflies to poke their long proboscises through the screen into the food while excluding other insects.

I’m writing this toward the end of summer so there is not a whole lot of time this year for butterflies to make use of my new feeder. When the weather gets too cold for butterflies I’ll hang the feeder from a ceiling hook near a window in my home and use it as a plant hanger! In the fall I can always use extra space for plants when it’s time to bring them inside – they have a way of multiplying in the warm months, don’t they? I’ll put the feeder back out in late winter, perhaps even before flowers are in bloom, so that early-emerging butterflies can get something to eat if they need it.