Categories
Backyard Wildlife DIY Gardening Sustainability Upcycling Ways With Wood

Upcoming DIY Class at Schnarr’s: Build a Pollinator House on May 17


Three wood pollinator houses with stenciled decoration


Pollinator houses on display on endcap

As part of the series of DIY Classes at Schnarr’s Hardware in Webster Groves, Carolyn Hasenfratz will be teaching you how to make, decorate and fill a Pollinator House for your garden. Such houses are sometimes called Bee Houses or Bug Houses. They provide nesting and hibernating space for beneficial insects that bring life, color, pollinating services and natural pest control for your garden. We’ll have paint and stencils available for you to play with so you can give your house a personal touch.

Space in this class is limited to four people and the cost is only $20 per person including materials. Class time is 5:30 pm on May 17, 2018. Register now at this link:
Build a Pollinator House

If you can’t make it to the class, we have instructions for making two styles of pollinator houses published on the Schnarr’s blog:
Making a Pollinator House – Part 1
Making a Pollinator House – Part 2

Stop by Schnarr’s in Webster to see some of Carolyn’s prototype pollinator houses on display. These samples are for sale in case you’d prefer to buy one rather than make your own.

Categories
DIY Gardening Lawns

A New Beginning in a New Garden

A New Beginning in a New Garden

by Carolyn Hasenfratz

It’s always a thrill in spring to see what comes up again in an established garden, but I have to say I get even more excited at the prospect of planning a new garden. I am getting married in August and I will be moving into my fiance’s house at that time. His yard has minimal plantings so there is a lot of potential. I will be able to expand my horizons a lot because there will be more sun and fewer restrictions on what I can do.

I will be renting out my condo after moving instead of selling it so there is no need to move all of my current garden plants right away. Even so, I have already started moving some of them because it’s a huge job and is too overwhelming to tackle all at once. Also, the future home has some issues with water leaking in the basement and I want to get an early start on using plants to reduce this problem. As I move my plants, I need to know right now where is the best place to put them. I have need of a thorough yard and garden plan so I that I put plants in the right place the first time to save money and labor in the long term. It’s kind of crude, but one of my favorite motivational sayings in any kind of work that I do is “Proper Planning Prevents Pi** Poor Performance”.

To begin my garden plan, I made a personal wish list for what I would like to do. Then I asked my fiance Tom what were his areas of dissatisfaction with the current landscaping. Next I made an appointment with Tim Wittmaier of Wittmaier Landscaping for a consultation. Here are some of the existing issues Tim and I discussed.
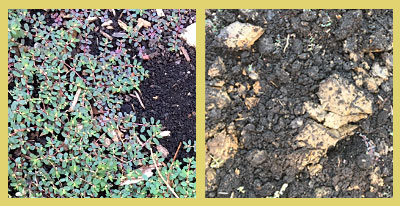
Moss in front lawn
This is a major problem in the front yard and one that many Schnarr’s customers are also dealing with. Tim informed me that most of the soil in this front yard is so played out that planting any more grass seed without major renovation is a waste.


Moss growing in a lawn


Oak tree in front has a ring of soil around the base


planting ring around an oak tree

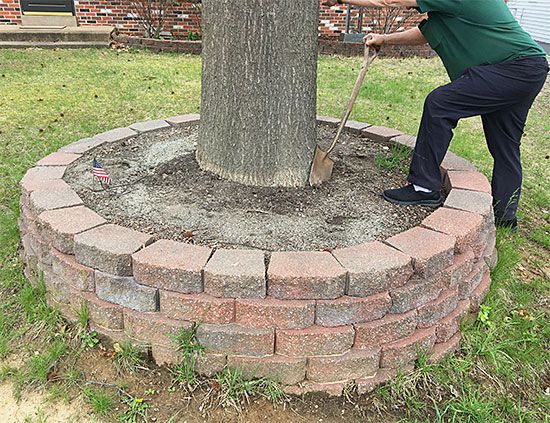
A planting ring around the base of tree like this is a disaster because it will slowly cause the bark to rot at the base and possibly kill the tree. It may take many years for damage to be apparent. This is a long-lived valuable tree so it’s worth trying to save.


Problems around the foundation
There is poorly located and executed pavement directing water toward the basement. Some of the grading around the foundation is sloping the wrong way adding to basement leak issues.


concrete directing water at the foundation

The existing patio is unattractive and also slopes the wrong way, directing water toward the foundation. It’s helping cause the basement to be “jacked up” so it needs to be literally jacked up with a jackhammer and replaced!


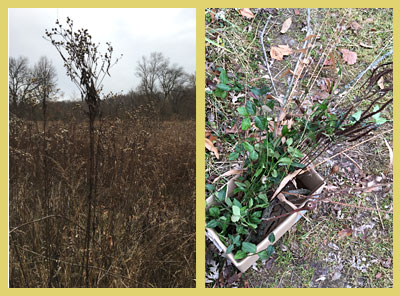
Invasive honeysuckle under power lines:


A volunteer hedge of invasive plants

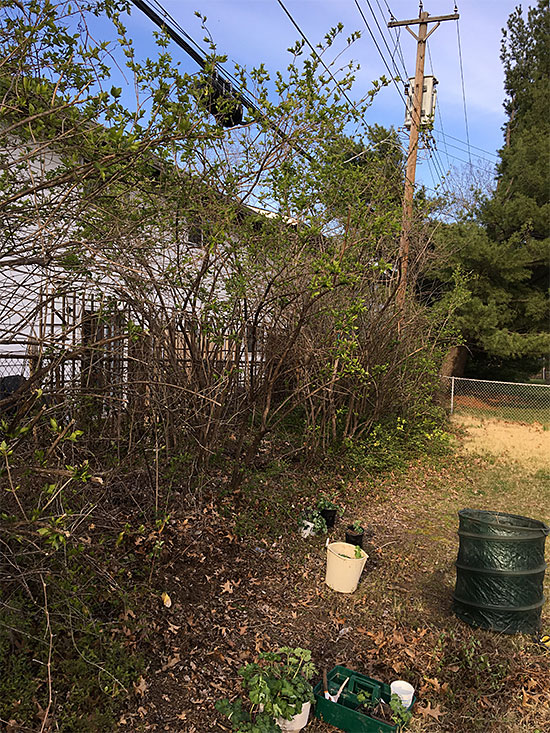
Until we can replace the honeysuckle, I’m adding part-shade loving plants from my existing garden to the front of this border that birds made.


A row of invasive honeysuckle has grown underneath power lines at the back of the property where birds perch. Have you heard of the technique of stringing a line for birds to perch on to get a free hedgerow? It works because the birds transfer seeds with their droppings. This particular “volunteer” hedge is actually very functional because it partially screens a view of the back of an apartment complex and provides a bit of privacy for us and them. However since this row mostly consists of invasive, non-native plants I want to gradually replace the honeysuckle with something more eco-friendly.

In addition to fixing problems, I have an extensive “wish list”. Some items are short term goals, some are long-term. I created a draft of a garden plan that includes the most realistic items from my wish list – roughly things that might be possible in the first three years. Later I will make another version that includes some longer term plans so that when I work on the short term items they are not in conflict with any long-term items that we might be able to do in the future.

What are your goals for your property?

When you make your own garden plan, keep in mind how your garden can solve problems as well as help you meet your personal goals for the use of your property. For example items on my wish list promote my highest priority garden goals which include in no particular order:

  • Wildlife habitat
  • Harvesting herbs and maybe someday food plants for personal use
  • Healthy and beautiful outdoor space to promote mental and physical wellness
  • Horticultural experiments and learning
  • Propagate and preserve heirloom plants and native plants
  • Learn and teach sustainable practices
  • Increase skills to help clients and customers meet their goals
  • Maintain Master Gardener certification

Examples of goals that have been high on clients’ priority lists:

  • Great looking lawns
  • Reduce maintenance costs
  • Reduce water use
  • Increase visual appeal of property for sale, customers, entertaining and personal use
  • Maintain neighborhood standards
  • Noise abatement
  • Reduce energy costs
  • Pest management
  • Garden maintenance
  • Improve water quality in water features
  • Bird watching

There are probably as many reasons to garden and landscape as there are people. If you keep in mind what your own goals are, your decisions will be easier.

Create a Plan

Once I know what my goals are, I can start to work on a plan. Here are the steps I’m plan to follow.


1. Review ordinances and rules for the neighborhood.

Find out what the governing body is and read the rules before you plan. For example, the property in my plan is in unincorporated St. Louis County, that means there is no level of government between me and St. Louis County. I have read the county code to see what I’m allowed to do and what requires a permit. You might have a neighborhood association and/or a municipality to conform to like I have at my current condo. It’s tempting to to try to slide something by but I personally don’t recommend investing time and money in work you might have to undo later. We live in a “gotcha” culture and someone will be looking for reasons to pick on you. Don’t give them any ammunition!

2. Prepare a diagram of the property with the information you need included.


My first draft of garden plans for my new home

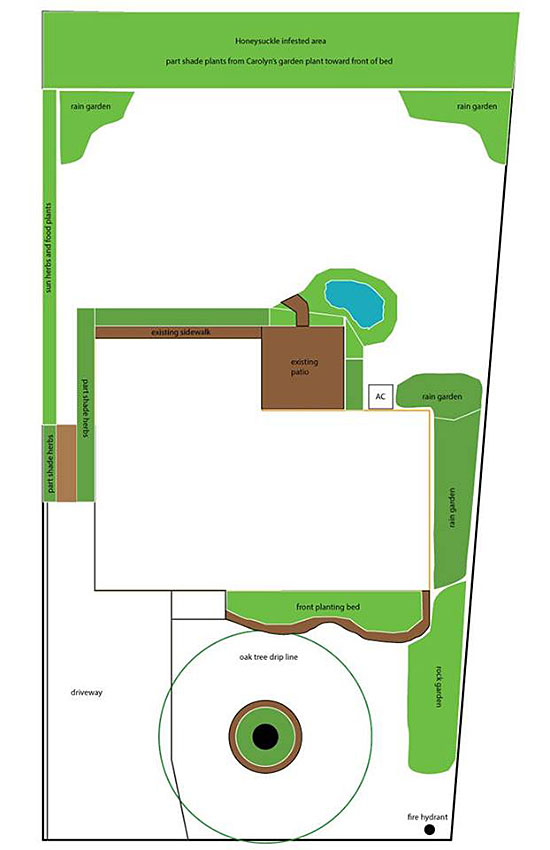
My first draft of garden plans for my future home

My first draft is missing some of these items and I need to add them. What is necessary information for you will vary by what your goals are. I recommend starting with:

  • Property boundaries
  • Power lines
  • Direction of North
  • House and outbuilding outline
  • Trees and shrubs
  • Paved and hardscaped areas – sidewalk, driveway, patio, walls, paths, etc.
  • Special features – play area, pool, dog house, chicken coop, compost pile, hot tub, fire pit, trellis, vegetable garden, fountain, patio furniture, grill, electrical outlets, etc.
  • Things that need to be accessible – utility panels, windows, doors, gates, air condtioners, pool filter, fire hydrant, etc.
  • If there is one, location of irrigation system and components.
  • Locations of outdoor faucets for hoses – for example will you need to hook three or four hoses together to reach a bed that needs a lot of water? Do you really want to do that on a regular basis? Three or four hoses hooked together are HEAVY (ask me how I know!).
  • Plantings that are going to stay as is.
  • Call 1-800-DIG-RITE and have them mark underground utilities for you. Put these on your diagram.
  • Areas of sun and shade.
  • Areas that tend to collect water.
  • Sight lines from parts of the yard and house that you use a lot.
  • Routes that machinery such as lawn mowers will take during maintenance. For example at Tom’s house the lawn mower needs a path through the planned herb garden from the garage to the front and back yards.
  • Paths that you will walk on to perform maintenance in the beds. Plan for mulch or more permanent paths so you don’t have to walk in the planting beds themselves.
  • Heavily used natural walking routes – for example, I’ve had a client whose mailman was wearing a path in the front lawn. That would be a good place to add a path with planting beds on either side so I put that in the drawing I made for the client. I don’t know if my plan got used or not, but paths help make gardens so appealing that I use any opportunity I can to suggest them!

You might consider drawing an overlay on tracing paper of what you would like to add or change, that’s a great way to visualize your plan and make sure it is workable with what is already there.

3. Get a soil test before making a big investment in time or money:

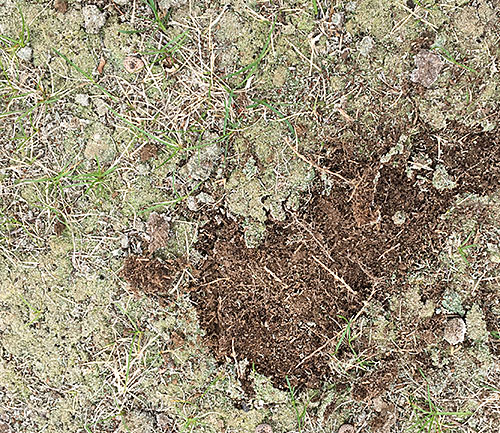
For example, a dying lawn filled with moss is a problem with our front yard and the yards of many customers right now. The moss did not kill the grass, the moss grew opportunistically after the grass died. It’s always safe to add organic fertilizer and compost – but please get a soil test and diagnose the problem before you do anything else. The soil test may give you all the answers you need or just be data that you use to lead to another diagnosis. Tim from Wittmaier Landscaping suspects that Tom’s lawn was killed by too much fertilizer. We don’t know for sure but it’s a common problem. If your grass does not need conventional fertilizer, adding it does not help and may hurt. If your lawn does not need lime, it’s useless and maybe destructive to add it. You might make a lucky guess, or you might cause a big problem that will take a lot of money and time to fix. What if your grass died from soil compaction, salt damage, a disease, a pest, too much shade or too much or too little water? It’s easy to add things like fertilzer and lime, but the actual remedy might be something else entirely.

Here is how and where to get a soil test: Test your soil now to assess your fertilizer needs

After I have made a good plan, I can start to break it down into individual projects. Stay tuned!

Categories
DIY Gardening Home Decor Upcycling Ways With Wood

Make a Wood Plant Tray

Make a Wood Plant Tray

by Carolyn Hasenfratz

Materials
*Indicates items available at Schnarr’s
*Piece of 1/2 inch thick wood cut to 4 inches by 13.5 inches (or other size of your choice)
*Wood for the sides of your planter (I used a variety of widths and thicknesses from my scrap pile plus the Schnarr’s scrap pile)
*Wood glue
*Nails
*Water putty
*Masking tape
*Paint
*3/16″ dowel rod
Ball knobs or drawer pulls with 3/16″ holes
*Disposable plastic gloves
*Dust mask for sanding

Tools
*Saw
*Pencil
*Ruler
*Hammer
*Putty knife
*Sandpaper
*Containers for water and mixing
*Paint brushes
Miter clamp
*Drill
*Small drill bit for pilot holes
*3/16″ drill bit
*Hand pruners
Old credit cards

Step 1: Cut a piece of wood that is 1/2 thick to 4 inches by 13.5 inches or to whatever size you want for the bottom piece of your plant tray. I actually used 1/4 inch thick wood in my sample because I had some lying around but you will have an easier time nailing it together if you use 1/2 inch thick wood.

Step 2: Decide where to cut the wood for the sides of the plant tray and mark the pieces with pencil. I made butt joints at the corners for this project so your wood pieces should be as long as the sides of the tray plus the thickness of the wood.

Parts for two wood plant trays

Step 3: Cut the side wood pieces to size and sand the rough edges.

Step 4: Dab on a little wood glue for extra hold as you arrange one of your butt joints in a miter clamp. We’re going to hammer a couple of nails in from the end to give more strength to the joint. Brace the clamped pieces in a vise as shown in my sample or on top of something like a large block of scrap wood. Drill a couple of pilot holes with a small drill bit. The pilot holes help the nail go in straighter and prevent the wood from splitting. Drive in a couple of nails and repeat until you have a three-sided frame assembled with one side open.

Wood pieces in a miter clamp


Miter clamp in a vise

Step 5: Now we are going to put the bottom in our tray. Squirt some wood glue on the edges of your bottom piece and slide it into the frame. You can temporarily hold it in place with masking tape as you work. Put the last side on the frame and glue and nail the last two corners.

Step 6: Reinforce the bottom by driving a few nails into each side after drilling pilot holes.

Step 7: Next we’ll fill any cracks or holes with water putty. Since I tend to use a lot of scrap wood that has holes in it for my projects, I often patch the wood with spackling paste, water putty or wood filler. Then I can cover up the patches with paint, decoupage or some other surface treatment. I’m using water putty this time because I want my tray to be leak proof. Water putty dries really hard. In my sample I applied the water putty to the bottom of the tray as well as in the inside seams and anywhere else there were holes in the wood.

Mix a little but of water putty at a time with water until it’s a workable consistency. Put on disposable gloves and smear the putty it into the cracks and crevices you want to fill. Water putty is fairly hard to sand off so before it dries do a really good job of flattening and cleaning up the patches to reduce the amount of sanding you’ll have to do later. Old credit cards are a good tool for scraping away excess putty.

Step 8: After the putty sets up, sand your piece to get rid of rough edges. Wear a dust mask while sanding so you don’t breathe in the particles.

Step 9: Place your feet where you want them on the bottom of the tray and trace around them with pencil. I like to use ball knobs and drawer pulls with 3/16″ holes as feet on a variety of wood pieces. I keep a supply on hand along with 3/16″ pieces of dowel rod to use in joining the feet to the wood. After tracing, set the feet aside and drill a 3/16″ hole where each foot will go.

Step 10: Cut pieces of dowel rod to size so that they fit into the hole in the feet and into the holes you drilled in the bottom of the tray without leaving gaps. If you have a pair of hand pruners, I’ve found they do a quick and easy job cutting the dowel rod pieces to size. Put a dab of wood glue into each hole, push the dowel rod piece into the feet and then push the feet into the drilled holes.

Attaching the feet with wood pegs

When the putty is dry enough, your tray is ready to paint and decorate. Add some extra varnish to the inside of the tray to help make it waterproof for plant pots.

Categories
DIY Gardening Home Decor

Making Holiday Centerpieces From Natural Materials

Making Holiday Centerpieces From Natural Materials

by Carolyn Hasenfratz

I enjoy walking around outside at any time of year. It takes more motivation to go outdoors in cold weather but I’m always glad at such times that I made the effort. A landscape that is mostly dry and brown may seem unappealing at first, but if you look closely at plants and their remains in winter you will see more textures, shapes and colors than you may have thought possible.

One way to enrich the way you see the winter landscape is to collect natural materials and use them to make centerpieces for your Holiday celebrations, or any occasion. I had the opportunity recently to join other volunteers at the Litzinger Road Ecology Center in making centerpieces for the annual Holiday party. We were provided with a variety of recycled and donated containers along with embellishments such as ribbon and floral accents. Our goal was to create arrangements of mostly natural materials from the prairie at Litzinger Road Ecology Center to make attractive centerpieces.


collecting natural materials from the prairie

After taking a quick look at the available floral supplies, we spread out around the property to look for plant materials that we wanted to use. We collected reeds, grasses, seed heads, dried flowers, branches, feathers, vines, berries, pods, snake-skin, pine cones, nuts, bark, evergreen branches and more. A few plants were still green. Others provided many variations on dried plant colors – red-brown, silvery grey, dark brown, straw yellow hues and more. Often when we are working in the field we are mindful of the identification of plants. This time we were free to concentrate mainly on what the plant materials look like and what would make attractive combinations. Tall or short, delicate or bold, feathery or solid, rough or smooth – how can one enhance the other?

It’s enjoyable to go into a craft store and buy materials that fit a preconceived idea of what you want to make – it’s also a fun creative challenge to see what you can make out of the limited materials on hand with little to no pre-planning. I decided to be a little irreverent with my arrangement and use some green invasive creeping euonymus (Euonymus fortunei) which is a plant that may not quite be as hated as invasive honeysuckle here at LREC but could be a close second! To keep the vine green until the time of the party, I placed the cut ends of the vines into small bottles of water in the bottom of the glass container I was using. This also helped provide structural support since we did not have any florist foam in our supply stash to help hold tall stems erect.


Making a holiday arrangement with invasive euonymus vines


I added a few small pine cones among the green to break up the color a little bit, then I made a small donut shape of grasses and placed it in the vase on its side to provide extra structural support at the top. Then I added some branches with red berries, a few pine needles and some tall thin strips of wood with plastic crystals on them. A few red berries fell into the vase and down into the greenery so I added a few more here and there to make it look like I put them there on purpose.


finished arrangements made from natural materials and a few embellishments

Finished arrangements made by other volunteers


Is there anything in your backyard that would look good in a Holiday arrangement? Explore with fresh eyes and you might find a new way to appreciate your garden in what we normally think of as the off-season. I recommend you take care to identify your finds if you have children or pets in the house who might eat things that they shouldn’t. Some common garden plants (and houseplants) are toxic. Have fun and see where your creativity takes you!

Categories
Gardening Sustainability

Tips for Removing Invasive Honeysuckle

Tips for Removing Invasive Honeysuckle

by Carolyn Hasenfratz

Honeysuckle is one of the last plants to drop leaves in the fall, and one of the first plants to get leaves in the spring. This makes it quite pretty to look at sometimes. A recent photo from Emmenegger Nature Park shows the light green leaves on honeysuckle growing in the understory of a forest in late November.

Honeysuckle at Emmanegger Nature Park

Unfortunately this characteristic also gives honeysuckle an advantage over other plants. Since many species of honeysuckle are not native and reseed readily, Honeysuckle can be a danger to native plants and plant diversity. Many organizations that are involved with environmental stewardship sponsor volunteer Honeysuckle removal days. I spent a couple of days volunteering recently to remove invasive Honeysuckle from Emmenegger Nature Park in Kirkwood and Litzinger Road Ecology Center in Ladue. If you remove invasive Honeysuckle from your own property you can help stop the spread to other areas. Birds really love to eat the berries and spread the seeds around to places where Honeysuckle is not wanted.

How to Identify Honeysuckle
If you need help with identification, it is very useful to participate in one or two group cleanups so that experts can show you what to look for. After an hour or two of practice you’ll be spotting it everywhere with little effort! Fall is an ideal time for removal because the leaves, being one of the last to persist in the forest, make identification easier.

Look for:
Opposite leaves
Red berries in the fall
Leaves can be green, yellowish, or red/brown depending on the time of year. You may even see it with different colored leaves on the same property on the same day.
Stems are hollow once it gets large enough – snip off a piece to check
Once stems get large enough the bark appears very groovy

Honeysuckle leaves in brown fall color

If you’re not sure whether your honeysuckle is a undesirable invasive type, you can get help with identification at Missouri Botanical Garden.

How to Remove Honeysuckle
If the plant is small enough, you may be able to just pull it out. Make sure to get the center root clump around the stem or it may grow back. It’s not necessary to get every little piece of root out.
If you can remove the root material from the premises after it’s pulled, do so. If that is not possible hang the plant in a tree off the ground so the roots dry out and die. If you leave the plant on the ground, it may regrow from the roots.
If the plant is too big to pull, dig it out if you can without damaging other plants or causing excessive disturbance of the soil.
If digging is not practical, saw the trunk off as close to the ground as you can. Treat the stub with a 20% solution of glyphosate herbicide. Glyphosate is the active ingredient in Roundup. You can apply it with a bottle that features a dauber attachment, such as a shoe polish bottle or a bingo marker. Or you can spray the glyphosate on the trunk stub. Clearly label bottles, store safely and observe all precautions. You can add dye to the solution to help you keep track of where you have already applied herbicide.
If you can’t remove all the branches from the property, cut them up into smaller pieces so that they lie flat on the ground. Contact with the ground will help the branches decompose faster.
Useful tools to have on hand are a small shovel, a pruning saw, hand pruners and loppers.

You can save yourself a lot of work over time by patrolling your property regularly and removing the Honeysuckle plants while they are still small enough to pull out easily. Once the bushes get to full size, they can still be removed but the job is a lot more labor intensive.

Honeysuckle next to a bottle of herbicide in a shoe polish bottle

Safety precautions
Wear eye protection, gloves, long sleeves and long pants. You need to protect yourself from scratches, pokes in the eye and chemicals.
Wear work boots or hiking boots with good ankle support – in the woods it’s easy to step in a hole or slip on an uneven surface.
Wear safety orange in case you are in or near a hunting area without realizing it.
Mark your tools with orange tape or paint, because they are easy to lose among the fall leaves on the ground.

After the Honeysuckle is gone, your woods might look a little bare. Don’t worry, there are native plants that can fill the gap and make a healthy as well as lovely contribution to the ecology of your property. Consider planting some of these species instead of Honeysuckle: Some recommended alternatives to bush honeysuckle and other exotic shrubs.

Here is some more information about Honeysuckle:
Bush Honeysuckle
Honeysuckles: For Better or For Worse – There are some species of Honeysuckle that are nice to have – read about them here.

Categories
Gardening

Strategies for Maintaining My Garden Through the Winter

Strategies for Maintaining My Garden Through the Winter

by Carolyn Hasenfratz

What do I normally do to prepare my garden for winter? I panic the night before a frost is predicted. I lay old towels on the floor to protect it from dirt and dampness and bring inside all the container plants that are not hardy. When I get time I then stick the plants where I can make some room in my condo which is for the most part not very well-lit. Some of my plants survive this kind of laissez-faire treatment for years but many of them although alive don’t look as good as they could. I think some planning is called for if I want to do better than have hit-or-miss results this year.

Strategy #1 – Saving seeds
Most of my garden plants are hardy perennials and need little or no help from me to survive the winter. However there are a few plants I grow as annuals that I replant every year from seed or just let them reseed themselves – for example Texas Sage and Flowering Tobacco.

Would you like to try saving some of your plants as seeds this year? Here are some tips on seed saving and seed starting:

Strategy #2 – Overwintering as cuttings
I love the sweet potato vines I planted in containers this year. The whole plants are too large for me to bring inside as is so I’m going to grow a couple as cuttings indoors and overwinter the rest as tubers (see Strategy #3).

Here is the method for starting cuttings that I learned in my Master Gardener class. One of my practice plants from the training program is still alive, so give it a try!

  • Prepare a tray full of sterile seed starting medium.
  • Use a sharp clean knife such as a craft knife to cut a 3-4 inch shoot from the stem tip.
  • Remove the bottom few leaves from the cut segment.
  • Dip cut end in rooting hormone.
  • Place cutting in medium and water in well, then let drain.
  • Put tray in a plastic bag or cover with plastic wrap for about a week.
  • Place cuttings in a well-lit location that is 75 to 80 degrees F if possible and keep evenly watered.
  • Gradually harden off cuttings to prepare for planting.

Strategy #3 – Overwintering as dormant bulbs
I grew Cannas and Sweet Potato vines in containers this summer and I’m going to need to bring them in for the winter. Here is how to store non-hardy bulbs.

  • Dig up bulbs, divide and clean them.
  • Let the bulbs dry in an area with good air circulation for a week or two.
  • Dust with sulfur powder to prevent rot.
  • Pack them in a box with peat moss, wood shavings or shredded paper and store in a dark, dry, cool location. Keep packing medium slightly moist and inspect monthly for rot. Make sure this location is away from stored fruits and vegetables.
  • Replant outside in the spring after the last frost.

For tender bulb plants that do not go dormant, repot in a container. Trim off any old foliage but leave the good foliage. Keep evenly moist in a well-lit warm environment.

Strategy #4 – Overwintering as a house plant
For cacti, succulents and tropical plants that are small enough to just leave in their containers and bring in, they will get the following treatment:

  • Provide as much light as possible.
  • Reduce the amount of watering.
  • Refrain from fertilizing.
  • Provide humidity tray for plants that like humidity.
  • Inspect for pests and treat if necessary.
  • Sprinkle BT on soil to reduce fungus gnats breeding in the soil.

Strategy #5 – What’s going to go in my containers during the winter?
This past year I made more use of container plantings in my outdoor garden than I ever have. They added so tremendously to my enjoyment of the garden and I got so many nice comments on them from neighbors that I’m going to try to keep at least one of my containers going all winter. Some of my containers are too fragile to ride out the freeze-thaw cycle so I will store them empty indoors, but there are one or two that I think can withstand the temperature variations as long as they have good drainage. Pretty soon I will have to decide what to put in them. I have decided to plant Pansies around the edges and Winter Scouring Rush in the center. The rush should stay green all winter. Winter Scouring Rush can become invasive but it has some good qualities – it’s an interesting “living fossil” that reproduces with spores and rhizomes. It can grow in soil or in standing water. I have some in my water garden also.

Many people wait until late winter or early spring to plant Pansies but you can plant them in fall – they may not look great all winter but planting them in the fall gives them a head start and you will get a better and earlier show in the spring. If I decide I need a third layer to add interest between my low plant and my tall plant, I think I will try putting some trimmed evergreen boughs in water containers set into the soil. If your winter planters need a little help, dried plants, artificial plants, lights and seasonal decorations can be good additions. As you’re planting your container in the fall, you can also add winter hardy bulbs for an extra surprise in the spring!

Strategy #6 – Keeping track of my perennials
Parts of my garden need a major makeover. Depending on what is going to be done, sometimes winter is an excellent time to perform some of the required tasks. Winter is also the time when many of my perennial plants are dormant and can’t be seen above the soil surface. I may risk damaging them if I make major changes in their spot. Some of my native plants like Wild Sweet William and Indian Pink I have tried for years to establish before success – I don’t want to risk losing
those plants now that I’ve finally gotten them in a place they like. They should not be trod on, accidentally dug up or smothered. I need to know where these plants are at all times so before they die back to the ground I will make drawings of my garden and put tags in the ground to mark the plants.

Strategy #7 – Protecting plants in situ
The growing season for some crops can be extended with row covers. Some plants such as strawberries, mums and roses need mulching for the winter and just about any plant will benefit from it even if it will survive without mulch. Mulch stabilizes the ground temperature, prevents frost heaving and can help keep soil from drying out too much. If you have any newly planted broadleaf evergreens such as azaleas, boxwood and hollies, place a burlap screen around them for winter wind protection. Paint the trunks of young fruit trees with diluted white latex paint to prevent winter sun scald.

Categories
Gardening

Adventures in Indoor Horticulture With Rich Reed

Adventures in Indoor Horticulture With Rich Reed

by Carolyn Hasenfratz


Name of Image

Rich Reed is a gardening friend that I met several years ago while trading plants on Freecycle. He also recently became a volunteer at Missouri Botanical Garden. I previously interviewed Rich for my blog in 2015 because I was impressed by what he was able to achieve at the apartment complex where he lives, using it as a living laboratory for indoor and outdoor growing.

At the time I’m writing this article we are past the average first frost date for our area without actually having frost yet. I’m enjoying the extra time to keep our plants outdoors this year but soon many of us will have to bow to the inevitable and bring some of them in. I wanted to interview Rich again because he grows a lot of tropical plants outdoors in the warm months that need to be moved with the seasons and he propagates a lot of plants indoors for transplanting outdoors later. I knew he’d have some useful tips for home gardeners because he does not indulge in a lot of special equipment and has learned a lot through trial and error on how to use his indoor growing space. Since our last interview, the manager of the apartment complex where Rich lives has given him the use of an empty apartment unit where he can store supplies and grow lots of plants. He packs this extra unit, which he calls the sun room, as well as his own living quarters with as many plants as possible! He also has an agreement with the apartment manager to supply plants for the grounds and the building’s indoor spaces such as stairwells and balconies. I asked Rich for some of his best tips.


Cuttings growing in the sun room

Because this apartment unit is not used as living quarters, Rich can make maximum use of the window light for growing cuttings.

Like the rest of us Rich does struggle with getting plants that normally live outside to stay alive indoors. His situation does not allow for a lot of supplemental lighting. To get more light to the plants he recommends rotating the plants outside on warm days whenever possible. He gets light from the West through his windows – both his living quarters and sun room face in that direction. He makes some use of ordinary household lighting fixtures and bulbs. He prefers fluorescent to incandescent lights because they are not as hot. When plants are not doing well in a particular spot in the room he moves them to see if the light is more favorable somewhere else.

Overwatering is the most common way for Rich to lose plants – not surprisingly he has found that plants kept indoors need a lot less water than when they are outside, and less water still when it’s colder. He does not take any precautions to remove pests from his plants or pots before bringing then indoors. Fortunately his pest problems have been minor so far.

He has had the most consistent success indoors with “viney” plants such as Pothos, Arrowhead vines, Sweet Potato, Lamium and Vinca. Not surprisingly the types of plants that are commonly sold as house plants do well in home lighting conditions.

Banana plant
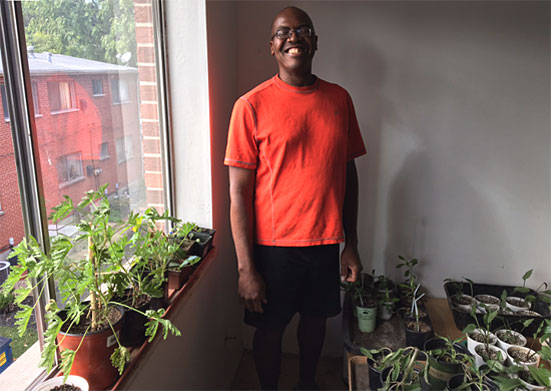
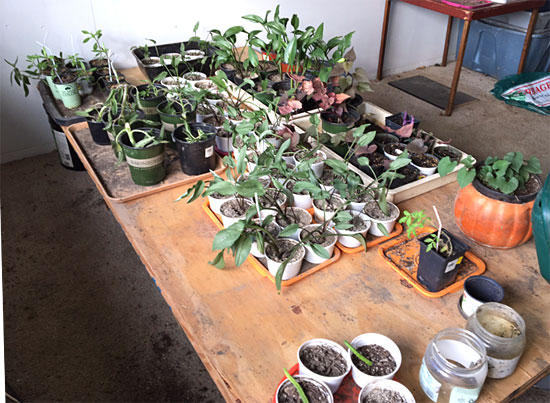
Rich is planning on bringing inside some of his really large and nice banana plants for the winter while leaving a few small ones outside as an experiment. His tropical Hibiscus and other tropical plants that are woody will also come inside as whole potted plants. He has many herbaceous tropical plants outside augmenting his perennials and annuals. For space reasons it’s not really possible to bring them all in intact, so he gets around that by making small cuttings of plants he wants to grow again next year. He grows more cuttings than he needs for the apartment property so that he has some available for gifts and trading stock. He does not use any special rooting hormone or treatments for cuttings – just water and soil.


Celosia outside and Celosia cuttings

Celosia adding color to the outdoor garden on the left. The right photo shows a cutting with root growth after two weeks in water.

Rich with rubber tree
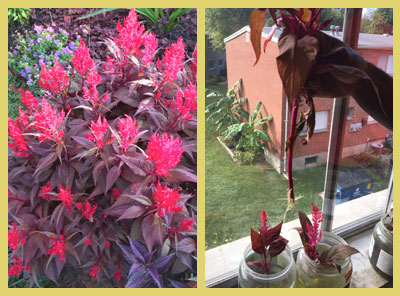
Even with an abundance of plants in his environment Rich still likes trading. Any plant he doesn’t already have he would like to add to
his collection – but realistically he has to be mindful of how much room is available. He is on the lookout for a Chinese Evergreen and some Peppermint – he has been able to find numerous other members of the mint family for trade but is missing that one.

At left: Rich with a favorite rubber tree and some other plants that live in the apartment building’s atria all year round.

Categories
Gardening Lawns

Coping With Dry Autumn Conditions

Coping With Dry Autumn Conditions

by Tim Wittmaier

Fall is normally a good time to work in the garden. The weather is cooler than normal which is easier to work in but forecasts call for warmer weather to return for awhile. We keep getting predictions for rain which so far has not come.

Warm water temperatures have made this year’s hurricane season especially bad in the South and some of those folks have suffered from too much water. Many plants in the St. Louis area are suffering from lack of moisture though some spots have been lucky with rain. The ground is generally very dry. There is more work that could be done right now if it was not so dry.

For example, lawn care. Normally this is the best time to seed a lawn. This year even irrigated lawns are struggling because the ground is so hard and compacted. The water cost of irrigating a lawn is a problem too.

If you decide to plant, thatch, aerate, feed and seed. Get the seed 1/4 inch 1/2 deep in the soil by raking. If you wait too late to seed the cold could slow down germination. The normal window is 45 days starting around September 1st but can be extended when the weather is warmer than normal.

A lot of zoysia lawns are suffering this year from excessive thatch. It’s important to to remove thatch periodically to avoid problems. Excessive thatch can kill your grass and necessitate starting over with a new planting.

Most ornamental plants in our lawns and gardens are shallow rooted. Check your irrigation system to see if it’s watering the right areas and make sure you are not wasting water with your system or hoses.

How can you tell if you are wasting water? Is anything broken or leaking? Are all your fittings tight? If you’re not sure if your irrigation system is set correctly, have a meeting with the company that installed it to check exactly what is being watered.

Make sure you are making the best of what water you do have. When is a good time to water? Morning is the best, but if you don’t have a choice try not to irrigate after 7 pm. If you have an automatic system or timers, try a 3:30 am – 5:30 am regimen – I have had success with that schedule. If you can’t water at the ideal time, don’t skip it because the plants need it. You may find that your lawn and plants need daily watering for 20 minutes per session. Depending on your conditions 40 minutes every other day works for some. Cool the water from your hose before putting on plants so you don’t scald them.

This is also a good time to prune and feed perennials. If your perennials don’t look good they will probably perk up when it gets more moist. Normally this a good time to divide perennials but this year I would hold off as long as it stays dry.

Trees and shrubs are not easy to keep alive in dry fall conditions. October is better for planting when September is very dry. Perennial flowers can be planted now. They will need daily watering for 10-14 days to get established. Container plantings are doing well now as long as they get watered.

We are probably going to lose a lot of mature trees to drought this year. A wet spring followed by drought is very hard on plants. The best preventative is selection so there may not be much you can do now. If you have a valuable tree that is important to you with unusual symptoms have an arborist take a look at it.

Categories
Gardening Home Decor

Disguise Problem Spots with Containers

Disguise Problem Spots with Containers

by Carolyn Hasenfratz

Let’s face it, our area is inherently challenging to gardeners. We have continentality which causes extreme variations in temperature and moisture, and we are in an area of the continent that is a transition zone for East, West, North and South. It’s difficult to keep all parts of our gardens looking good at the same time. With the recent dry spell we just had, many of us have spots in our gardens that look a little burned out. I have a lot of native plants which love our conditions, but even some of those look ragged and dried up in late summer.


Cacti and succulents
The cactus in the middle is my oldest one – I’ve had it since I was five years old!

When choosing containers, first keep in mind what style of garden you have. You can break design “rules” but you will have more predictable success if you try to match the style of pots to the style of home and garden you have.

A traditional planter for a traditional home
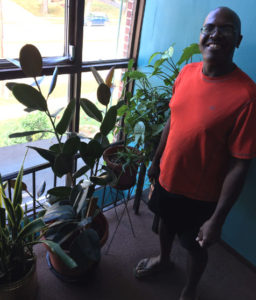
We have a client with a large Colonial Revival house and a lot of iron fencing and furniture in the backyard. When adding some container plantings we chose symmetrical numbers of faux cast iron urn style planters that harmonized with the existing architecture and garden. We filled them with traditional flowers in a limited color palette that went well with what was already planted in the yard and garden. The look we chose for that client would not be appropriate in my garden.

My own informal garden contains a lot of wildflowers and herbs mixed with ornamentals that grow in shade. Mixing and matching pots and using odd numbers of containers are design techniques that work well with an informal garden.

To prepare a place to set the pots, I gathered up an assortment of flat decorative sandstone pieces and made little stands for the pots. You can set pots right on the ground, but I think they look better raised a little bit. I used some extra thin pieces of rock as shims for any pots that did not look level.


Raising containers off the ground with decorative sandstone pieces
Starting a new container grouping in a bare spot.


Finished container group with foliage plants
Finished container group with foliage plants.

Two of the pots you see here already had plants in them. Keeping in mind the colors, shapes and sizes of the other three pots I wanted to add to the grouping, I went plant shopping for part shade annuals. I chose Sweet Potato Vine, Ornamental Pepper ‘Black Pearl’, and Hypoestes. I couldn’t resist adding a Basil plant that was on sale. In large pots a good design formula is to mix tall, shorter, and trailing plants. In the largest pot I made the Basil the tall plant. I just love the smell of Basil and I’ll harvest it just before frost and cook with it. I know it’s a little late in the season to be planting annuals but these should last into October. If we’re lucky and we get an extra long growing season, maybe I’ll get more out of them. Containers small enough to move can be brought inside to avoid frosty nights and extend the life of the plants. I love the colors of the garden with bright fall leaves nestled among the plants so to me the extra effort of adding some more colorful foliage is worth it. I chose all foliage plants instead of flowering plants because two of my containers featured a mosaic design that I did and they were already very colorful on their own.

Group of container plantsI made a design mistake in this second grouping. The Hypoestes in the tall pot does not contrast enough with the color of the ground cover that was already there. How would I fix this? One way would be to add some brightly colored trailing plants around the edge of the pot. Or if I had any faux flowers or foliage around I could stick some in. Or I could sink an empty narrow container that holds water like a test tube into the soil and put a colorful cutting in there for a temporary display that would still look natural. Or for a nighttime display I could add a tall narrow water container to the pot, fill it with acrylic or glass gems and put a battery powered water light in it and say “I meant to do that!”

As you can see, container gardening is a great addition to your existing garden. It provides a fun outlet for creativity and some instant gratification too!

Categories
Gardening

Let’s Purge the Spurge! Part 1

Let’s Purge the Spurge! Part 1

by Carolyn Hasenfratz

One of my frequent landscaping tasks in summer is weeding at clients’ properties. Many of the weeds can be hand-pulled, but on a recent occasion there was such an abundance of Prostrate Spurge (Euphorbia maculata) that it was hopeless to try to pull it in a reasonable amount of time.

After consulting with my colleague, we decided to turn over the soil in the badly infested spots with a spade and bury the spurge rather than try to hand pull it.


Controlling Prostrate Spurge

At the left is a spurge-infested patch, and on the right is how it looks after the soil is turned over with a spade. Since we are not going to plant anything here, we don’t need to take the time to break up the clay chunks – nature will do the job over time.

There are benefits to turning the soil over:

  • Weeds often are able to reach down with taproots and pull nutrients out of hard-packed soil and clay that other plants can’t reach. You can see from the photo above that there is only a thin layer of good soil here with clay underneath. By burying the weeds and letting them decompose, we are returning the nutrients to the soil rather than removing them and discarding them.
  • Prostrate Spurge likes compacted soils and by making the soil less compacted we are making it less hospitable to future Spurge.
  • The area in question is in a restaurant drive-thru so among the weeds were an abundance of cigarette butts thrown from cars. It sure takes less time to bury the butts than pick them all up!

Turning over the soil has some disadvantages too:

  • Bare soil exposed without mulch or existing vegetation is an invitation to weeds so this area needs to be mulched right away. Since the old mulch in this bed was about gone, it was due for a fresh application anyway.
  • Turning over the soil exposes possibly buried weed seeds to sunlight and may make them sprout when they otherwise would have lain dormant. Some weed seeds remain viable for up to 100 years! Quick action needs to be taken to prevent a fresh infestation.

We are planning a three inch application of mulch in this bed to suppress and slow down weeds. The mulch will also keep the soil more workable and make it easier to pull future weeds. We don’t think the mulch alone will be enough to control the weeds to the extent we’d like.

In addition to the mulch, we are going to conduct a test of two different preventative measures to see which is most effective and long-lasting. In one half of the bed, we are going to apply a pre-emergent herbicide. On the other half, we are going to put down a layer of cardboard under the mulch to smother any weeds I may have missed plus future weeds that might sprout. The cardboard blocks light getting to the weed seeds. It eventually breaks down and feeds the soil but buys you quite a bit of time – several months to year. Using the cardboard or other layers of organic matter is called “Lasagna Gardening” or “Sheet Composting” and I use it extensively with good results in my own garden. It wouldn’t be practical to try in every circumstance but our test will show whether or not it works well enough to use in some commercial situations. Stay tuned for updates on what happens!