Categories
Backyard Wildlife Gardening

Why Grow Oats?

It will most likely be gone by the time anyone reads this article, but right now my garden is covered with a couple of inches of fresh snow. I haven’t put out any purchased bird seed yet this morning, but in the meantime there are plenty of birds in my yard nibbling on the seed heads of many plants that I have left standing as sources of winter food. Some of the seeds being consumed are from native wildflowers which I grow in order to enhance the utility of our garden as a habitat for beneficial insects and birds. Other seeds are from useful plants that I grow for different purposes, one of which is Oats, Avena sativa.

Cat Grass, aka Common Oat, Wild Oat

At Schnarr’s we sell Botanical Interests brand seeds which packages Oats as “Cat Grass”. In the past I have made extensive use of Oats as a cover crop. I was able to order from Schnarr’s a large sack packaged as “Race Horse Oats”. The Oats contained within were viable seeds and grew very well for me as a cool-season cover crop. As the Oat plants matured and produced seed, I noticed their popularity with wild birds and enjoyed the extra benefit of attracting more winged visitors in my garden.

Oats are often green at times of the year when you need something besides brown in the garden (“Cat Grass…”), so they are useful to keep in mind as an option when planning the seasonal succession of plants in your garden. However, they might not be suited to every garden. In some regions they have been reported as invasive (“Cat Grass…”) and although the dried stalks are very pretty as they arch over the garden with a full head of golden seeds, animals quickly rough up the patch trying to get at them so unfortunately the plants don’t stay pretty for very long once they are ripe.

When Oat plants finish their life cycles, they dry out and produce straw. Straw potentially has many uses in the garden such as mulch, a soil amendment, or if it’s made into bales, a growing medium. The hollow straw Oats produce is also a great material for filling houses designed as nesting sites for pollinating peaceful native bees.

Pollinator houses with straw
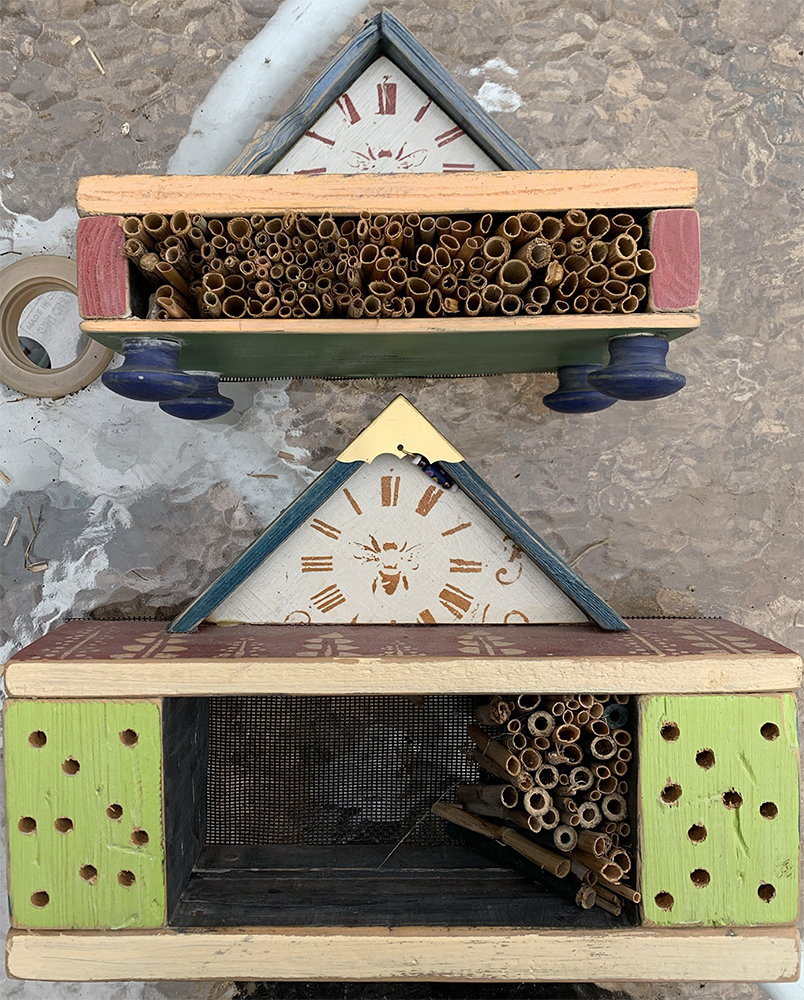
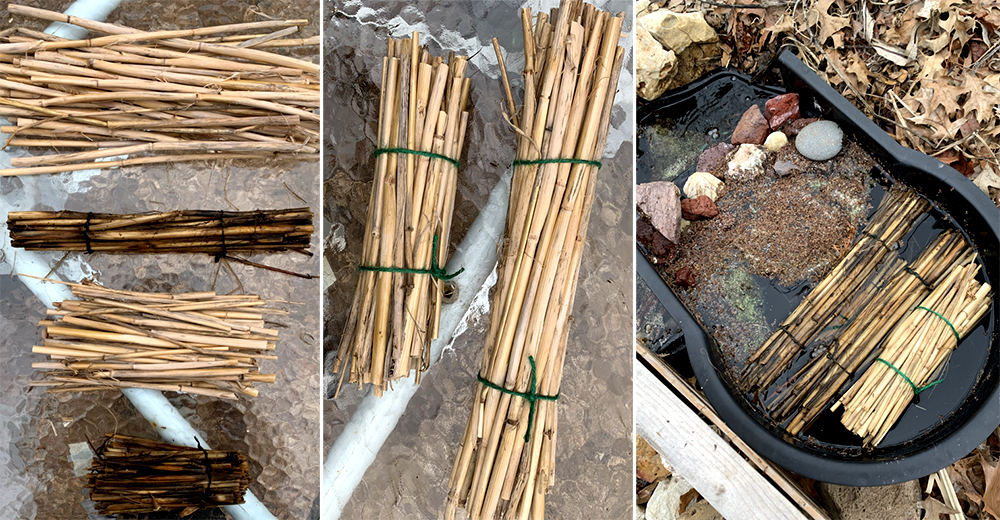
Pollinator houses with oat straw. The lower house is being filled with alternating straw and bamboo lengths to provide a variety of nest hole sizes.

Last summer my husband and I installed a small pond. We’re still working on parts of the system, especially the aesthetics, but the filters and waterfall have been functional for many months now. We’ve had a pretty mild winter overall, so on many days when it’s not freezing I’m able to run one of the filters that directs its outflow water to our small waterfall where it is further filtered with lava rock and, in season, plants as the flow trickles back down to the main section of the pond system.

In that short video above, you can see that I have bundles of floating straw in the filter. Many people are familiar with the use of Barley straw in ponds to prevent excess algae growth. I did a little research to find out if I could use Oat straw as a substitute, and although it may not be quite as effective as Barley, Oats can indeed be used as an algae treatment (Poole).

Forming straw bundles for pond filter.
Forming oat straw bundles for pond filter, sized to fit.

The straw algae treatment is more effective as a prevention than as a cure, so adding it before there is a visible algae problem is an advantage. If you have Oat straw or other straw available, try tying it in bundles to add to your pond – right now is a great time, if you’re looking for a winter task you can do for your garden. The straw looses effectiveness after a few months, so you can also use some of your winter gardening “down time” to make extra bundles for use later in the season.

Works Cited and Further Reading

Avena sativa L.” United States Department of Agriculture, 2021, plants.usda.gov/core/profile?symbol=AVSA. Accessed 28 January 2021.

“Cat Grass, Common Oat, Wild Oat.” Dave’s Garden, 2021, davesgarden.com/guides/pf/go/62227/. Accessed 28 January 2021.

Poole, Terri. “Controlling Pond Algae With Straw.” Turfgrass Matters, May 5, 1996 p. 5. archive.lib.msu.edu/tic/matnl/article/1996may5.pdf. Accessed 28 January 2021.

Rust, Kenneth. “Spring Pond Algae Invasion.” Ogden Publications, Inc., 2014, www.motherearthnews.com/homesteading-and-livestock/pond-spring-algae-invasion-zbcz1404. Accessed 28 January 2021.

Winkelmann, Carolyn Hasenfratz. “Help – My Pond is Full of Algae!” Schnarr’s Hardware Company, 2017, schnarrsblog.com/help-my-pond-is-full-of-algae/. Accessed 28 January 2021.

Categories
Backyard Wildlife DIY Gardening Sustainability Upcycling Ways With Wood

Upcoming DIY Class at Schnarr’s: Build a Pollinator House on May 17


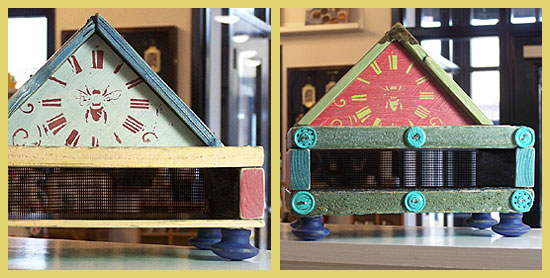
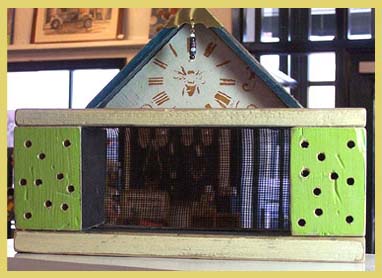
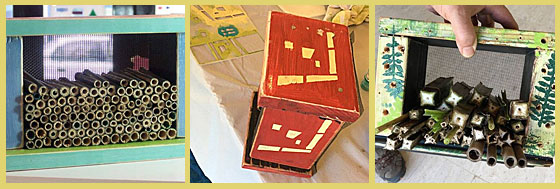
Three wood pollinator houses with stenciled decoration


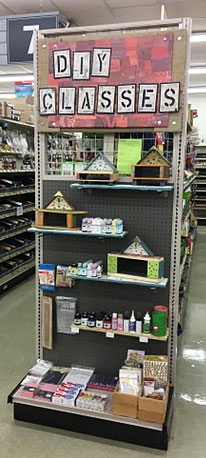
Pollinator houses on display on endcap

As part of the series of DIY Classes at Schnarr’s Hardware in Webster Groves, Carolyn Hasenfratz will be teaching you how to make, decorate and fill a Pollinator House for your garden. Such houses are sometimes called Bee Houses or Bug Houses. They provide nesting and hibernating space for beneficial insects that bring life, color, pollinating services and natural pest control for your garden. We’ll have paint and stencils available for you to play with so you can give your house a personal touch.

Space in this class is limited to four people and the cost is only $20 per person including materials. Class time is 5:30 pm on May 17, 2018. Register now at this link:
Build a Pollinator House

If you can’t make it to the class, we have instructions for making two styles of pollinator houses published on the Schnarr’s blog:
Making a Pollinator House – Part 1
Making a Pollinator House – Part 2

Stop by Schnarr’s in Webster to see some of Carolyn’s prototype pollinator houses on display. These samples are for sale in case you’d prefer to buy one rather than make your own.

Categories
Backyard Wildlife DIY Gardening Sustainability Upcycling Ways With Wood

Make a Pollinator House – Part 2

Make a Pollinator House – Part 2

by Carolyn Hasenfratz

In my previous article Making a Pollinator House – Part 1 I explained why you might want to build a home for native bees and other beneficial insects for your garden. I also provided an example of a quick way to build a shelter out of cinder blocks, wood scraps and dried plant material. I promised to write up plans for a more attractive pollinator house. Here are instructions for building two different designs to enhance your garden’s decor as well as it’s productivity and ecological health.

Tools and Supplies
* indicates items that are available at Schnarr’s
Tracing paper
Pencil
Ruler*
Hot glue gun*
Wood hot glue sticks
1″ x 6″ x 8′ multipurpose board*
2″ x 4″ x 8′ board*
Saw*
Sandpaper*
Dust mask*
Acrylic craft paint
Paint brushes*
Water container*
Heat tool for speeding up drying (optional)
Painters tape or masking tape*
Decorative stencils
Sponges*
Drill*
Tiny drill bit*
Nails*
Window screen*
Hammer*
Wood glue*
Clear matte finish varnish*
Hardware cloth or chicken wire (optional)*

For the additional second design with the pediment, you’ll also need:
Assorted sizes of distressed wood pieces
Decorative brass box corner*
Miter saw*
3/16″ drill bit*
3/16″ dowel rod*
Wooden ball knobs or drawer pulls* with 3/16″ holes to use as feet
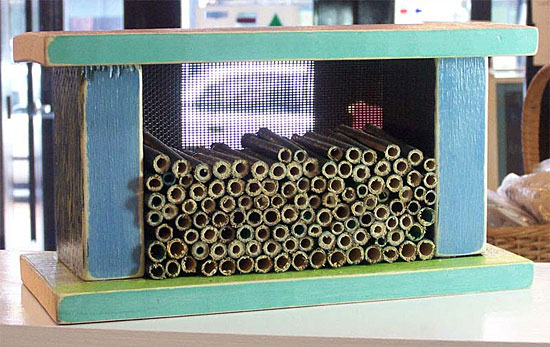
Mid-Century Modern style pollinator house

Instructions for Style #1 – “Mid-Century Modern” Pollinator House

1. Download the PDF document “Pollinator House Assembly Diagram”. It is sized to print out on a legal-sized piece of paper. Recreate the diagram in scale on a piece of tracing paper with pencil.

2. From the 1″ x 6″ x 8′ board, cut two 12″ x 5.5″ pieces(although the board is called 1″ x 6″ x 8′ it’s probably closer to 5.5″ so you might only have to cut the board into 12″ lengths).

3. From your 2″ x 4″ x 8′ (probably really 3.5″) board cut two 5″ segments.

4. Put on a dust mask and sand your wood pieces until smooth.
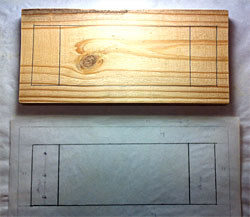
copy diagram onto wood
5. Mark each of your 12″ x 5.5″ pieces with the rectangles shown in the diagram. These will become the inner top and inner bottom of your house.
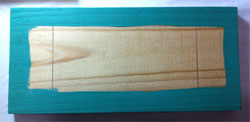

paint around edges
6. Paint a color of your choice in the border around the inner rectangle on each piece. For this step you don’t have to worry about painting precisely in the lines. Let paint dry.


7. Mark off around the middle rectangle with masking or painter’s tape on both pieces and paint black. When paint is dry, remove tape.

paint middle of boards black


8. Paint what will be the insides of your 5″ high supports black. Paint all other surfaces of your wood pieces assorted colors of your choice.
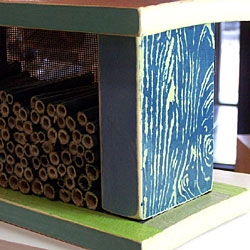
decorative stenciling
9. Decorate the top of your house and the sides of the supports with decorative stencils. I did not decorate the board edges with stenciling in my sample but you can if you want to. If you are new to stenciling on wood, see this article for tips –
Stencil a Wood Garden Sign.

10. Sand all the edges of your wood pieces so that the bare wood shows through on the corners. This gives the wood a distressed look. If you want to distress any other painted or stenciled surfaces further you can do so by roughing them up with sandpaper.

11. To assemble the house, stage the upright pieces by placing them in their footprints as indicated on the diagram on one of the 12 x 5.5″ pieces. Face the black painted sides inward and the stenciled sides facing out. If you’ve covered up your pencil lines with paint, you can use your diagram to redraw them as needed.

12. Load up your hot glue gun with wood project glue sticks and plug it in to heat up. Apply hot glue to the bottoms of the support pieces and press in place. Let glue harden.

13. Glue the other ends of the supports in place on the other 12 x 5.5″ piece. Let glue harden.

14. Place the tracing paper diagram on top of your house. Mark where the nail holes will go in pencil. Drill small pilot holes then hammer nails in. Repeat for the bottom.

15. Mix some dark brown paint with water to make a thin wash and paint over the whole house. Test first on the bottom to make sure it’s not too heavy or light. Alternately, you could use a wash of off-white paint if you’d rather have a pale wash. The purpose of the wash is to give an aged appearance to the wood – this is particularly effective when the paint clings to the corners that have been bared by sanding. Let paint dry.

16. Paint whole house with clear matte varnish.

17. Cut out a 10 x 5″ piece out of scrap window screen and nail it to the back side. This is to keep whatever materials you fill the house with from falling out the back side.

18. Fill the house from the front with materials that contain holes for pollinating insects such as native bees to live in.

Some suggestions of materials you could use to fill the house:

  • Bamboo or reed segments
  • Rocks
  • Rolled up corrugated cardboard
  • Chunks of scrap wood with holes drilled in it
  • Bundles of twigs or straw
  • Unfired ceramic clay with holes poked in it
  • Natural dried stems and reeds from the garden cut into segments
  • Dried seed pods

If necessary, cut out a piece of hardware cloth or chicken wire and nail it over the front to hold materials in.

19. Read this article for ideas on where to place the house in your garden or yard –
Making a Pollinator House – Part 1.

Depending on where you want to put your house, you may want to attach hanging hardware to it or mount it on a post. The wood pieces we used are thick enough to give you flexibility in attachment options.
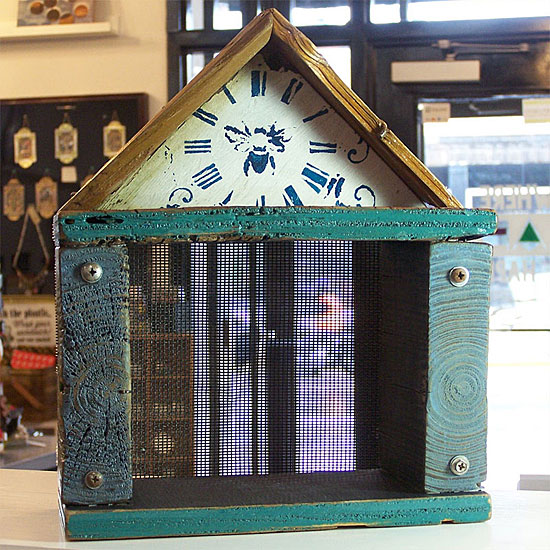
Pollinator House with Pediment

Instructions for Style #2 – Pollinator House with Pediment

The prototypes I made for the second design vary somewhat in size and proportions because I used distressed wood that I had lying around. I designed the houses around what wood I had available and embellished some with found objects or hardware. If you want to build similar houses and don’t have access to distressed wood, you can use new wood.

1. Cut out two chunky pieces of wood to use as uprights and two thin pieces to use as the top and bottom.
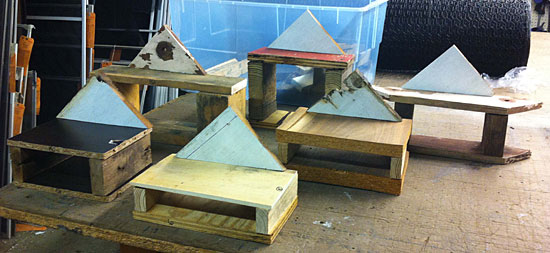
Different pollinator house designs

2. Cut a right triangle out of wood that is 3/4 to 1″ thick for the pediment piece. A pediment is like a roof gable that is decorative rather than functional. My samples vary slightly in size but the triangles are mostly around 7 1/2″ inches on the long side and 3 3/4″ on the short sides.

3. Choose some thin, narrow wood pieces for the roof overhang. Lattice wood strips are about the right size – if you don’t have any distressed wood in that size range you can purchase some lattice strips to use. Cut these strips into approximately 6″ pieces and miter the corners.

4. Sand all wood pieces.

5. Paint the sides of your wood pieces that will become the interior with black paint.

6. Paint the other sides and parts in assorted colors of your choice.

7. Stencil a bee design or other stencil of your choice on the front of the triangle.

8. If you think any of the other wood surfaces need to be enhanced with stencil designs, decorate those also. Since many of my wood pieces were distressed and had a pronounced wood grain, knots, old nails and other irregularities I let those provide the visual interest in many areas. Antique look, vintage look, grunge or botanical stencils would be especially effective for this design.

9. Sand the edges of your wood pieces to expose the bare wood on the corners and distress any other areas that you think are in need of it.

10. Hot glue the vertical support pieces to the top and bottom of your house then nail in place.

11. To assemble the pediment section, put your two roof pieces in a miter clamp with the mitered ends butted together to make the roof point. Put a little wood glue on the ends as you do this. Position the clamped-together pieces on a block of scrap wood to brace them. Drill small pilot holes in one end and hammer in small nails. Slip a couple of nails in between from the other direction.

Creating roof peak with miter clamp and nails

12. Take your triangle pediment and apply hot glue to the top edge. On your work surface, lay the pediment down, slide the triangle part in and press in place. When the glue has hardened, hammer small nails through the roof pieces into the pediment for extra hold.

Attach roof overhang to pediment

13. Apply hot glue to the bottom of the triangle section. Place in place on top of house and let the glue harden. Drill two pilot holes at each end and drive long thin nails down into the supports below.

14. If you would like to attach wood feet to the bottom of your house, drill 3/16″ holes into the bottom of the house. Cut short pieces of 3/16″ wood dowel rod and put wood glue on both ends. Insert one end of each dowel rod piece into a hole in the house and the other end into the hole in a wooden ball knob or drawer pull.

15. Mix some dark brown paint with water to make a thin wash and paint over the whole house. Test first on the bottom to make sure it’s not too heavy or light. Alternately, you could use a wash of off-white paint if you’d rather have a pale wash. The purpose of the wash is to give an aged appearance to the wood – this is particularly effective when the paint clings to the corners that have been bared by sanding. Let paint dry.

16. Paint whole house with clear matte varnish.

17. Attach a decorative brass box corner to the roof peak.

18. Cut out a piece out of scrap window screen and nail it to the back side.

19. Fill house with nesting materials and place in a suitable location.

Here are some pictures showing how some of the other houses turned out.
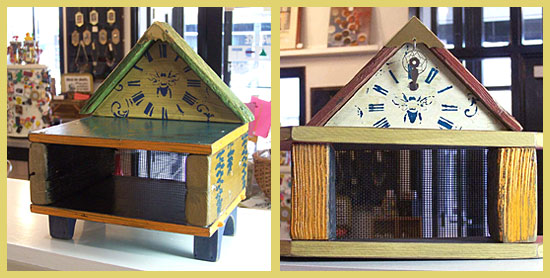
Pollinator houses made with distressed wood

Pollinator houses made with distressed wood

Pollinator house made with distressed wood

Categories
Backyard Wildlife DIY Gardening Sustainability Upcycling

Making a Pollinator House – Part 1

Making a Pollinator House – Part 1

by Carolyn Hasenfratz


It’s becoming increasingly common to see structures called “Bug Houses” or “Insect Hotels” in gardens. Some people get squeamish at the mention of bugs or insects so perhaps the most appealing way to label such a structure is “Pollinator House”. Such structures are provided as a nesting and sheltering area for beneficial insects.

Most people are familiar with the pollinating actions of honeybees, bumblebees and wasps. Social bees and wasps are beneficial to the garden in many ways, not only by pollinating but in the case of wasps eating garden pests.

It’s understandable to be nervous about the idea of having colonies of stinging insects living in your garden because some of these species are very aggressive about defending their homes. If you want more pollinators in your garden fortunately there are other bees and wasps that are easier to co-exist with peacefully. If you fear you have attracted the wrong kind of bee or wasp to your garden, I recommend getting help from an expert before deciding how or if to deal with them.

I don’t mind bees and wasps because I can identify them and know how close I can safely get to them. I also don’t have any serious allergic reactions to stings. I work in the garden alongside Honeybees, Carpenter Bees, Bumblebees, Cicada Killers, Mud Daubers, Potter Wasps and others with little apprehension. Honeybees often land on me and I just stay still until they fly away. I steer clear of Yellow Jackets because I know from experience they will sting if you inadvertently disturb their nest (happened last summer in a client’s garden). I don’t attempt to eliminate them unless they are really in the way or other people are in danger. Even though I’m in the garden a lot I only get stung once every several years or so. The consequences for me are some brief anger, localized soreness and itching for a few days. The consequences for others could be far more serious and even deadly so use your best judgement.

Many of the solitary species of bees such as Mason and Leafcutter Bees like to nest in hollow plant stalks or holes in old wood. We take away many of these potential nesting sites by cleaning dead plants and old wood out of the garden. Some amount of cleanup is necessary for human safety, aesthetics and homeowners associations but we can mitigate the effects of a too-clean garden by building a Pollinator House. As an added benefit you may get other desirable insects such as ground beetles and butterflies hibernating in the structure.


Insect Hotel at Missouri Botanical Garden
Here are some suggestions about what materials to use:

  • Stones and bricks
  • Dead leaves
  • Twigs or twig bundles
  • Corrugated cardboard rolls
  • Dried seed pods
  • Paper straws
  • Hollow reeds – preferably 6-8 inches long, closed on one end
  • Drilled pieces of wood – variety of hole diameters, 3-6″ deep

The structure should be sturdily built to avoid toppling.

Where to place the house:

  • Protected from high winds
  • Partly in sun and partly in shade to meet a variety of species preferences
  • If possible near water and mud for drinking and nest building

Dad's fence is falling down
You can have a lot of fun designing your Pollinator House by creatively using materials, limited only by your imagination. I started a simple one for my Dad’s garden, custom designed to solve two problems for him.

Problem 1 – Decorative garden fence is falling apart and sagging
Problem 2 – Lots of sticks lying around from deadfall and pruning


Propping up fence with cinder blocks
Solution
I bought 12 cinder blocks and used them to prop up the ailing fence. Then I filled some of the spaces with twigs and short segments of hollow, dead plant parts from the garden. I drilled some holes in some pieces of scrap wood. A variety of hole sizes and depths are good for different species. As we get more material we’ll keep filling in the spaces in the blocks.


Filling the blocks with nesting material
The result is practical and may not score high marks in the aesthetics department. However the fence is located in the middle of a mint patch (also a superb beneficial insect attractor) and it will be partially concealed by vegetation for much of the year. If Dad agrees I think I will add shelving to the top for containers of trailing plants which will help disguise the blocks. I will probably have to work on the bases of the cinder block towers to make them straighter since the ground here is soft and did some settling after I stacked the blocks.

Dad is pleased that his fence is at least upright again and he’s happy to do his part for invertebrate conservation. Dad’s garden was designed with wildlife in mind and already supports an abundant population of beneficial insects.

Hopefully my condo association will approve a Pollinator House in my garden. I don’t know what my chances are but I do know that my Pollinator House is going to have to be pretty to even have a prayer of getting approved. I guess I will have to make it portable so I can sell it if they say no! They have previously said yes to a bird house but a bug house might be a harder sell. Stay tuned for a more aesthetically pleasing Pollinator House plan in a future newsletter!

More information about bees, wasps and insect shelters: