Fall is normally a good time to work in the garden. The weather is cooler than normal which is easier to work in but forecasts call for warmer weather to return for awhile. We keep getting predictions for rain which so far has not come.
Warm water temperatures have made this year’s hurricane season especially bad in the South and some of those folks have suffered from too much water. Many plants in the St. Louis area are suffering from lack of moisture though some spots have been lucky with rain. The ground is generally very dry. There is more work that could be done right now if it was not so dry.
For example, lawn care. Normally this is the best time to seed a lawn. This year even irrigated lawns are struggling because the ground is so hard and compacted. The water cost of irrigating a lawn is a problem too.
If you decide to plant, thatch, aerate, feed and seed. Get the seed 1/4 inch 1/2 deep in the soil by raking. If you wait too late to seed the cold could slow down germination. The normal window is 45 days starting around September 1st but can be extended when the weather is warmer than normal.
A lot of zoysia lawns are suffering this year from excessive thatch. It’s important to to remove thatch periodically to avoid problems. Excessive thatch can kill your grass and necessitate starting over with a new planting.
Most ornamental plants in our lawns and gardens are shallow rooted. Check your irrigation system to see if it’s watering the right areas and make sure you are not wasting water with your system or hoses.
How can you tell if you are wasting water? Is anything broken or leaking? Are all your fittings tight? If you’re not sure if your irrigation system is set correctly, have a meeting with the company that installed it to check exactly what is being watered.
Make sure you are making the best of what water you do have. When is a good time to water? Morning is the best, but if you don’t have a choice try not to irrigate after 7 pm. If you have an automatic system or timers, try a 3:30 am – 5:30 am regimen – I have had success with that schedule. If you can’t water at the ideal time, don’t skip it because the plants need it. You may find that your lawn and plants need daily watering for 20 minutes per session. Depending on your conditions 40 minutes every other day works for some. Cool the water from your hose before putting on plants so you don’t scald them.
This is also a good time to prune and feed perennials. If your perennials don’t look good they will probably perk up when it gets more moist. Normally this a good time to divide perennials but this year I would hold off as long as it stays dry.
Trees and shrubs are not easy to keep alive in dry fall conditions. October is better for planting when September is very dry. Perennial flowers can be planted now. They will need daily watering for 10-14 days to get established. Container plantings are doing well now as long as they get watered.
We are probably going to lose a lot of mature trees to drought this year. A wet spring followed by drought is very hard on plants. The best preventative is selection so there may not be much you can do now. If you have a valuable tree that is important to you with unusual symptoms have an arborist take a look at it.
Starting on Friday, October 6th, Schnarr’s Hardware in Webster Groves in the Old Webster Business District will host artist and Schnarr’s employee Carolyn Hasenfratz during the Old Webster Fall Art Walk. You can see all different kinds of artwork in various businesses by taking a self-guided walking tour in the area.
On Saturday October 7 and Saturday October 14 from 12-4 pm, Carolyn will be at Schnarr’s in Webster demonstrating art projects you can do with items from a hardware store. On the 7th there will be a demonstration of Stamping and Printing with Found Objects and on the 14th Carolyn will make fall greeting cards while you watch. Carolyn’s display will be viewable when the store is open from October 6 through October 15. Stop by to see examples of things she has made from repurposed and recycled materials such as distressed wood, salvaged hardware, reclaimed ceramic tiles, scrap fabric and much more.
Create a piece of original artwork while learning how to print with found objects. You’ll also learn some basic monoprinting techniques while creating a background for your composition.
Materials and Supplies
Masa printmaking paper
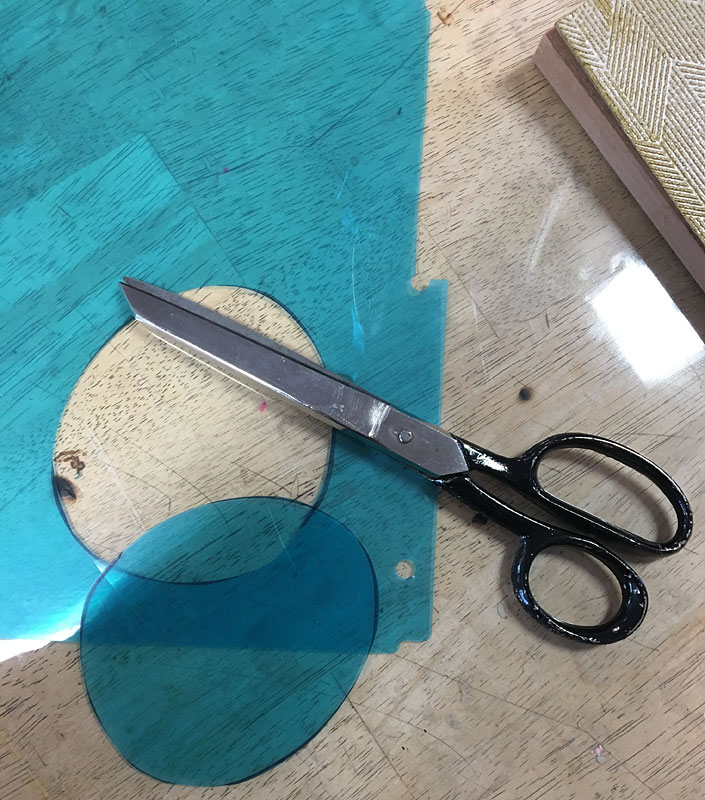
*Scrap plexiglass
*Scrap wood blocks
Scrap chipboard
Scrap mesh
Scrap textured wallpaper
*Acrylic varnish
Used mailing envelopes lined with bubble wrap
*Thumbtacks
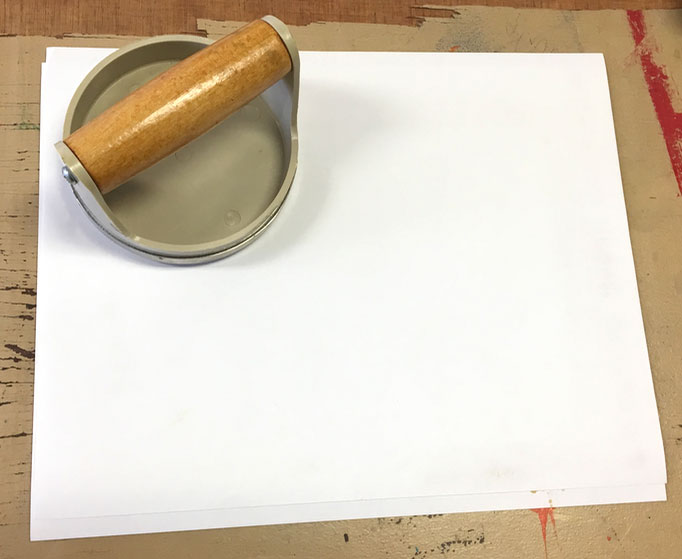
Baren (printmaking tool sold at art supply stores)
Printing registration frame (can be built from instructions online)
Small tabletop printing press (sold at art supply stores)
Brayers – hard and soft (sold at art supply stores)
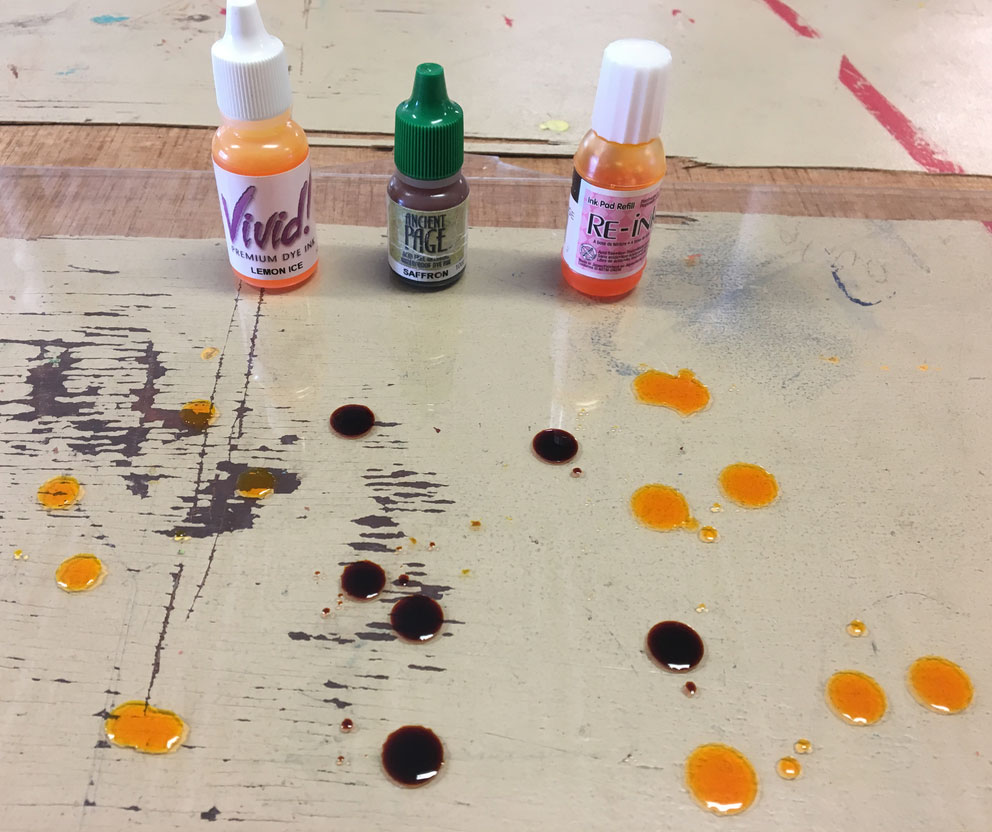
Dye-based rubber stamping ink
*Acrylic paint
Palette knife
Pie plate or other cleaned shallow food container
*Small sponge pieces
*Water container
*Ball point pens
*Rags for cleanup
*Double sided tape
*Painters tape
*Craft/X-acto knife and blades
*Cork pieces
Scrap paper
*Scissors
Recycled plastic file folders
Heat tool (optional)
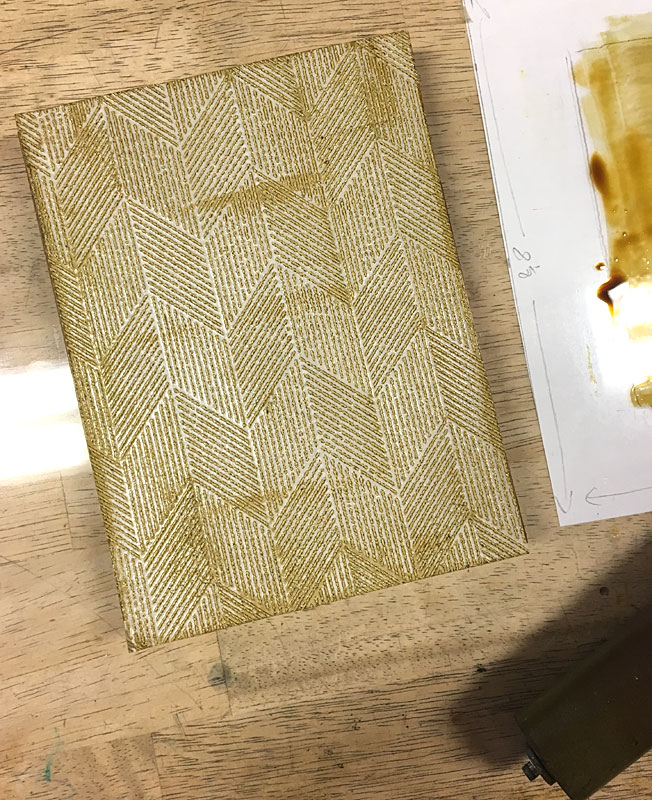
5 x 7 inch wood blocks
foam from cleaned food containers
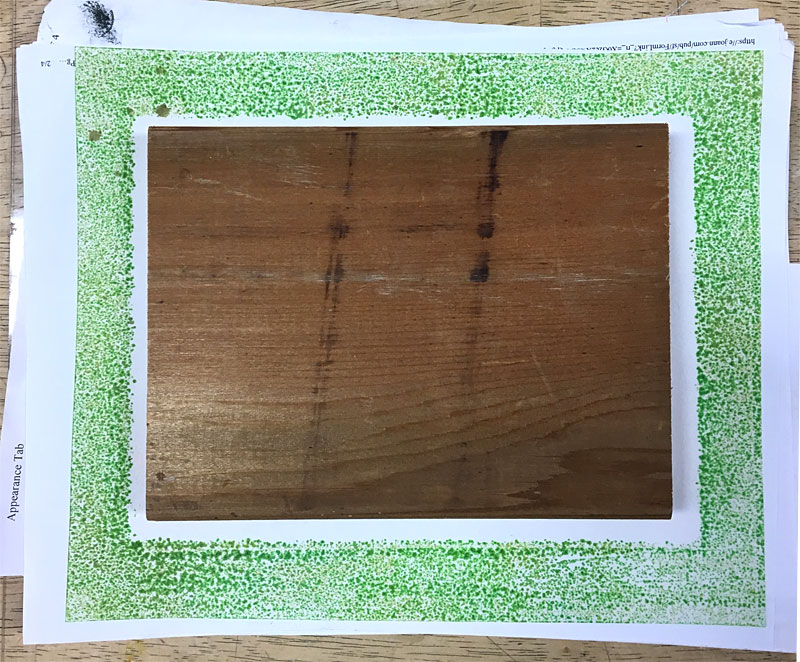
Cut out a piece of scrap paper 8 x 10 inches. In this middle of this page, draw a 5 x 7 inch rectangle. This will be a guide to use while designing and printing.
Cut out a few pieces of scrap chipboard the size of the inner rectangle in your schematic, 5 x 7 inches. Using a white glue or wood glue, glue some scrap materials to the front such as mesh placemats, mesh from food packaging or textured wallpaper scraps. After glue is dry, coat the textured surface with acrylic varnish and let dry. This is for durability and so the ink washes off after printing. Trim around the chipboard if needed.
From Masa printmaking paper or some other printmaking paper of your choice, Cut some 8 x 10 inch sheets and some 5 x 7 inch sheets.
Squirt some light-colored dye-based ink onto a piece of plexiglass. You can use one color or a blend of multiple colors. Roll out an area of color with a brayer that is at least as big as the smaller of your two pieces of paper. If you use plexiglass as a temporary palette and work surface as I did in part of my demo, you can put your schematic drawing under the plexiglass to use as a guide.
Tip: if you use waterproof dye-based ink, you can apply water based media to your design later without smearing or blending the ink.
If you color the image in some way after printing, it is called a hand-colored print. If you have interest, experiment with painting and drawing media, stamping, stenciling or collage to turn your print into a mixed media piece.
Cut out a shape of your choice from a piece of bubble-wrap lined envelope. Place this shape down on your area of color. Roll over the back of it with a brayer. Lift bubble wrap and set aside with ink still on it. Do not clean the bubble wrap yet.
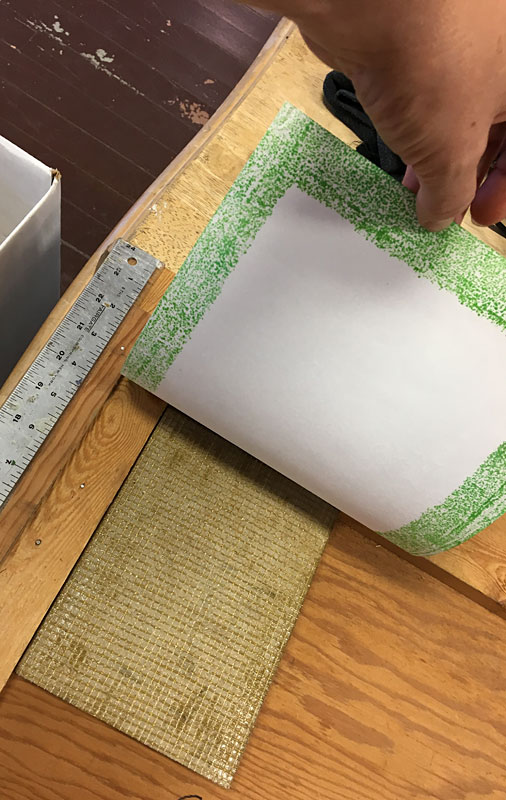
Take one of your 5 x 7 inch pieces of paper and place it face down on the inked area. The rougher side of Masa paper is considered the face but you can try both sides if you want to see which effect you like better.
Take one of the 8 x 10 inch pieces of paper and place it face down over the back of the first piece of paper. Put a piece of scrap paper over all and rub with the baren. Lift up your paper pieces. You should now have one small piece with a monoprinted background design on it and a larger piece with a white space in the middle of a monoprinted frame.
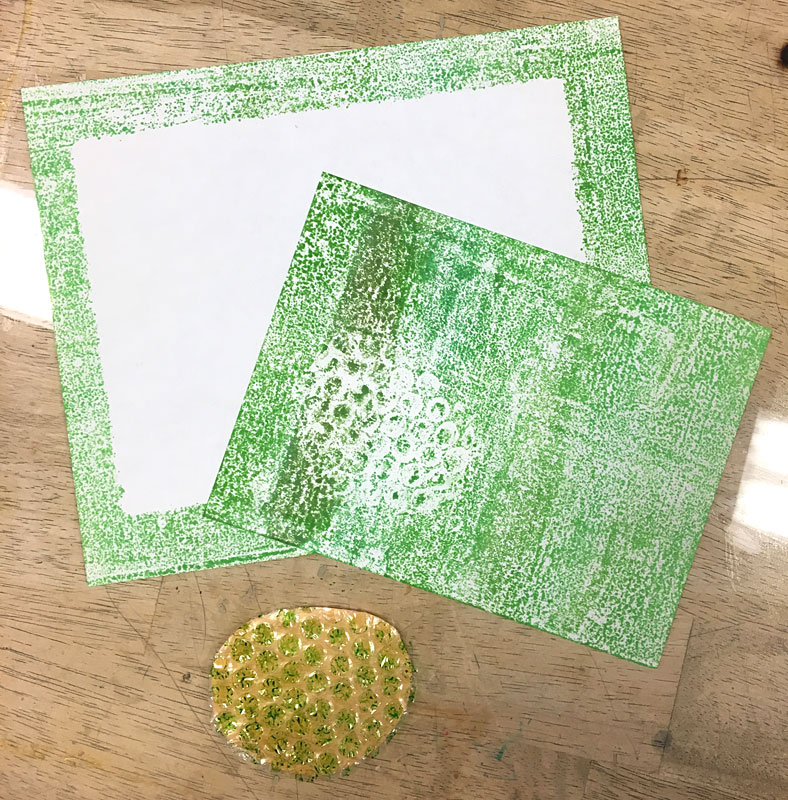
This picture shows a printmaking tool called a baren. It’s used to rub the back of the paper to help the ink transfer to the front of the paper evenly.
The texture of the bubble wrap has been transferred onto the background piece. This is just one way you can make marks in ink that’s been rolled out on a plate. You can draw into it with a rubber stylus, press rubber stamps into it and experiment with a myriad of found objects to see what kinds of marks they make in the ink. A monoprint is a one-off – you don’t have to worry about trying to duplicate it to make an edition.
Tip – you can also use pigment rubber stamping ink or block printing ink for printing. You can get finer details and markings with pigment stamping ink than with dye-based ink. Pigment ink will take longer to dry, however, perhaps several days unless you speed up the drying with a heat tool.
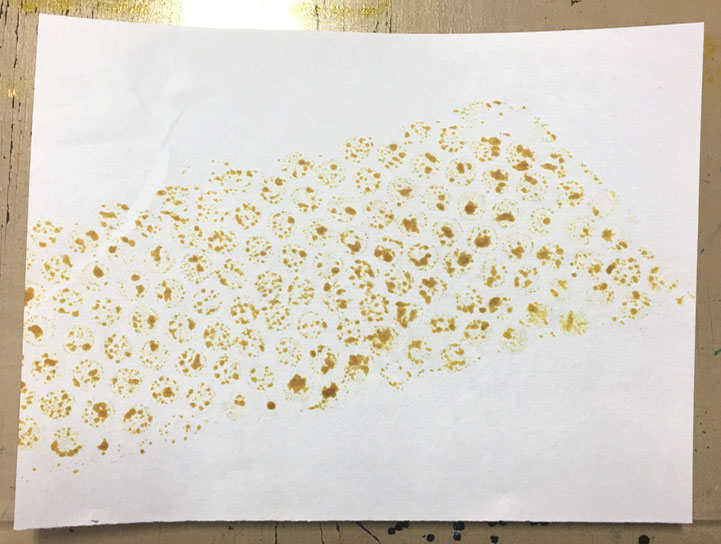
Take another blank piece of paper and place your inked up bubble wrap on it ink side down to the paper. Roll over the back of the bubble wrap piece with a brayer and lift up.
At this stage we have three pieces of paper with different areas printed. Add additional layers of colors and designs. Use increasingly darker colors for subsequent layers to add depth to your piece. To make your design more lively I recommend letting a little bit of white show through in one or more spots as you add layers.
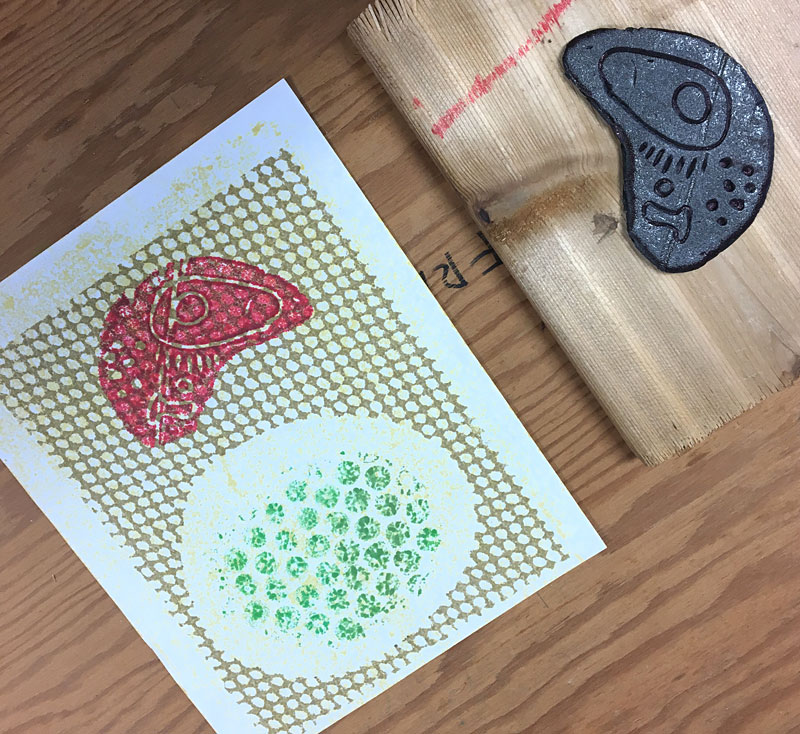
Use a brayer to roll out a slightly darker color of your choice. Choose one of the four blocks of wood with a texture plate taped to the front. Roll some color onto one of the texture plates. To lift ink up, roll fast – to lay ink down, roll slow. Roll in different directions to help get an even application of ink over the whole design.
Tip – do test prints on scrap paper to get a feel for how much ink you need before doing a “good” print.
Cut out a shape of your choice from a piece of recycled plastic folder. Use this piece of plastic as a mask if you want to leave any areas unprinted. Slip the mask between printing block and paper when it’s time to print.
How can you print with an inked design mounted on a wood block? Here are some methods to try.
A. By “stamping” with the block – put a stack of old newspaper or scrap paper on your work surface so it has a little “give” – you’ll get a better print that way. Press your block straight down on the paper and apply as much pressure as you can without moving the block. Take care to apply pressure to the edges and center of the block. Lift straight up.
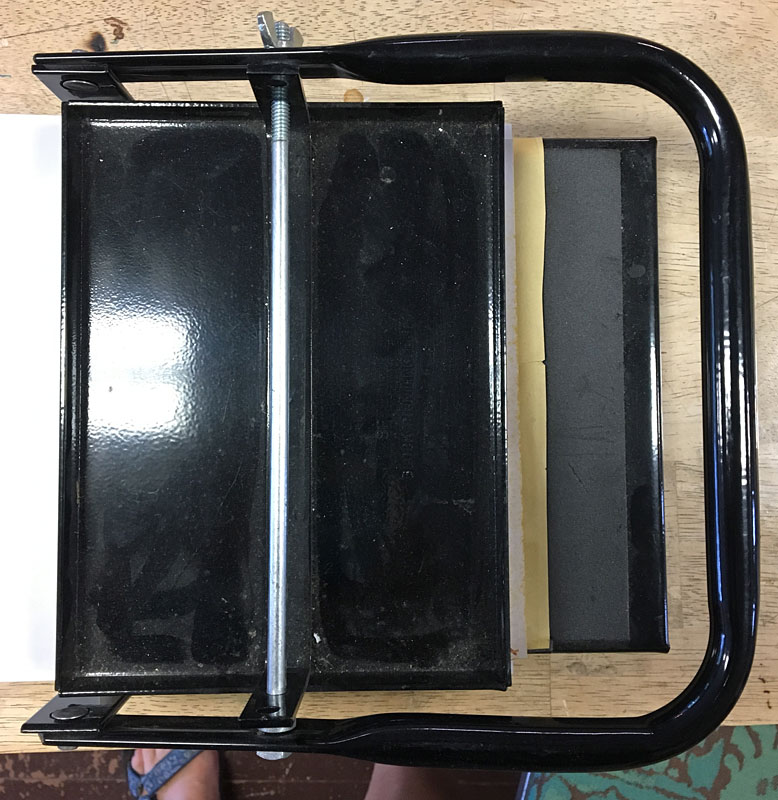
B. With a tabletop printing press – the model shown was purchased from an art supply company.
C. With a block printing frame – you can made one for yourself with wood and a big clipboard clip – the ruler built into my sample is optional. These frames are terrific for block print registration and keeping your print from moving while rubbing. Look online for plans if you want to build one. Rub the back of your print with a large spoon or a baren to transfer the ink to the paper. Take care to rub all parts and pay special attention to the middle or edges since those areas tend to get missed.
Another way of making a design from a recycled item is to take a piece of scrap foam from a cleaned food tray and cut it to a shape of your choice. Draw into the foam with a ball point pen, keeping in mind that whatever lines you draw will be a negative space that won’t print. Tape this shape to a wood block with double sided tape. Ink the shape and print with the method of your choice.
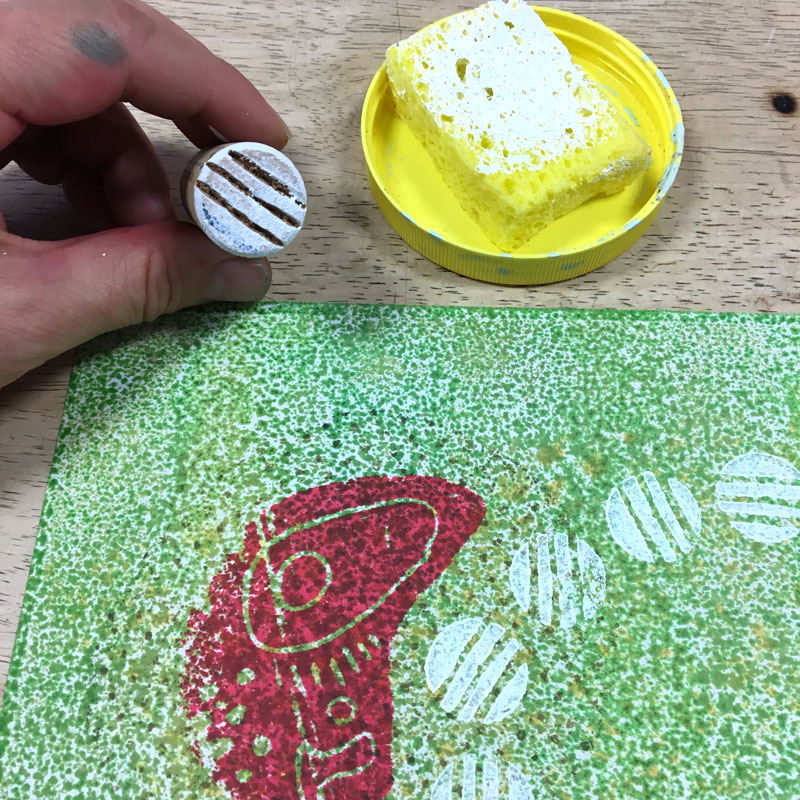
A very simple way of printing is to take a piece of cork and draw a simple design on it. Cut around it with a craft knife to make a stamp.
Stamp cutting safety tips:
Aim knife blade away from yourself while cutting
Use sharp blades to decrease chance of blade slipping
To print with a cork stamp, place a small, slightly damp sponge on a pie plate or in an old lid. Mix up a little acrylic paint of your choice and dab some on the sponge with a palette knife. Acrylic paint is usually fairly opaque unless it is diluted. Small stamps applied with opaque paint are a great way to add a finishing touch to a print made with translucent inks. Press your cork stamp into the sponge and to some test prints on scrap paper. Stamp your cork stamp on your prints.
Tip – Rubber erasers and rubber carving material are also good for making your own stamps. Read my tutorial for instructions – http://www.limegreennews.com/howcarv.html
Let’s face it, our area is inherently challenging to gardeners. We have continentality which causes extreme variations in temperature and moisture, and we are in an area of the continent that is a transition zone for East, West, North and South. It’s difficult to keep all parts of our gardens looking good at the same time. With the recent dry spell we just had, many of us have spots in our gardens that look a little burned out. I have a lot of native plants which love our conditions, but even some of those look ragged and dried up in late summer.
The cactus in the middle is my oldest one – I’ve had it since I was five years old!
When choosing containers, first keep in mind what style of garden you have. You can break design “rules” but you will have more predictable success if you try to match the style of pots to the style of home and garden you have.
We have a client with a large Colonial Revival house and a lot of iron fencing and furniture in the backyard. When adding some container plantings we chose symmetrical numbers of faux cast iron urn style planters that harmonized with the existing architecture and garden. We filled them with traditional flowers in a limited color palette that went well with what was already planted in the yard and garden. The look we chose for that client would not be appropriate in my garden.
My own informal garden contains a lot of wildflowers and herbs mixed with ornamentals that grow in shade. Mixing and matching pots and using odd numbers of containers are design techniques that work well with an informal garden.
To prepare a place to set the pots, I gathered up an assortment of flat decorative sandstone pieces and made little stands for the pots. You can set pots right on the ground, but I think they look better raised a little bit. I used some extra thin pieces of rock as shims for any pots that did not look level.
Starting a new container grouping in a bare spot.
Finished container group with foliage plants.
Two of the pots you see here already had plants in them. Keeping in mind the colors, shapes and sizes of the other three pots I wanted to add to the grouping, I went plant shopping for part shade annuals. I chose Sweet Potato Vine, Ornamental Pepper ‘Black Pearl’, and Hypoestes. I couldn’t resist adding a Basil plant that was on sale. In large pots a good design formula is to mix tall, shorter, and trailing plants. In the largest pot I made the Basil the tall plant. I just love the smell of Basil and I’ll harvest it just before frost and cook with it. I know it’s a little late in the season to be planting annuals but these should last into October. If we’re lucky and we get an extra long growing season, maybe I’ll get more out of them. Containers small enough to move can be brought inside to avoid frosty nights and extend the life of the plants. I love the colors of the garden with bright fall leaves nestled among the plants so to me the extra effort of adding some more colorful foliage is worth it. I chose all foliage plants instead of flowering plants because two of my containers featured a mosaic design that I did and they were already very colorful on their own.
I made a design mistake in this second grouping. The Hypoestes in the tall pot does not contrast enough with the color of the ground cover that was already there. How would I fix this? One way would be to add some brightly colored trailing plants around the edge of the pot. Or if I had any faux flowers or foliage around I could stick some in. Or I could sink an empty narrow container that holds water like a test tube into the soil and put a colorful cutting in there for a temporary display that would still look natural. Or for a nighttime display I could add a tall narrow water container to the pot, fill it with acrylic or glass gems and put a battery powered water light in it and say “I meant to do that!”
As you can see, container gardening is a great addition to your existing garden. It provides a fun outlet for creativity and some instant gratification too!
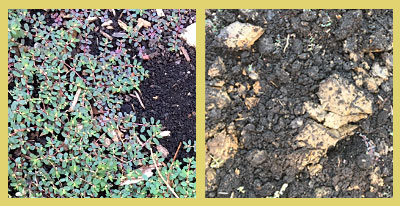
One of my frequent landscaping tasks in summer is weeding at clients’ properties. Many of the weeds can be hand-pulled, but on a recent occasion there was such an abundance of Prostrate Spurge (Euphorbia maculata) that it was hopeless to try to pull it in a reasonable amount of time.
After consulting with my colleague, we decided to turn over the soil in the badly infested spots with a spade and bury the spurge rather than try to hand pull it.
At the left is a spurge-infested patch, and on the right is how it looks after the soil is turned over with a spade. Since we are not going to plant anything here, we don’t need to take the time to break up the clay chunks – nature will do the job over time.
There are benefits to turning the soil over:
Weeds often are able to reach down with taproots and pull nutrients out of hard-packed soil and clay that other plants can’t reach. You can see from the photo above that there is only a thin layer of good soil here with clay underneath. By burying the weeds and letting them decompose, we are returning the nutrients to the soil rather than removing them and discarding them.
Prostrate Spurge likes compacted soils and by making the soil less compacted we are making it less hospitable to future Spurge.
The area in question is in a restaurant drive-thru so among the weeds were an abundance of cigarette butts thrown from cars. It sure takes less time to bury the butts than pick them all up!
Turning over the soil has some disadvantages too:
Bare soil exposed without mulch or existing vegetation is an invitation to weeds so this area needs to be mulched right away. Since the old mulch in this bed was about gone, it was due for a fresh application anyway.
Turning over the soil exposes possibly buried weed seeds to sunlight and may make them sprout when they otherwise would have lain dormant. Some weed seeds remain viable for up to 100 years! Quick action needs to be taken to prevent a fresh infestation.
We are planning a three inch application of mulch in this bed to suppress and slow down weeds. The mulch will also keep the soil more workable and make it easier to pull future weeds. We don’t think the mulch alone will be enough to control the weeds to the extent we’d like.
In addition to the mulch, we are going to conduct a test of two different preventative measures to see which is most effective and long-lasting. In one half of the bed, we are going to apply a pre-emergent herbicide. On the other half, we are going to put down a layer of cardboard under the mulch to smother any weeds I may have missed plus future weeds that might sprout. The cardboard blocks light getting to the weed seeds. It eventually breaks down and feeds the soil but buys you quite a bit of time – several months to year. Using the cardboard or other layers of organic matter is called “Lasagna Gardening” or “Sheet Composting” and I use it extensively with good results in my own garden. It wouldn’t be practical to try in every circumstance but our test will show whether or not it works well enough to use in some commercial situations. Stay tuned for updates on what happens!
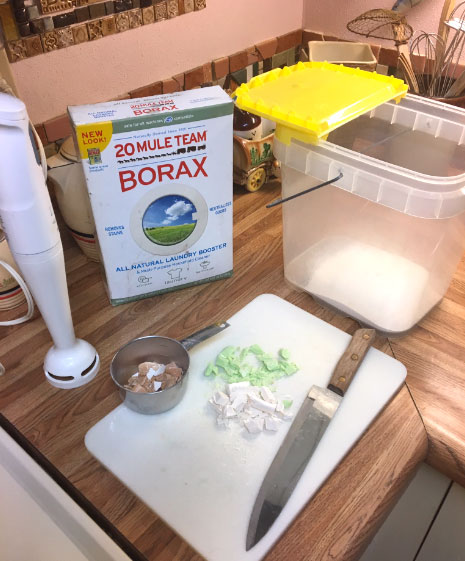
When a bar of soap gets worn down and is near the end of its usefulness, it’s considerably less appealing than when it was new. The scent has faded, it’s brittle or soggy – time to throw it out, right? Do you have some soap bars you don’t like? Do you have a collection of little motel soaps that you don’t know what to do with? You could throw these soaps out, but I prefer to save up my soap scraps and make them into laundry soap. It’s fun to do and probably uses supplies and equipment that you already have on hand or can obtain for little cost.
What You’ll Need * = available at Schnarr’s
Small bucket with lid*
Stick blender
Knife*
Cutting board*
Borax*
Soap bar scraps
Measuring cups*
Instructions
Put one cup dry Borax into the bucket.
Cut up soaps and add 2 cups soap pieces to the bucket.
Add 6 cups of water.
Blend all well with the stick blender. If you have more soap pieces and room in the bucket, add more ingredients in the same proportions until your bucket is about 2/3 full. After blending well, let the mixture sit for awhile and see if the liquid thickens. If so add more water until it’s roughly the consistency of liquid laundry detergent.
This is the time of year when small lakes, ponds and water gardens sometimes get green “pea soup” water or mats of algae floating on the surface. The limiting factors for algae growth are mainly food and sunlight. If you can reduce the amount of sunlight and nutrients getting into the water, you can reduce algae growth in your water feature.
First lets look at possible food sources for the algae.
Fertilizer:
Is runoff from your lawn or garden getting into the water? Try reducing the use of artificial fertilizers in those areas. If that is not possible, try creating a rain garden or bioswale in a place that interrupts the water before it reaches the body of water you want to protect. Plants will help take up the extra nutrients before they pollute your water feature.
Plant debris:
Are leaves or other dead plant material decaying in the water? Remove plant debris that falls in ASAP.
Animal waste:
If you have fish in your pond, do you have too many fish for the size of your water feature? Do the fish get too much food? If you overcrowd the water or overfeed your aquatic animals, you will help feed algae as well as cause health problems for the animals. Uneaten food in the water is even worse for water quality than fish waste because it has more nutrients in it. Birds are another source of waste in the water. I have a small water garden specifically intended to attract birds. They bathe in it and sometimes dunk their food in the water to moisten it. Despite that activity, my water garden contains clean-looking, clear water. If you want wild birds to make use of your water feature, that doesn’t automatically mean you have to put up with water that looks like pea soup.
Filtration Once you have addressed the sources of excess nutrients in the water, I recommend you next take a look at how the water is being filtered. Aquatic plants are great natural filters. Add more marginal and submerged plants to the water, and you will help starve out the algae. Areas around the water that support bog or marsh plants not only help filter water but they give your water feature a more natural appearance.
Artificial filters* are a great help too. I use one in my small water garden and it plays a role in keeping my water garden clean. There are lots of different kinds of filters. Follow the recommendations of the manufacturer of your filter for proper maintenance and cleaning schedules. If you have a type of filter that uses media that you rinse out, rather than replace, rinse the filter media in chlorine free water (such as old pond water that you’ve removed during water changes) so that you don’t kill the beneficial bacteria that live in the filter media. Beneficial bacteria that break down waste grow on just about every surface in the water, but are most numerous where there is porous material and the water flow is swift – conditions that exist inside a filter. These bacteria are what make most filters function. This is called biological filtration. Other types of filtration include chemical and mechanical. Many filter designs, including the sponge filter that I use, combine mechanical and biological filtration. For example the sponge picks up large particles and takes them out of circulation while the bacteria that live in the tiny holes in the sponge digest the water pollutants and turn them into less toxic substances. It’s a good idea to know which kind of filter you have and understand how it works – that will help you understand what to clean and when. For example if I squeeze out my filter’s sponge in a pail of chlorine-free water to remove the debris it’s collected and put the old sponge back in the filter, I’m doing a good thing for the water quality. If I dunked the filter parts in chlorinated water and scrubbed off the thin film that is all over the parts, I would be doing harm to my water quality because I would be removing beneficial bacteria that are helping and not in the way. This is why aquaria and bodies of water that are established and “seasoned” are much easier to keep clean. In the aquarium world, this “seasoning” is called “cycling”. If you are not familiar with cycling, learning more about how it works will help you troubleshoot your water quality.
Don’t forget – the rinse water from cleaning your filter media makes wonderful plant fertilizer!
Reduce sunlight
If you’ve done everything you can to reduce the amount of nutrients in your water, next see if there is a way you can cut down on the amount of sunlight that reaches the water. If you have a small water garden like mine that is portable when empty, you can move it from full sun to part shade and use it for growing part-shade aquatic plants. If you can’t move your water feature, what can you do?
Add shade plants around the edges:
Grow some plants around the edges of the pond that will help cast some shade on the water, if not for a whole day, just part of the day. You could use small trees, bushes, rushes, big annuals with large leaves and many others. Choose plants that can tolerate waterlogged areas or having “wet feet” or add some container plants around the margins.
Grow floating plants:
Water lilies, lotus, water lettuce, water hyacinth, duckweed and many other lovely plants either float right on the surface or emerge at the surface and help provide shade. If you are experimenting with plants that are not native, make sure they don’t get discarded in natural bodies of water. Some floating plants can cause other problems if they cover the entire surface of the water – no more than 50% of the water surface should be covered with plants. Duckweed is an example of a plant that sometimes can blanket the entire surface. This inhibits the exchange of gasses at the water’s surface and can compromise the amount of oxygen in the water. Remove the excess growth and use it as mulch or put it in the compost! That way any overgrowth will be a boon to your garden instead of a nuisance.
More suggestions
Add more oxygen:
Speaking of oxygen, if possible try to increase the amount of oxygen in the water. The addition of a bubbler, fountain or waterfall will help agitate water at the surface and bring in more oxygen. Oxygen is important for the health of the aquatic community as a whole, including the aerobic bacteria that are doing most of the work of keeping the water clean. At Schnarr’s we sell pumps* that can be used to power waterfalls and fountains.
Add minnows:
Small fish like minnows eat some of the algae and as a bonus keep mosquito larvae out of the water as well. Their small size means they produce small amounts of fish waste. Koi or goldfish are wonderful animals with many good qualities but they produce a lot of waste and need a lot of space and clean water to thrive.
UV sterilizers:
A friend of mine struggled with algae in his koi pond until he added a UV sterilizer to his recirculating waterfall. It was effective. He might have been able to avoid the expense by stocking his fish at more reasonable levels but he liked a LOT of fish and was willing to do the extra maintenance required.
Chemical filtration:
You can purchase an algaecide* to kill the algae. This will likely be a short-lived solution because the dead algae will decay and add more dead organic matter to the water which will probably cause either another outbreak of algae later, a drop in oxygen, a toxic ammonia spike or all of those conditions. Addressing the reason the algae is there in the first place is more effective in the long run but it may take some time to notice improvement. An algaecide might work well in a situation where you need a quick fix now but later conditions are not that important. I don’t recommend you use algaecide if you have fish or other aquatic animals that you care about in the water because a sudden deterioration in water quality can cause a die-off. Algaecide makes more sense in something like a small decorative water fountain or other feature that is not intended to support aquatic life.
Safe first aid for an algae-infested pond:
If practical, perform a 20% water change while vacuuming the bottom with a gravel washer device. This is very easy to do for small water gardens like mine, not possible in a large pond or lake. Use of Clear-Water Pond Clay* 24 hours before you vacuum the gravel will help small particles fall to the bottom where they can be picked up.
Clean filter medium if you have a filter or add a filter.
If practical add a bubbler or some device to agitate water surface.
If you have floating mats of “hair” algae, rake off if possible and use in compost.
Inoculate the water feature with a live culture of beneficial bacteria – this may not work if you are using a UV sterilizer or if the water is not well aerated. You can buy wet and dry bacteria cultures designed for ponds or request some used gravel from a friend who has an established freshwater aquarium or pond.
Get some terra cotta plant pots* and scrub well with plain water, no soap or bleach. Do not use if they have ever been used with chemicals that are not pond safe.
Fill plant pots with rinsed lava rock*.
Place pots in pond and stack almost to water level to use as a plant stand.
Set a planter* containing aquatic plants on top of the stack. These could be fully aquatic plants or bog plants as long as the roots can reach the water to take nutrients out of it. Use pots to adjust the water level to what the particular plant needs.
If you don’t want to bother with plants, just add permeable, pond-safe containers of lava rock and if possible place them in a spot where the current is faster. Lava rock is a terrific natural filter medium because it contains many tiny holes for beneficial bacteria to live. Give the bacteria a good home and they will do a lot of your filtration for you.
Additional water garden tips:
The guys who produced this podcast taught me most of what I know about water quality. I think I have listened to every podcast that is archived on their site, and that’s a lot! (The rest I learned from decades of aquarium keeping!) Podcast on Starting a Pond – by the Bailey Brothers
Aquatic Macro Invertebrates at Litzinger Road Ecology Center
Aquatic Macro Invertebrates are animals without a backbone that live in water and can be seen with the naked eye. I’ve had an interest in these creatures ever since I can remember. When I was young I caught a variety of water invertebrates such as water beetles, clams, crawdads and snails and attempted to maintain them in my aquariums. I was thrilled when my brother’s aquarium started to grow hydra even though they predate on tiny fish, because I’d read about them but never thought I’d see any. I currently have small colonies of freshwater shrimp in three of my aquariums. Many aquatic invertebrates are insects that live part of their life cycles in water but have an adult flying stage.
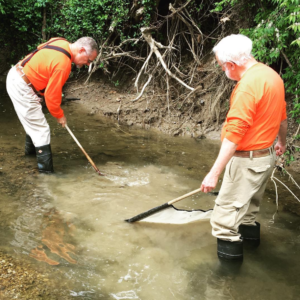
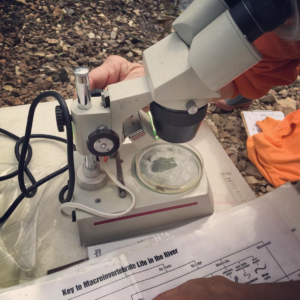
When the Litzinger Road Ecology Center offered a training workshop for volunteers on how Aquatic Macro Invertebrates are used to monitor water quality, of course I had to attend. Master Naturalist and Stream Team member Cliff Parmer taught us some Aquatic Entomology facts then we went outside to Deer Creek to learn how to take a scientific sample of water invertebrates.
Volunteer collectors chose two spots in the stream for collecting samples – one in a riffle, and one in a calm area. The stream bottom was disturbed while a seine caught the small animals that were swept downstream.
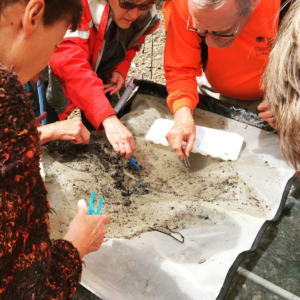
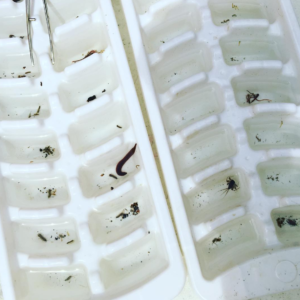
We examined the contents of the seine for small invertebrates which we placed in ice cube trays filled with stream water.
Here are some of our finds – there is a nice leech in there (yuck). One of the animals in the right tray is a Mayfly nymph – something I was happy to see because the purpose of sampling is to check water quality. Mayfly nymphs are one of the animals found only in healthier streams. Stream team sample findings are reported to the Missouri Department of Conservation so they can use the data to check stream health.
Although macro invertebrates can be seen with the naked eye, a microscope is useful to see small details to help identify each species. We were provided with identification charts to show us what to look for.
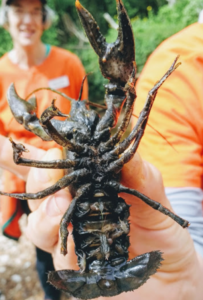
I used my childhood crawdad catching skills to hand-catch the most “Macro” invertebrate of the day – a large mother crawdad with tiny babies clinging to the underside of her tail. We released all the animals back into the water after we had a look at them.
If your garden has a water feature, at some point you may encounter aquatic invertebrates. A common example is the mosquito, very undesirable and needs to be eliminated. A strain of BT (Bacillus thuringiensis) will kill mosquitoes without harming any other life forms (except some gnats, which I don’t think anyone will be sad about – except maybe hummingbirds which eat them). Most other aquatic invertebrates are harmless or downright beneficial. For example, dragonflies live the first stages of their lives in water and are one of the best predators of mosquito larvae. When dragonflies emerge as flying adults they have a voracious appetite for adult flying mosquitoes – they also add beauty and color to the garden. Others, like caddisfly larvae or water beetles are not exactly beautiful in a conventional sense but have interesting lifestyles that are fun to observe and study.
Even if your garden does not include a water feature, there are ways that your garden can impact aquatic invertebrates. Water that runs off your garden and yard into a storm sewer is eventually released into natural bodies of water. If you can keep excess pesticides and fertilizer out of storm runoff you can help invertebrates to survive. Excess fertilizer harms invertebrates by causing algae blooms that reduce oxygen in the water and kill off more sensitive animals. Life forms higher up on the food chain such as fish and birds depend on a steady supply of invertebrates for food.
If your property is adjacent to a body of water, you can further aid the water quality by implementing a riparian corridor or creek corridor vegetative buffer. Such a corridor does many things for water quality, including temperature regulation. By cooling the water, streamside vegetation helps maintain higher oxygen levels in the water.
Backyard wildlife increases my enjoyment of the outdoors and my garden. If you feel the same way, an appreciation for small but vital water animals can be rewarding!
1. Make sure the tree you’re planting is suitable for the conditions.
Ask yourself:
Is this tree right for this zone?
How much sunlight does it need?
What is the mature size of the tree? Does it have enough room to grow?
Is the soil type suitable?
Can I provide the right amount of water?
Does the site have good drainage? If not, can this tree tolerate sitting in water?
2. Apply 2-4 inches of mulch or compost in at least a 3 foot in diameter circle around the tree. Keep mulch 4″ away from the bark and don’t make a mulch volcano – aim for a donut shape rather than a volcano shape. You can mulch all the way out to the drip line or beyond if you want to – this will reduce competition from grasses or other plants and help the tree grow faster.
3. When planting the tree, the top of the root ball should be planted 4″ above the ground, but no more. Dig the hole at least twice as wide as it is deep.
4. If the root ball is wrapped in burlap that has been treated to not decompose or is synthetic, remove the burlap. Otherwise loosen burlap from around the trunk, and spread out but do not remove. Cover burlap with soil or mulch so it does not wick moisture away.
5. Cut all ropes around the root ball, natural or synthetic.
6. When transporting a tree in the bed of a truck or trailer, cover it with a tarp so that it doesn’t get dried out. Don’t let the tree sit under a tarp in the sun for an extended time. Don’t grab the trunk to lift up the root ball.
7. If planting a tree susceptible to sun scald, protect it by wrapping the trunk with a light colored wrap or painting it white with latex paint.
8. Protect the trunks of small trees from rabbits and deer.
9. Don’t hit the trunk with weed eaters or lawn mowers. Mulch can help make sure machinery doesn’t get too close.
10. Be aware of what pests and diseases your tree is susceptible to and treat if necessary.
11. Get a soil test and feed your tree with fertilizer if necessary. Don’t use more chemical fertilizer than you need. An excess of organic fertilizer is unlikely to do any harm.
12. Don’t prune without a specific purpose in mind and follow the pruning timing and techniques best for the tree species you have. Pruning is not the same for all trees and every tree doesn’t necessarily need it. Do prune out dead wood and look for structural problems that need correcting – much easier to do when the tree is small.
I recently had a client ask me how to get more color into his shady yard. If you have a lot of shade in your garden and want a lot of color, that’s a challenge. Most flowering shade plants don’t bloom as heavily as plants for sun. Here are some ideas to help you get some color even with this limitation.
Bright colored foliage
In a shady garden, foliage that is golden in color (in reality more like lime green) or variegated with gold, cream, silver, pink or red is a great advantage. You wouldn’t want to use such bright foliage in the whole garden but an accent here and there looks fantastic. Some plants that do well in shade such as Hosta, Coleus, Lamium, Heuchera and Caladium feature many great foliage colors. There are groundcovers with beautifully colored foliage too.
Annuals for shade
Annuals tend to bloom for longer periods of time than perennials because they are trying to make as many seeds as possible to compensate for their shorter life. If constant color is a high priority try to include a lot of annuals in your design. Of course some of the plants we grow as annuals are actually perennials in warmer areas. Plant families to take a look at include Begonia, Nicotiana, Coleus, Torenia and Viola. Impatiens used to be my favorite shade annual but they are not recommended right now due to Impatiens Downey Mildew (IDM). Until a cure is found, you are likely wasting your money and possibly helping spread the disease if you buy Impatiens.
Perennials for shade
This is the category that I have the most personal experience growing. The main disadvantage to focusing on perennials is that they usually bloom only for short periods of time so much of the year you’ll just be looking at foliage. With careful planning using succession plantings and companion plants you can enjoy their brief period of color and let other plants be the focus at other times. In the perennials category you will have many more plant choices than with annuals. For maximum interest try to choose shade perennials that also have attractive or evergreen foliage.
In my part-shade conditions, the following plants with colorful flowers are very reliable – Wild Sweet William, Bee Balm, Columbine, Astilbe, Spiderwort, Vinca, Cranesbill, Golden Ragwort, Barren Strawberry and Lobelia. Of the above, I think Astilbe would be best suited to a garden that has more of a manicured look than a “wild” or informal look. I have an Astilbe that is as least 8 years old and has never spread or multiplied. Of the above choices it has the best foliage also, in my opinion.
I periodically walk the shady spots at Missouri Botanical Garden to get ideas for what to plant in my own part shade conditions. While I haven’t tried to grow these personally, from seeing them in use I think Brunnera, Caltha, Dicentra, Helleborus, Ligularia and Pulmonaria would be good plants to consider.
Spring ephemerals
Spring ephemerals are plants that die back when spring is over and the weather starts to get hot. This is also when trees really leaf out, so spring ephemerals are used to getting sun while they can and storing up their food for the next year early. You won’t get color all year with these, but since the foliage dies down for summer, they won’t be taking up space above ground while other plants are dominant. They are a good addition if your shade comes from trees – perhaps not so great if you have building shade. Examples of spring ephemerals are Mertensia, Chionodoxa, Narcissus and Scilla.
A touch of white
So far in this article I have focused on flowers that are a color and not white. Shade plants with white flowers are common so my focus here is to direct people to colors. However, I’ve found that in garden designs or any other kind of design, a touch of white here and there does add some pizazz. Don’t be afraid to try a little white to help your other colors “pop”.
The plants above are recommended for people who live in the St. Louis area, who have shade and whose highest priority is color. You may have other criteria that are just as important – Missouri native, food for wildlife, low-maintenance, deer-resistant, likes water, tolerates drought, etc. Try the MOBOT plant finder to narrow down your choices and learn about new possibilities – Plant Finder

 Create a piece of original artwork while learning how to print with found objects. You’ll also learn some basic monoprinting techniques while creating a background for your composition.
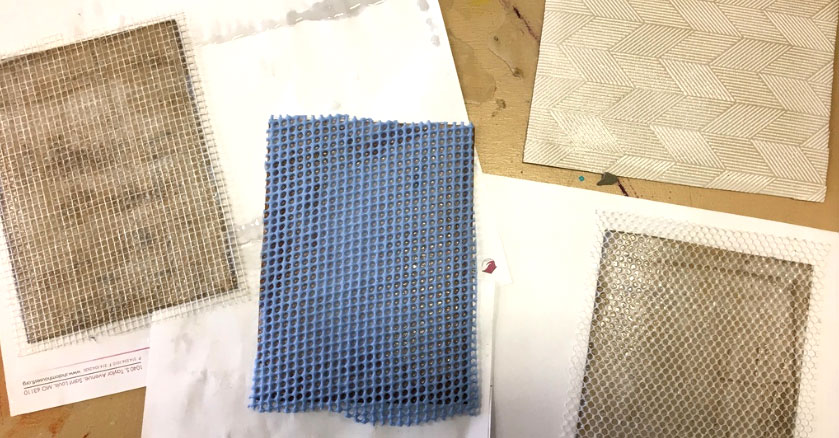


 We have a client with a large Colonial Revival house and a lot of iron fencing and furniture in the backyard. When adding some container plantings we chose symmetrical numbers of faux cast iron urn style planters that harmonized with the existing architecture and garden. We filled them with traditional flowers in a limited color palette that went well with what was already planted in the yard and garden. The look we chose for that client would not be appropriate in my garden.

 I made a design mistake in this second grouping. The Hypoestes in the tall pot does not contrast enough with the color of the ground cover that was already there. How would I fix this? One way would be to add some brightly colored trailing plants around the edge of the pot. Or if I had any faux flowers or foliage around I could stick some in. Or I could sink an empty narrow container that holds water like a test tube into the soil and put a colorful cutting in there for a temporary display that would still look natural. Or for a nighttime display I could add a tall narrow water container to the pot, fill it with acrylic or glass gems and put a