Categories
Gardening Lawns Sustainability

MSD’s Project Clear and Our Local Water Issues

MSD’s Project Clear and Our Local Water Issues

by Carolyn Hasenfratz

The Metropolitan Sewer District has been working hard on outreach to inform the public about Project Clear. In their own words, Project Clear is the “planning, design and construction of MSD’s initiative to improve water quality and alleviate many wastewater concerns in the St. Louis region.” MSD operates in both St. Louis City and County.

What are some examples of wastewater concerns in our region? Flooding, erosion, water pollution and sewer backups are some issues that affect many of our neighbors if not ourselves. MSD deals with both stormwater, which is intended to discharge directly into the natural environment, and wastewater, which needs to be treated at a wastewater treatment plant before release. MSD is undertaking large scale projects right now that are estimated to take 23 years to complete.

The budget for this work is 4.7 billion – the largest infrastructure investment so far in the history of our region. For official information about the project and about your own flood risk, see these resources:

The first sewers in the St. Louis region were built in the 1850s. The amount of development present now is of course much greater than then and there are a lot more impermeable surfaces generating runoff. The existing system cannot cope with the demands being placed on it. MSD conducted a pilot program to test the effects of green infrastructure and came to the conclusion that the conversion of 400 acres from impermeable to permeable surfaces is equal to a 2 billion dollar savings in spending on wastewater infrastructure. Greenscaping has many other benefits – more oxygen, more pleasant and healthful surroundings, crime reduction, noise abatement, habitat for wildlife, temperature regulation – the benefits go way beyond just financial.

MSD is requesting help from the public with the wastewater issues they are working on. It’s in all of our best interests to do what we can to assist because the MSD projects are going to take decades to complete. Even if our own property is properly insured against damage, we will pay for water damage all over the region one way or the other in fees and taxes. In addition, cleaning up after a water disaster is no fun. It’s stinky, messy and time-consuming.

Some water management challenges are inevitable because of the geography and geology of where we live, but we all have the power to mitigate these problems by a small amount. If we each do a little bit we can help each other save money. What can we as individuals do to prevent erosion, flooding, water pollution and sewer backups?

  • If your residential downspout is connected to your wastewater sewer line, disconnect it and direct the stormwater from the downspout elsewhere. My understanding is that this is going to be mandatory soon if it isn’t already so you might as well get started now. MSD will inspect your property on request to see if your downspout is improperly hooked up. Call (314) 768-6260 for assistance. MSD will pay the cost of disconnecting your downspout from the wastewater line. If you’ve ever thought that a rain garden or rain barrel was an intriguing idea, there has never been a better time to put one in! A rain barrel will help cut down on your water bill if you use it to water your garden, and natural rainwater sans chlorine and chloramines is better for your plants. Redirecting this water reduces the overload
    on wastewater lines and prevents sewer backups. I suspect some of the downspouts at my condo are hooked up wrong and I know my neighbor whose unit is lower in elevation than mine has had a sewer backup before – so I find what MSD is saying about this credible.
  • Utilize rainscaping improvements on your property such as making surfaces water-permeable and protecting erosion-prone areas. There are rainscaping small grants available for residents in certain areas. Rainscaping has many benefits – prevents flood damage and erosion, improves water quality and recharges underground aquifers.
  • Explore opportunities to re-use some of your gray water. This may also cut your costs because in some places you are charged for how much water goes out of your household through the sewers as well as for how much comes in – my understanding is that’s the case where I live. My water bill is included in my condo fee so I don’t see it but that’s what I’ve been told.
  • Keep fats, oils and grease out of the sewer system by disposing in the trash and not down the drain. To help you remember here is a catchphrase – COOL it, CAN it, TRASH it. Improper disposal can cause sewer backups and water
    quality problems.
  • Don’t use the sink or toilet to dispose of garbage.
  • Use compost as much as you can in your landscape – compost absorbs water and slows velocity.
  • Join a grass-roots effort to encourage the adoption of greenscaping and rainscaping practices.
  • Join a stream cleanup sponsored by the Open Space Council,
    River Des Peres Watershed Coalition, and others.
  • Join a volunteer storm drain marking project.
  • Join a Stream Team.

Additional water management resources:
Categories
Gardening Sustainability Upcycling

Do you have discarded woody plant material? Try making a Bonsai!

Do you have discarded woody plant material? Try making a Bonsai!

by Carolyn Hasenfratz

When I was in college studying art, I took printmaking and ceramics classes. Some of the finest printmaking and ceramics in the world come from Japan and our professors exposed me to many beautiful examples and concepts. I made sketches at the Japanese Garden and turned some of them into prints. Several of my friends from ceramics class and I went on a multi-year Japanese kick. We made tea bowls and sake sets and acquired a taste for the appropriate beverages. We learned the Raku firing method. We started attending the Japanese Festival at Missouri Botanical Garden every year and bought all of the Japanese-influenced objects d’art and books that we could afford on our student budgets.

We greatly admired Bonsai and made lots and lots of Bonsai planters, many of which we sold at our pottery sales. I kept several for myself to experiment with Bonsai growing. I killed four Bonsai trees in a row before giving up. A college student schedule and lifestyle just doesn’t lend itself very well to Bonsai care I guess – my cacti collection had a much better survival rate! I still like making ceramic planters that would work for Bonsai – it’s a shape I just kind of naturally go to while wheel throwing though in recent years if I didn’t sell the planters I mainly just used them for dish garden type plantings.

Bonsai are not a particular species of tree – they are plants, usually woody, that are trained to grow at diminutive sizes but in the proportions of mature plants to create the illusion of a natural scene. Woody plants can be trained by wire and selective pruning to assume the shape of a craggy, aged and venerable tree, a popular style influenced by Japan’s natural mountainous terrain. This training takes a long time – decades, perhaps even longer than a human lifetime to achieve the desired effect. Any gardener has to learn patience but Bonsai gardening is a particularly good example of how Japanese culture promotes the long view of things. In my ceramics class we learned about how to age clay for better handling. We were taught how to speed up the process. To emphasize the benefits of aging clay we were taught about how Japanese potters made clay for the next generation while making use of clay that the precious generation had made for them. That’s an impressive attitude. If I make a Bonsai I’m pleased at the thought that future generations might enjoy it but I also want to get some enjoyment out of it in my own lifetime! One way to shorten the amount of training time required is to choose plant stock that features unusually thickened or distorted trunks or branches.

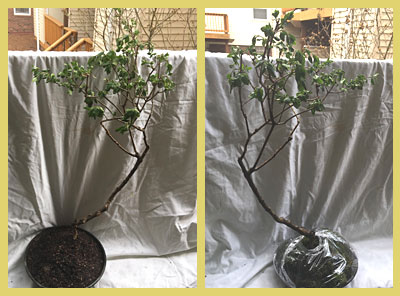
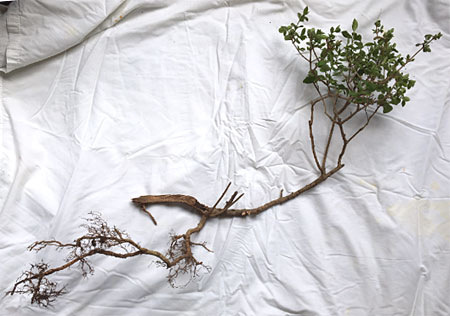
Sometimes plants that don’t look right for their intended purpose can be suitable for Bonsai. For example, this Privet bush (Ligustrum vulgare ‘Cheyenne’) was removed and replaced because it didn’t look right in the hedge where it had been growing. Back in the day I had read my Bonsai book so many times that I still remember some of the criteria for selecting good Bonsai stock.

Privet bush with bonsai potential

This plant looks bad in a hedge but in my opinion it would make a great Bonsai!

When I saw this bush I thought of three things:
  • Craggy, twisted shape – check
  • Woody plant – check
  • Small leaves – check

This plant has Bonsai potential! It was going to be discarded, so it’s not a big loss if I kill it. I’m going to try not to though!

Try making a Bonsai

My Bonsai experiment

Here are the results of my attempting to turn a twisted looking, stunted privet bush into a Bonsai. I looked through my Bonsai book to decide what style of Bonsai was best suited to my plant material. There may be as many Bonsai styles as there are varieties of Koi, with corresponding Japanese names that I don’t know. I decided that since my bush had a long, prominent root system, the rock-clasping style would be appropriate. I read several articles online about rock-clasping Bonsai, and there seemed to be as many different ways of doing it as there were articles. In the rock-clasping style, roots are trained to grow exposed over a rock and become a major focus of the planting. One recommendation that came up more than once was to pack sand or some other substrate around both root and rock and put plastic wrap around the base, then remove the plastic and the sand from around the root and rock in a year or two to give it a chance to develop the thickness that will make the tree look old.

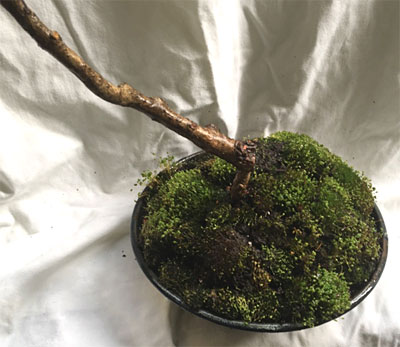
Since I also had some moss that I had collected from a site where it was being eradicated, I decided to use soil over my root and rock and overplant with moss. Both moss and Bonsai like frequent watering. Then after a couple of years I’ll remove the moss and replant it elsewhere and see how my root is doing under the soil.

I studied the shape of my bush and held it up to different rocks to see which would complement the shape of the bush. I refined the shape by pruning and held the bush roots on the rock with strips of old cut up fabric – these should rot away in time after the roots have grown enough to hold the bush in place.

Each article I read had a different recommendation for a soil mixture so I just decided to look at what I had on hand and do my best to make a well-draining and nutritious mixture. I used 1/3 potting soil, 1/3 earthworm castings, and 1/3 Flourite, a type of fired clay ground into small chips that is meant to give plants better drainage and supply them with iron. It’s usually used with aquatic plants. I don’t know if it’s common to use it for terrestrial plants but I didn’t have any sand or Turface on hand (a clay product that is great for improving soil drainage) so I decided to try it.

After I packed the soil around the rock and roots, I put the moss on top and wrapped it in plastic for a week, similar to what is done to keep new cuttings moist. If all goes well, I’ll see the rock again in a couple of years when I check to see what my roots look like!

Moss around base of Bonsai

Categories
Candles DIY Lighting Sustainability Upcycling

Make Old Wax Candles Into New Candles

Make Old Wax Candles Into New Candles

by Carolyn Hasenfratz

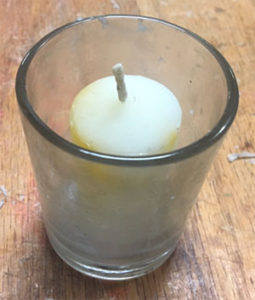
Votive candles made from scraps of old candles

Supplies
Candle scraps and stubs – such as taper candles, partially filled votive candles, old pillar candles
Gulf Wax*
Candle holders – empty glass candle holders, Mason jars*
Votive candle wicks
Roll of wicking string
Metal washers* – if using wicking string
Essential oils – optional
Candle coloring dyes – optional

Tools
Hot plate* or stove top
Shallow pan that can take heat from burner
Cutting board*
Thin non-serrated sturdy knife – best if somewhat sharp but not extremely so for safety
Assorted sizes of foil pie plates
Pot holders and oven mitts
Pyrex glass measuring cups*
Jar lifter*
Pliers*
Clothes pins*
Metal spoons
Fire extinguisher*
Metal lid that fits over your melting setup
Trivets and hot pot pads
Thermometer*

* indicates available at Schnarr’s

Before beginning, please read and heed these wax melting safety precautions:
1. Do not allow pets or young children around the wax melting area. If you choose to allow older children to participate, supervise them closely.

2. Keep a fire extinguisher and a metal lid that will fit over your melting setup nearby. In the unlikely event that a wax fire occurs, you can try to smother the fire with the lid and if that doesn’t work, use the fire extinguisher. Make sure you have read the instructions for an oil or grease fire beforehand because a wax fire is similar. You should not use water on a wax fire.

3. Do not leave the melting wax unattended. Do not allow the water pan to go dry.

4. Replace the water in the boiling pan when it gets lower. Pyrex glass measuring cups will withstand the infusion of cooler water without cracking but empty glass holders of unknown origin may not be able to take rapid temperature changes. To prevent cracking, remove non-heat resistant glass containers from the boiling pan when adding new cooler water.

5. A jar lifter is a good tool for lifting jars from the boiling pan safely, but some containers may be too small for the jar lifter tool. I’ve made do with pliers in a pinch. If you choose to pick up a glass container by the edge with pliers, be aware that thin glass containers may crack under the stress. This has not happened to me, but be ready just in case by holding the container away from you so you don’t get splashed with hot wax.

6. Observe normal cooking precautions. Keep long hair tied up and avoid loose clothing that could catch fire or things that may catch on pot handles and the like. If using an extension cord for a hot plate, tape it down and deal with any other tripping hazards you might find. Wax cools off rapidly but until it does it clings and can cause serious burns.

7. Protect your work surface from hot containers with trivets and hot pot pads.

8. Monitor the wax temperature with a thermometer and make sure the wax does not exceed 250 degrees F.

9. Wear old clothes because wax is difficult to get out of fabrics.

10. Do not leave burning candles unattended.

Ok, now that I’ve scared the heck out of you, it’s time to have some fun!

First I’ll demonstrate a couple of ways to refill votive candle holders.

A really easy way to refill a votive candle holder is to take an old taper candle or long tall candle and cut it into a section short enough to fit the candle holder. If there are any gaps between the candle and the sides of the container, melt some wax and pour it in between to fill it in. I don’t know what will happen if you attempt to mix soy wax with paraffin wax – the experiments in this article were all done with paraffin wax.

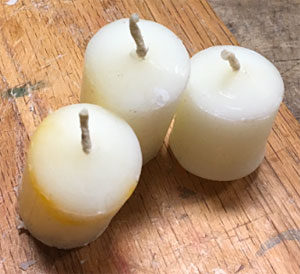
Tops of longer candles trimmed down to the height of a votive candle holder

This picture shows three tops of long tall pillar candles that have been cut down to votive candle height. After trimming these stubs, I cut up some chunks of Gulf Wax for melting. I was making these votives for a support group I belong to that has a member with allergies, so I chose unscented stubs and avoided adding fragrances or color to the melted portion.

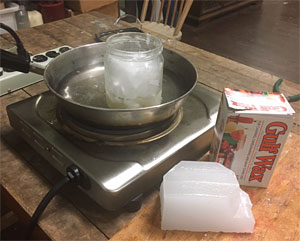
Here is one example of a double boiler setup at Perennial, a community studio where I do some of my work. Placing your melting container in water rather than directly on a burner decreases the risk of fire, produces more even heat and prevents scorching of the wax. I brought a pan of water to the simmering point with the glass jar of wax pieces in it. As you know from reading the safety precautions above, there is some risk in using a random jar and not a Pyrex measuring cup for this, but most of the time it will work if you don’t shock the glass with sudden temperature changes. I forgot to bring my Pyrex with me on this occasion so I made do with what was there.

Melting paraffin wax using the double-boiler method

When my wax was melted, I dipped the bottom end of the candle stub in wax and pressed it into the empty votive candle holder. This held the stub in place long enough to pour wax around it. To pour, I picked up the glass jar with a jar lifter tool, being careful to hold it away from me in case I dropped it or the glass broke.


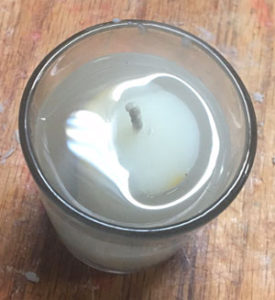
Here is a candle with some fresh new Gulf wax poured around it. I poured just up to where the wick emerges from the candle stub.


If you don’t have candle stubs available, you can refill votive candles with melted wax poured around purchased votive candle wicks, available at craft stores. Melt the wax as before and hold the wicks in place with clothespins as shown in the picture. Leave the clothespins in place until the wax is solid so that your wicks don’t migrate from the center. Your candles will burn better and more safely if the wick is centered.

I came back to Perennial later to make more candles, this time intending to experiment with fragrances and colors. I brought my Dad with me – he’s the one who had turned me on to candle burning when I was very young. We used to sit around the dinner table and watch pillar candles burn after eating. Dad used to let me put metallic crayons in them so I could watch the little mica flakes swirl around the base of the flame. Now I know that crayons are not good for candles because they clog the wick, but wow that was fun!

Dad and I brought to the workshop all the candle stubs and partially filled glass candle holders that we had lying around from our homes. Combined with a new package of Gulf Wax that I bought and the donated old candles and wax chunks available at Perennial, we had enough for hours of fun.

Dad had some tall glass candle holders he wanted to refill. To fill each candle, he tied a piece of wick to a washer to weigh it down and suspended the top of the wick over the mouth of the candle holder with a clothespin. He filled his candles with many layers of different colors in a sort of ombre effect. While he worked on that I experimented with colored chunks around taper candle pieces.

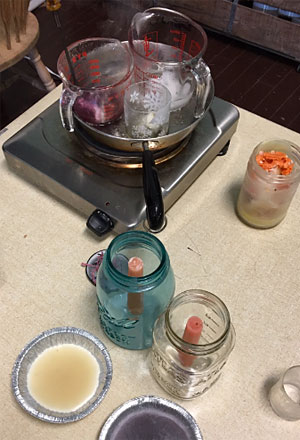
As you can see from the photo, I remembered to bring my Pyrex glass measuring cups this time. If you set the cups so that the handles are toward the outside edge of your pan, they may be cool enough to pick up with your bare hand but if they are not use a pot holder or oven mitt.

My first step was to get the wax out of a bunch of half melted container candles in glass. I set the partly filled containers in the double boiler before turning up the heat to avoid shocking the glass. When the wax was melted, I pulled out the old candle wick and metal pieces with pliers and then poured the wax into small pie plates. I kept the wax sorted by color and fragrance so that the colors and fragrances in my new candles could be coordinated and not clash too much. Perennial has a refrigerator so I put the wax into the freezer to speed up hardening so I could cut it later.

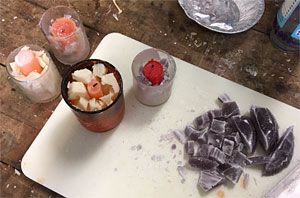
I had a few small glass container candles to fill so I repeated my technique of using sections of tapers cut down to the container height. Then I filled in around them with cut up wax chunks in preparation for filling in the spaces with a matrix of a contrasting wax color. The creamy white chunks shown had a fragrance already in them that was tobacco and vanilla. To my freshly poured wax portion I added Sweetgrass and Woodsmoke fragrances that I thought would blend well.

The purple chunks are from lavender scented candles, so to the matrix wax I added my own blend of relaxing essential oils that already includes lavender. For some of my favorite essential oil blends, see this web page of mine that contains a lot of information about my experiments with essential and fragrance oils.

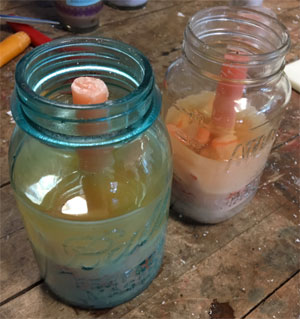
I decided to also make a couple of large candles out of old Mason jars to use as insect repelling candles outdoors. I dipped two taper candles cut to the right length in melted wax then pressed them into the bottoms of the Mason jars. I poured a little melted wax around the tapers for extra hold.

I un-molded more of my colored melted wax pieces and cut them into chunks. Then I distributed them between the two Mason jar candles around the central taper. I melted more wax and poured it to fill in between the chunks. Right before pouring, I added an insect-repelling essential oil blend to the off white wax to make these into insect repelling candles for the patio or the summer camp site. As these candles burn down, the colored chunks will create a pleasing decorative effect. I didn’t add any additional dyes to the wax for the projects shown, I just used what colors of scrap wax were on hand, but if you want to add colors use candle wax dye colors purchased from a craft store.

To clean out your containers, pour the extra wax out into one of your pie plates, then wipe out with a rag or paper towel. Discard rag or paper towel. Clean containers with alcohol if a more thorough cleaning is needed.


If you'd rather buy ready-made candles, Colonial Candles are sold at Schnarr's Hardware in Webster Groves!
If you’d rather buy ready-made candles, Colonial Candles are sold at Schnarr’s Hardware in Webster Groves!
Categories
Sustainability

Prairie Restoration at Litzinger Road Ecology Center

Prairie Restoration at Litzinger Road Ecology Center

by Carolyn Hasenfratz

I’m a volunteer at the Litzinger Road Ecology Center in Ladue. Volunteers and on some occasions the public are invited to educational events on the premises. I recently attended a session for volunteers to learn about why the prairie sections at the center are periodically burned and an introduction about how to start a fire, control the fire, and perform the burn safely.

At the time of European settlement, about 1/3 of the state of Missouri was covered by tall grass prairie. Today 70,000 acres remain and only 22,000 acres are protected, making prairie one of the most endangered ecosystems. Fire is necessary to maintain prairie. Lightning and human intervention provided the fire in historic times and in the present day.


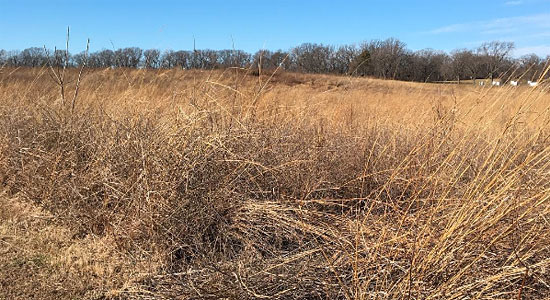
Tallgrass Prairie at Fort Bellefontaine County Park

An example of a restored tall grass prairie at Fort Bellefontaine County Park

Here are some reasons why Native Americans in Missouri used fire:

  • Fire stimulates growth of raw shoots which attract game animals to eat them
  • Aid to visibility of enemies coming
  • Weapon against enemies
  • Herding game
  • Made travel easier

In the present day fire is used for managing remnants and for restoration. The prairie at LREC is not a remnant of prairie that was never plowed or otherwise destroyed, it is a restoration approximating to the best of our ability what used to be there. A real prairie takes thousands of years to form so a restored prairie is not exactly the same but a managed restoration can perform some of the functions of this type of ecosystem.

Purposes fire management at LREC:

  • Removal of non-native invasive plants and woody seedlings that are unwanted
  • Supports birds and other animals with food and habitat
  • Encourages forbs and grasses
  • Increases plant diversity
  • Protects against unplanned burns by removing excess fuel
  • Removes thatch and helps animals that can’t make use of the thatched areas

I’m sure many readers remember the Yellowstone Fire of 1988. That is an example of a situation that was more serious than it might have been if the land had not been managed to suppress all fire and to let fuel build up for many decades. My first visit to Yellowstone was during the 1988 fire so I remember it well!

At LREC we only burn certain sections of the prairie at one time, so animals can escape and take shelter in the unburned portions. Also we want to leave some habitat for insects, reptiles and amphibians. We try to keep from cutting down or burning stems until spring because many insects overwinter in the stems and they need a chance to escape.


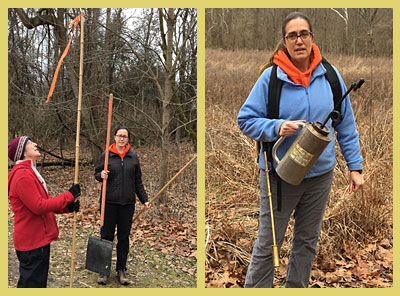
Tools for starting and managing fires

We were shown tools and techniques that are used to start and manage controlled prairie fires

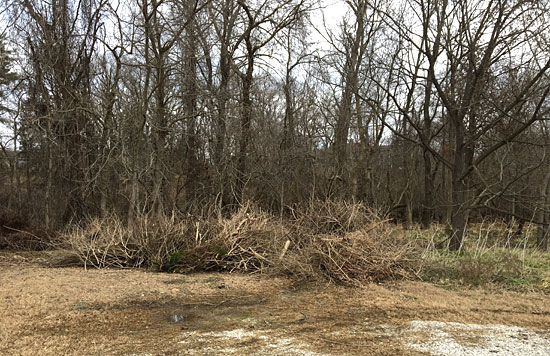
This year we are going to attempt to burn the “Mulch Pile Woods”. Woods are harder to burn because there is less fuel. The large piles of brush will be removed before the burn because too much fuel could set trees on fire and we only want to burn the undergrowth. Large logs and vines may also be removed before the burn. Some wood may be returned after the burn so it can continue to serve it’s natural purpose in the forest.


Mulch Pile Woods

The brush in the foreground will be removed before the burn because that is too much fuel for the type of fire desired

Settled areas are difficult to burn in. Mowing can be used for management in areas where burning is not possible. Mowed grassy areas are used around the prairie patches as a firebreak.

LREC submits burn plans to the Ladue Fire Department and the St. Louis County Health Department to make sure air quality is good enough and that the Ladue Fire Department is available for backup. We have to let them know what sections we want to burn and what the reasons are for burning. Three prairie sections are on two-year rotations.

The best conditions for burning consist of low wind speeds, humidity levels of 20-50%, air temperature of 35-65 degrees F and good air quality. LREC obtains a permit for a range of dates so they can seize a favorable opportunity when it happens. Volunteers are given 24 hours notice. This year a permit was applied for between December and May. The Ladue Fire Department comes as a backup but so far they have not needed to do anything to help out. If the Fire Department is too busy to come that day the burn will have to be postponed until they are available.

Click this link to see photos and video of previous year’s burns:

Many volunteers at LREC are eager to witness a burn or to participate in one because it’s unusual and exciting. I don’t know if I’ll be available the day it happens this year, but if I participate I’ll be sure to write about how it went.

If you would like to learn about fire safety or how to conduct a controlled burn on your own property, these resources from the Missouri Department of Conservation will help you get started:

Here are a couple of my other articles about activities at the Litzinger Road Ecology Center:

Categories
DIY Home Decor Sustainability Upcycling Ways With Wood

Stencil a Sofa Shelf Made From Distressed Wood

Stencil a Sofa Shelf Made From Distressed Wood

by Carolyn Hasenfratz

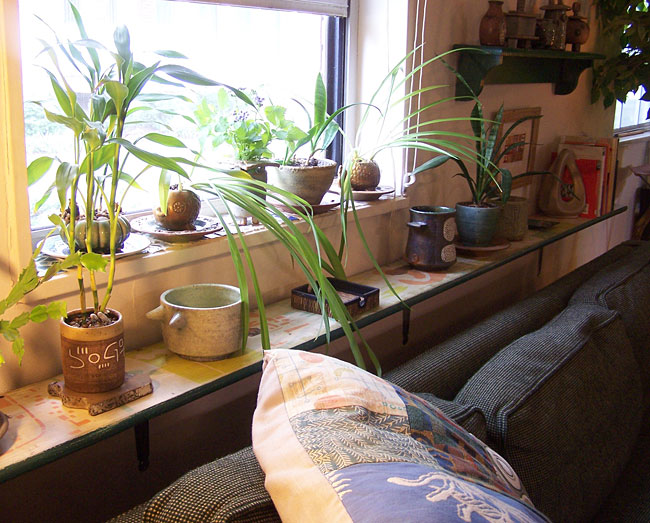
Sofa shelf made from distressed wood

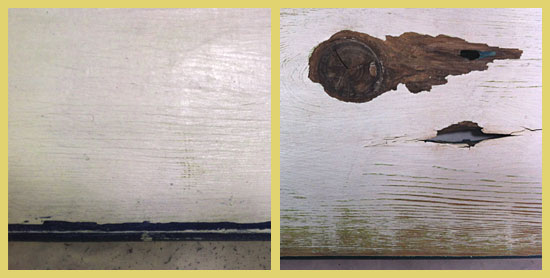
This project was made from the same stash of distressed wood that I used for the previous project Stencil a Wood Garden Sign. I kept aside a couple of intact large planks so I could make some interesting shelving. The wood was bare on one side and had partially peeling white paint over green on the other side. I decided to use the white side as a ground for some stencils I cut that were inspired by a mid-century modern building I saw on vacation last summer.

Tools and Supplies
* indicates items that are available at Schnarr’s
Distressed wood plank the length of your sofa
Sandpaper*
Dust mask*
Drop cloth for work surface*
Water based paint* for large areas
Acrylic craft paints for stenciling
Decorative stencils
Water based clear satin wood varnish*
Rags*
Paintbrush*
Assorted size old food containers for mixing paint and varnish
Sponges*
Old food container lids to use as palette while stenciling
Masking tape or painters tape*
Shelf brackets*
Screws*

Instructions

1. Put on a dust mask and sand your wood plank to remove rough edges and peeling paint. It’s always a good idea to wear a dust mask to keep from breathing small particles but I think it is even more important when working with old salvaged wood. You don’t know what that wood was treated with, what is in the old paint and it could be moldy as well. After sanding, wipe off the dust with a damp rag.

2. My wood plank already had a satisfactory ground color, white, on what would become the top surface. If your plank does not already have a ground color that you like, you can apply one. House or wall paint is a good choice. One technique that is really effective with the distressed look is to paint a contrasting color under the ground color. Some random sanding here and there later to expose the different layers of paint will simulate the effect of an old piece of wood that has been painted multiple times.

3. Apply a contrasting color to the sides and bottom of the board. As you can see, when you paint surfaces where two colors come together at a corner, it’s easy to slop a little paint over where you don’t want it. One reason that I love the distressed look so much is that when you sand off paint to conceal your mistakes, it looks like part of the design. If you are trying to paint precise corners or lines they don’t look good unless they are perfect, but with a distressed effect you can be a little sloppy!

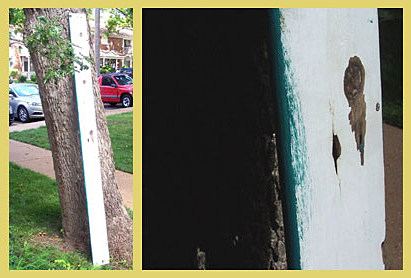
My distressed board with closeup of paint job

4. Next put your dust mask on again and sand the corners and edges of your board to expose the wood in those places. Then check to see if any paint is beyond the corner where it is supposed to be, such my example below on the left.

Sanding in process

Sand away any paint that is in the wrong place, such as the excess paint that I removed from the top of the board. As I sanded the excess paint off, I exposed some of the wood grain on the front of the board and some of the green paint that is under the white paint. If you are using a really beat up piece of wood like I did in my sample, you can make some artistic decisions about sanding other areas. If there was a rough spot that I found pleasing, such as wood grain, I sanded such spots to enhance the texture. If there were spots that were not pleasing, such as dirty spots or flaking paint, I sanded to remove those unwanted areas of paint.

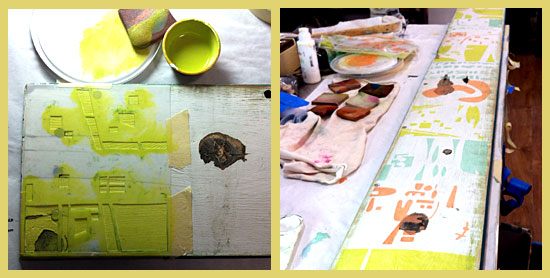
5. Decide what design you want to stencil on the top side of your shelf. I designed stencils specifically for this project but I have and will use them in lots of other projects as well. If you would like detailed information on how to cut your own stencils, see my article Fun With Stencils.

6. Apply craft paint through your chosen stencils in the colors of your choice. If you are new to stenciling on wood, please see my article Stencil a Wood Garden Sign for detailed instructions.

Stenciling in process

7. When stenciled paint is dry, to further enhance the distressed look mix up a paint/varnish/water mixture. Here is how – in a small container, mix some paint until you get a shade of dark brown that you like. In another larger container, mix a half and half solution of water and satin finish water based wood varnish. Gradually mix in some of the brown paint until you get a stain that you like – test by brushing on an inconspicuous spot. It should be dark enough to tone down your design a little bit and give it a weathered look, but not so dark that it obscures it. When the mix is right, stain/varnish your whole board and let dry.

8. Attach brackets of your choice to the wall behind your sofa, and set shelf in place. You’re done!

Categories
Backyard Wildlife DIY Gardening Sustainability Upcycling Ways With Wood

Make a Pollinator House – Part 2

Make a Pollinator House – Part 2

by Carolyn Hasenfratz

In my previous article Making a Pollinator House – Part 1 I explained why you might want to build a home for native bees and other beneficial insects for your garden. I also provided an example of a quick way to build a shelter out of cinder blocks, wood scraps and dried plant material. I promised to write up plans for a more attractive pollinator house. Here are instructions for building two different designs to enhance your garden’s decor as well as it’s productivity and ecological health.

Tools and Supplies
* indicates items that are available at Schnarr’s
Tracing paper
Pencil
Ruler*
Hot glue gun*
Wood hot glue sticks
1″ x 6″ x 8′ multipurpose board*
2″ x 4″ x 8′ board*
Saw*
Sandpaper*
Dust mask*
Acrylic craft paint
Paint brushes*
Water container*
Heat tool for speeding up drying (optional)
Painters tape or masking tape*
Decorative stencils
Sponges*
Drill*
Tiny drill bit*
Nails*
Window screen*
Hammer*
Wood glue*
Clear matte finish varnish*
Hardware cloth or chicken wire (optional)*

For the additional second design with the pediment, you’ll also need:
Assorted sizes of distressed wood pieces
Decorative brass box corner*
Miter saw*
3/16″ drill bit*
3/16″ dowel rod*
Wooden ball knobs or drawer pulls* with 3/16″ holes to use as feet

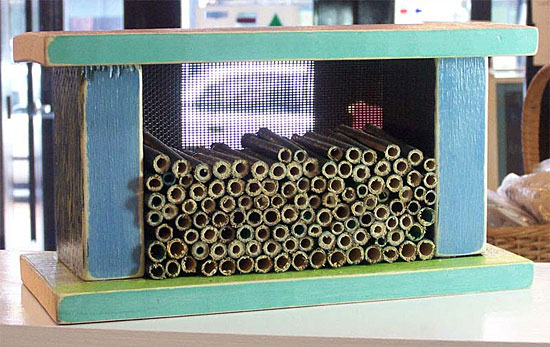
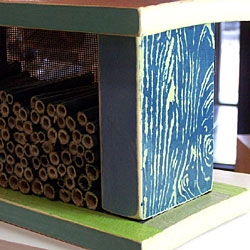
Mid-Century Modern style pollinator house

Instructions for Style #1 – “Mid-Century Modern” Pollinator House

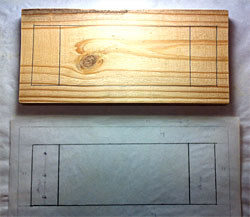
1. Download the PDF document “Pollinator House Assembly Diagram”. It is sized to print out on a legal-sized piece of paper. Recreate the diagram in scale on a piece of tracing paper with pencil.

2. From the 1″ x 6″ x 8′ board, cut two 12″ x 5.5″ pieces(although the board is called 1″ x 6″ x 8′ it’s probably closer to 5.5″ so you might only have to cut the board into 12″ lengths).

3. From your 2″ x 4″ x 8′ (probably really 3.5″) board cut two 5″ segments.

4. Put on a dust mask and sand your wood pieces until smooth.

copy diagram onto wood
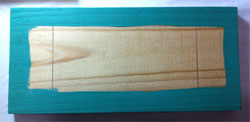
5. Mark each of your 12″ x 5.5″ pieces with the rectangles shown in the diagram. These will become the inner top and inner bottom of your house.


paint around edges
6. Paint a color of your choice in the border around the inner rectangle on each piece. For this step you don’t have to worry about painting precisely in the lines. Let paint dry.


7. Mark off around the middle rectangle with masking or painter’s tape on both pieces and paint black. When paint is dry, remove tape.

paint middle of boards black


8. Paint what will be the insides of your 5″ high supports black. Paint all other surfaces of your wood pieces assorted colors of your choice.

decorative stenciling
9. Decorate the top of your house and the sides of the supports with decorative stencils. I did not decorate the board edges with stenciling in my sample but you can if you want to. If you are new to stenciling on wood, see this article for tips –
Stencil a Wood Garden Sign.

10. Sand all the edges of your wood pieces so that the bare wood shows through on the corners. This gives the wood a distressed look. If you want to distress any other painted or stenciled surfaces further you can do so by roughing them up with sandpaper.

11. To assemble the house, stage the upright pieces by placing them in their footprints as indicated on the diagram on one of the 12 x 5.5″ pieces. Face the black painted sides inward and the stenciled sides facing out. If you’ve covered up your pencil lines with paint, you can use your diagram to redraw them as needed.

12. Load up your hot glue gun with wood project glue sticks and plug it in to heat up. Apply hot glue to the bottoms of the support pieces and press in place. Let glue harden.

13. Glue the other ends of the supports in place on the other 12 x 5.5″ piece. Let glue harden.

14. Place the tracing paper diagram on top of your house. Mark where the nail holes will go in pencil. Drill small pilot holes then hammer nails in. Repeat for the bottom.

15. Mix some dark brown paint with water to make a thin wash and paint over the whole house. Test first on the bottom to make sure it’s not too heavy or light. Alternately, you could use a wash of off-white paint if you’d rather have a pale wash. The purpose of the wash is to give an aged appearance to the wood – this is particularly effective when the paint clings to the corners that have been bared by sanding. Let paint dry.

16. Paint whole house with clear matte varnish.

17. Cut out a 10 x 5″ piece out of scrap window screen and nail it to the back side. This is to keep whatever materials you fill the house with from falling out the back side.

18. Fill the house from the front with materials that contain holes for pollinating insects such as native bees to live in.

Some suggestions of materials you could use to fill the house:

  • Bamboo or reed segments
  • Rocks
  • Rolled up corrugated cardboard
  • Chunks of scrap wood with holes drilled in it
  • Bundles of twigs or straw
  • Unfired ceramic clay with holes poked in it
  • Natural dried stems and reeds from the garden cut into segments
  • Dried seed pods

If necessary, cut out a piece of hardware cloth or chicken wire and nail it over the front to hold materials in.

19. Read this article for ideas on where to place the house in your garden or yard –
Making a Pollinator House – Part 1.

Depending on where you want to put your house, you may want to attach hanging hardware to it or mount it on a post. The wood pieces we used are thick enough to give you flexibility in attachment options.

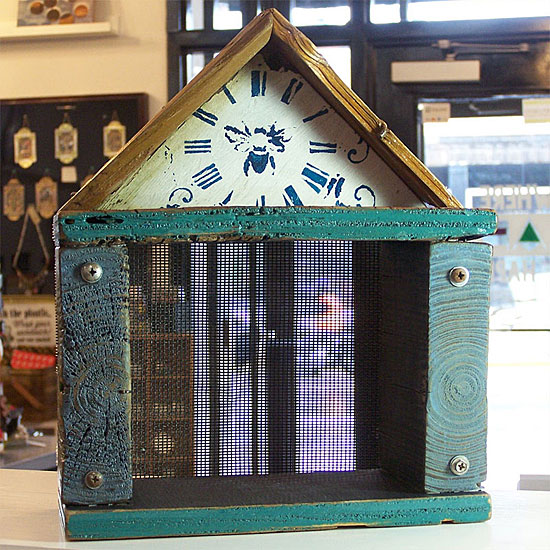
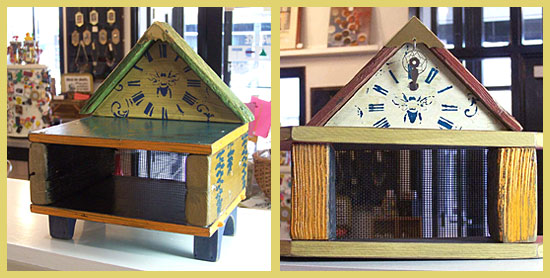
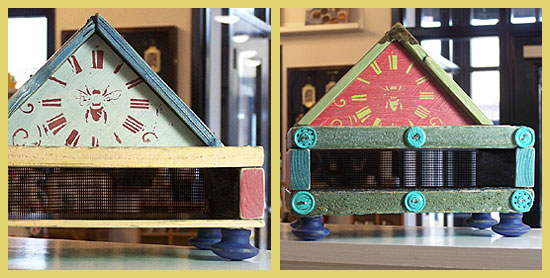
Pollinator House with Pediment

Instructions for Style #2 – Pollinator House with Pediment

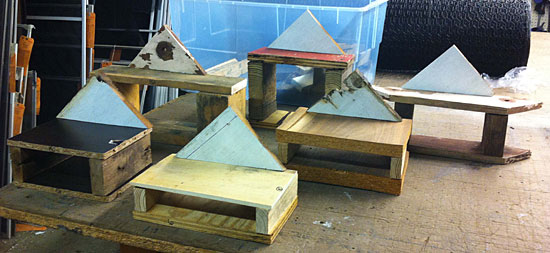
The prototypes I made for the second design vary somewhat in size and proportions because I used distressed wood that I had lying around. I designed the houses around what wood I had available and embellished some with found objects or hardware. If you want to build similar houses and don’t have access to distressed wood, you can use new wood.

1. Cut out two chunky pieces of wood to use as uprights and two thin pieces to use as the top and bottom.

Different pollinator house designs

2. Cut a right triangle out of wood that is 3/4 to 1″ thick for the pediment piece. A pediment is like a roof gable that is decorative rather than functional. My samples vary slightly in size but the triangles are mostly around 7 1/2″ inches on the long side and 3 3/4″ on the short sides.

3. Choose some thin, narrow wood pieces for the roof overhang. Lattice wood strips are about the right size – if you don’t have any distressed wood in that size range you can purchase some lattice strips to use. Cut these strips into approximately 6″ pieces and miter the corners.

4. Sand all wood pieces.

5. Paint the sides of your wood pieces that will become the interior with black paint.

6. Paint the other sides and parts in assorted colors of your choice.

7. Stencil a bee design or other stencil of your choice on the front of the triangle.

8. If you think any of the other wood surfaces need to be enhanced with stencil designs, decorate those also. Since many of my wood pieces were distressed and had a pronounced wood grain, knots, old nails and other irregularities I let those provide the visual interest in many areas. Antique look, vintage look, grunge or botanical stencils would be especially effective for this design.

9. Sand the edges of your wood pieces to expose the bare wood on the corners and distress any other areas that you think are in need of it.

10. Hot glue the vertical support pieces to the top and bottom of your house then nail in place.

11. To assemble the pediment section, put your two roof pieces in a miter clamp with the mitered ends butted together to make the roof point. Put a little wood glue on the ends as you do this. Position the clamped-together pieces on a block of scrap wood to brace them. Drill small pilot holes in one end and hammer in small nails. Slip a couple of nails in between from the other direction.

Creating roof peak with miter clamp and nails

12. Take your triangle pediment and apply hot glue to the top edge. On your work surface, lay the pediment down, slide the triangle part in and press in place. When the glue has hardened, hammer small nails through the roof pieces into the pediment for extra hold.

Attach roof overhang to pediment

13. Apply hot glue to the bottom of the triangle section. Place in place on top of house and let the glue harden. Drill two pilot holes at each end and drive long thin nails down into the supports below.

14. If you would like to attach wood feet to the bottom of your house, drill 3/16″ holes into the bottom of the house. Cut short pieces of 3/16″ wood dowel rod and put wood glue on both ends. Insert one end of each dowel rod piece into a hole in the house and the other end into the hole in a wooden ball knob or drawer pull.

15. Mix some dark brown paint with water to make a thin wash and paint over the whole house. Test first on the bottom to make sure it’s not too heavy or light. Alternately, you could use a wash of off-white paint if you’d rather have a pale wash. The purpose of the wash is to give an aged appearance to the wood – this is particularly effective when the paint clings to the corners that have been bared by sanding. Let paint dry.

16. Paint whole house with clear matte varnish.

17. Attach a decorative brass box corner to the roof peak.

18. Cut out a piece out of scrap window screen and nail it to the back side.

19. Fill house with nesting materials and place in a suitable location.

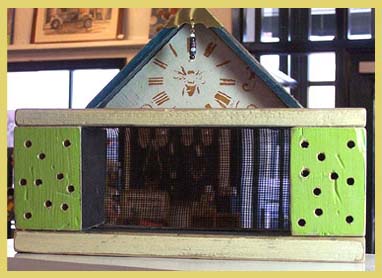
Here are some pictures showing how some of the other houses turned out.

Pollinator houses made with distressed wood

Pollinator houses made with distressed wood

Pollinator house made with distressed wood

Categories
Backyard Wildlife Gardening Sustainability

What To Do If You Find a Bird That Needs Help

What To Do If You Find a Bird That Needs Help

by Carolyn Hasenfratz

I can tell by the amount of food and feeders that we sell that Schnarr’s customers love their backyard birds! Many of us will encounter at some point a bird that is sick or injured or a baby that appears to be abandoned. Right now some birds are starting their second brood of the summer so baby bird season is not over yet!

Baby birds are very vulnerable if they fall or are pushed out of the nest. If you feel compelled to intervene, I totally understand why – that’s how I came to be living with two European Starlings – it’s a long story! Having been through the situation of finding a baby bird more than once, I’ve done a lot of reading and learning from experience and here is what I recommend.

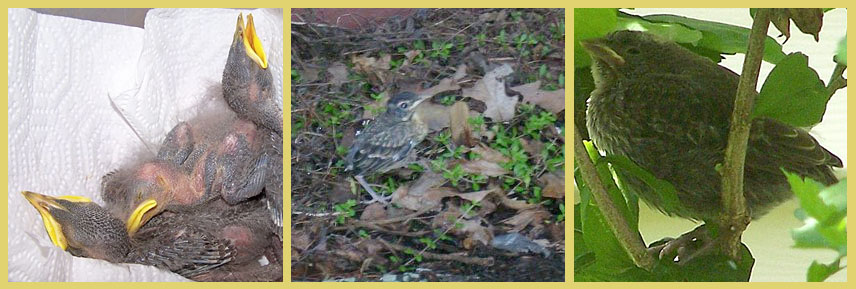
First determine if the bird is a nestling or a fledgling. A nestling will not be fully feathered and will not be able to run away. It needs to be back in a nest ASAP. Try to put the bird back in the original nest if you can and if you know the parents are alive. It’s a myth that the smell of humans will cause the parent birds to abandon it – most birds can’t smell.

Sometimes it’s not possible to put the bird back in the original nest – you can’t find it, you can’t reach it, or it’s been destroyed. If that’s the case you have the following options.

One plan is to make a makeshift nest and put it in a place where the parents can find it and it is safe from predators. If the bird is a species that nests in a cavity, you can look up nest box plans online specifically for that species and build one. I’ve been successful in getting a Starling family to move to a homemade nest box after the babies fell out of a dryer vent. Observe the nest to see if the parents find the baby and start feeding it. If they don’t, take the bird to a wild bird rehab center. It’s hard to say how long you should wait before giving up on the effort to re-involve the parents. The necessary feeding intervals of baby birds can vary depending on how old they are – if in doubt you could call a wild bird rehab center for advice. It’s easy for baby birds to get dehydrated if they go too long without food because most of them don’t drink liquids but get their moisture from their squishy bug diet. Don’t attempt to give the baby bird water or liquids unless you know the right way – it’s very easy to accidentally kill a baby bird by giving it water without knowledge of the correct procedure.

It’s time-consuming to make and observe a makeshift nest – if you have the time, you might find it worthwhile to put in the effort. You’ll learn a lot while doing it and it’s very rewarding! If you don’t have the time or the interest, just take the bird to the nearest wild bird rehab center right away. If it’s one of the three species not protected by federal laws (Pigeons, House Sparrows or European Starlings) the rehabber might either euthanize it or refuse to accept it. In that case you will have a difficult choice to make and having been in that position, I wouldn’t envy you! I chose to raise the five-day-old Starling I found in 2009 rather than let it be killed but everyone does not have the means or desire to take on the job of raising a baby bird. It can be done with the correct knowledge but it’s a big commitment. Raising a baby bird and releasing it to the wild later sounds like a good idea but is not an option if the bird has been raised alone and if you want the bird to survive – it will not have learned survival skills from the parents. It may not know how to act around other wild birds and could fail to be accepted by a wild flock. A protected species (not one of the three mentioned) is not legal to keep without a permit and you must take it to a licensed rehabber to help it.

Nestlings and Fledglings
The baby birds on the left are nestlings and the other two examples are fledglings.

If the bird is fully feathered and can run away and perch, it’s a fledgling. Most fledglings do not need any help. It’s not uncommon for baby birds to leave the nest before they can fly well. The fledgling will be somewhat vulnerable until it can fully fly but the parents should be feeding it and trying to keep it away from danger. The best way to help it is to put it on a perch off the ground (if you can catch it). If you have cats or dogs keep them indoors for a week or so. It’s not good for the health of pet cats to let them outside in any circumstances, but if you must let yours out try not to do so until the fledglings are flying.

If you find a bird that is sick or injured, it will need care no matter what age it is, so in that case try to get it to a rehabber as soon as possible. If a bird does not look sick but has been caught by a dog or cat, it needs antibiotics within a day or so or it is probably doomed. When birds are to the point of showing signs of illness or injury they are in bad shape – their instinct is to hide their infirmity as long as possible so they are not caught by predators or rejected by their flocks. Speaking of sick birds, it is my understanding is that a thorough hand-washing after handling is sufficient precaution in case the bird does have something a human can catch, like Salmonella. I am not a vet or a scientist so get more information on diseases if you are concerned. Many bird-borne diseases are species-specific and can’t be caught by humans. However, if you have disposable gloves on hand it’s smart to wear them for extra protection.

The best way to transport a bird to a rehabber is to put it in a box with soft nest-like materials and cover the box. Make sure it can breathe if it’s boxed or wrapped. The bird will likely be terrified and if it’s confined it will be less likely to injure itself. Handle it as little as possible and try not to expose it to loud noises.

If the bird is really large, like a hawk, heron, goose or pea fowl (which I once rescued believe it or not!), get advice from the Humane Society or other knowledgeable group before attempting to transport. My handling of the peahen I found went very smoothly but without good instructions and remembering to remain calm I might have had trouble! Some large birds can cause serious injuries with talons or beaks if not handled carefully. The peahen I transported had some mean-looking spurs but fortunately did not attempt to use them on me!

For more advice from the experts, please see these links:
I Found A Baby Bird. What Do I Do?
Songbirds
Ducklings or goslings
Birds of prey, vultures, herons, pelicans or swans

Information on raising House Sparrows and Starlings:
Sparrows and Starlings
www.starlingtalk.com – Everything you need to know about raising Starlings and if you want to, living with them permanently

Categories
Gardening Outdoor Fun Sustainability

Master Gardener Training Program Volunteer Activities

Master Gardener Training Program Volunteer Activities

by Carolyn Hasenfratz

One of the requirements of the St. Louis Master Gardener Training Program is to perform at least 40 hours of volunteer work per year. We have until December to complete the hours but I thought it would be a good idea to get an early start (ok I admit it, I was dying to get my kayak out on the water). My first volunteer effort of the year was to participate in Operation Clean Stream at Simpson Lake in Valley Park on February 27, 2016.

Simpson Lake in Valley Park

Simpson Lake was a bit trashed due to the flooding in December but we made a really good dent in it. I was rewarded with sightings of a Bald Eagle and a beaver!

On St. Patrick’s Day I went on a tour of the Litzinger Road Ecology Center in Ladue with other Master Gardener trainees and made arrangements to volunteer there on a regular basis. The center is a private teaching facility owned by a foundation and managed by Missouri Botanical Garden. It is not open to the public so I thought you might enjoy seeing some photos of our tour if you have never been there.

Litzinger Road Ecology Center

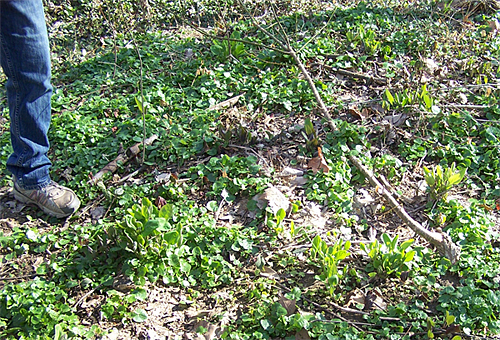
One of the major activities at the center is removing non-native plants so that native plants can flourish. This picture shows native Bluebells emerging among other plants that are slated for removal. When I start my volunteer work I have no doubt that I’ll be learning a lot more about invasive plants!

Litzinger Road Ecology Center

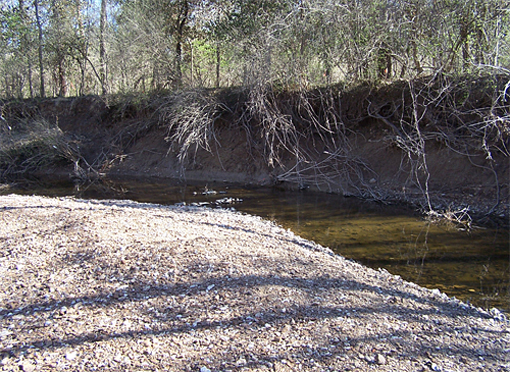
Here is a section of Deer Creek that runs through the center. At the top of the ridge there is an old railroad right-of-way that was formerly the Laclede and Creve Coeur Lake Railroad route. I knew nothing about this interesting historical tidbit until last year when I was riding my bike in the area and noticed the right-of-way and looked it up to see what it might be. As you can see from the photo, erosion is a big problem along the creek. If you own property within the watershed of Deer Creek and you would like to learn how to manage your property to reduce flooding and erosion and to improve the water quality, the Deer Creek Watershed Alliance can help you learn how to do that.

Litzinger Road Ecology Center

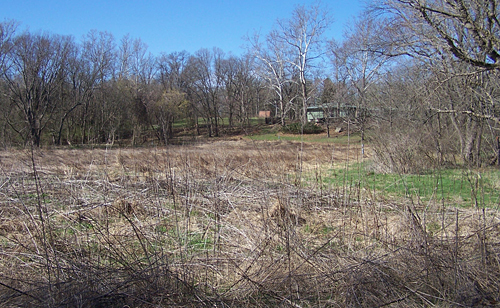
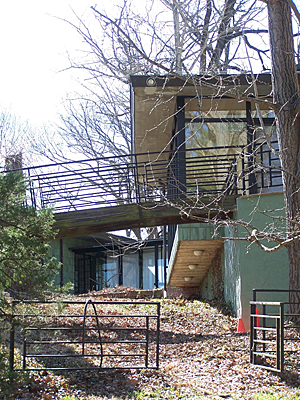
In the foreground is a prairie area and on the ridge is an exquisite Mid-Century Modern house that was formerly the home of the benefactors who donated the land for the center. It is now used as an office for the foundation.

Litzinger Road Ecology Center

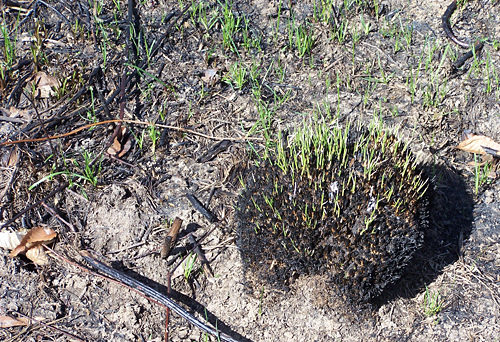
Fire is one of the tools sometimes used here for prairie management. Here is a clump of Prairie Dropseed coming back after a burn.

Litzinger Road Ecology Center

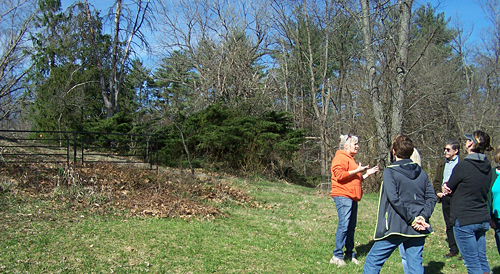
Our tour guide is pictured here explaining that a Monarch Waystation is planned for the area around the fence. The kids who come here for programs (and adults like me) should really love that when it’s done! I developed an interest in insects at a very young age and still haven’t lost it. Here and there on the grounds are “bug boards” that can be lifted up to see what’s taking shelter underneath. I loved doing that kind of thing when I was young and I still can’t resist it!

Litzinger Road Ecology Center

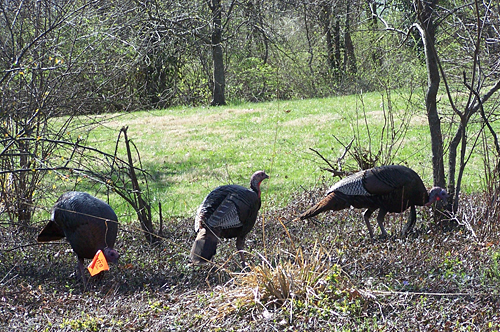
I’m also crazy about birds so seeing these gorgeous turkeys was a treat!

Litzinger Road Ecology Center

Here is a view of the circa 1964 house that shows some of the cool details.

Litzinger Road Ecology Center

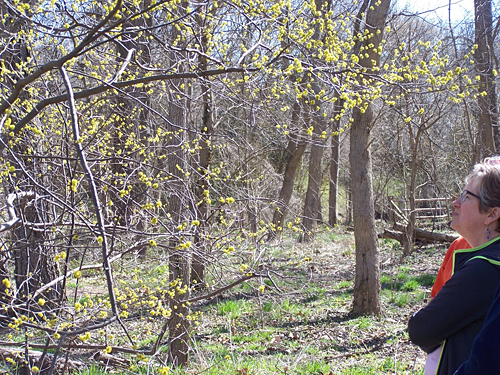
Here is a Spicebush in flower – a beautiful and desirable native plant for the St. Louis area. It’s worth considering if you are planting to help pollinators and birds because it is a host plant for the Spicebush Swallowtail butterfly.

I hope you enjoyed my virtual tour of the Litzinger Road Ecology Center! It is likely that I’ll mention some of my upcoming work here in future issues of this newsletter.

Categories
Gardening Sustainability

Seed Saving and Trading

Seed Saving and Trading

by Carolyn Hasenfratz

Do you find yourself with leftover seeds after doing your spring planting? When I have leftover seeds I usually put aside some for next year in case this year’s crop fails. Even if the germination rate won’t be as high next year it might be better than none at all. Some of my plants are so prolific that I have many more seeds than I can use in two seasons. I occasionally even have extras of commercial seeds because the packet I bought contains more than I need. When that happens I like to give the seeds away or trade them. Local gardening clubs and online groups sometimes host seed swaps.

A major advantage to acquiring seeds at a local swap is that you are trading with people who have grown the plants in similar conditions and soil as your own. The plants that survived well enough to produce seed are likely to grow well for you too. Whether the seeds are saved for your own use or for trading, keeping good records is important. I keep a three-ring binder with a page for each plant that I grow. I write on the page all the information I have for the source of that plant. If I grew it from commercial seed, I tape that packet on the page so I can refer back to it. If I acquired the seeds through a swap, I record as much information as possible. If the trader included the species name, you can look up the rest of what you need to know, but sometimes traders include growing tips also which is very handy.

The ideal way to package seeds for a swap is in a paper envelope with information about the plant written on it. Species name and cultivar name (if any) and date of harvest I would say is the bare minimum of information you should include. Plastic bags and empty film containers are sometimes used. These are not as good for storage as paper since they hold in moisture. If the seeds were not dried thoroughly before packaging, that could cause a mold problem. If you get seeds packaged in a plastic container and are not going to plant them right away, I recommend transferring them to a paper envelope as soon as possible.


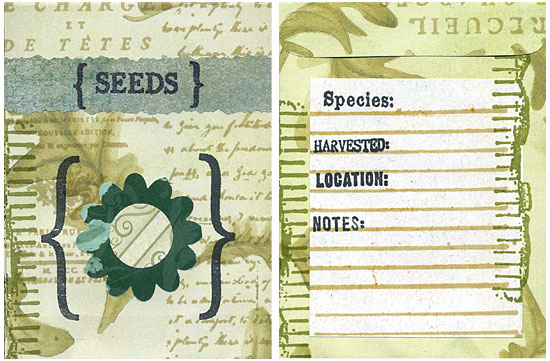
Decorated homemade seed packet'
You can purchase small paper envelopes to store your seeds or download and print out some free templates from the internet. I do a lot of paper crafts so I had some fun making my own more decorative versions. Here are instructions for these seed packets if you would like to make some like them. We also have a pre-printed PDF template you can download to make more utilitarian looking seed packets.

As this year’s growing season progresses, you may want to start saving and storing some seeds for the 2017 season. Every plant is not a good candidate for seed saving, for example hybrids will not breed true from seed. Some hybrids don’t produce seed at all. Some cultivars are stable and some are not.


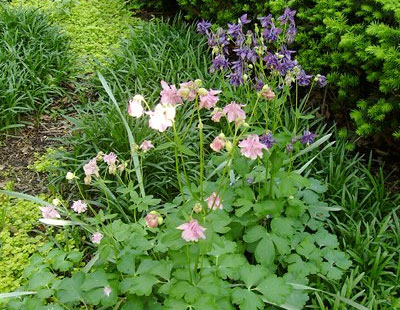
Columbines'
I suspect that these Columbines, the parent plants having been acquired through a seed swap, are the descendants of hybrids. The swapper labeled these as blue and red but they and their descendants came out pink and purple. I would have rather had blue and red, but these are nice too so that’s ok. It’s hard to grow anything where I live so I’m not going to turn up my nose at something that is pretty and grows really well for me! You never know what is going to come out when you plant the seeds of a hybrid or of a plant that is likely to cross-pollinate with other plants in the vicinity. You might find this uncertainty part of the fun of gardening or an annoyance depending on what you are trying to do. This year I have a bunch of seedlings coming up that came from a Columbine plant that I know is a hybrid because I have the seed packet and it says so. I don’t know what the resulting plants are going to look like. If I don’t like them I just won’t save their progeny. Each year I grow petunias that are descended from seeds that my Mom and Dad got in a pack at Aldi in the 1980s. I don’t know from year to year if the flowers are going to be white, purple, magenta, or pink but that’s part of the fun for me! They’re all pretty so I don’t care. If you’re growing food or trying to breed plants for specific traits you need to know a lot more about where your seed stock comes from and what pollen it’s exposed to. For example if you’re growing one type of vegetable and your neighbor is growing one that is similar but not the same they could cross-pollinate. If that is a concern it’s good to know how your plant is pollinated and how to prevent cross-pollination. If you are not sure whether your plant is a good candidate for seed saving or how to do it, it’s best to look up the recommendations for that particular plant.

Aside from some of my Columbines, my garden has few hybrids. In my case one reason is so that I can reliably save seeds so I have some trading stock or when I want to grow more of a particular plant. Species plants are often more attractive to wildlife than hybrids, and wildlife is an important part of my garden. I also am not allowed to grow vegetables where I live (unless they are in containers on the deck) – I mostly concentrate on herbs and wildflowers. Wildflowers are good candidates for seed saving because they need to reproduce without human help and can be open pollinated. Many herbs if you get the species plant and not a hybrid will grow true from seed. I harvest when the seeds are brown and starting to get loose and the pod if there is one is starting to come open. When I cut the pods or seed heads to save them, I store them in paper bags that I have labeled with the species and date of harvest. I hang these bags from a chain in my closet for at least a month – then they are dry enough to separate the seeds from the chaff. I sometimes don’t bother to separate the seeds until I’m ready to plant them or put them in envelopes for trading. I collect the seeds from the healthiest plants and try to mingle the seeds of several parent plants together so the genetic diversity is greater. I’ve never noticed any strange mutations but if you get one you might be able to start a new variety!

If you’re a beginner to seed saving, here are some suggestions of plants I have had good results with:

Swamp Milkweed
Bronze Fennel
Dill
Blackberry Lily (flower color varies – can be red-purple, red-orange, or yellow)
Yucca filamentosa
Horehound
Hollyhock
Lemon Balm
Purple Coneflower
Moonflower
Agastache rugosa
Feverfew
German and Roman Chamomile
Calendula
Evening Primrose
Queen Anne’s Lace
Rue
Yarrow (white)
Cilantro
Blue Mistflower
Rose of Sharon (not cultivars)
Grape tomatoes

If you don’t have any of these plants take a look at what reseeds itself and breeds true in your own garden and try those first!

Categories
Backyard Wildlife DIY Gardening Sustainability Upcycling

Making a Pollinator House – Part 1

Making a Pollinator House – Part 1

by Carolyn Hasenfratz


It’s becoming increasingly common to see structures called “Bug Houses” or “Insect Hotels” in gardens. Some people get squeamish at the mention of bugs or insects so perhaps the most appealing way to label such a structure is “Pollinator House”. Such structures are provided as a nesting and sheltering area for beneficial insects.

Most people are familiar with the pollinating actions of honeybees, bumblebees and wasps. Social bees and wasps are beneficial to the garden in many ways, not only by pollinating but in the case of wasps eating garden pests.

It’s understandable to be nervous about the idea of having colonies of stinging insects living in your garden because some of these species are very aggressive about defending their homes. If you want more pollinators in your garden fortunately there are other bees and wasps that are easier to co-exist with peacefully. If you fear you have attracted the wrong kind of bee or wasp to your garden, I recommend getting help from an expert before deciding how or if to deal with them.

I don’t mind bees and wasps because I can identify them and know how close I can safely get to them. I also don’t have any serious allergic reactions to stings. I work in the garden alongside Honeybees, Carpenter Bees, Bumblebees, Cicada Killers, Mud Daubers, Potter Wasps and others with little apprehension. Honeybees often land on me and I just stay still until they fly away. I steer clear of Yellow Jackets because I know from experience they will sting if you inadvertently disturb their nest (happened last summer in a client’s garden). I don’t attempt to eliminate them unless they are really in the way or other people are in danger. Even though I’m in the garden a lot I only get stung once every several years or so. The consequences for me are some brief anger, localized soreness and itching for a few days. The consequences for others could be far more serious and even deadly so use your best judgement.

Many of the solitary species of bees such as Mason and Leafcutter Bees like to nest in hollow plant stalks or holes in old wood. We take away many of these potential nesting sites by cleaning dead plants and old wood out of the garden. Some amount of cleanup is necessary for human safety, aesthetics and homeowners associations but we can mitigate the effects of a too-clean garden by building a Pollinator House. As an added benefit you may get other desirable insects such as ground beetles and butterflies hibernating in the structure.


Insect Hotel at Missouri Botanical Garden
Here are some suggestions about what materials to use:

  • Stones and bricks
  • Dead leaves
  • Twigs or twig bundles
  • Corrugated cardboard rolls
  • Dried seed pods
  • Paper straws
  • Hollow reeds – preferably 6-8 inches long, closed on one end
  • Drilled pieces of wood – variety of hole diameters, 3-6″ deep

The structure should be sturdily built to avoid toppling.

Where to place the house:

  • Protected from high winds
  • Partly in sun and partly in shade to meet a variety of species preferences
  • If possible near water and mud for drinking and nest building

Dad's fence is falling down
You can have a lot of fun designing your Pollinator House by creatively using materials, limited only by your imagination. I started a simple one for my Dad’s garden, custom designed to solve two problems for him.

Problem 1 – Decorative garden fence is falling apart and sagging
Problem 2 – Lots of sticks lying around from deadfall and pruning


Propping up fence with cinder blocks
Solution
I bought 12 cinder blocks and used them to prop up the ailing fence. Then I filled some of the spaces with twigs and short segments of hollow, dead plant parts from the garden. I drilled some holes in some pieces of scrap wood. A variety of hole sizes and depths are good for different species. As we get more material we’ll keep filling in the spaces in the blocks.


Filling the blocks with nesting material
The result is practical and may not score high marks in the aesthetics department. However the fence is located in the middle of a mint patch (also a superb beneficial insect attractor) and it will be partially concealed by vegetation for much of the year. If Dad agrees I think I will add shelving to the top for containers of trailing plants which will help disguise the blocks. I will probably have to work on the bases of the cinder block towers to make them straighter since the ground here is soft and did some settling after I stacked the blocks.

Dad is pleased that his fence is at least upright again and he’s happy to do his part for invertebrate conservation. Dad’s garden was designed with wildlife in mind and already supports an abundant population of beneficial insects.

Hopefully my condo association will approve a Pollinator House in my garden. I don’t know what my chances are but I do know that my Pollinator House is going to have to be pretty to even have a prayer of getting approved. I guess I will have to make it portable so I can sell it if they say no! They have previously said yes to a bird house but a bug house might be a harder sell. Stay tuned for a more aesthetically pleasing Pollinator House plan in a future newsletter!

More information about bees, wasps and insect shelters: