Categories
DIY Gardening Lawns

Landscape Plan Drawing – Practice Rendering Symbols

Landscape Plan Drawing – Practice Rendering Symbols

by Carolyn Hasenfratz Winkelmann

Late last summer I was asked to take a list of plants that had been chosen for a client and to make a plan drawing to show where they should be installed. I’ve made lots of rough drawings over the years that only I have to understand. Since this was for a client, I consulted a landscaping drawing book and attempted to make one that was more professional and readable to other people. Here is the result.

Landscape drawing plan
Landscape plan drawing for a client – August, 2019

It got the job done, but it’s crude and I’d like to improve on my landscaping drawing skills. My art degree didn’t include landscaping drawing and there are certain conventions that make landscaping drawings more understandable for the client and for the installers. For planning my own projects and client projects in the the 2020 season, I’m making more detailed drawings of sections of my own yard first. To prepare for that I’m practicing how to draw the various elements individually before I combine them all together.

I don’t own any computer software that is specific to landscaping design. I frequently use Adobe Photoshop and Adobe Illustrator, which I used to prepare a diagram of my yard to start some basic planning and calculate the amount of dirt I wanted to buy for the new planting beds we have been putting in. Over the last few years I’ve also done a lot of adult coloring and art journaling and it’s been really satisfying to pick up the hand-drawing tools again after so many years of focusing mainly on computer graphics. I’m enlarging a version of my yard diagram to 1/4 inch to 1 foot graph paper, and I’m going to practice hand drawing sections in a more professional manner as I work on our garden plan.

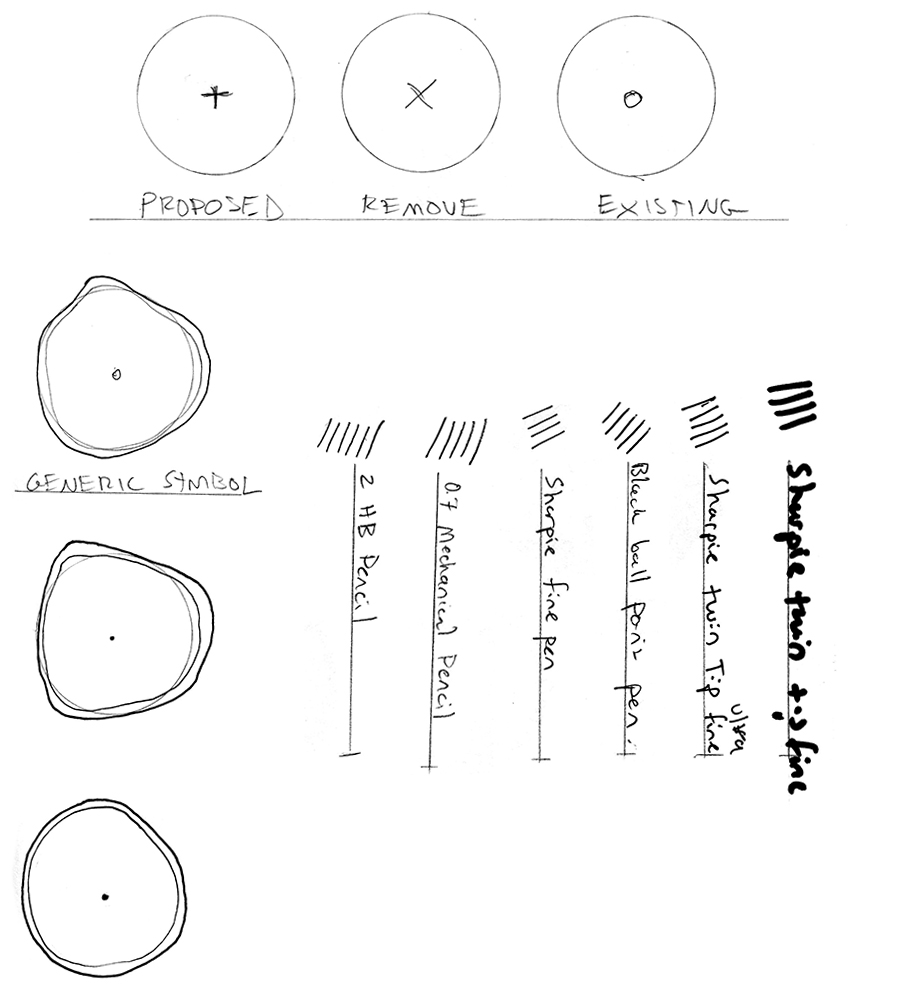
I consulted the book Plan Graphics for the Landscape Designer: 2nd Edition by Tony Bertauski and thought about how to adapt my drawing tools and methods to the techniques shown in the book. I took out my favorite drawing tools and did tests to decide what I would use for my thin line weight, my medium line weight, and my thick line weight. In any kind of art or design, varying the line weight adds a great deal to the liveliness and appeal of a rendering. Then I practiced drawing some generic symbols. Symbols indicate a plant and the dot in the middle shows where the center of the plant will be placed. The outer edge of the symbol represents the mature spread of the plant, so that you can anticipate how the plants will fill in the available space as they grow.

Practicing rendering generic symbols and testing line weights of drawing tools.
Drawing tool tests and generic symbols.

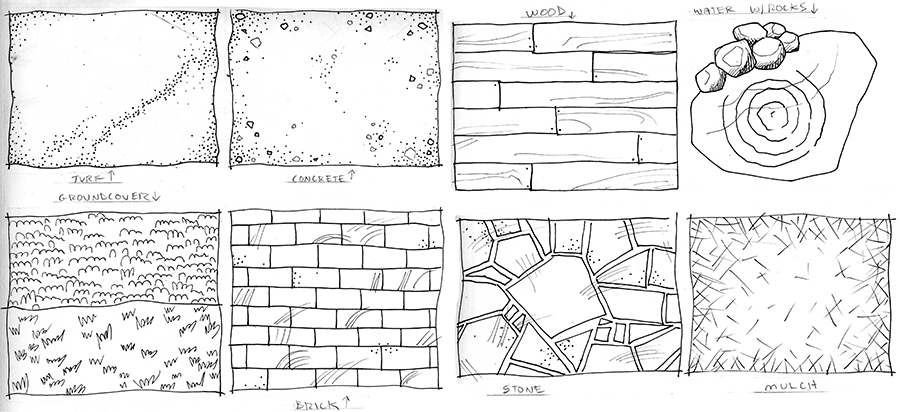
I also practiced drawing textures and non-plant symbols that represent surfaces and features that I anticipate will play a role in our new planting beds, patio and water features. Preliminary markings were made with pencil, then I drew over the pencil lines with two thicknesses of black Sharpie markers and erased the pencil lines. I used a circle template to pencil in accurate circles.

Practice drawing surfaces and landscaping symbols.

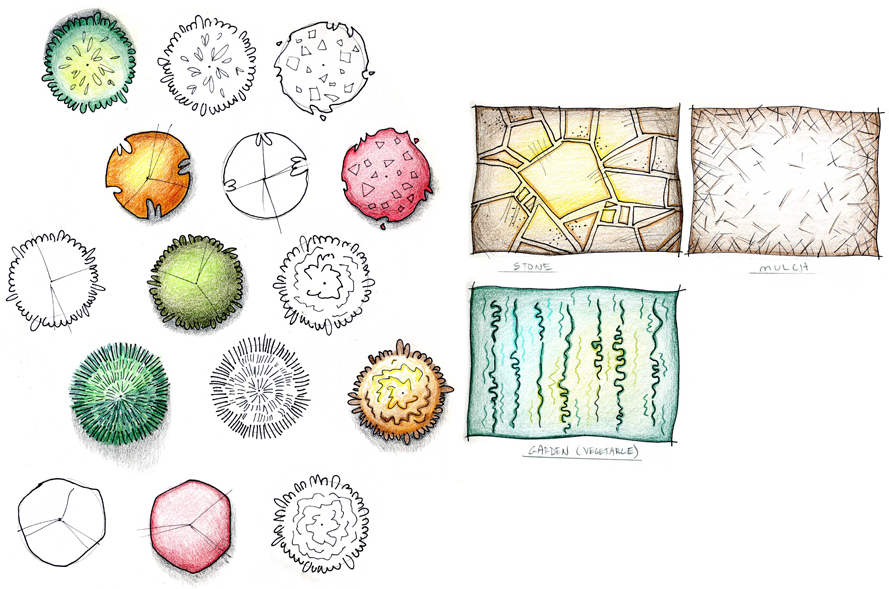
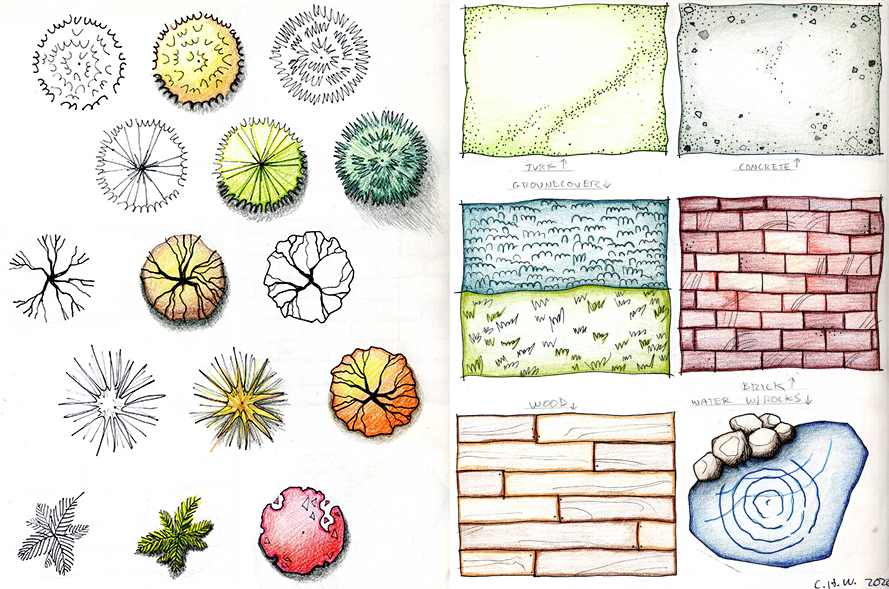
I made two black and white drawings of a variety of plant symbols, then colored one of each in with colored pencils. I’ll keep these sheets as a reference to get ideas for how to render types of plants as I work. Now that I’ve scanned these drawings to use in this article, I also have the option of importing them into Photoshop or Illustrator to use in computer based renderings I might make in the future. That will sure save a lot of drawing time later!

Practice coloring symbols and surfaces for landscape design.
Some plant symbol tests, and textures for stone, mulch, and vegetable garden patches.


Practice rendering landscaping symbols
More plant symbols, plus turf, concrete, ground cover, brick, wood and a little pond with rocks.

I’m going to practice adhering to many conventions of this style of drawing so that it will be understood by professionals in the industry. It’s also inevitable that some personal style characteristics will be made manifest and I hope at least some of the drawings will become works of art on some level as well as useful guides. These exercises have already had a positive influence on my other art work.

If you are interested in drawing some of your own garden plans, here are some resources I’ve found that might help you out on our Schnarr’s Pinterest site:
Garden and Landscape Planning

Categories
DIY Gardening Lawns

A New Beginning in a New Garden

A New Beginning in a New Garden

by Carolyn Hasenfratz

It’s always a thrill in spring to see what comes up again in an established garden, but I have to say I get even more excited at the prospect of planning a new garden. I am getting married in August and I will be moving into my fiance’s house at that time. His yard has minimal plantings so there is a lot of potential. I will be able to expand my horizons a lot because there will be more sun and fewer restrictions on what I can do.

I will be renting out my condo after moving instead of selling it so there is no need to move all of my current garden plants right away. Even so, I have already started moving some of them because it’s a huge job and is too overwhelming to tackle all at once. Also, the future home has some issues with water leaking in the basement and I want to get an early start on using plants to reduce this problem. As I move my plants, I need to know right now where is the best place to put them. I have need of a thorough yard and garden plan so I that I put plants in the right place the first time to save money and labor in the long term. It’s kind of crude, but one of my favorite motivational sayings in any kind of work that I do is “Proper Planning Prevents Pi** Poor Performance”.

To begin my garden plan, I made a personal wish list for what I would like to do. Then I asked my fiance Tom what were his areas of dissatisfaction with the current landscaping. Next I made an appointment with Tim Wittmaier of Wittmaier Landscaping for a consultation. Here are some of the existing issues Tim and I discussed.

Moss in front lawn
This is a major problem in the front yard and one that many Schnarr’s customers are also dealing with. Tim informed me that most of the soil in this front yard is so played out that planting any more grass seed without major renovation is a waste.
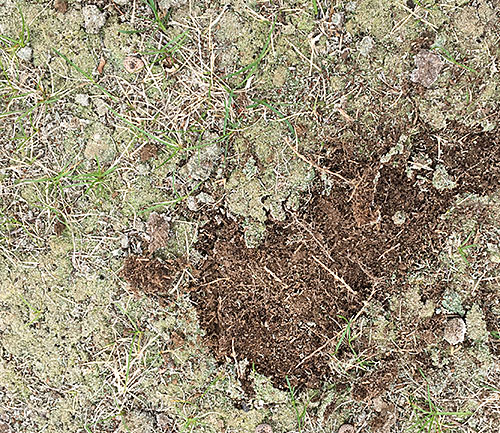

Moss growing in a lawn


Oak tree in front has a ring of soil around the base
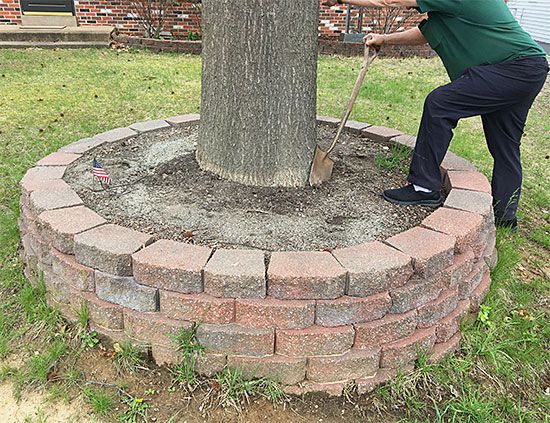

planting ring around an oak tree

A planting ring around the base of tree like this is a disaster because it will slowly cause the bark to rot at the base and possibly kill the tree. It may take many years for damage to be apparent. This is a long-lived valuable tree so it’s worth trying to save.


Problems around the foundation
There is poorly located and executed pavement directing water toward the basement. Some of the grading around the foundation is sloping the wrong way adding to basement leak issues.
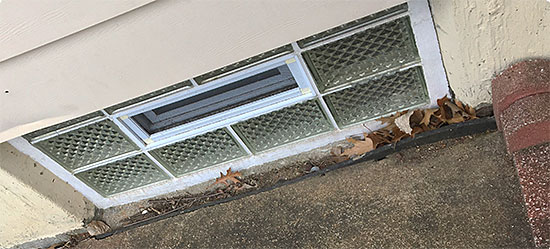

concrete directing water at the foundation

The existing patio is unattractive and also slopes the wrong way, directing water toward the foundation. It’s helping cause the basement to be “jacked up” so it needs to be literally jacked up with a jackhammer and replaced!


Invasive honeysuckle under power lines:
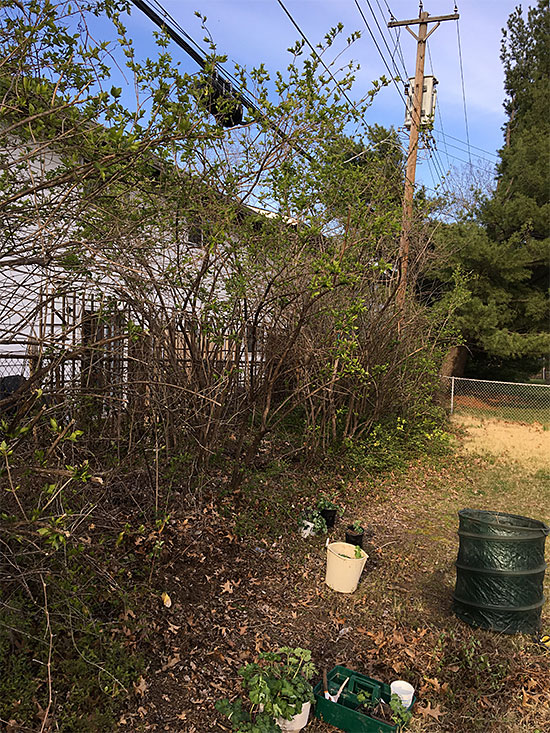

A volunteer hedge of invasive plants

Until we can replace the honeysuckle, I’m adding part-shade loving plants from my existing garden to the front of this border that birds made.


A row of invasive honeysuckle has grown underneath power lines at the back of the property where birds perch. Have you heard of the technique of stringing a line for birds to perch on to get a free hedgerow? It works because the birds transfer seeds with their droppings. This particular “volunteer” hedge is actually very functional because it partially screens a view of the back of an apartment complex and provides a bit of privacy for us and them. However since this row mostly consists of invasive, non-native plants I want to gradually replace the honeysuckle with something more eco-friendly.

In addition to fixing problems, I have an extensive “wish list”. Some items are short term goals, some are long-term. I created a draft of a garden plan that includes the most realistic items from my wish list – roughly things that might be possible in the first three years. Later I will make another version that includes some longer term plans so that when I work on the short term items they are not in conflict with any long-term items that we might be able to do in the future.

What are your goals for your property?

When you make your own garden plan, keep in mind how your garden can solve problems as well as help you meet your personal goals for the use of your property. For example items on my wish list promote my highest priority garden goals which include in no particular order:

  • Wildlife habitat
  • Harvesting herbs and maybe someday food plants for personal use
  • Healthy and beautiful outdoor space to promote mental and physical wellness
  • Horticultural experiments and learning
  • Propagate and preserve heirloom plants and native plants
  • Learn and teach sustainable practices
  • Increase skills to help clients and customers meet their goals
  • Maintain Master Gardener certification

Examples of goals that have been high on clients’ priority lists:

  • Great looking lawns
  • Reduce maintenance costs
  • Reduce water use
  • Increase visual appeal of property for sale, customers, entertaining and personal use
  • Maintain neighborhood standards
  • Noise abatement
  • Reduce energy costs
  • Pest management
  • Garden maintenance
  • Improve water quality in water features
  • Bird watching

There are probably as many reasons to garden and landscape as there are people. If you keep in mind what your own goals are, your decisions will be easier.

Create a Plan

Once I know what my goals are, I can start to work on a plan. Here are the steps I’m plan to follow.


1. Review ordinances and rules for the neighborhood.

Find out what the governing body is and read the rules before you plan. For example, the property in my plan is in unincorporated St. Louis County, that means there is no level of government between me and St. Louis County. I have read the county code to see what I’m allowed to do and what requires a permit. You might have a neighborhood association and/or a municipality to conform to like I have at my current condo. It’s tempting to to try to slide something by but I personally don’t recommend investing time and money in work you might have to undo later. We live in a “gotcha” culture and someone will be looking for reasons to pick on you. Don’t give them any ammunition!

2. Prepare a diagram of the property with the information you need included.
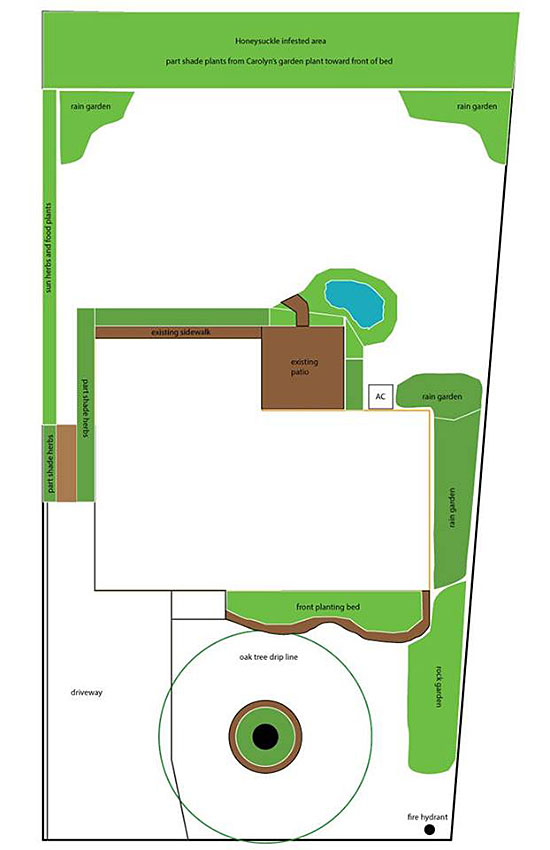

My first draft of garden plans for my new home

My first draft of garden plans for my future home

My first draft is missing some of these items and I need to add them. What is necessary information for you will vary by what your goals are. I recommend starting with:

  • Property boundaries
  • Power lines
  • Direction of North
  • House and outbuilding outline
  • Trees and shrubs
  • Paved and hardscaped areas – sidewalk, driveway, patio, walls, paths, etc.
  • Special features – play area, pool, dog house, chicken coop, compost pile, hot tub, fire pit, trellis, vegetable garden, fountain, patio furniture, grill, electrical outlets, etc.
  • Things that need to be accessible – utility panels, windows, doors, gates, air condtioners, pool filter, fire hydrant, etc.
  • If there is one, location of irrigation system and components.
  • Locations of outdoor faucets for hoses – for example will you need to hook three or four hoses together to reach a bed that needs a lot of water? Do you really want to do that on a regular basis? Three or four hoses hooked together are HEAVY (ask me how I know!).
  • Plantings that are going to stay as is.
  • Call 1-800-DIG-RITE and have them mark underground utilities for you. Put these on your diagram.
  • Areas of sun and shade.
  • Areas that tend to collect water.
  • Sight lines from parts of the yard and house that you use a lot.
  • Routes that machinery such as lawn mowers will take during maintenance. For example at Tom’s house the lawn mower needs a path through the planned herb garden from the garage to the front and back yards.
  • Paths that you will walk on to perform maintenance in the beds. Plan for mulch or more permanent paths so you don’t have to walk in the planting beds themselves.
  • Heavily used natural walking routes – for example, I’ve had a client whose mailman was wearing a path in the front lawn. That would be a good place to add a path with planting beds on either side so I put that in the drawing I made for the client. I don’t know if my plan got used or not, but paths help make gardens so appealing that I use any opportunity I can to suggest them!

You might consider drawing an overlay on tracing paper of what you would like to add or change, that’s a great way to visualize your plan and make sure it is workable with what is already there.

3. Get a soil test before making a big investment in time or money:

For example, a dying lawn filled with moss is a problem with our front yard and the yards of many customers right now. The moss did not kill the grass, the moss grew opportunistically after the grass died. It’s always safe to add organic fertilizer and compost – but please get a soil test and diagnose the problem before you do anything else. The soil test may give you all the answers you need or just be data that you use to lead to another diagnosis. Tim from Wittmaier Landscaping suspects that Tom’s lawn was killed by too much fertilizer. We don’t know for sure but it’s a common problem. If your grass does not need conventional fertilizer, adding it does not help and may hurt. If your lawn does not need lime, it’s useless and maybe destructive to add it. You might make a lucky guess, or you might cause a big problem that will take a lot of money and time to fix. What if your grass died from soil compaction, salt damage, a disease, a pest, too much shade or too much or too little water? It’s easy to add things like fertilzer and lime, but the actual remedy might be something else entirely.

Here is how and where to get a soil test: Test your soil now to assess your fertilizer needs

After I have made a good plan, I can start to break it down into individual projects. Stay tuned!

Categories
Lawns

Staying Ahead of Crabgrass

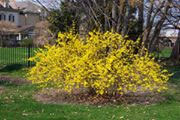
Forsythia bush in bloom

Staying Ahead of Crabgrass

by Frank Blair

One of the questions I hear every year at this time is “when do I apply crabgrass preventer to my lawn?” The proper timing for application of crabgrass preventer is related more to temperature and weather than the calendar.

Crabgrass is a low growing invasive annual weed. Because it is an annual, and grows from seed each year, the best way to control crabgrass is to us a pre-emergent herbicide to prevent the seed from germinating.

When the temperature of the soil reaches 55 to 60 degrees for several consecutive days, crabgrass seeds begin to germinate. The timing on this can vary widely from year to year and from place to place within your own lawn.

So how does one know when exactly to apply pre-emergent? Well, the most accurate method is to actually “take your lawn’s temperature”, every couple of days, using an instant read probe-type thermometer. But really now, who wants to do that? Another perfectly reasonable method is to watch for the forsythia shrubs (pictured) to bloom. If you time your pre-emergent application to this harbinger of spring you will almost always be well ahead of crabgrass germination. The crabgrass preventers we sell at Schnarr’s will prevent crabgrass and other annual weeds from germinating, and can remain active in the soil for an entire season.

A word or two of caution, if you are seeding your lawn, or you seeded late last fall, most crabgrass preventers will keep grass seed from germinating and damage young grass plants. If this is the case, let us know when you come by to pick up your pre-emergent and we’ll provide a product that can be used when seeding.

Enjoy the spring weather!
Frank

Categories
Gardening Lawns

Coping With Dry Autumn Conditions

Coping With Dry Autumn Conditions

by Tim Wittmaier

Fall is normally a good time to work in the garden. The weather is cooler than normal which is easier to work in but forecasts call for warmer weather to return for awhile. We keep getting predictions for rain which so far has not come.

Warm water temperatures have made this year’s hurricane season especially bad in the South and some of those folks have suffered from too much water. Many plants in the St. Louis area are suffering from lack of moisture though some spots have been lucky with rain. The ground is generally very dry. There is more work that could be done right now if it was not so dry.

For example, lawn care. Normally this is the best time to seed a lawn. This year even irrigated lawns are struggling because the ground is so hard and compacted. The water cost of irrigating a lawn is a problem too.

If you decide to plant, thatch, aerate, feed and seed. Get the seed 1/4 inch 1/2 deep in the soil by raking. If you wait too late to seed the cold could slow down germination. The normal window is 45 days starting around September 1st but can be extended when the weather is warmer than normal.

A lot of zoysia lawns are suffering this year from excessive thatch. It’s important to to remove thatch periodically to avoid problems. Excessive thatch can kill your grass and necessitate starting over with a new planting.

Most ornamental plants in our lawns and gardens are shallow rooted. Check your irrigation system to see if it’s watering the right areas and make sure you are not wasting water with your system or hoses.

How can you tell if you are wasting water? Is anything broken or leaking? Are all your fittings tight? If you’re not sure if your irrigation system is set correctly, have a meeting with the company that installed it to check exactly what is being watered.

Make sure you are making the best of what water you do have. When is a good time to water? Morning is the best, but if you don’t have a choice try not to irrigate after 7 pm. If you have an automatic system or timers, try a 3:30 am – 5:30 am regimen – I have had success with that schedule. If you can’t water at the ideal time, don’t skip it because the plants need it. You may find that your lawn and plants need daily watering for 20 minutes per session. Depending on your conditions 40 minutes every other day works for some. Cool the water from your hose before putting on plants so you don’t scald them.

This is also a good time to prune and feed perennials. If your perennials don’t look good they will probably perk up when it gets more moist. Normally this a good time to divide perennials but this year I would hold off as long as it stays dry.

Trees and shrubs are not easy to keep alive in dry fall conditions. October is better for planting when September is very dry. Perennial flowers can be planted now. They will need daily watering for 10-14 days to get established. Container plantings are doing well now as long as they get watered.

We are probably going to lose a lot of mature trees to drought this year. A wet spring followed by drought is very hard on plants. The best preventative is selection so there may not be much you can do now. If you have a valuable tree that is important to you with unusual symptoms have an arborist take a look at it.

Categories
Gardening Lawns Sustainability

MSD’s Project Clear and Our Local Water Issues

MSD’s Project Clear and Our Local Water Issues

by Carolyn Hasenfratz

The Metropolitan Sewer District has been working hard on outreach to inform the public about Project Clear. In their own words, Project Clear is the “planning, design and construction of MSD’s initiative to improve water quality and alleviate many wastewater concerns in the St. Louis region.” MSD operates in both St. Louis City and County.

What are some examples of wastewater concerns in our region? Flooding, erosion, water pollution and sewer backups are some issues that affect many of our neighbors if not ourselves. MSD deals with both stormwater, which is intended to discharge directly into the natural environment, and wastewater, which needs to be treated at a wastewater treatment plant before release. MSD is undertaking large scale projects right now that are estimated to take 23 years to complete.

The budget for this work is 4.7 billion – the largest infrastructure investment so far in the history of our region. For official information about the project and about your own flood risk, see these resources:

The first sewers in the St. Louis region were built in the 1850s. The amount of development present now is of course much greater than then and there are a lot more impermeable surfaces generating runoff. The existing system cannot cope with the demands being placed on it. MSD conducted a pilot program to test the effects of green infrastructure and came to the conclusion that the conversion of 400 acres from impermeable to permeable surfaces is equal to a 2 billion dollar savings in spending on wastewater infrastructure. Greenscaping has many other benefits – more oxygen, more pleasant and healthful surroundings, crime reduction, noise abatement, habitat for wildlife, temperature regulation – the benefits go way beyond just financial.

MSD is requesting help from the public with the wastewater issues they are working on. It’s in all of our best interests to do what we can to assist because the MSD projects are going to take decades to complete. Even if our own property is properly insured against damage, we will pay for water damage all over the region one way or the other in fees and taxes. In addition, cleaning up after a water disaster is no fun. It’s stinky, messy and time-consuming.

Some water management challenges are inevitable because of the geography and geology of where we live, but we all have the power to mitigate these problems by a small amount. If we each do a little bit we can help each other save money. What can we as individuals do to prevent erosion, flooding, water pollution and sewer backups?

  • If your residential downspout is connected to your wastewater sewer line, disconnect it and direct the stormwater from the downspout elsewhere. My understanding is that this is going to be mandatory soon if it isn’t already so you might as well get started now. MSD will inspect your property on request to see if your downspout is improperly hooked up. Call (314) 768-6260 for assistance. MSD will pay the cost of disconnecting your downspout from the wastewater line. If you’ve ever thought that a rain garden or rain barrel was an intriguing idea, there has never been a better time to put one in! A rain barrel will help cut down on your water bill if you use it to water your garden, and natural rainwater sans chlorine and chloramines is better for your plants. Redirecting this water reduces the overload
    on wastewater lines and prevents sewer backups. I suspect some of the downspouts at my condo are hooked up wrong and I know my neighbor whose unit is lower in elevation than mine has had a sewer backup before – so I find what MSD is saying about this credible.
  • Utilize rainscaping improvements on your property such as making surfaces water-permeable and protecting erosion-prone areas. There are rainscaping small grants available for residents in certain areas. Rainscaping has many benefits – prevents flood damage and erosion, improves water quality and recharges underground aquifers.
  • Explore opportunities to re-use some of your gray water. This may also cut your costs because in some places you are charged for how much water goes out of your household through the sewers as well as for how much comes in – my understanding is that’s the case where I live. My water bill is included in my condo fee so I don’t see it but that’s what I’ve been told.
  • Keep fats, oils and grease out of the sewer system by disposing in the trash and not down the drain. To help you remember here is a catchphrase – COOL it, CAN it, TRASH it. Improper disposal can cause sewer backups and water
    quality problems.
  • Don’t use the sink or toilet to dispose of garbage.
  • Use compost as much as you can in your landscape – compost absorbs water and slows velocity.
  • Join a grass-roots effort to encourage the adoption of greenscaping and rainscaping practices.
  • Join a stream cleanup sponsored by the Open Space Council,
    River Des Peres Watershed Coalition, and others.
  • Join a volunteer storm drain marking project.
  • Join a Stream Team.

Additional water management resources:

Categories
Gardening Lawns

Tim’s Tips – Mid-March

Tim’s Tips – Mid-March

by Tim Wittmaier

Now is a good time to go after cool season weeds in your beds, mainly Henbit and Chickweed. These weeds can take over bare spots of ground. In the warm season, these weeds will die then reappear in the fall.

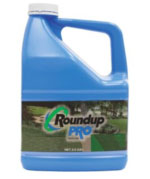
Roundup Pro
You can remove weeds by mechanical means such as a garden hoe, or use a chemical. Non-chemical treatments of weeds can work but sometimes are not practical considering the labor needed to treat the area affected. I recommend Roundup Pro because it includes a surfactant that helps the herbicide stick to the weed. You can mix an herbicide using Dawn as surfactant also.

Moles in your lawn are slowed down by pre-emergent herbicides and fertilizer. They don’t like the smell and the chemical odors will deter their mating for awhile. Moles have a very keen sense of smell. For a more permanent mole solution I recommend spring-loaded mole traps.

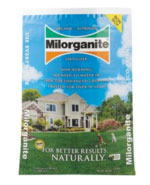
Milorganite
Milorganite fertilizer has a bonus effect – the smell repels rabbits and deer for awhile.

You can probably reseed lawns earlier than normal this year but it’s still a little early. Wait until the ground temperature is 50 degrees or above through the night. If you have no choice but to seed now, use a rye grass. If you have used any pre-emergent herbicide, wait three weeks to seed or your seed may not come up.

The intermittent warm temperatures may tempt you to accelerate some spring tasks but you still have to be vigilant about the possibility of more freezing temperatures.

Keep an eye out for plants that did not survive the dry winter or have salt damage.

Categories
Gardening Lawns

Tim’s Tips – Late February

Tim’s Tips – Late February

by Tim Wittmaier

February wasn’t normal and all rules changed compared to a typical February. We also don’t know how the rest of the late winter season is going to play out. Frost in March is a possibility. Now we’re on the chase. More warmer weather is coming. Everything is pushed ahead for professionals and homeowners. This February we could have fertilized and applied pre-emergent herbicide to our yards because of the atypical ground temperature. If you didn’t apply in February apply in March as usual and you’ll be fine. Grass will probably need cutting in March.

All the nurseries that grow plants in the ground are digging out everything they can because many plants are leafing out and blooming early. Magnolias and Forsythias will be ok because they will be finished blooming before cold weather starts.

Plants that are sensitive and need protection from frost may include lilacs, roses, Japanese maples, privet and fruit trees. If we do have a frost talk to a landscape garden service about how and when to prune back. We have to think ahead. Sensitive plants have to be protected.

Tips on materials for plant protection:

  • Avoid plastic
  • Old bed sheets are good
  • Paper bags
  • Newspaper
  • Straw
  • Shredded Leaves
  • Burlap
Categories
Gardening Lawns

Tim’s tips for February Lawn and Garden Care

Tim’s tips for February Lawn and Garden Care

by Tim Wittmaier

There are many tasks that need to be performed in the yard and garden at this time.

If you mow your own lawn, give your mower a spring tune up. Get blades sharpened, change oil, check for mechanical problems and check that your blade is set at the right height for the type of grass you have.

If your turf has too much acid apply lime to correct the PH.

If your PH is too high (too alkaline) and your soil is compacted, add some gypsum. Gypsum will also combat the effects of salinity and sodicity in the soil that may occur due to irrigation and the use of ice melting products. Gypsum reduces soil crusting and aids water penetration into the soil.

Scale in trees appear this month and they are crawling. Now is a good time to use dormant spray/horticultural oil if you need to control them. Dormant spray/horticultural oil is a product that does not discriminate between beneficial and non beneficial invertebrates, so it’s best to apply it for scale when other invertebrates are not yet active.

Ferti-lome Brush Killer Stump Killer
February is a good time to prune trees, shrubs and perennials, especially fruit trees. Some evergreens are not yet ready for pruning. Prune pines, holly and spruces now. Wait another month to prune boxwoods and yews.

Take a look at your lawn and planting beds. Unwanted woody plants can be a problem. Look for invasives such as Mulberry and Honeysuckle. If you can identify them without their leaves, pull or dig them as soon as you can. If you can’t pull or dig the unwanted woody plant out, cut off as much of the stem as you can and dab an herbicide product onto the end of the stub. You can apply the herbicide with a paintbrush or bingo markers. For safety wear gloves and use eye protection while applying. Ferti-lome Brush Killer Stump Killer is a product sold at Schnarr’s that would be suitable.

It’s drier than normal for this time of year, so water your evergreens now.

Categories
Backyard Wildlife Gardening Lawns

Are Starlings Taking Over Your Bird Feeders?

Are Starlings Taking Over Your Bird Feeders?

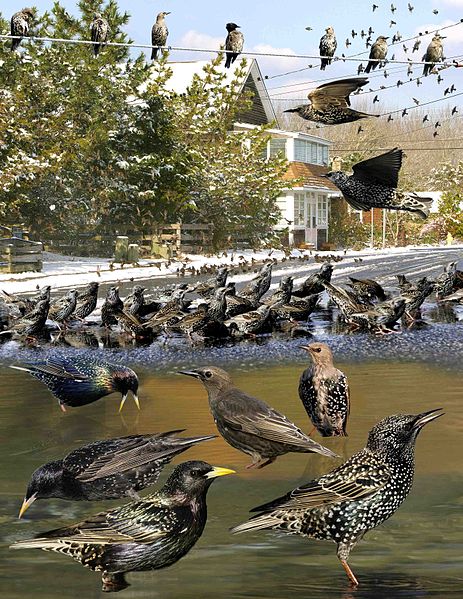
European starlings. Image by Richard Crossley.

I was eating dinner outside in downtown St. Louis recently and observed a large flock of European Starlings (Sturnus vulgaris), known as a murmuration, select a group of trees in a nearby park for their nightly roosting spot. This is the time of year that Starlings finish raising their families and start living a more communal lifestyle, which will persist until the next spring breeding season.

A popular topic with customers at the store last winter was how to keep flocks of Starlings from eating all the food put out for the other backyard birds. This is a problem I WISH I had – I know that sounds strange. Starlings are my favorite bird, because I rescued a nestling nearly six years ago and raised her and adopted another one two years later. My Starlings Attila and Pooky are my beloved pets (as I’m writing this I have one my arm and one on my shoulder) and because of them I’ve done lot of reading about Starlings. I like to observe wild ones whenever I get the chance to see how their behavior and vocalizations are like or unlike my tame pair.

Unfortunately if a flock of Starlings descends in my yard, if I go to the window to watch them they immediately take off. So that is my first idea about how to keep Starlings away from your feeders – try putting the feeders within view of a window where there is human activity. Some birds are more tolerant of people, for example on my deck Carolina Wrens, Robins and Song Sparrows will not only tolerate me looking at them through the window but will sometimes accept my presence with them on the deck as well.

Another idea is to serve food that Starlings don’t like – that is difficult to do, since they eat almost anything. They cannot open the shells of sunflower seeds, so you might try feeding sunflower seeds with the shells on.

Another tactic I’ve seen recommended on other web sites is to remove perches on your feeders so that other birds can access the seeds but Starlings cannot because they say Starlings need a perch. Based on my own observations, I’m skeptical about this, but who knows, it might work on small feeders. I’ve seen Starlings cling to surfaces with no perch just fine, they even spread their short tails out like a woodpecker does to use as a prop, but the absence of a perch on a small tube feeder where there is not enough room to prop the tail might deter them. Another idea is to smear suet on a pine cone and hang it, allowing small clinging birds to access the suet but making it difficult for the Starlings. Others recommend putting wire mesh around the feeder that allows small birds in but excludes Starlings. That should work but of course will exclude all larger birds.

A squirrel baffle over a feeder is said to deter Starlings because they don’t like going under a cover. This I can believe – my two Starlings hate it when I pass a hand or arm over them, so I try not to do that. I also don’t cover their cage at night because it frightens them. They are also said not to like feeding while hanging upside down, so any feeder that makes the bird feed this way will probably not be attractive to them.

If you like Starlings but just wish they would give the other birds a chance too, you might also try providing a separate feeding area that appeals to Starlings more than other birds. A platform feeder stocked with cat food is perfect for Starlings. You could augment the cat food with vegetable and culinary herb scraps left over from your cooking if you have any, my two Starlings love vegetables, greens and herbs, both cooked and raw. Just leave out the avocados, onions and garlic – they are toxic to birds. There is a risk in this strategy, Starling flocks can be big enough to take over ALL the feeders if they are in the area – also you’ll get other animals – but it might be worth trying as a temporary measure to give your other backyard birds a break. If this type of feeder accidentally attracts crows and ravens, that can be a good thing, they will help drive off predatory hawks and falcons with their mobbing behavior.

You don’t have to rely only on feeders to attract birds. I’m not allowed to put out bird food where I live, so I provide a water feature that gives the birds filtered, and in the winter heated water for drinking and bathing. This attracts quite a few birds. I also have a lot of bird-attracting plants in my garden and when I’m able I leave the seed-heads standing all winter to provide food. Rose of Sharon, Purple Coneflower and Korean Hyssop seem to be particularly attractive to small birds such as finches. Woody plants like the Rose of Sharon will support the Starlings’ weight while feeding but many of the herbaceous plants won’t so the smaller birds can get a good chance at the seed. Starlings are imported to our continent – a greater proportion of native plants in your yard may bring an increase in native birds to give the starlings some competition. Areas of leaf litter also attract birds for invertebrate foraging – this is worth trying if you have an area of your yard that you don’t mind leaving in a more natural state. You can even include a dust bath area if you want to, since Starlings adore water baths and some other birds would rather have a dust bath.

Starlings have been doing what they do for 20 million years, and stopping them will not be easy. If it makes you feel any better, the fact that there are Starlings in the vicinity means that you will have fewer lawn grubs, tent caterpillars, Japanese beetles, stink bugs and other insect pests. Starlings are perfect eating machines for lawn grubs – their beaks have more force in the opening than the closing, and are suited for prying in the dirt and grass and exposing invertebrate prey – watch this great video to see this action from an insect’s point of view!

Help! I’m Being Predated by a Starling!

It might prove more productive to enjoy Starlings rather than try to fight them. Whichever way you want to go, it’s helpful to understand more about them. I recommend the following resources for learning more about Starlings.

Starlingtalk.com

An Unwelcome Success – The European Starling in America

Documentary Film

Do Starlings Talk?

Baby Bird Rescue 2014 – My attempt to save starling nestlings, and an account of how I developed an interest in starlings.

Categories
Gardening Lawns Sustainability

Garden Maintenance in Wet Weather

Garden Maintenance in Wet Weather

The unusually wet weather we’ve been having in the St. Louis area is causing my garden to flourish like never before – for now. In periods of heavy rain you should check your garden and yard for possible detrimental effects. Here are some things to look for.

1. Check and see if your mulch is washing away. If it is, replace it quickly so that the next rainstorm doesn’t wash your soil away.

2. Make sure plant roots haven’t been exposed. Replace the soil around them if that’s the case.

3. Heavy rains can wash away fertilizer – reapply compost and organic fertilizer. The reason I recommend organic fertilizer is that chemical fertilizer is likely to wash away and harm bodies of water that storm runoff washes into. Also if you are not sure how much fertilizer is needed to make up the loss, plants can’t be harmed as easily by excess organic fertilizer as by excess chemical fertilizer, so there is less chance of problems caused by over-feeding.

Here is some more information if you would like to learn more about organic fertilizers:

Benefits of Organic Fertilizers: An Overview

The basic NPK of Organic Fertilizers

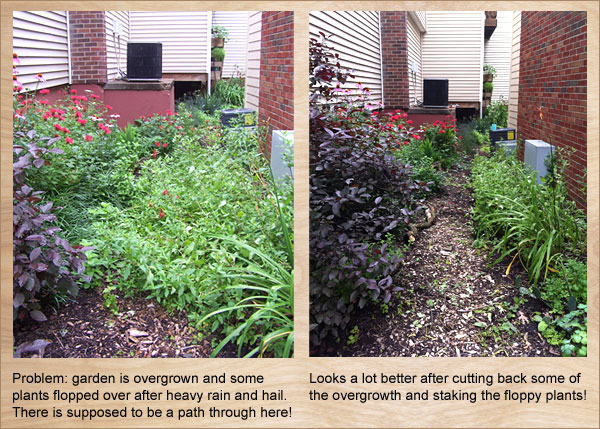
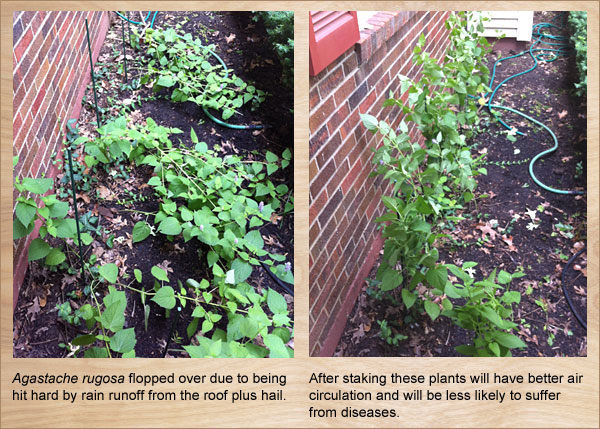
4. Do any plants need staking? Since I garden in part shade, it’s not uncommon for some of my plants to lean a bit because they are reaching for more sun, but some are leaning far too much due to being beaten down by storms and need some help. Stakes are not the most attractive things but green stakes and green twine, available at Schnarr’s, help the appearance considerably. Organic fertilizers build stronger plants, according the article “Benefits of Organic Fertilizers: An Overview” on the Dave’s Garden web site, so that is one way to prevent having to do so much staking in the future.

Gardenn maintenance may include cutting back and staking plants

5. Wet weather plus a crowded garden is a recipe for possible fungus problems on your plants. Inspect your plants for signs of fungus and treat the problem if you have to. You might consider thinning plants out or moving container plants farther apart until things dry a bit to facilitate air circulation. Wet weather is kind to transplants, so if you want to do some thinning and start a new bed with the excess plants or give them away to a gardening friend, wet times could be a good opportunity.

Garden maintenance may include staking plants damaged by rain and hail

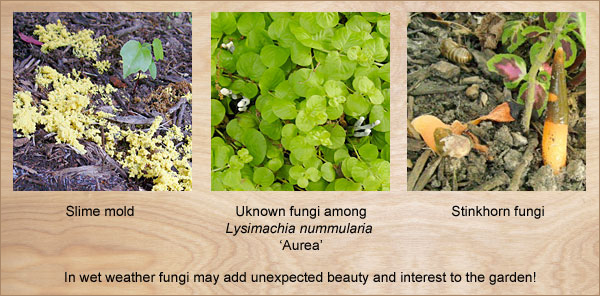
6. Is your mulch becoming a growing medium for mushrooms and other fungi? Since I use a lot of wood chip mulch, I frequently encounter interesting fungal growths in my garden and with wet weather we are likely to see more than usual. When I see one, I try to find out what it is before I decide if it needs to be controlled. My favorite mycology reference site is Tom Volk’s Fungi.

Garden maintenance may iclude monitoring surprise fungi in the garden

If the fungus doesn’t need to be controlled, my usual practice is to leave it alone since I find the variety of fungi fascinating and beautiful. If you have pets or children, health concerns, or a fungus that is harmful to plants, you may decide control is necessary. While I’m a fan of eating wild foods if I am sure of what it is, I have never eaten a mushroom from my garden no matter how delicious it looks. I am not a mycologist or skilled forager – I recommend only harvesting mushrooms or any wild foods with expert help since the consequences of making a mistake can be catastrophic.

7. Are any spots in your yard becoming a breeding ground for mosquitoes? Check saucers, bird baths, containers, wheelbarrows and anything in your yard that can collect water. You can dump the water, treat it with a mosquito dunk, add a bubbler (mosquitoes prefer still water) or add fish to eat the larvae if that’s feasible. Bats and dragonflies are excellent mosquito predators. Making your yard more hospitable to those species is a great way to increase mosquito defense.

8. Do you see any drainage problems in your yard? Heavy rain can reveal opportunities to improve how water flows across your property. Since I live in a condo, I only have the ability to address small-scale issues – if you have a large-scale problem come into Schnarr’s to talk to our knowledgeable staff. If we can’t address the problem we can recommend an expert to consult. Small-scale problems in my own garden usually consist of spots where excess erosion happens or water tends to puddle due to how rainfall drains off my building. If you are interested in adding a butterfly puddling area, bog garden, rain garden or water feature to your yard, a spot that already collects water is a great place to consider building it. Most of those options are not available to me because of where I live, so I like to control erosion and puddling by digging small trenches to interrupt the water flow and filling them in with lava rock. You can use any kind of gravel for this, but I like lava rock because it fertilizes the soil as it breaks down and the porous nature of the rock provides some natural water filtering capacity. I can extend the trenches to reach areas that I want to get more water and if I cover them up with mulch or plant over them the appearance is harmonious with the rest of the garden.

Such trenches can also become a decorative feature, like these two examples:

Stone and brick used to drain downspout

Ornamental dry creek bed

One puddling problem I had a few years ago was caused by a leak in my soaker hose. The resulting puddle was threatening my neighbor’s air conditioner so I fixed the issue with a gravel filled-trench – that was a quicker solution than digging up the whole hose out of the trench it was in and it bought me time to address the leaking soaker hose later.

Be sure to consult the Missouri One Call system before doing any digging!

I don’t know if a rain chain is particularly functional, but if it adds to your enjoyment of the rainfall why not make one?
Creative DIY Rain Chains

9. If water is puddling around plants and those plants are not of a type that can tolerate such conditions, you can create holes around them with a garden fork to help the water drain away so the roots don’t rot.

If you have a problem area that needs a long-term solution and you don’t want some kind of water-loving garden feature there, you can try moving the plants and building a raised bed in the spot. Fill it with soil that contains a lot of organic matter and soil amendments that facilitate drainage, such as sand or ground up lava rock. Apply organic matter to the surface as well – that will attract earthworms whose burrows will help the water drain. See how much water your new bed tends to accumulate then plant appropriately. The Missouri Botanical Garden plant finder is a great tool for helping to find appropriate plants for special conditions.

Excess rain can be aggravating and destructive, but wet conditions can also be an opportunity to make improvements or add new interesting features. Walk your garden
and yard, observe the effects of rain and see if you get any good ideas!