Categories
Backyard Wildlife Gardening

How to Raise Mealworms For Your Backyard Birds

How to Raise Mealworms For Your Backyard Birds

by Carolyn Hasenfratz

Late winter and early spring are good seasons to attract desirable bird species to your yard. Birds are not brooding eggs yet because they need to wait until later in spring when there is enough insect food to feed their young. However, they are now engaged in, well, getting engaged! In other words many birds are scouting out nest sites and selecting mates if they haven’t done that already.

You can entice birds to think your property is a good place to raise families by managing it with good bird habitat in mind – some ideas are in my previous article “Gardening for the Birds”. Some of the most sought-after backyard bird species are heavy insect eaters. Many dried and live mealworms are purchased to attract Eastern Bluebirds. Although they tend to be rare in urban and suburban areas, I saw one at the Litzinger Road Ecology Center a couple of weeks ago, so I know they are present in Ladue in places where the habitat is suitable.

Dried mealworms, which can be purchased at Schnarr’s, are more convenient than live mealworms and possibly more acceptable to those who are squeamish. If you would like to try raising your own however, I’ll tell you how. It’s so easy, I started raising mealworms by accident! For years I’ve raised plenty for my pet birds, newt and fish and there are enough left over to share with the outdoor birds also.


Mealworm larva, pupae and adult

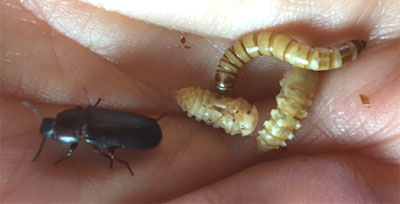
Life stages of the mealworm beetle in my hand – one larva, two pupae and one adult

Mealworms are not actually worms. They are larvae of a species of beetle, usually Tenebrio molitor L. My indoor and outdoor birds will happily consume all three forms of the beetle – adult, pupae, and larvae. When you purchase live mealworms in a store, they are usually larvae only and they are refrigerated to slow down their development into pupae and adults. To get adults who will lay eggs and make more mealworms, you need only to store the larvae at room temperature and give them food and a little moisture!

To begin, acquire a container that is steep sided so the adult beetles can’t escape. An unused 10-gallon aquarium is ideal. Place an inch or so of some kind of “meal” product on the floor of the aquarium. I use a combination of oatmeal, chicken food, and flaxseed meal. These creatures are not that picky so you can use what is cheap and available – I’ve seen an exhibit at the zoo of mealworm beetles consuming styrofoam!

Place a couple of pieces of bark or wood on top of the meal for hiding places. You don’t need a light, they don’t like it. I only use a light to see when it’s time to harvest some larvae. Nor do you need a lid because the adult beetles don’t fly. Buy a container of live mealworms and dump the contents into your mealworm container. Every couple of days, add a little more food and something with moisture that the larvae can “drink” from. Good choices are a piece of carrot or potato, or leftover pieces and rinds from fruits and vegetables that aren’t too odoriferous. You can also buy a special gelatin-like product that is designed for “watering” crickets. Avoid a dish of water because the insects might fall in and drown. If the substrate gets wet and moldy, replace with dry substrate.

When nutritious foods are fed to a prey animal like mealworms and crickets, that is called “gut loading”. In theory, the better you feed your mealworms the more nutrition you’ll be passing along to the eventual bird consumers. Cat food contains protein and amino acids that are very good for insectivorous and omnivorous birds. My two pet European Starlings’ staple food is made from 1/3 chicken food and 2/3 cat food. They are picky about what size food particles they will eat so there are always lots of leftovers that are given to my mealworms and quickly devoured.

Eventually the larvae will develop into adult beetles that will lay eggs. Lift up the wood pieces periodically to see how many insects are hiding under there. When you think you have a high enough population to start harvesting, go ahead and take some. You will get a feel for how many you can take and how often over time.

If you get a fruit fly infestation, try moving the mealworm container to place where a few tiny flies are not that bothersome, like a garage. You can also set up a fruit fly trap (available at Schnarr’s) near the mealworms to catch the flies.

Raising mealworms may seem “gross” at first but it’s a great way to see and teach the life cycle of insects. If you have young family members they might be intrigued by this activity and develop an interest in animals and science. I started aquarium keeping when I was eight years old and I already liked bugs at that age. Besides fish I loved to keep lizards, toads and praying mantises. Seeing the mealworms I bought for my pets turn into pupae was really interesting! If you give a little squeeze to a pupa that is alive it will wiggle, which is an amazing thing for a kid to see!

Categories
Gardening

How to Transplant Herbaceous Plants

How to Transplant Herbaceous Plants

by Carolyn Hasenfratz

In the spring it’s fun to see how many of your herbaceous perennials from last year are coming back. Maybe you need to thin or divide some and trade your extras with friends and neighbors, or move some of them to a better spot, or buy some new plants. It’s likely transplanting will be part of your spring gardening activities. Here is how to successfully transplant herbaceous plants.

1. First test the soil drainage in the new planting spot. Dig a hole 10-12 inches deep and fill with water. If the water does not drain away in several hours, consider adding organic matter to the soil or building a raised bed, unless you are planting bog plants which won’t mind sitting in water.

2. Test your soil if you want precise information about what fertilizer to add. Here is an article on how to get your soil tested. In some cases, excess fertilizer can do more harm than good so it’s best to know if you really need it.

3. If you have purchased plants or grown them indoors, harden them off gradually for a few days before planting in the ground.

4. Select a cloudy day for transplanting. If plants are in containers, water well.

5. If you’re transplanting a group of plants, if you haven’t worked out the positions of the plants in advance on paper, it’s helpful to set the pots on the ground where they will go to help you visualize the arrangement.


Arrangement of plants ready to be transplanted

My arrangement might look a little strange because the front plant looks bigger, but I was taking into account the mature sizes of the plants and not the current size.
Root ball of Mums

6. Turn the pot over and slide the plant out, catching it around the crown with your other hand. Tap or push the bottom of the container to help the root ball out if needed. Inspect the roots to make sure they are not circling around the pot. If they are, untangle and spread out the roots so that they don’t continue to grow in a circle.

7. Dig a hole that is as deep as the root ball, but several times wider if possible. If the roots are loose, make a mound in the middle of the hole and drape roots around it to raise the crown of the plant to be even with the soil surface around your hole and to encourage the roots to grow outward. For an extra good start you can dust the plant roots with a Mycorrhizal Fungi inoculant. Mycorrhizal Fungi work with the plant’s roots to help them better absorb water and nutrients. Some soil mixes such as Pro Mix already include the fungi. Learn more about this symbiosis here – Mycorrhizal Fungi: The Amazing Underground Secret to a Better Garden.

8. Fill hole in with dirt and water well. Add more dirt if the water makes it settle too much. The crown of the plant should end up level with the soil line.


Name of Image
9. Apply mulch around plant to conserve moisture in soil and suppress weeds and diseases.

10. Check and water plants more frequently when newly transplanted.

Transplants of seedlings need to be handled slightly differently – see this article for tips – Start Some of Your Spring Planting Right Now! Part 3.

Happy planting!

Categories
Gardening Lawns

Tim’s Tips – Late February

Tim’s Tips – Late February

by Tim Wittmaier

February wasn’t normal and all rules changed compared to a typical February. We also don’t know how the rest of the late winter season is going to play out. Frost in March is a possibility. Now we’re on the chase. More warmer weather is coming. Everything is pushed ahead for professionals and homeowners. This February we could have fertilized and applied pre-emergent herbicide to our yards because of the atypical ground temperature. If you didn’t apply in February apply in March as usual and you’ll be fine. Grass will probably need cutting in March.

All the nurseries that grow plants in the ground are digging out everything they can because many plants are leafing out and blooming early. Magnolias and Forsythias will be ok because they will be finished blooming before cold weather starts.

Plants that are sensitive and need protection from frost may include lilacs, roses, Japanese maples, privet and fruit trees. If we do have a frost talk to a landscape garden service about how and when to prune back. We have to think ahead. Sensitive plants have to be protected.

Tips on materials for plant protection:

  • Avoid plastic
  • Old bed sheets are good
  • Paper bags
  • Newspaper
  • Straw
  • Shredded Leaves
  • Burlap
Categories
Gardening Lawns

Tim’s tips for February Lawn and Garden Care

Tim’s tips for February Lawn and Garden Care

by Tim Wittmaier

There are many tasks that need to be performed in the yard and garden at this time.

If you mow your own lawn, give your mower a spring tune up. Get blades sharpened, change oil, check for mechanical problems and check that your blade is set at the right height for the type of grass you have.

If your turf has too much acid apply lime to correct the PH.

If your PH is too high (too alkaline) and your soil is compacted, add some gypsum. Gypsum will also combat the effects of salinity and sodicity in the soil that may occur due to irrigation and the use of ice melting products. Gypsum reduces soil crusting and aids water penetration into the soil.

Scale in trees appear this month and they are crawling. Now is a good time to use dormant spray/horticultural oil if you need to control them. Dormant spray/horticultural oil is a product that does not discriminate between beneficial and non beneficial invertebrates, so it’s best to apply it for scale when other invertebrates are not yet active.

Ferti-lome Brush Killer Stump Killer
February is a good time to prune trees, shrubs and perennials, especially fruit trees. Some evergreens are not yet ready for pruning. Prune pines, holly and spruces now. Wait another month to prune boxwoods and yews.

Take a look at your lawn and planting beds. Unwanted woody plants can be a problem. Look for invasives such as Mulberry and Honeysuckle. If you can identify them without their leaves, pull or dig them as soon as you can. If you can’t pull or dig the unwanted woody plant out, cut off as much of the stem as you can and dab an herbicide product onto the end of the stub. You can apply the herbicide with a paintbrush or bingo markers. For safety wear gloves and use eye protection while applying. Ferti-lome Brush Killer Stump Killer is a product sold at Schnarr’s that would be suitable.

It’s drier than normal for this time of year, so water your evergreens now.

Categories
Gardening

A Couple of Common Problems with Trees

A Couple of Common Problems with Trees

by Carolyn Hasenfratz

A Couple of Common Problems with Trees

The two trees in the picture above have some issues. The one on the left was planted in early winter in my neighborhood. That in itself is not a problem – hardy woody plants and perennials can be transplanted any time in winter that the soil is workable – that is, not frozen and not too wet. This winter there have been times when the soil has been frozen but certainly not continuously and there were some good opportunities for planting. The trouble lies in the gap you see between the original root ball and the side of the new planting hole. A freezing spell has pushed the root ball partly out of the hole. This is called “frost heaving”. It’s not good for the root flare of the tree to be too much higher than the surrounding soil, though having it a little too high is better than having it too deep. The root flare is the topmost point where roots start to flare out from the trunk. There is also an air pocket around the roots which can hinder root growth, moisture uptake and tree stability. A good course of action for this tree would be to try to push the root ball back in the hole if possible (while not compacting dirt too much), to fill any gaps with dirt and to apply 2 to 3″ of mulch around the tree to regulate temperature extremes around the planting and retain moisture. Moisture level is especially important in the first 2-3 years after planting. If mulching isn’t done correctly however it could cause the problem that the second tree on the right is suffering from.

The tree on the right is in front of my bedroom window. I’ve lived in my condo for 12 years and ever since I moved in this tree has had a “mulch volcano” around it. Mulch around a tree should not touch the tree trunk or be piled up around the trunk. This tree produces beautiful white flowers in the spring and I will miss it if it has to be removed. It might be doomed because during this past year the bark has been cracking and peeling off, a sign that it’s dying. Am I certain that the “mulch volcano” caused whatever the problem is? Not 100% because the disease has not been diagnosed, but since this practice is well known to cause death to the inner bark layer (cambium) or cause myriad other problems I recommend you avoid it. Trees can be mulched all the way out to the drip line or beyond if you want, and if you do that they may grow up to three times faster because they won’t have so much vegetation (like grass) to compete with for nutrients. The mulch must not touch the trunk – keep mulch several inches away and make your mulch resemble a donut rather than a volcano!

I hope you can protect your investment in trees by avoiding these commonly occurring issues!

Categories
Gardening Good Eating

How to Harvest and Dry Herbs

How to Harvest and Dry Herbs

by Carolyn Hasenfratz

Lemon Balm - Melissa officinalis
Lemon Balm – Melissa officinalis

Here are the methods I use for drying and storing herbs. These procedures come partly from the book “Growing and Using Herbs Successfully” by Betty E.M. Jacobs plus years of trial and error. In order to get the optimal flavor and fragrance from herbs, the best time to harvest them is between the time the first flower buds appear and before the flowers open. If possible, lightly spray the herbs with water the day before you plan to harvest, that way you can save a step by not having to wash them after cutting. It’s ideal to harvest on a sunny day after the dew has dried on the leaves but before the day has reached its hottest point. As you harvest, you can remove all but 4 inches of the stem on annual herbs. On perennial herbs, you can take 1/3 of the plant. Proper identification of your plants before harvesting for consumption is critical because some plants are toxic.

Different herbs will be at their best time for harvesting at varying points during the season. You may be able to get two or three cuts from some plants. If you miss the optimum time, you will still get some benefit from the herbs but you may have to use more. Some of my herbs (like most members of the mint family) need to be trimmed and thinned regularly anyway to keep them from taking over the garden.

Dad's garden in early October
Dad’s garden in early October – lots of Lemon Balm and Peppermint around the fence

There are some exceptions, but most herbs can be stored and used in the dry form. It’s most common to dry herb leaves, though with some herbs you might use different parts of the plant such as the flowers or roots. I’ll demonstrate an easy way to dry leafy herbs with some Lemon Balm (Melissa officinalis) from my Dad’s garden. These plants (and all the Lemon Balm plants in my own garden) are descendants from a specimen I purchased a the Webster Groves Herb Society Sale in 2003 when I first started herb gardening.

If your herbs are already clean from spraying with water the previous day, you can put them right in the drying bag. Take a paper grocery bag and write on it the species you are harvesting and the date. Cut the herbs and loosely let them fall into the bag as you cut (cut the parts you want rather than pull off as pulling may damage the roots). Put the bag in a dry, dark area for one month. To save space, I hang my bags with clothespins from a chain in a closet. The herbs should be dry after a month has passed. The next step is to strip and store the herb leaves.

Stripping the leaves from the stems is very easy but a little messy. You might want to do this task outdoors if possible but if the weather is not favorable you’ll have to do this inside. Spread a towel over your work area to catch plant bits. Place a container to one side to catch stems. Take each herb stem from the bag and hold it over a large bowl. Starting from the top of the stem and working down, pull off the leaves with your hand. If the herbs are fully dried the leaves should come right off with no effort. There are a few herbs that cause some irritation to my nose during this step so if you are concerned about allergies you could try wearing a dust mask.

Store the stripped leaves in a labeled glass jar or in a paper bag, away from moisture or sunlight. Keep the leaves intact if possible before using, in case crumbling them ahead of time releases some of the potency. If you later notice any condensation in the jar, the herbs were not dry enough, so take them out and let them dry some more in a paper bag so they don’t get moldy. You can discard the stems in the compost or try to find a creative way to use them – depending on the herb the stems may have some fragrance or flavor in them. I’ve been known to put them in sachet bags, grind them up to make fragrance pastilles, burn them in a grilling fire or campfire, heat them in water in potpourri crock pot or use them to make flavored vinegar. When it’s time to use the herb leaves, they will probably crumble just fine with your fingers but you could use a grinder or mortar and pestle to help get a finer grind if needed.

If you need to wash the herbs after picking, here is an easy way to do it. Clean your kitchen sink and fill it with cool water. Take a handful of herb stems with leaves and shake – this helps dislodge any bugs or dirt. If any leaves fall off on their own accord, discard those. Quickly dunk the herbs in the water, shake again and let drip dry on a towel. Inspect each stem for chewed up or discolored leaves and remove those. Place herbs on another dry towel and let dry. If you need to speed up the drying, you can run a fan over them. Turn the herbs while drying and place them on a fresh dry towel. Usually after about a day the herbs are dry to the touch and ready to put in a labeled bag and left for a month in a dark dry place to dry completely. If you have larger quantities of herbs to handle and you have space you can set up special drying areas with racks but if you want to keep it simple just harvest as much as you have room to process at one time.

Herb washing and drying station
Herb washing and drying station in Dad’s kitchen

The preceding instructions will work for most herbs but if you need guidance with things like fruits, seeds, fleshy roots or other special cases just do a search for “how to harvest + name of herb”.

Ideas for herbal tea blends:
Make Your Own Herbal Teas

Directory of useful herbs
Directory of Culinary and Medicinal Herbs

Some ways I’ve experimented with my harvested herbs:
Fun With Food
Melt and Pour Soap Recipes and Other Personal Care Products – making soap is what inspired me to start growing herbs in the first place!

Categories
Gardening

Bulb Planting and Care Tips for Fall

Bulb Planting and Care Tips for Fall

by Carolyn Hasenfratz

Many popular bulb plants, such as Tulips, Daffodils and Hyacinths are best planted in the fall. Here are some tips to help you get the most out of your bulb investment.

Preparation, Selection and Planting of Spring Flowering Bulbs

  • Since the food the plant needs to flower in spring is contained in the bulb already if you have quality, healthy bulbs to work with, you can choose to plant new bulbs every year to (almost) guarantee a spectacular display in spring. This is what they do in the bulb area at Missouri Botanical Garden where I took my Master Gardener Training. If you are interested in your bulb plantings lasting for several years, try to match the species of bulb you’re planting with the light and moisture conditions in your garden so that the plants can make enough food for next year. For example, in my garden Daffodils do not get enough sun to have produced flowers after the first year I planted them. They’ve survived for over a decade now and grow foliage but there are no flowers. I’m leaving them be because some of the trees in my area are sickly and if they are ever taken down my bulbs might flower in the future. If they don’t, the foliage is better than empty space and it’s ephemeral so they’re not in the way. But that’s not the most satisfying way to enjoy bulbs!
  • Bulbs need a lot of Potassium in the soil but low Nitrogen and mid-level Phosphorus. A fertilizer regimen that is suitable for onions will also work for bulbs. For spring blooming bulbs, apply fertilizer in late fall.
  • Soil with good drainage is very important for bulbs. If your soil does not drain well as is, the product Turface is recommended to improve the soil structure. You could also try planting in raised beds filled with well-draining soil.
  • As you decide what bulbs to plant where in your garden, also consider what plants could “take over” for the bulb plants once the foliage dies down and the bulb plants go dormant for the summer. This is called succession planting. You could wait until spring and work annuals in among the bulb plants or you could plant them with a perennial that is late to get started in spring or is not so aggressive that it will out-compete the bulbs. Bulb plants look wonderful emerging from low groundcovers. You’ll want to take into account height, foliage colors and texture, bloom colors and bloom times as you plan your bed. Keep good records of what you did because it’s really easy to forget the location of ephemeral plants! You could also try interplanting fall-blooming bulbs to remind you where the bulb areas are when the spring bulbs are dormant.
  • Some bulb plants with a strong vertical aspect such as Alliums and Tulips might look good as part of a formal planting but many other bulbs look better in a natural planting style. For an informal look, planting in “amoeba” shapes in odd numbers works well. You could also try tossing a bunch of bulbs in the air and planting them where they fall. The smaller the plants are, the more you will need to get a good show.
  • Animals that snack on bulbs need to be considered while planning your bulb plantings also. If certain animals are a problem in your area, look for bulbs that they don’t like – there are repellents you can try but although it will limit your selection it’s much easier to plant something less tasty. For example in my garden squirrels are a big problem but there are no deer, while other neighborhoods have many deer.
  • Squirrels that dig up bulbs might be deterred by a wire screen placed over the bulbs and just under the soil. This takes some effort and planning but is a lot less trouble than constantly applying repellents. Make sure the holes in the screen are big enough for the plant stems to get through without allowing access to the bulbs. Schnarr’s sells plastic-coated wire mesh which will last a lot longer than uncoated wire.
  • I’ve heard that squirrels can smell bulbs. In case this is true, you could try placing the bulbs in the holes with tongs to avoid getting the bulb smell on your gloves or changing gloves after you handle the bulbs so you don’t get the smell on the soil and other things. If you discard any bulb parts in the compost such as some of the papery sheath that falls off the bulb, make sure your pile is not near the bulbs. I don’t know for sure if this helps but it’s a small effort that might pay off.
  • When planting, the hole should be big enough to accommodate the bulb without having to jam it in. If you can find spacing and depth recommendations for the specific plant, use those guidelines. If you are not sure make the hole thrice the depth of the bulb and space them apart the the same distance (thrice the depth of the bulb) . It’s better to plant a little too deep than a little too shallow because a too-shallow planting can hinder blooming in some bulbs. The orientation of the bulb is important – the root side needs to point down. Discard any bulbs that are mushy or moldy.
  • Water in your new bulbs well while planting and give adequate moisture through fall so they have a chance to grow some roots before deep cold sets in.
  • Overwintering Non-Hardy Bulbs

    Do you have any bulb plants in your garden that are not winter hardy? Depending on the species they may need to be dug up and stored for winter before the first hard frost. Other plants such as Dahlias, Cannas and Pineapple Lilies can be overwintered by putting a circle of mesh around the plant and filling it with loose mulch 1-2 feet deep. Look up the guidelines for your particular plant if you are not sure.

  • To store non-hardy bulbs that need to remain dormant over winter, after digging, divide and clean them. Let them dry out then dust them lightly with sulphur powder to prevent rot. Pack them with peat moss or wood shavings in a crate or box and store them in a dark, dry, cool location. Make sure the bulb storage area is away from stored fruits and vegetables so the ethylene gas emitted by the ripening fruits and vegetables does not harm the bulbs viability. Replant in spring after the last frost.
  • For tender bulb plants that do not go dormant, repot in a container. Trim off any old foliage but leave the good foliage. Keep evenly moist in a well-lit warm environment.
  • Here are links to some specific planting and care guidelines for bulbs that we sell at Schnarr’s. The bulb offerings at each of our stores differ somewhat so call ahead to check on stock if you want a specific plant.

    Hyacinths
    Hyacinths

  • Planting information from TOTALGREEN
  • Information on Hyacinths from Missouri Botanical Garden

  • Daffodils
    Daffodils


    Tulips
    Tulips


    Alliums
    Alliums


    Crocus
    Crocus


    Muscari
    Muscari


    Categories
    Gardening Outdoor Fun

    How I Use My Garden for Self Care

    How I Use My Garden for Self Care

    by Carolyn Hasenfratz

    mygardenLife can be stressful at times. If we don’t take time for self care our health can suffer. I recently saw an advertisement for a workshop about gardening and holistic self care. I was not able to attend and learn some new things, but I can think of a lot of ways in which my garden already helps me with my own self care.

    Exercise – That’s good for physical and mental health.

    Time outdoors – Health benefits accrue from contact with nature and sunlight.

    Hobby activity and learning – Observing what is going on in my garden and finding out the reasons why is great excercise for the brain. Studying for my Master Gardener tests earlier this year gave my memorization skills a big boost. If photography, sketching, painting or other visual arts are hobbies for you the garden can provide a lot of interesting subjects.

    Mindfulness – I’m learning more about Mindfulness and how to practice it. The pleasant sensory experiences in a garden (taste, sight, smell, sound, touch) are a great incentive for Mindfulness exercises.

    A sense of purpose – When I work on my garden, I have the satisfaction of knowing that I am learning things that I can teach to others. I’m making the vicinity healthier and more pleasant for my human neighbors. Because of the way I manage my garden I’m helping address environmental problems that affect all of us – soil erosion, soil health, flooding, overuse of pesticides, scarcity of pollinators for crops, air quality and water quality. The impact of my garden may be small but it’s more satisfying to do something than nothing. The number of beneficial non-human species that use my garden lets me know that I’m providing healthy habitat for them. I also donate some of the extra seeds I raise to non-profits.

    Indoor environment improved – My gardens surround all three exterior walls of my condo so when I open the windows delicious fragrances waft in. I set vases of cut flowers and herbs around to freshen and beautify the interior. If you believe in aromatherapy, you can breathe in some herbal essential oils right from the plant! I also make potpourri from the dried herbs.

    Nutrition – I harvest edible leaves and make tasty beverages from herbs in my garden. The freshness enhances both taste and nutritional value.

    Personal care products – I use herbs from the garden dried or fresh in a number of personal care products such as facial masks, bath tea, soaps, face lotion, skin balm and more (some of my recipes are here). Luxury bath products do make you feel cared for and when you make your own they’re even more luxurious because they’re made to your specifications.

    Spritual benefits – Many faith traditions can incorporate gardening and plants – for example mazes, grottoes, shrines, incense and more. Many people find that working in concert with nature makes them feel closer to the Creator they believe in.

    According to a book I’m reading now, “The Expressive Arts Activity Book” by Suzanne Darley and Wende Heath, the arts are inherently therapeutic. Gardening is an art and many products of the garden can be used in art forms such as cooking and flower arranging. Although I don’t know much about it yet, there is a professional field called Horticultural Therapy. If you already have a garden, I encourage you to take time to enjoy it’s benefits. If you are thinking of starting one the fall is an excellent time – waiting until spring to start a garden from scratch can be a challenge!

    Categories
    DIY Gardening Home Decor Upcycling Ways With Wood

    Build a Mosaic Plant Stand

    Build a Mosaic Plant Stand

    by Carolyn Hasenfratz

    Make a Mosaic Plant Stand

    In this article I’ll show you how to make a stand to show off a special container plant. Raising a planter off of its surface can really enhance the appearance of a single specimen or help you create an attractive container plant grouping by providing elevation to some containers. Such a stand may also help protect the surface underneath by allowing air circulation under the pot so the surface can dry out between waterings. This stand is designed for both indoor and outdoor use. It is designed to let water from the plants run off, rather than catching it. This stand can also be used as a sturdy trivet indoors or outdoors.

    Tools and Supplies
    * indicates items that are available at Schnarr’s
    8 x 8″ x 1/2″ board*
    Lattice wood strips 1 1/4″ wide*
    Saw*
    Miter saw*
    Sandpaper*
    Dust mask*
    Pencil or pen
    Ruler*
    Hot glue gun*
    Wood hot glue sticks
    Drill*
    Tiny drill bit*
    Nails*
    Hammer*
    Wooden ball knobs or drawer pulls with 3/16″ holes to use as feet (Wood drawer pulls are available at Schnarr’s Webster Groves store)
    Wood glue*
    3/16″ drill bit*
    3/16″ dowel rod*
    An assortment of ceramic tiles and/or glass pieces that are about 1/4″ thick
    Palette knife or putty knife*
    Ceramic tile cement*
    Old plastic lid
    Tile grout*
    Water container*
    Mixing container for grout (can be an old food container)
    Rags*
    Disposable gloves*
    Bucket* of water for cleanup
    Tile and grout sealer*

    Instructions

    1. Cut an 8 x 8″ square out of 1/2″ thick plywood.

    2. Cut four 8 1/4″ lengths out of a piece of 1 1/4″ wide lattice wood. Miter the corners at a 45 degree angle as you cut.

    3. Put on dust mask and sand the rough edges off of your wood pieces.

    4. On the inside edge of each mitered piece draw a line 1/4″ from the top.

    Mitered wood strip with drawn line

    5. Glue mitered pieces to the edges of the 8 x 8″ block using hot glue as the adhesive and your drawn line as a guide to help line them up. You should end up with a 1/4″ lip all the way around, creating a tray that will hold your tile pieces.

    1/4 inch lip around edge

    6. As a reinforcement to the glue, drill a couple of small pilot holes on each side of the tray and hammer nails in for a strong hold.

    7. Choose four wooden ball knobs or wooden drawer pulls with 3/16″ holes. Place them in the corners of the bottom of your tray. Draw around the base of each with pencil to indicate where their footprint will be. Set knobs aside.

    8. Switch to a 3/16″ drill bit and drill a hole in the center of each drawn circle. Try not to go all the way through the wood but if you accidentally do it’s no big problem.

    9. Cut short segments (about 1″) from a 3/16″ in diameter piece of wooden dowel rod to make pegs. Insert pegs into holes in wood and thread knobs onto pegs to make sure they are not too long and that there is no gap between the knob and the bottom of the tray. When satisfied, remove, dab wood glue onto each end of each peg, and re-insert into holes. Place knobs over pegs and press in place. Let wood glue dry. I left the wood unpainted in my sample but if you want to you can paint or stain the wood and give a waterproof clear coating like spar varnish.

    10. Get out your tiles and arrange in the tray to make an arrangement that is pleasing to you. For my sample I used tiles I salvaged from Leftovers, Etc. and some translucent glass blobs which were backed with colored paper. Try to leave a litte bit of space between each piece.

    11. Once you have decided on an arrangement, scoop a small quantity of ceramic tile cement out of the container and place on an old plastic lid. Keep container closed so the rest of your cement doesn’t dry out. Use palette knife or putty knife to apply cement to the back of each pice and press in place. If any tile pieces are thinner than the others, you can put some extra cement on the back to build up the height. Let cement dry for the time period indicated on the container.

    Tiles glued down and before grouting

    12. When cement is dry you’re ready to apply grout. Grouting is very messy – I recommend you wear old clothes and protect your work surface and floor. Have plenty of clean rags on hand and a small bucket of water for cleanup. Don’t be surprised if you need a bath when you’re done!

    13. Put some grout in a small plastic tray, such as one left over from a microwave dinner. Add water until it’s about the consistency of soft cream cheese – a little at a time to make sure you don’t add too much. Stir it with your putty knife as you add the water. Try to only mix up small amounts at a time so it does not start to set up before you’ve applied it.

    14. Put on your disposable gloves, and use a rag to pick up a portion of tile cement. Smear it around to fill the cracks between tiles. The rags will help protect your hands from sharp pieces if there are any. The thin disposable gloves will protect your hands from being irritated, dried out or discolored by the grout, but alone they will not protect you from cuts.

    After the tray is grouted, go back over it with a succession of fresh rags to remove the grout from the surface of the tiles. Dampen the rag with a little water toward the end to get them really cleaned off if needed. Be careful not to dispose of any grout in your sink – it could clog the drain. Dispose of any rags that are really soaked with grout – I put mine in the compost. If some are only slightly dirty, you may be able to re-use them by rinsing them in a bucket of water. If you do that, dump the dirty water out in the yard, don’t put it down the drain.

    15. Let the grout dry, then apply tile and grout sealer. You’re done!

    Finished mosaic plant stand

    Categories
    Gardening Good Eating

    Recipe: Herbed Up Melon Salad

    Recipe: Herbed Up Melon Salad

    by Carolyn Hasenfratz

    This will spice up your breakfast a bit!

    Go the garden and pick a double handful mixed selection of whatever you have in your garden from this list:

    Leaves:
    Bee Balm (Monarda), Lemon Balm (Melissa), Peppermint (Mentha), Korean Hyssop (Agastache Rugosa), edible wild Violet (Viola), Basil, Borage (young leaves)

    Flowers:
    Edible Hibiscus, Dandelion (discard calyx), edible Roses, edible wild Violet (Viola), Borage

    Chop a melon and put pieces in a bowl. Drizzle with lemon juice and agave nectar. Top with chopped herbs and flowers. If you have any discarded stems, use them to flavor your morning tea!

    If you are interested you can read more of my recipes on my Fun With Food page.