Author: Carolyn Hasenfratz Winkelmann
Carolyn was raised in a DIY household. From an early age she was encouraged to try everything from baking to soldering. These days she enjoys paper crafts, mixed media crafts, sewing, ceramics, mosaics, gardening, making things out of wood, home decor projects and upcycling found items into useable and decorative objects.
In the past Carolyn has worked in the retail, web design, and marketing fields. She now works part time at Schnarr's as a cashier, helps with the store's marketing efforts, writes her own blog and craft tutorials, and teaches craft classes. Carolyn’s father introduced her to hardware stores, his tools, and the “stuff stash” that every DIYer collects. It’s no surprise that time spent at Schnarr’s makes her giddy in the presence of things you can use to create! She still loves working on projects with her Dad and it's a treat to make a joint trip to the hardware store!
Carolyn is excited for the opportunity to help Schnarr's customers enrich their lives with creative and fun projects. She wants as many people as possible to experience the joy that DIY projects have brought to her life.
Other places to share Carolyn’s passion for creating:
Carolyn Hasenfratz Design Blog - http://www.chasenfratz.com/wp/
Carolyn's Stamp Store - http://www.carolynsstampstore.com/catalog/index.php
Carolyn's Pinterest Boards - https://www.pinterest.com/chasenfratz/
Tim’s tips for February Lawn and Garden Care
There are many tasks that need to be performed in the yard and garden at this time.
If you mow your own lawn, give your mower a spring tune up. Get blades sharpened, change oil, check for mechanical problems and check that your blade is set at the right height for the type of grass you have.
If your turf has too much acid apply lime to correct the PH.
If your PH is too high (too alkaline) and your soil is compacted, add some gypsum. Gypsum will also combat the effects of salinity and sodicity in the soil that may occur due to irrigation and the use of ice melting products. Gypsum reduces soil crusting and aids water penetration into the soil.
Scale in trees appear this month and they are crawling. Now is a good time to use dormant spray/horticultural oil if you need to control them. Dormant spray/horticultural oil is a product that does not discriminate between beneficial and non beneficial invertebrates, so it’s best to apply it for scale when other invertebrates are not yet active.

February is a good time to prune trees, shrubs and perennials, especially fruit trees. Some evergreens are not yet ready for pruning. Prune pines, holly and spruces now. Wait another month to prune boxwoods and yews.
Take a look at your lawn and planting beds. Unwanted woody plants can be a problem. Look for invasives such as Mulberry and Honeysuckle. If you can identify them without their leaves, pull or dig them as soon as you can. If you can’t pull or dig the unwanted woody plant out, cut off as much of the stem as you can and dab an herbicide product onto the end of the stub. You can apply the herbicide with a paintbrush or bingo markers. For safety wear gloves and use eye protection while applying. Ferti-lome Brush Killer Stump Killer is a product sold at Schnarr’s that would be suitable.
It’s drier than normal for this time of year, so water your evergreens now.
A Couple of Common Problems with Trees
A Couple of Common Problems with Trees
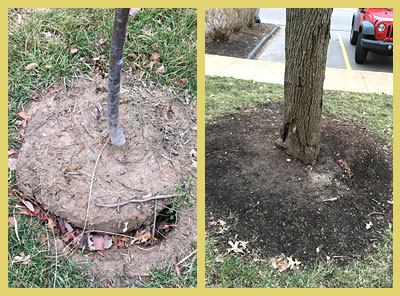
The two trees in the picture above have some issues. The one on the left was planted in early winter in my neighborhood. That in itself is not a problem – hardy woody plants and perennials can be transplanted any time in winter that the soil is workable – that is, not frozen and not too wet. This winter there have been times when the soil has been frozen but certainly not continuously and there were some good opportunities for planting. The trouble lies in the gap you see between the original root ball and the side of the new planting hole. A freezing spell has pushed the root ball partly out of the hole. This is called “frost heaving”. It’s not good for the root flare of the tree to be too much higher than the surrounding soil, though having it a little too high is better than having it too deep. The root flare is the topmost point where roots start to flare out from the trunk. There is also an air pocket around the roots which can hinder root growth, moisture uptake and tree stability. A good course of action for this tree would be to try to push the root ball back in the hole if possible (while not compacting dirt too much), to fill any gaps with dirt and to apply 2 to 3″ of mulch around the tree to regulate temperature extremes around the planting and retain moisture. Moisture level is especially important in the first 2-3 years after planting. If mulching isn’t done correctly however it could cause the problem that the second tree on the right is suffering from.
The tree on the right is in front of my bedroom window. I’ve lived in my condo for 12 years and ever since I moved in this tree has had a “mulch volcano” around it. Mulch around a tree should not touch the tree trunk or be piled up around the trunk. This tree produces beautiful white flowers in the spring and I will miss it if it has to be removed. It might be doomed because during this past year the bark has been cracking and peeling off, a sign that it’s dying. Am I certain that the “mulch volcano” caused whatever the problem is? Not 100% because the disease has not been diagnosed, but since this practice is well known to cause death to the inner bark layer (cambium) or cause myriad other problems I recommend you avoid it. Trees can be mulched all the way out to the drip line or beyond if you want, and if you do that they may grow up to three times faster because they won’t have so much vegetation (like grass) to compete with for nutrients. The mulch must not touch the trunk – keep mulch several inches away and make your mulch resemble a donut rather than a volcano!
I hope you can protect your investment in trees by avoiding these commonly occurring issues!
Prairie Restoration at Litzinger Road Ecology Center
I’m a volunteer at the Litzinger Road Ecology Center in Ladue. Volunteers and on some occasions the public are invited to educational events on the premises. I recently attended a session for volunteers to learn about why the prairie sections at the center are periodically burned and an introduction about how to start a fire, control the fire, and perform the burn safely.
At the time of European settlement, about 1/3 of the state of Missouri was covered by tall grass prairie. Today 70,000 acres remain and only 22,000 acres are protected, making prairie one of the most endangered ecosystems. Fire is necessary to maintain prairie. Lightning and human intervention provided the fire in historic times and in the present day.
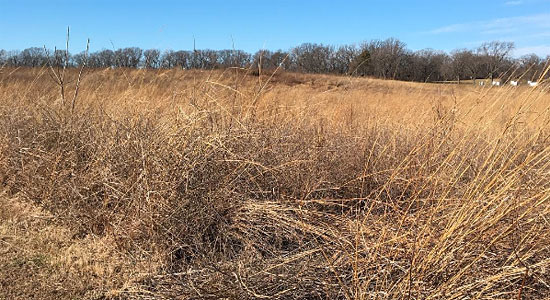
An example of a restored tall grass prairie at Fort Bellefontaine County Park
Here are some reasons why Native Americans in Missouri used fire:
- Fire stimulates growth of raw shoots which attract game animals to eat them
- Aid to visibility of enemies coming
- Weapon against enemies
- Herding game
- Made travel easier
In the present day fire is used for managing remnants and for restoration. The prairie at LREC is not a remnant of prairie that was never plowed or otherwise destroyed, it is a restoration approximating to the best of our ability what used to be there. A real prairie takes thousands of years to form so a restored prairie is not exactly the same but a managed restoration can perform some of the functions of this type of ecosystem.
Purposes fire management at LREC:
- Removal of non-native invasive plants and woody seedlings that are unwanted
- Supports birds and other animals with food and habitat
- Encourages forbs and grasses
- Increases plant diversity
- Protects against unplanned burns by removing excess fuel
- Removes thatch and helps animals that can’t make use of the thatched areas
I’m sure many readers remember the Yellowstone Fire of 1988. That is an example of a situation that was more serious than it might have been if the land had not been managed to suppress all fire and to let fuel build up for many decades. My first visit to Yellowstone was during the 1988 fire so I remember it well!
At LREC we only burn certain sections of the prairie at one time, so animals can escape and take shelter in the unburned portions. Also we want to leave some habitat for insects, reptiles and amphibians. We try to keep from cutting down or burning stems until spring because many insects overwinter in the stems and they need a chance to escape.
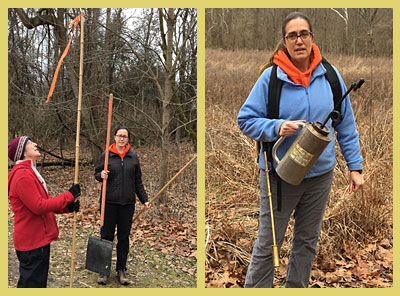
We were shown tools and techniques that are used to start and manage controlled prairie fires
This year we are going to attempt to burn the “Mulch Pile Woods”. Woods are harder to burn because there is less fuel. The large piles of brush will be removed before the burn because too much fuel could set trees on fire and we only want to burn the undergrowth. Large logs and vines may also be removed before the burn. Some wood may be returned after the burn so it can continue to serve it’s natural purpose in the forest.
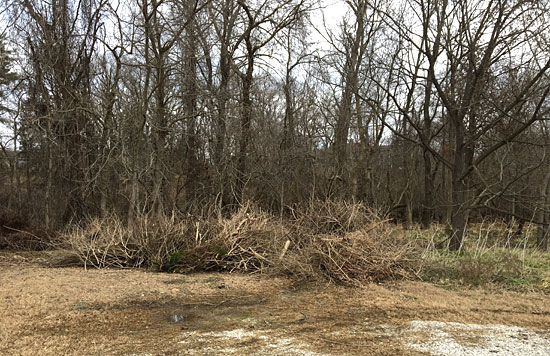
The brush in the foreground will be removed before the burn because that is too much fuel for the type of fire desired
Settled areas are difficult to burn in. Mowing can be used for management in areas where burning is not possible. Mowed grassy areas are used around the prairie patches as a firebreak.
LREC submits burn plans to the Ladue Fire Department and the St. Louis County Health Department to make sure air quality is good enough and that the Ladue Fire Department is available for backup. We have to let them know what sections we want to burn and what the reasons are for burning. Three prairie sections are on two-year rotations.
The best conditions for burning consist of low wind speeds, humidity levels of 20-50%, air temperature of 35-65 degrees F and good air quality. LREC obtains a permit for a range of dates so they can seize a favorable opportunity when it happens. Volunteers are given 24 hours notice. This year a permit was applied for between December and May. The Ladue Fire Department comes as a backup but so far they have not needed to do anything to help out. If the Fire Department is too busy to come that day the burn will have to be postponed until they are available.
Click this link to see photos and video of previous year’s burns:
Many volunteers at LREC are eager to witness a burn or to participate in one because it’s unusual and exciting. I don’t know if I’ll be available the day it happens this year, but if I participate I’ll be sure to write about how it went.
If you would like to learn about fire safety or how to conduct a controlled burn on your own property, these resources from the Missouri Department of Conservation will help you get started:
Here are a couple of my other articles about activities at the Litzinger Road Ecology Center:
550 KTRS broadcasting live from Schnarr’s Ladue on December 21, 2016
Recipe: Kombucha Cocktail
Recipe: Kombucha Cocktail

Kombucha is a fermented tea drink that contains a lot of probiotics. I attended a lecture on fermented foods recently and decided it sounded interesting. The lecturers recommended trying small amounts of Kombucha at first until your digestive system gets used to it. Here is a really refreshing drink to try.
Pour in layers into a glass filled with ice:
1/3 Kombucha
1/3 Sparkling Cucumber flavored water
1/3 Chilled herbal tea
Optional: garnish with fresh herbs or edible flowers from the garden.
Are you interested in brewing your own Kombucha? What interesting flavors could you make from your tea herb harvest? Here are a couple of articles to help you get started.
How to Harvest and Dry Herbs
How to Harvest and Dry Herbs
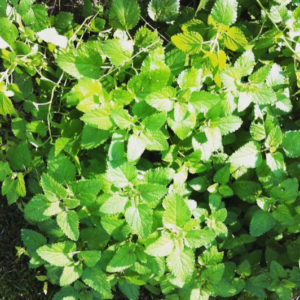
Lemon Balm – Melissa officinalis
Here are the methods I use for drying and storing herbs. These procedures come partly from the book “Growing and Using Herbs Successfully” by Betty E.M. Jacobs plus years of trial and error. In order to get the optimal flavor and fragrance from herbs, the best time to harvest them is between the time the first flower buds appear and before the flowers open. If possible, lightly spray the herbs with water the day before you plan to harvest, that way you can save a step by not having to wash them after cutting. It’s ideal to harvest on a sunny day after the dew has dried on the leaves but before the day has reached its hottest point. As you harvest, you can remove all but 4 inches of the stem on annual herbs. On perennial herbs, you can take 1/3 of the plant. Proper identification of your plants before harvesting for consumption is critical because some plants are toxic.
Different herbs will be at their best time for harvesting at varying points during the season. You may be able to get two or three cuts from some plants. If you miss the optimum time, you will still get some benefit from the herbs but you may have to use more. Some of my herbs (like most members of the mint family) need to be trimmed and thinned regularly anyway to keep them from taking over the garden.
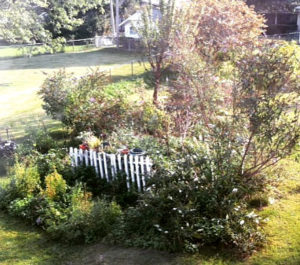
Dad’s garden in early October – lots of Lemon Balm and Peppermint around the fence
There are some exceptions, but most herbs can be stored and used in the dry form. It’s most common to dry herb leaves, though with some herbs you might use different parts of the plant such as the flowers or roots. I’ll demonstrate an easy way to dry leafy herbs with some Lemon Balm (Melissa officinalis) from my Dad’s garden. These plants (and all the Lemon Balm plants in my own garden) are descendants from a specimen I purchased a the Webster Groves Herb Society Sale in 2003 when I first started herb gardening.
If your herbs are already clean from spraying with water the previous day, you can put them right in the drying bag. Take a paper grocery bag and write on it the species you are harvesting and the date. Cut the herbs and loosely let them fall into the bag as you cut (cut the parts you want rather than pull off as pulling may damage the roots). Put the bag in a dry, dark area for one month. To save space, I hang my bags with clothespins from a chain in a closet. The herbs should be dry after a month has passed. The next step is to strip and store the herb leaves.
Stripping the leaves from the stems is very easy but a little messy. You might want to do this task outdoors if possible but if the weather is not favorable you’ll have to do this inside. Spread a towel over your work area to catch plant bits. Place a container to one side to catch stems. Take each herb stem from the bag and hold it over a large bowl. Starting from the top of the stem and working down, pull off the leaves with your hand. If the herbs are fully dried the leaves should come right off with no effort. There are a few herbs that cause some irritation to my nose during this step so if you are concerned about allergies you could try wearing a dust mask.
Store the stripped leaves in a labeled glass jar or in a paper bag, away from moisture or sunlight. Keep the leaves intact if possible before using, in case crumbling them ahead of time releases some of the potency. If you later notice any condensation in the jar, the herbs were not dry enough, so take them out and let them dry some more in a paper bag so they don’t get moldy. You can discard the stems in the compost or try to find a creative way to use them – depending on the herb the stems may have some fragrance or flavor in them. I’ve been known to put them in sachet bags, grind them up to make fragrance pastilles, burn them in a grilling fire or campfire, heat them in water in potpourri crock pot or use them to make flavored vinegar. When it’s time to use the herb leaves, they will probably crumble just fine with your fingers but you could use a grinder or mortar and pestle to help get a finer grind if needed.
If you need to wash the herbs after picking, here is an easy way to do it. Clean your kitchen sink and fill it with cool water. Take a handful of herb stems with leaves and shake – this helps dislodge any bugs or dirt. If any leaves fall off on their own accord, discard those. Quickly dunk the herbs in the water, shake again and let drip dry on a towel. Inspect each stem for chewed up or discolored leaves and remove those. Place herbs on another dry towel and let dry. If you need to speed up the drying, you can run a fan over them. Turn the herbs while drying and place them on a fresh dry towel. Usually after about a day the herbs are dry to the touch and ready to put in a labeled bag and left for a month in a dark dry place to dry completely. If you have larger quantities of herbs to handle and you have space you can set up special drying areas with racks but if you want to keep it simple just harvest as much as you have room to process at one time.
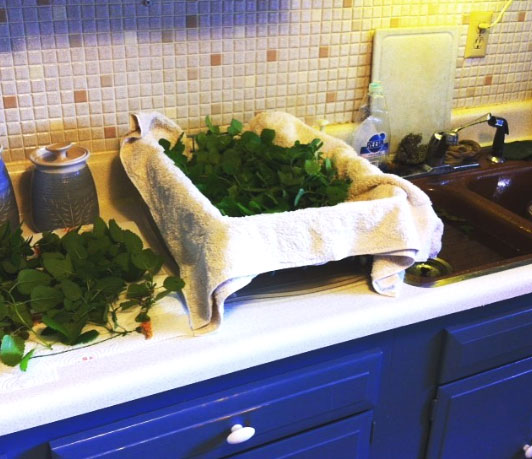
Herb washing and drying station in Dad’s kitchen
The preceding instructions will work for most herbs but if you need guidance with things like fruits, seeds, fleshy roots or other special cases just do a search for “how to harvest + name of herb”.
Ideas for herbal tea blends:
Make Your Own Herbal Teas
Directory of useful herbs
Directory of Culinary and Medicinal Herbs
Some ways I’ve experimented with my harvested herbs:
Fun With Food
Melt and Pour Soap Recipes and Other Personal Care Products – making soap is what inspired me to start growing herbs in the first place!
Bulb Planting and Care Tips for Fall
Bulb Planting and Care Tips for Fall
Many popular bulb plants, such as Tulips, Daffodils and Hyacinths are best planted in the fall. Here are some tips to help you get the most out of your bulb investment.
Preparation, Selection and Planting of Spring Flowering Bulbs
Overwintering Non-Hardy Bulbs
Do you have any bulb plants in your garden that are not winter hardy? Depending on the species they may need to be dug up and stored for winter before the first hard frost. Other plants such as Dahlias, Cannas and Pineapple Lilies can be overwintered by putting a circle of mesh around the plant and filling it with loose mulch 1-2 feet deep. Look up the guidelines for your particular plant if you are not sure.
Here are links to some specific planting and care guidelines for bulbs that we sell at Schnarr’s. The bulb offerings at each of our stores differ somewhat so call ahead to check on stock if you want a specific plant.
Skeleton Key Necklace
 This necklace project is great for anyone who likes the vintage or upcycled look in jewelry.
Tools and materials
* indicates items that are available at Schnarr’s
Skeleton key*
Vinegar* (optional)
Salt (optional)
Can of clear sealing spray* (could be acrylic or polyurethane)
Round nose pliers
Chain nose pliers (small long nose*, needle nose* or flat nose* pliers would also work)
Side cutters (When they’re sold as jewelry tools, these are called side cutters but the diagonal cut pliers* found at Schnarr’s are very similar. You can also buy long nose pliers that include a cutter. These aren’t as good for close in cutting as the side or diagonal cut pliers, but for this project they will probably be adequate. If you only want to buy one tool for this project and don’t care if your loops are perfectly round, you can get by with just the long nose pliers if they include a cutter. For perfectly round loops you will need round nose pliers in addition.)
Split ring pliers
An assortment of crystal, pearl and glass beads
Copper or gold colored seed beads
Headpins (6), eyepins (8), split rings (4) and large jump rings (4) in metal color or colors of your choice
1mm beading cord
Scissors*
Glue*
Crimping cord ends
Clasp
If you like, you can substitute metal craft chain* for the beading cord and then you would not need the cord ends.
Instructions
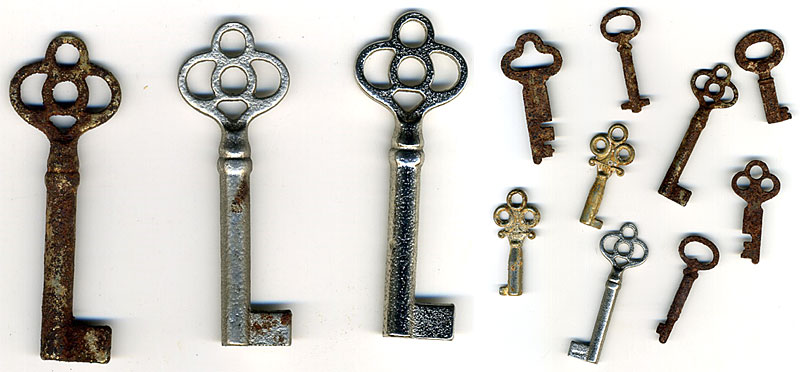
1. First select a skeleton key to be the focal point of your necklace. If you’re lucky you might find an antique key that looks just right. Vintage metal parts are in such demand that craft retailers sell a variety of replicas. You can also buy a brand new skeleton key from Schnarr’s. Decide if you want to simulate an antique patina. To artificially age your key soak it in a cup or so of vinegar with a teaspoon of salt added overnight. Let dry and rinse well with water. Let key dry thoroughly and spray with a clear coating.
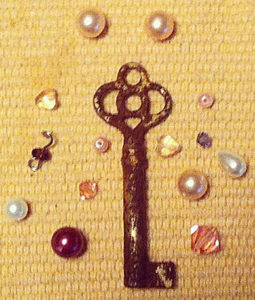
2. Put your key down on your work surface and select small beads that complement your key. Arrange beads around it to see if you like how they look and how you would like them to hang. You can also add charms if you have any.
3. Make dangles for each side of the key by stringing beads onto eyepins and headpins. Make some of your dangles longer by connecting headpin sections to eyepin sections. Use gold or copper colored seed beads as accents and spacers for the pearl, crystal and glass beads.
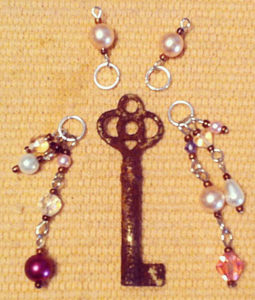
4. Attach dangles to the lower openings of the key on either side.
5. Select a large jump ring and attach it to the top loop of your key. Run a piece of chain through the jump ring to suspend the key as a pendant on the chain. Variation: if using beading cord, thread two additional pearl beads onto eyepins and use them as a transition from the jump rings at the top of the key to the beading cord.
6. Attach clasp to the chain ends with jump rings. If using beading cord, attach split rings to the pearl segments and attach a doubled piece of 1 mm cord to the split ring with a lark’s head knot.
7. If using beading cord, attach the clasp by crimping the cord ends with cord end findings, using a dot of glue to help hold them in place. Attach a split ring to each end then a clasp to one end. You’re done!
If you need a source for the jewelry supplies, try my online store or a local craft supply retailer.
See my Pinterest site and past lesson plans for more jewelry design ideas and other craft projects.
www.pinterest.com/chasenfratz/
www.limegreennews.com/lessons.html
We also have a lot of great projects on the Schnarr’s Pinterest site!
