Categories
DIY Upcycling

Art Journaling With Stencils and Image Transfers

Art Journaling With Stencils and Image Transfers

by Carolyn Hasenfratz Winkelmann

Materials (* = items that are available at Schnarr’s)
Scrap mat board or chipboard
Book binding rings* available at Schnarr’s Webster Groves Location
Clean scrap paper
Tracing paper
Clear packing tape – wider strips are the most versatile
An assortment of found papers (pages from old books, magazine pictures, catalog pictures, laserprint copies, paint samples, etc.)
Assorted papers to use as pages – can be drawing papers, art papers or found papers from various sources.
Paper towels*

Tools
Paper cutter
Art stencils* available at Schnarr’s Webster Groves Location
Permanent* and other markers
Colored pencils
Gel pens
Glue sticks*
Hole punch
Scissors*
Pencil*
Ruler*
Masking tape* or painter’s tape* for holding papers and stencils in place while tracing and stenciling
Bone folder, burnishing tool or squeegee*
Basin* filled with water
Clear packing tape*

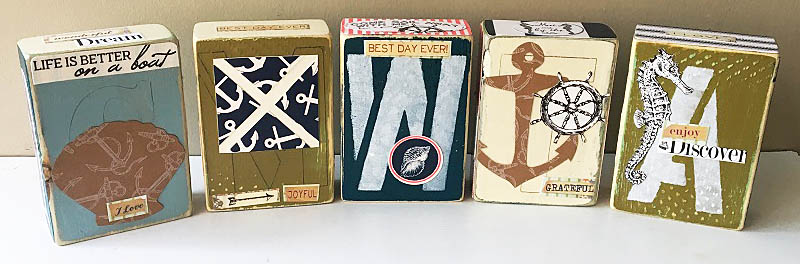
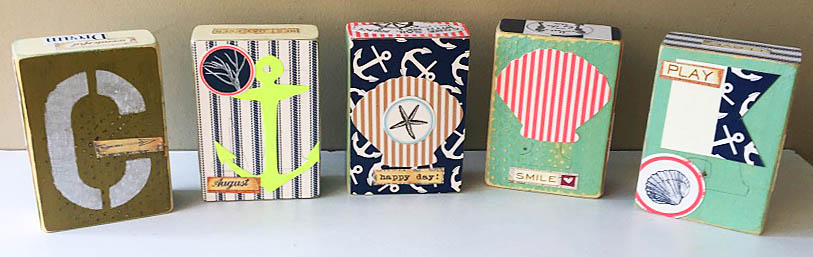
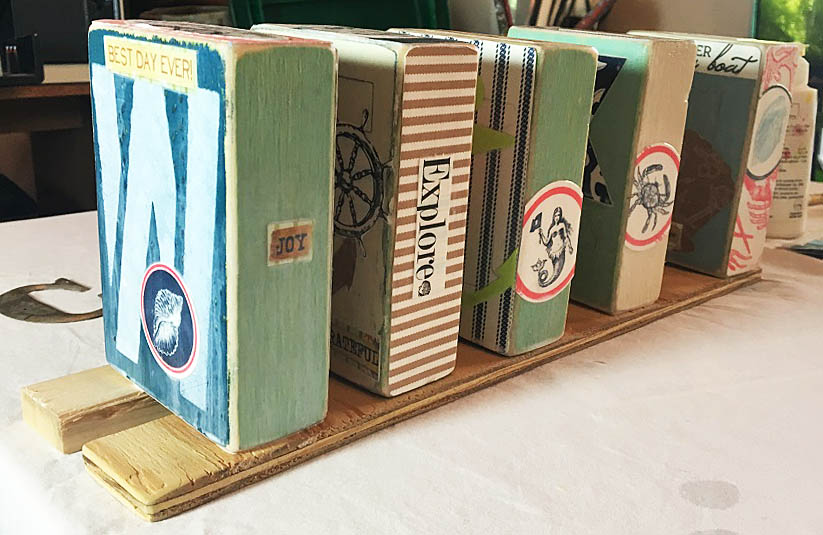
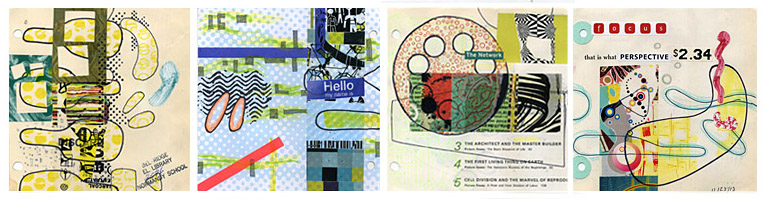
In case you missed my in-store demo during the Webster Groves Fall Art Walk in October 2018, this art journal book is what I was working on. I chose to work with a lot of abstract designs and random images to have fun with shapes and colors and not worry too much about content. When I was working on my demo, a customer asked what I was doing and I told him. He responded by saying, “I don’t have any kids”. Kids could do a book like this, but it’s fun for a person of any age who likes to experiment with visual media. I’m 51 and I can play with this stuff for hours! Coloring and playing is healthy for anyone to do.

Instructions:

To make the cover, cut two pieces of scrap mat board or chip board into 6″ by 6″ squares.

Punch two holes in each piece along one edge and link with binding rings.

From an assortment of your found papers, cut several pages 6″ x 6″. Using the cover piece as a template, trace circles on your inner pages to indicate where to punch the holes for the binding rings.

Here is a selection of potential pages cut from old books, posters and magazine ads.
Here is a selection of potential pages cut from old books, posters and magazine ads. You can use blank sheets of paper in your book, but it can be intimidating to start with a blank page. When you’re making altered art you can just build on what is there.

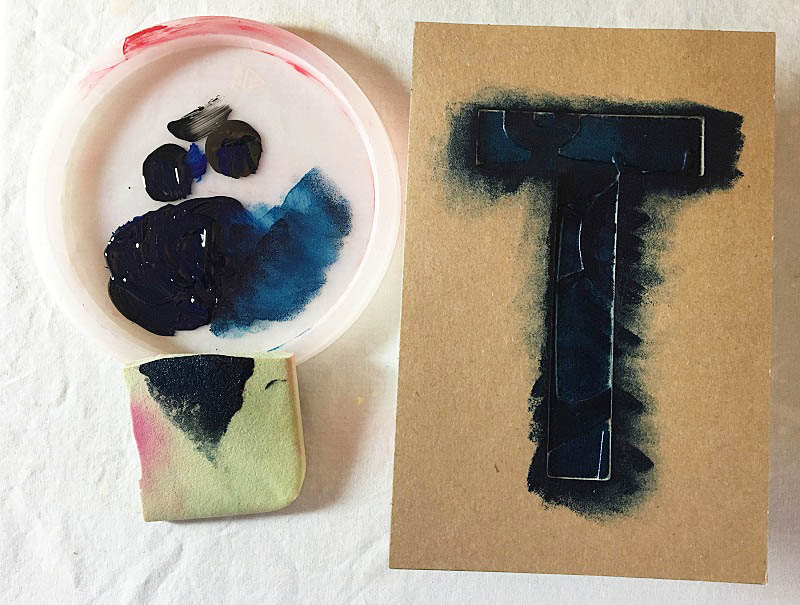
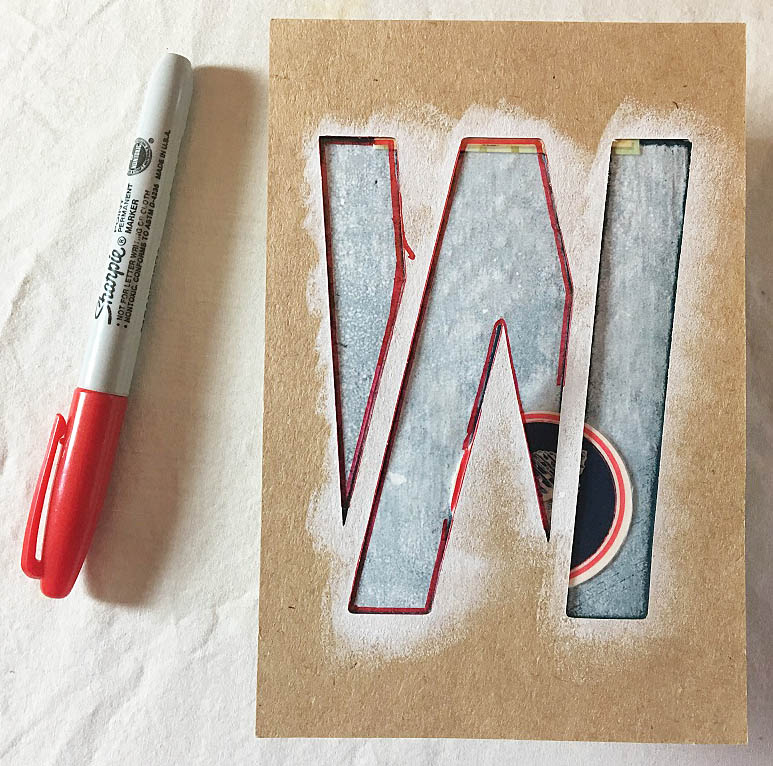
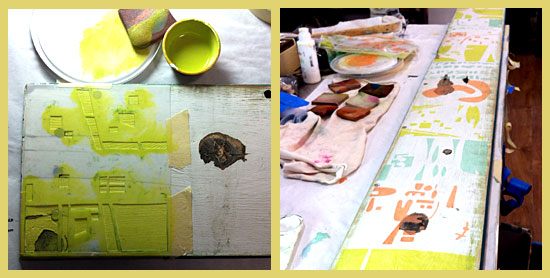
Using permanent markers, draw through some stencils to start some compositions on your pages. The stencils shown in the above sample are stencils that I cut myself. You can cut your own stencils or use pre-cut art stencils. It helps make your work more interesting if you vary the line weight of the markers. Add bits and pieces of collage papers if you are inspired to do so. Glue them down with a glue stick.

Here are a few more examples of two page spreads in progress.
Here are a few more examples of two page spreads in progress. I added paint sample strips to some of the pages to remind me to have fun with color.

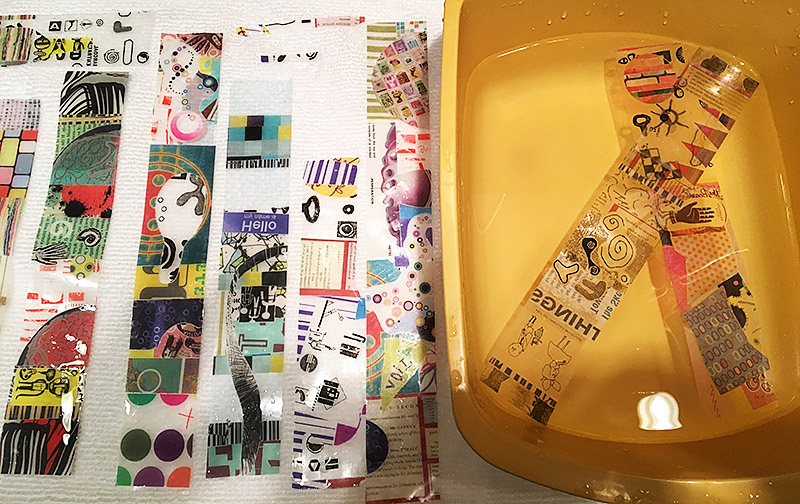
Next start making some image transfers to add to your pages from packing tape. Use masking tape to hold strips of packing tape flat on your work surface, sticky side up. Start sticking papers you like to the tape, keeping in mind that the side that connects with the sticky side and faces down is the one that will show. The recommended sources of good papers for image transfers are glossy images from catalogs and magazines, and black and white or color images from a copier or laser printer. Areas that are white on the paper may turn out to be mostly clear or translucent depending on how much ink and clays and minerals are in the paper.

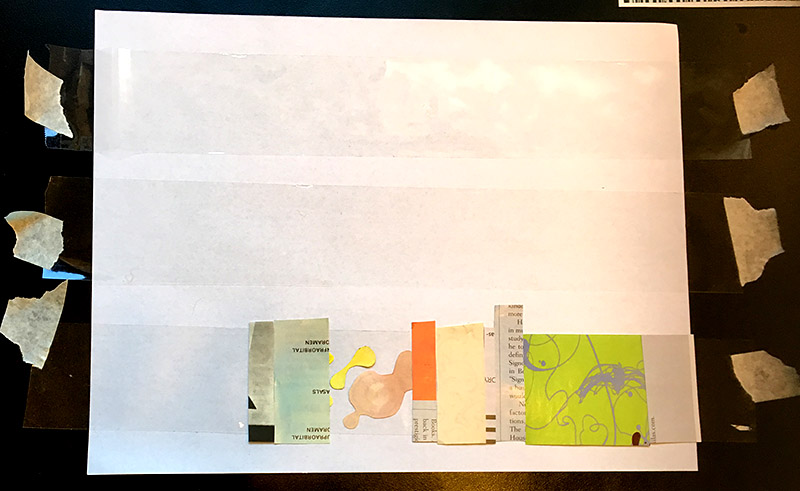
When you have covered the tape with images, turn the tape over and burnish well with a bone folder or squeegee. Burnish in at least three different directions and press hard to make sure all the paper areas make contact with the sticky tape. In the image below, the tape pieces in the center have had the paper removed already, and the strips on the sides still have the paper on the back.

After the tape strips are thoroughly burnished, soak them in water. When the paper on the back gets soft, gently rub it until it peels away. You will probably have to change the water and rub multiple times to get all the paper off. When you are done, only the ink will be left on the tape. Dry the tape pieces sticky side up on paper towels.

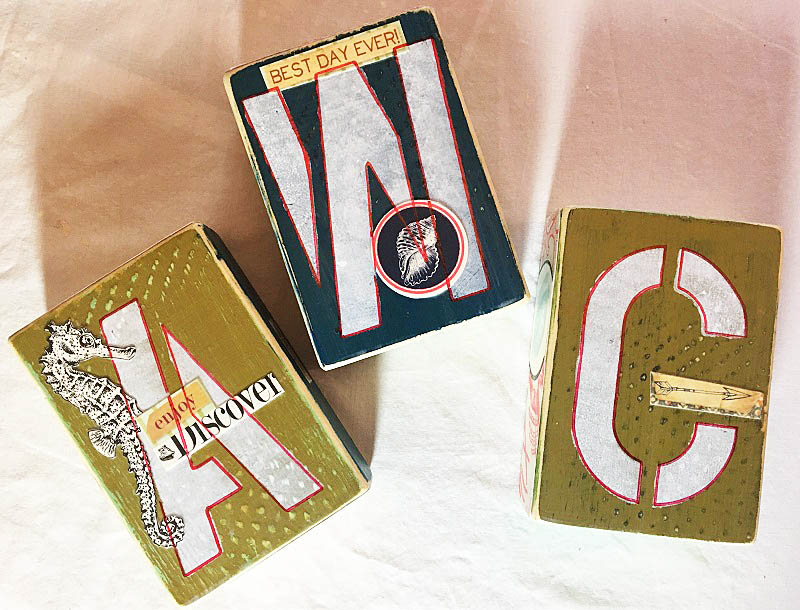
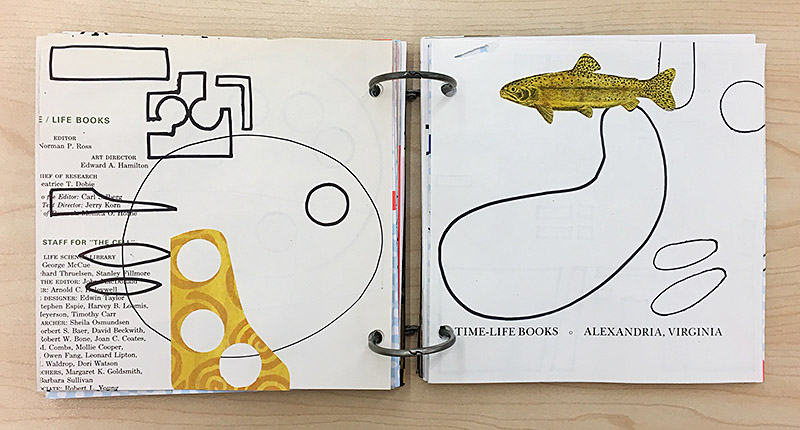
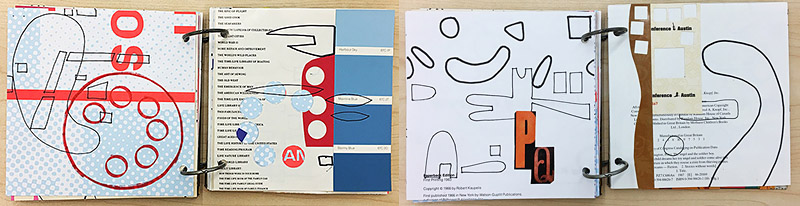
When your tape strips are dry, you can apply a glue stick to the sticky side and paste them in your book where you think they’ll harmonize with what you’ve already started. Continue to develop your pages further with coloring implements of your choice and more stenciling and collage if you choose. These little books make a great portable art activity if you carry them around with a selection of your favorite drawing and coloring tools. Here are some of my pages in various stages of completion.

Open the binding rings to insert your pages inside the covers in any order that you like. Decorate the book cover if you want. If you ever want to add new pages, you can just open the rings and insert them where you want them. I put a date on my pages when I consider them complete, and if I am really pleased with them I upload them to my Art Journaling Pinterest board. Have fun!

Categories
DIY Home Decor Ways With Wood

Stenciled Letter Blocks

Tools and Materials
*indicates available at Schnarr’s
*Wood blocks – 5″ x 3.5″ x 1.5″
*Water based paint in assorted colors
Old lids from cleaned food containers
*Letter Stencils
*Sponge
Scrapbooking or decorative paper
*Scissors
*Modge Podge matte finish (available at the Ladue Schnarr’s store)
*Paintbrushes
*Water container
*Sandpaper
*Painter’s tape or masking tape
Squeegee tool
*Rags
*Pencil
Sharpie Markers

Optional if using metal letters:
*Metal letters
*Hammer
*Nails or tacks

Cut blocks of wood into 5″ x 3.5″ x 1.5″ pieces (two-by-fours cut into 5″ lengths). Make as many pieces as you want letters. For example, if you want to display someone’s initials, cut two or three blocks. To spell out the word “holiday” cut 7 blocks.

Paint all sides of the wood blocks with holiday colors, beachy colors, or any color scheme of your choice. Let dry.

Sand the blocks to bare the corners and get rid of any painting mistakes. I’m fond of the distressed look so I don’t mind the sanded spots giving an aged and worn appearance to the wood. The distressed look is even better if your wood pieces have bumps, knots or other flaws in them.

I worked on several blocks at a time so I wanted to experiment with different layering effects. One some of the darker colored sides, I stenciled a letter with white paint.

Cut some shapes out of decorative papers and use Modge Podge to adhere them to some of the painted wood surfaces. You might want to use shapes that are related to the theme of your project, such as ornament shapes or trees for Christmas, fish for beachy, trees or deer for woodsy, etc. Possible sources of shapes to trace are stencils or cookie cutters. Let dry. You can also cover an entire side of the block with paper if you want.

Since I was working on several blocks at a time, I labeled the backs of my paper pieces and the spots where I wanted to put them with corresponding letters so I could match them up later.

Here is the method I use to apply paper with Modge Podge or other glue without the paper wrinkling.

  1. Paint one side of the paper pieces you want to glue with Modge Podge and let dry.
  2. Paint the other side and let dry.
  3. When ready to apply, paint a thin (but not watered down) layer of Modge Podge on the back of the paper and on the surface you’re gluing it to.
  4. Press paper in place and burnish with the squeegee tool to get a flat seal and push out excess glue. Wipe glue away.

To help me decide where to place paper pieces, I outlined in pencil where my stenciled on and metal letters would go.

Here are the fronts and backs of my blocks with the paper pieces glued on.

Mix up some white or off-white paint with water to make a light wash. Paint your wood blocks with the wash and let dry.

Use painter’s tape or masking tape to hold a letter stencil where you want it on a wood block. Sponge paint through the stencil. Remove stencil and let block dry. Repeat for each block until all your letters are done.

If you think your letters need a little more emphasis, you can place your stencil over the letter again and use it as a guide to draw an outline with a Sharpie Marker. You’re done!

Categories
DIY Home Decor Ways With Wood

Upcoming DIY Class at Schnarr’s – Stenciled Letter Blocks July 19, 2018

Upcoming DIY Class at Schnarr’s – Stenciled Letter Blocks July 19, 2018

Stenciled Letter Blocks – $20.00 Class

Join us at Schnarr’s Hardware in Webster Groves to decorate wood blocks with paint, stencils and mixed media to create fun home decor. Spell out words, make initial blocks. house numbers or dates to enhance a festive occasion. All supplies included.

CLASS DETAILS
Thursday, Jul 19 2018
05:30:00 PM
Price: $20.00

For More Class information or to Sign Up – Click here


Categories
DIY Home Decor Sustainability Upcycling Ways With Wood

Stencil a Sofa Shelf Made From Distressed Wood

Stencil a Sofa Shelf Made From Distressed Wood

by Carolyn Hasenfratz

Sofa shelf made from distressed wood

This project was made from the same stash of distressed wood that I used for the previous project Stencil a Wood Garden Sign. I kept aside a couple of intact large planks so I could make some interesting shelving. The wood was bare on one side and had partially peeling white paint over green on the other side. I decided to use the white side as a ground for some stencils I cut that were inspired by a mid-century modern building I saw on vacation last summer.

Tools and Supplies
* indicates items that are available at Schnarr’s
Distressed wood plank the length of your sofa
Sandpaper*
Dust mask*
Drop cloth for work surface*
Water based paint* for large areas
Acrylic craft paints for stenciling
Decorative stencils
Water based clear satin wood varnish*
Rags*
Paintbrush*
Assorted size old food containers for mixing paint and varnish
Sponges*
Old food container lids to use as palette while stenciling
Masking tape or painters tape*
Shelf brackets*
Screws*

Instructions

1. Put on a dust mask and sand your wood plank to remove rough edges and peeling paint. It’s always a good idea to wear a dust mask to keep from breathing small particles but I think it is even more important when working with old salvaged wood. You don’t know what that wood was treated with, what is in the old paint and it could be moldy as well. After sanding, wipe off the dust with a damp rag.

2. My wood plank already had a satisfactory ground color, white, on what would become the top surface. If your plank does not already have a ground color that you like, you can apply one. House or wall paint is a good choice. One technique that is really effective with the distressed look is to paint a contrasting color under the ground color. Some random sanding here and there later to expose the different layers of paint will simulate the effect of an old piece of wood that has been painted multiple times.

3. Apply a contrasting color to the sides and bottom of the board. As you can see, when you paint surfaces where two colors come together at a corner, it’s easy to slop a little paint over where you don’t want it. One reason that I love the distressed look so much is that when you sand off paint to conceal your mistakes, it looks like part of the design. If you are trying to paint precise corners or lines they don’t look good unless they are perfect, but with a distressed effect you can be a little sloppy!

My distressed board with closeup of paint job

4. Next put your dust mask on again and sand the corners and edges of your board to expose the wood in those places. Then check to see if any paint is beyond the corner where it is supposed to be, such my example below on the left.

Sanding in process

Sand away any paint that is in the wrong place, such as the excess paint that I removed from the top of the board. As I sanded the excess paint off, I exposed some of the wood grain on the front of the board and some of the green paint that is under the white paint. If you are using a really beat up piece of wood like I did in my sample, you can make some artistic decisions about sanding other areas. If there was a rough spot that I found pleasing, such as wood grain, I sanded such spots to enhance the texture. If there were spots that were not pleasing, such as dirty spots or flaking paint, I sanded to remove those unwanted areas of paint.

5. Decide what design you want to stencil on the top side of your shelf. I designed stencils specifically for this project but I have and will use them in lots of other projects as well. If you would like detailed information on how to cut your own stencils, see my article Fun With Stencils.

6. Apply craft paint through your chosen stencils in the colors of your choice. If you are new to stenciling on wood, please see my article Stencil a Wood Garden Sign for detailed instructions.

Stenciling in process

7. When stenciled paint is dry, to further enhance the distressed look mix up a paint/varnish/water mixture. Here is how – in a small container, mix some paint until you get a shade of dark brown that you like. In another larger container, mix a half and half solution of water and satin finish water based wood varnish. Gradually mix in some of the brown paint until you get a stain that you like – test by brushing on an inconspicuous spot. It should be dark enough to tone down your design a little bit and give it a weathered look, but not so dark that it obscures it. When the mix is right, stain/varnish your whole board and let dry.

8. Attach brackets of your choice to the wall behind your sofa, and set shelf in place. You’re done!