Do you have discarded woody plant material? Try making a Bonsai!
When I was in college studying art, I took printmaking and ceramics classes. Some of the finest printmaking and ceramics in the world come from Japan and our professors exposed me to many beautiful examples and concepts. I made sketches at the Japanese Garden and turned some of them into prints. Several of my friends from ceramics class and I went on a multi-year Japanese kick. We made tea bowls and sake sets and acquired a taste for the appropriate beverages. We learned the Raku firing method. We started attending the Japanese Festival at Missouri Botanical Garden every year and bought all of the Japanese-influenced objects d’art and books that we could afford on our student budgets.
We greatly admired Bonsai and made lots and lots of Bonsai planters, many of which we sold at our pottery sales. I kept several for myself to experiment with Bonsai growing. I killed four Bonsai trees in a row before giving up. A college student schedule and lifestyle just doesn’t lend itself very well to Bonsai care I guess – my cacti collection had a much better survival rate! I still like making ceramic planters that would work for Bonsai – it’s a shape I just kind of naturally go to while wheel throwing though in recent years if I didn’t sell the planters I mainly just used them for dish garden type plantings.
Bonsai are not a particular species of tree – they are plants, usually woody, that are trained to grow at diminutive sizes but in the proportions of mature plants to create the illusion of a natural scene. Woody plants can be trained by wire and selective pruning to assume the shape of a craggy, aged and venerable tree, a popular style influenced by Japan’s natural mountainous terrain. This training takes a long time – decades, perhaps even longer than a human lifetime to achieve the desired effect. Any gardener has to learn patience but Bonsai gardening is a particularly good example of how Japanese culture promotes the long view of things. In my ceramics class we learned about how to age clay for better handling. We were taught how to speed up the process. To emphasize the benefits of aging clay we were taught about how Japanese potters made clay for the next generation while making use of clay that the precious generation had made for them. That’s an impressive attitude. If I make a Bonsai I’m pleased at the thought that future generations might enjoy it but I also want to get some enjoyment out of it in my own lifetime! One way to shorten the amount of training time required is to choose plant stock that features unusually thickened or distorted trunks or branches.
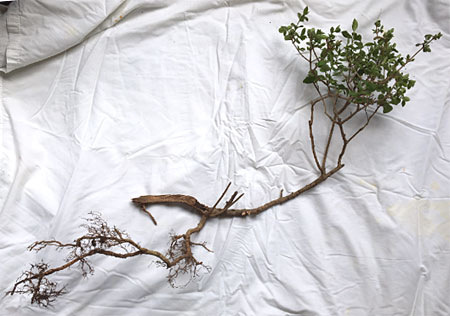
Sometimes plants that don’t look right for their intended purpose can be suitable for Bonsai. For example, this Privet bush (Ligustrum vulgare ‘Cheyenne’) was removed and replaced because it didn’t look right in the hedge where it had been growing. Back in the day I had read my Bonsai book so many times that I still remember some of the criteria for selecting good Bonsai stock.

This plant looks bad in a hedge but in my opinion it would make a great Bonsai!
When I saw this bush I thought of three things:
- Craggy, twisted shape – check
- Woody plant – check
- Small leaves – check
This plant has Bonsai potential! It was going to be discarded, so it’s not a big loss if I kill it. I’m going to try not to though!

My Bonsai experiment
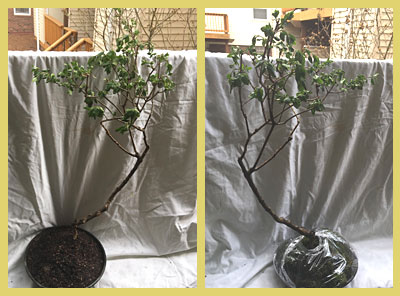
Here are the results of my attempting to turn a twisted looking, stunted privet bush into a Bonsai. I looked through my Bonsai book to decide what style of Bonsai was best suited to my plant material. There may be as many Bonsai styles as there are varieties of Koi, with corresponding Japanese names that I don’t know. I decided that since my bush had a long, prominent root system, the rock-clasping style would be appropriate. I read several articles online about rock-clasping Bonsai, and there seemed to be as many different ways of doing it as there were articles. In the rock-clasping style, roots are trained to grow exposed over a rock and become a major focus of the planting. One recommendation that came up more than once was to pack sand or some other substrate around both root and rock and put plastic wrap around the base, then remove the plastic and the sand from around the root and rock in a year or two to give it a chance to develop the thickness that will make the tree look old.
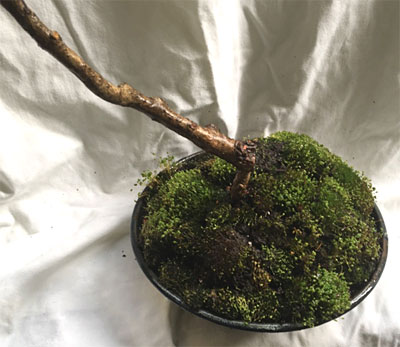
Since I also had some moss that I had collected from a site where it was being eradicated, I decided to use soil over my root and rock and overplant with moss. Both moss and Bonsai like frequent watering. Then after a couple of years I’ll remove the moss and replant it elsewhere and see how my root is doing under the soil.
I studied the shape of my bush and held it up to different rocks to see which would complement the shape of the bush. I refined the shape by pruning and held the bush roots on the rock with strips of old cut up fabric – these should rot away in time after the roots have grown enough to hold the bush in place.
Each article I read had a different recommendation for a soil mixture so I just decided to look at what I had on hand and do my best to make a well-draining and nutritious mixture. I used 1/3 potting soil, 1/3 earthworm castings, and 1/3 Flourite, a type of fired clay ground into small chips that is meant to give plants better drainage and supply them with iron. It’s usually used with aquatic plants. I don’t know if it’s common to use it for terrestrial plants but I didn’t have any sand or Turface on hand (a clay product that is great for improving soil drainage) so I decided to try it.
After I packed the soil around the rock and roots, I put the moss on top and wrapped it in plastic for a week, similar to what is done to keep new cuttings moist. If all goes well, I’ll see the rock again in a couple of years when I check to see what my roots look like!
