Categories
DIY Home Decor Sustainability Upcycling Ways With Wood

Stencil a Sofa Shelf Made From Distressed Wood

Stencil a Sofa Shelf Made From Distressed Wood

by Carolyn Hasenfratz

Sofa shelf made from distressed wood

This project was made from the same stash of distressed wood that I used for the previous project Stencil a Wood Garden Sign. I kept aside a couple of intact large planks so I could make some interesting shelving. The wood was bare on one side and had partially peeling white paint over green on the other side. I decided to use the white side as a ground for some stencils I cut that were inspired by a mid-century modern building I saw on vacation last summer.

Tools and Supplies
* indicates items that are available at Schnarr’s
Distressed wood plank the length of your sofa
Sandpaper*
Dust mask*
Drop cloth for work surface*
Water based paint* for large areas
Acrylic craft paints for stenciling
Decorative stencils
Water based clear satin wood varnish*
Rags*
Paintbrush*
Assorted size old food containers for mixing paint and varnish
Sponges*
Old food container lids to use as palette while stenciling
Masking tape or painters tape*
Shelf brackets*
Screws*

Instructions

1. Put on a dust mask and sand your wood plank to remove rough edges and peeling paint. It’s always a good idea to wear a dust mask to keep from breathing small particles but I think it is even more important when working with old salvaged wood. You don’t know what that wood was treated with, what is in the old paint and it could be moldy as well. After sanding, wipe off the dust with a damp rag.

2. My wood plank already had a satisfactory ground color, white, on what would become the top surface. If your plank does not already have a ground color that you like, you can apply one. House or wall paint is a good choice. One technique that is really effective with the distressed look is to paint a contrasting color under the ground color. Some random sanding here and there later to expose the different layers of paint will simulate the effect of an old piece of wood that has been painted multiple times.

3. Apply a contrasting color to the sides and bottom of the board. As you can see, when you paint surfaces where two colors come together at a corner, it’s easy to slop a little paint over where you don’t want it. One reason that I love the distressed look so much is that when you sand off paint to conceal your mistakes, it looks like part of the design. If you are trying to paint precise corners or lines they don’t look good unless they are perfect, but with a distressed effect you can be a little sloppy!

My distressed board with closeup of paint job

4. Next put your dust mask on again and sand the corners and edges of your board to expose the wood in those places. Then check to see if any paint is beyond the corner where it is supposed to be, such my example below on the left.

Sanding in process

Sand away any paint that is in the wrong place, such as the excess paint that I removed from the top of the board. As I sanded the excess paint off, I exposed some of the wood grain on the front of the board and some of the green paint that is under the white paint. If you are using a really beat up piece of wood like I did in my sample, you can make some artistic decisions about sanding other areas. If there was a rough spot that I found pleasing, such as wood grain, I sanded such spots to enhance the texture. If there were spots that were not pleasing, such as dirty spots or flaking paint, I sanded to remove those unwanted areas of paint.

5. Decide what design you want to stencil on the top side of your shelf. I designed stencils specifically for this project but I have and will use them in lots of other projects as well. If you would like detailed information on how to cut your own stencils, see my article Fun With Stencils.

6. Apply craft paint through your chosen stencils in the colors of your choice. If you are new to stenciling on wood, please see my article Stencil a Wood Garden Sign for detailed instructions.

Stenciling in process

7. When stenciled paint is dry, to further enhance the distressed look mix up a paint/varnish/water mixture. Here is how – in a small container, mix some paint until you get a shade of dark brown that you like. In another larger container, mix a half and half solution of water and satin finish water based wood varnish. Gradually mix in some of the brown paint until you get a stain that you like – test by brushing on an inconspicuous spot. It should be dark enough to tone down your design a little bit and give it a weathered look, but not so dark that it obscures it. When the mix is right, stain/varnish your whole board and let dry.

8. Attach brackets of your choice to the wall behind your sofa, and set shelf in place. You’re done!

Categories
Backyard Wildlife DIY Gardening Sustainability Upcycling Ways With Wood

Make a Pollinator House – Part 2

Make a Pollinator House – Part 2

by Carolyn Hasenfratz

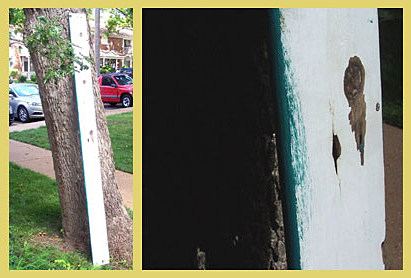
In my previous article Making a Pollinator House – Part 1 I explained why you might want to build a home for native bees and other beneficial insects for your garden. I also provided an example of a quick way to build a shelter out of cinder blocks, wood scraps and dried plant material. I promised to write up plans for a more attractive pollinator house. Here are instructions for building two different designs to enhance your garden’s decor as well as it’s productivity and ecological health.

Tools and Supplies
* indicates items that are available at Schnarr’s
Tracing paper
Pencil
Ruler*
Hot glue gun*
Wood hot glue sticks
1″ x 6″ x 8′ multipurpose board*
2″ x 4″ x 8′ board*
Saw*
Sandpaper*
Dust mask*
Acrylic craft paint
Paint brushes*
Water container*
Heat tool for speeding up drying (optional)
Painters tape or masking tape*
Decorative stencils
Sponges*
Drill*
Tiny drill bit*
Nails*
Window screen*
Hammer*
Wood glue*
Clear matte finish varnish*
Hardware cloth or chicken wire (optional)*

For the additional second design with the pediment, you’ll also need:
Assorted sizes of distressed wood pieces
Decorative brass box corner*
Miter saw*
3/16″ drill bit*
3/16″ dowel rod*
Wooden ball knobs or drawer pulls* with 3/16″ holes to use as feet

Mid-Century Modern style pollinator house

Instructions for Style #1 – “Mid-Century Modern” Pollinator House

1. Download the PDF document “Pollinator House Assembly Diagram”. It is sized to print out on a legal-sized piece of paper. Recreate the diagram in scale on a piece of tracing paper with pencil.

2. From the 1″ x 6″ x 8′ board, cut two 12″ x 5.5″ pieces(although the board is called 1″ x 6″ x 8′ it’s probably closer to 5.5″ so you might only have to cut the board into 12″ lengths).

3. From your 2″ x 4″ x 8′ (probably really 3.5″) board cut two 5″ segments.

4. Put on a dust mask and sand your wood pieces until smooth.

copy diagram onto wood
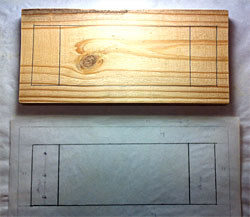
5. Mark each of your 12″ x 5.5″ pieces with the rectangles shown in the diagram. These will become the inner top and inner bottom of your house.


paint around edges
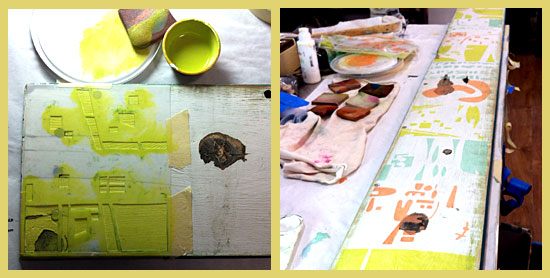
6. Paint a color of your choice in the border around the inner rectangle on each piece. For this step you don’t have to worry about painting precisely in the lines. Let paint dry.


7. Mark off around the middle rectangle with masking or painter’s tape on both pieces and paint black. When paint is dry, remove tape.

paint middle of boards black


8. Paint what will be the insides of your 5″ high supports black. Paint all other surfaces of your wood pieces assorted colors of your choice.

decorative stenciling
9. Decorate the top of your house and the sides of the supports with decorative stencils. I did not decorate the board edges with stenciling in my sample but you can if you want to. If you are new to stenciling on wood, see this article for tips –
Stencil a Wood Garden Sign.

10. Sand all the edges of your wood pieces so that the bare wood shows through on the corners. This gives the wood a distressed look. If you want to distress any other painted or stenciled surfaces further you can do so by roughing them up with sandpaper.

11. To assemble the house, stage the upright pieces by placing them in their footprints as indicated on the diagram on one of the 12 x 5.5″ pieces. Face the black painted sides inward and the stenciled sides facing out. If you’ve covered up your pencil lines with paint, you can use your diagram to redraw them as needed.

12. Load up your hot glue gun with wood project glue sticks and plug it in to heat up. Apply hot glue to the bottoms of the support pieces and press in place. Let glue harden.

13. Glue the other ends of the supports in place on the other 12 x 5.5″ piece. Let glue harden.

14. Place the tracing paper diagram on top of your house. Mark where the nail holes will go in pencil. Drill small pilot holes then hammer nails in. Repeat for the bottom.

15. Mix some dark brown paint with water to make a thin wash and paint over the whole house. Test first on the bottom to make sure it’s not too heavy or light. Alternately, you could use a wash of off-white paint if you’d rather have a pale wash. The purpose of the wash is to give an aged appearance to the wood – this is particularly effective when the paint clings to the corners that have been bared by sanding. Let paint dry.

16. Paint whole house with clear matte varnish.

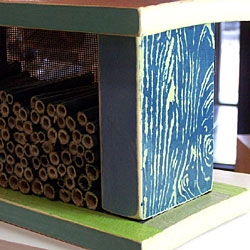
17. Cut out a 10 x 5″ piece out of scrap window screen and nail it to the back side. This is to keep whatever materials you fill the house with from falling out the back side.

18. Fill the house from the front with materials that contain holes for pollinating insects such as native bees to live in.

Some suggestions of materials you could use to fill the house:

  • Bamboo or reed segments
  • Rocks
  • Rolled up corrugated cardboard
  • Chunks of scrap wood with holes drilled in it
  • Bundles of twigs or straw
  • Unfired ceramic clay with holes poked in it
  • Natural dried stems and reeds from the garden cut into segments
  • Dried seed pods

If necessary, cut out a piece of hardware cloth or chicken wire and nail it over the front to hold materials in.

19. Read this article for ideas on where to place the house in your garden or yard –
Making a Pollinator House – Part 1.

Depending on where you want to put your house, you may want to attach hanging hardware to it or mount it on a post. The wood pieces we used are thick enough to give you flexibility in attachment options.

Pollinator House with Pediment

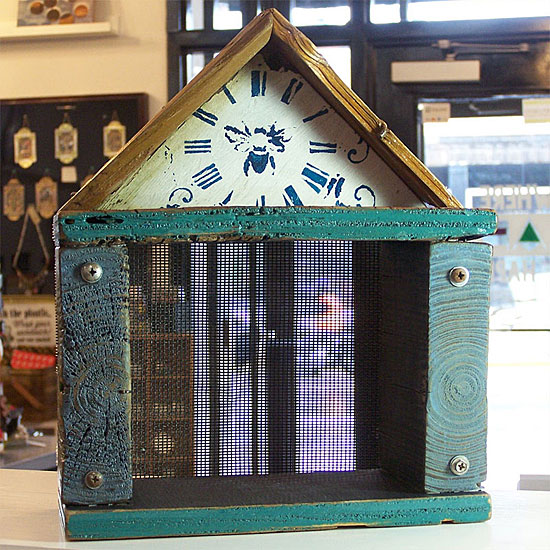
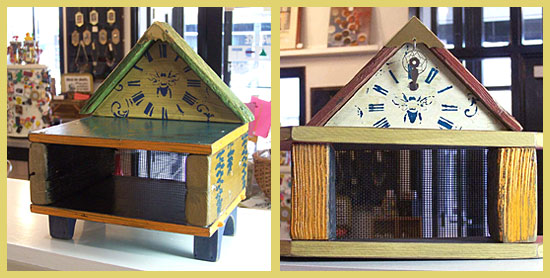
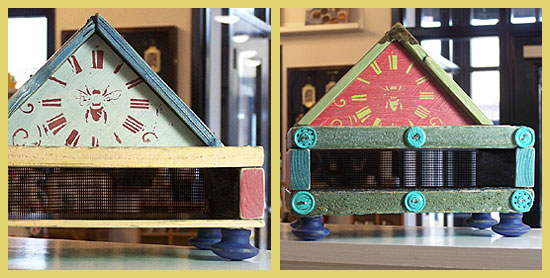
Instructions for Style #2 – Pollinator House with Pediment

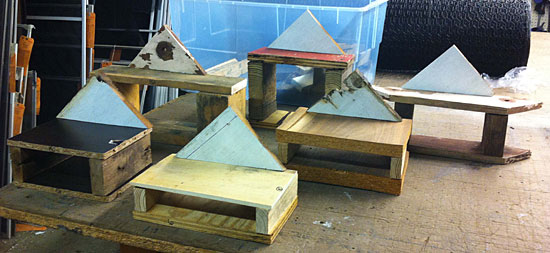
The prototypes I made for the second design vary somewhat in size and proportions because I used distressed wood that I had lying around. I designed the houses around what wood I had available and embellished some with found objects or hardware. If you want to build similar houses and don’t have access to distressed wood, you can use new wood.

1. Cut out two chunky pieces of wood to use as uprights and two thin pieces to use as the top and bottom.

Different pollinator house designs

2. Cut a right triangle out of wood that is 3/4 to 1″ thick for the pediment piece. A pediment is like a roof gable that is decorative rather than functional. My samples vary slightly in size but the triangles are mostly around 7 1/2″ inches on the long side and 3 3/4″ on the short sides.

3. Choose some thin, narrow wood pieces for the roof overhang. Lattice wood strips are about the right size – if you don’t have any distressed wood in that size range you can purchase some lattice strips to use. Cut these strips into approximately 6″ pieces and miter the corners.

4. Sand all wood pieces.

5. Paint the sides of your wood pieces that will become the interior with black paint.

6. Paint the other sides and parts in assorted colors of your choice.

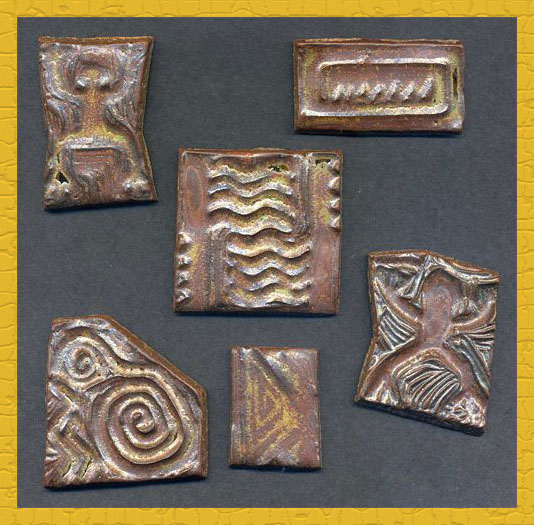
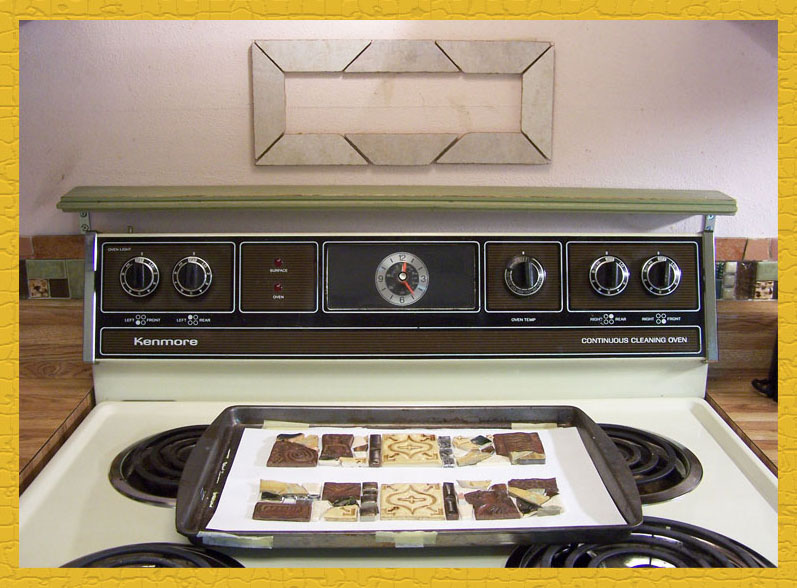
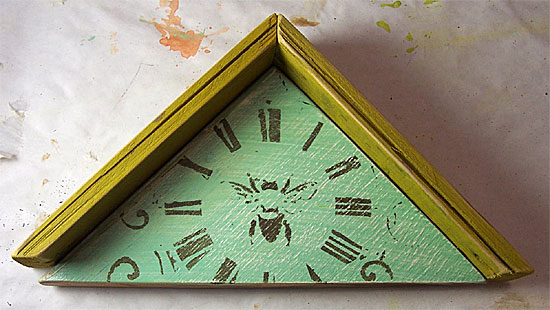
7. Stencil a bee design or other stencil of your choice on the front of the triangle.

8. If you think any of the other wood surfaces need to be enhanced with stencil designs, decorate those also. Since many of my wood pieces were distressed and had a pronounced wood grain, knots, old nails and other irregularities I let those provide the visual interest in many areas. Antique look, vintage look, grunge or botanical stencils would be especially effective for this design.

9. Sand the edges of your wood pieces to expose the bare wood on the corners and distress any other areas that you think are in need of it.

10. Hot glue the vertical support pieces to the top and bottom of your house then nail in place.

11. To assemble the pediment section, put your two roof pieces in a miter clamp with the mitered ends butted together to make the roof point. Put a little wood glue on the ends as you do this. Position the clamped-together pieces on a block of scrap wood to brace them. Drill small pilot holes in one end and hammer in small nails. Slip a couple of nails in between from the other direction.

Creating roof peak with miter clamp and nails

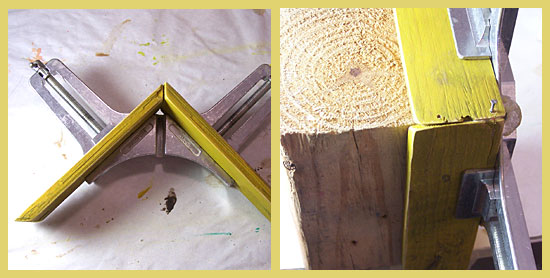
12. Take your triangle pediment and apply hot glue to the top edge. On your work surface, lay the pediment down, slide the triangle part in and press in place. When the glue has hardened, hammer small nails through the roof pieces into the pediment for extra hold.

Attach roof overhang to pediment

13. Apply hot glue to the bottom of the triangle section. Place in place on top of house and let the glue harden. Drill two pilot holes at each end and drive long thin nails down into the supports below.

14. If you would like to attach wood feet to the bottom of your house, drill 3/16″ holes into the bottom of the house. Cut short pieces of 3/16″ wood dowel rod and put wood glue on both ends. Insert one end of each dowel rod piece into a hole in the house and the other end into the hole in a wooden ball knob or drawer pull.

15. Mix some dark brown paint with water to make a thin wash and paint over the whole house. Test first on the bottom to make sure it’s not too heavy or light. Alternately, you could use a wash of off-white paint if you’d rather have a pale wash. The purpose of the wash is to give an aged appearance to the wood – this is particularly effective when the paint clings to the corners that have been bared by sanding. Let paint dry.

16. Paint whole house with clear matte varnish.

17. Attach a decorative brass box corner to the roof peak.

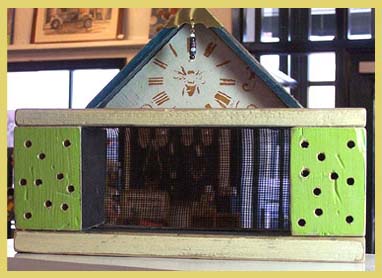
18. Cut out a piece out of scrap window screen and nail it to the back side.

19. Fill house with nesting materials and place in a suitable location.

Here are some pictures showing how some of the other houses turned out.

Pollinator houses made with distressed wood

Pollinator houses made with distressed wood

Pollinator house made with distressed wood

Categories
DIY Gardening Home Decor Upcycling

Decorate a Terra Cotta Plant Pot with Acrylic Paint and Stencils

Decorate a Terra Cotta Plant Pot with Acrylic Paint and Stencils

by Carolyn Hasenfratz

Terra cotta pots decorated with paint and stencils

Supplies and Materials
*Indicates items available at Schnarr’s

Terra cotta pot*
Acrylic paint*
Water-based varnish or sealer*
Small containers for mixing paint (can be disposable cleaned food containers)
Rags for cleanup*
Paintbrushes*
Water container*
Sponges*
Decorative stencils
Letter and number stencils*
Palette knife for paint mixing
Palette (could be a proper artists palette or a temporary one made from freezer paper*)
Sandpaper* (optional)
Memory Essentials Get Rollin’ tool
Memory Essentials Bits and Pieces
Optional – heat tool for speeding up drying between steps if you need to
Masking tape*
Optional – disposable plastic gloves* if you want to keep paint off your hands
Drop cloth* for work surface

Painting and stenciling terra-cotta pots is a fun and inexpensive way to enhance your patio or garden decor. Younger and older crafters alike can join in. Small decorated pots can be used as party favors. Medium-sized pots might provide the base for a table centerpiece. A large pot could function as a gift basket that you can fill with items for a loved one who likes gardening. Gardeners can always use extra small items such as gloves* (they tend to wear out with regularity), seeds*, bulbs*, bug repellent*, gardener’s soap, hand lotion*, sunscreen*, lip balm* and plant tags*. You can also throw in a gift card* so they can get exactly what they want!

You can use either a brand-new terra cotta pot or a used one. I kind of like a used one for this project because I’m going for an artificially aged or distressed look and and that’s easier to achieve if the pot already features some stains from being used. A brand new pot will work also.

Directions

1. Clean and dry your pot.

2.Using your acrylic paints, mix a terra cotta color that is lighter than your pot. Good colors to use in the mix are white, brown, orange and maybe red.

3. Put some water-based varnish in a small container and mix in some of the light terra cotta color. Brush some inside your pot to see how translucent it is. I used a stiff brush that was about 1″ wide. You should be adding a light, translucent haze of color in which you can see some brush strokes. Paint the whole inside of the pot and let dry. This step achieves two objectives – it seals the inside of the pot and tests your mixture to make sure it’s right – not too opaque and not too transparent. Normally one of the benefits of a terra cotta plant pot is the porosity, but since we’re applying paint to ours we don’t want water seeping through and wearing off the design over time. Set aside the remainder of the paint/varnish mixture to use later.

4. On your palette, squeeze out some green, yellow and white paint. Use a sponge to blend these colors in random ways and lightly sponge paint onto your pot in random areas. This is to simulate lime scaling and moss or algae that would normally appear on a terra cotta pot over time as it’s in use. After this paint is dry, if you need to tone it down any you can sand it lightly or sponge a litte of your translucent light terra cotta color over it.

5. The next step is to apply a loose vertical texture to the rim of the pot to accentuate it. I used a Memory Essentials Get Rollin’ tool with rubber bands on it from the set Memory Essentials Bits and Pieces. This is one of my favorite textures of all time and I’ve used it in paper crafts, fabric surface design and all kinds of random projects over the years. If you don’t have these tools you can create a similar texture tool by wrapping rubber bands or string around a wood block. Spread some cream-colored paint on your palette and run or press your tool in it then apply to the rim to make the texture. Let dry.

6. Select a stencil or stencils for applying a design to the side of your pot. You might want to use letter or number stencils to create names, initials, words or house numbers. In my examples I used decorative stencils in garden-related designs. Temporarily tape the stencils to the side of the pot with masking tape. Put some cream-colored paint on your palete (do not thin with water) and apply paint through the stencil with a dry sponge. When you’re done, pull off stencil and either wash paint from stencil immediately or put in a container of water to wash later. If your design requires more than one color, use a clean dry sponge for each color – a moist sponge will make your paint run under the stencil and mar the design. While you’re working, if you don’t want to pause and go to the sink to wash paint from your stencils, brushes and sponges at each step, throw them in the container of water until you’re ready to do cleanup at the end. Let stenciled paint dry on pot.

7. Take a look at your pot and see if you like the appearance the way it is or if you want to make it a little more distressed. Randomly hit some areas with sandpaper if you want to “age” it a bit more. Wipe off dust with a slightly damp rag.

8. Paint outside of pot with your translucent light terra cotta / varnish mixture. Let some brush marks show, but smooth them out a bit if you think they are too prominent. Turn pot over and paint the bottom to seal it. Let dry. You’re done!

For more information on stenciling, here are some of my other articles:


Seed packet bouquet

If you want to take the idea of using a decorated pot as table decor or a party favor a little further, here is an idea you might like from my personal blog. Make a bouquet out of seed packets with free templates that I provided for download and display it in one of your decorated pots.
Make a Seed Packet Bouquet

Categories
DIY Gardening Good Eating

Impatient for home-grown greens? Try some sprouts!

Impatient for home-grown greens? Try some sprouts!

by Carolyn Hasenfratz

Seed Sprouter from Botanical Interests
There are a lot of health claims associated with eating sprouts. I know for sure that they taste great and can be ready to eat just a few days after starting so if you’re ready for something green and yummy to eat you won’t have long to wait. I purchased a Seed Sprouter from Schnarr’s and I’ll be giving it a try shortly. Schnarr’s carries some seeds from Botanical Interests that can be used for sprouting. We might not have everything listed on the Botanical Interests web site but we have some of them. You can also get seeds for sprouting from the Whole Foods bulk section.

Did you know you can let some of your seeds grow two or three weeks past the sprout stage and cut the tops off to use them in juices or smoothies? Wheat Grass and Oat Grass work well for this because they are easy to grow indoors and they germinate pretty quickly. When they are long enough you can use them in your favorite recipe. I sowed my seeds in seed starting potting mix, harvested a first cutting and got a second smaller cutting off of them later before turning them over to my pet birds. Apparently European Starlings don’t need to be told that sprouts are good for you! They rapidly ate the stems, leaves, roots, and still-attached seeds with gusto! I think I remember reading somewhere that if you observe birds pulling up young seedlings in your garden, they are not just engaging in wanton vandalism, they want the extra nutrition from the sprouts. My own birds’ instinctive behavior around sprouts would seem to reinforce that idea.


Oat Grass and Wheat Grass


The Oat Grass is mainly marketed for cats while the Wheat Grass is marketed for human consumption. Both are nutritious for humans but the fibers are not digestible for us. You can get some of the nutrients from wheat and oat grass in a smoothie by thoroughly chopping the grass in a blender with the liquid that is going to go into your smoothie. Then strain the grass pieces out of the liquid and discard the fibrous parts. (I left some pieces in one of my smoothies as a test and I did not notice any digestive upsets but some people might not react well to the fibers). I don’t have a juicer and I’m not familiar with how they work but Wheat Grass is more commonly known for use with juicers.

According to the website WebMD, Wheat Grass contains vitamins A, C and E, iron, calcium, magnesium and amino acids. WebMD states that there is not enough evidence to support most health effects other than nutrition although people do attempt to treat some health conditions with it and rates it LIKELY SAFE consumed in food amounts. WebMD has no listing for Oat Grass but other web sites I looked at state that it is also nutritious for people though perhaps not as much as Wheat Grass.

Here is a delicious smoothie recipe to try.

1/2 cup milk (any kind)
Handful of cut wheat and/or oat grass
1 frozen banana
1 cup frozen cucumber pieces
1 scoop Vanilla Flavored Whey Protein powder*
1 heaping TBSP Matcha Green Tea Latte powder*
*available at Trader Joe’s

Directions:
Blend milk and grass pieces together in blender until well chopped. Strain grass pieces out of milk with a fine strainer. Return milk (now with a green tint) to blender and add all other ingredients. Mix well until smooth. Enjoy!

Categories
Backyard Wildlife DIY Gardening Sustainability Upcycling

Making a Pollinator House – Part 1

Making a Pollinator House – Part 1

by Carolyn Hasenfratz


It’s becoming increasingly common to see structures called “Bug Houses” or “Insect Hotels” in gardens. Some people get squeamish at the mention of bugs or insects so perhaps the most appealing way to label such a structure is “Pollinator House”. Such structures are provided as a nesting and sheltering area for beneficial insects.

Most people are familiar with the pollinating actions of honeybees, bumblebees and wasps. Social bees and wasps are beneficial to the garden in many ways, not only by pollinating but in the case of wasps eating garden pests.

It’s understandable to be nervous about the idea of having colonies of stinging insects living in your garden because some of these species are very aggressive about defending their homes. If you want more pollinators in your garden fortunately there are other bees and wasps that are easier to co-exist with peacefully. If you fear you have attracted the wrong kind of bee or wasp to your garden, I recommend getting help from an expert before deciding how or if to deal with them.

I don’t mind bees and wasps because I can identify them and know how close I can safely get to them. I also don’t have any serious allergic reactions to stings. I work in the garden alongside Honeybees, Carpenter Bees, Bumblebees, Cicada Killers, Mud Daubers, Potter Wasps and others with little apprehension. Honeybees often land on me and I just stay still until they fly away. I steer clear of Yellow Jackets because I know from experience they will sting if you inadvertently disturb their nest (happened last summer in a client’s garden). I don’t attempt to eliminate them unless they are really in the way or other people are in danger. Even though I’m in the garden a lot I only get stung once every several years or so. The consequences for me are some brief anger, localized soreness and itching for a few days. The consequences for others could be far more serious and even deadly so use your best judgement.

Many of the solitary species of bees such as Mason and Leafcutter Bees like to nest in hollow plant stalks or holes in old wood. We take away many of these potential nesting sites by cleaning dead plants and old wood out of the garden. Some amount of cleanup is necessary for human safety, aesthetics and homeowners associations but we can mitigate the effects of a too-clean garden by building a Pollinator House. As an added benefit you may get other desirable insects such as ground beetles and butterflies hibernating in the structure.


Insect Hotel at Missouri Botanical Garden
Here are some suggestions about what materials to use:

  • Stones and bricks
  • Dead leaves
  • Twigs or twig bundles
  • Corrugated cardboard rolls
  • Dried seed pods
  • Paper straws
  • Hollow reeds – preferably 6-8 inches long, closed on one end
  • Drilled pieces of wood – variety of hole diameters, 3-6″ deep

The structure should be sturdily built to avoid toppling.

Where to place the house:

  • Protected from high winds
  • Partly in sun and partly in shade to meet a variety of species preferences
  • If possible near water and mud for drinking and nest building

Dad's fence is falling down
You can have a lot of fun designing your Pollinator House by creatively using materials, limited only by your imagination. I started a simple one for my Dad’s garden, custom designed to solve two problems for him.

Problem 1 – Decorative garden fence is falling apart and sagging
Problem 2 – Lots of sticks lying around from deadfall and pruning


Propping up fence with cinder blocks
Solution
I bought 12 cinder blocks and used them to prop up the ailing fence. Then I filled some of the spaces with twigs and short segments of hollow, dead plant parts from the garden. I drilled some holes in some pieces of scrap wood. A variety of hole sizes and depths are good for different species. As we get more material we’ll keep filling in the spaces in the blocks.


Filling the blocks with nesting material
The result is practical and may not score high marks in the aesthetics department. However the fence is located in the middle of a mint patch (also a superb beneficial insect attractor) and it will be partially concealed by vegetation for much of the year. If Dad agrees I think I will add shelving to the top for containers of trailing plants which will help disguise the blocks. I will probably have to work on the bases of the cinder block towers to make them straighter since the ground here is soft and did some settling after I stacked the blocks.

Dad is pleased that his fence is at least upright again and he’s happy to do his part for invertebrate conservation. Dad’s garden was designed with wildlife in mind and already supports an abundant population of beneficial insects.

Hopefully my condo association will approve a Pollinator House in my garden. I don’t know what my chances are but I do know that my Pollinator House is going to have to be pretty to even have a prayer of getting approved. I guess I will have to make it portable so I can sell it if they say no! They have previously said yes to a bird house but a bug house might be a harder sell. Stay tuned for a more aesthetically pleasing Pollinator House plan in a future newsletter!

More information about bees, wasps and insect shelters:

Categories
Candles DIY Home Decor Lighting Outdoor Fun

Luminous Decor with Flameless Candles: Idea #3

Luminous Decor with Flameless Candles: Idea #3

What you’ll need:
Candle lantern*
Glass container
*Water Lights – special submersible flameless candles
Acrylic or glass gems, *clear or colored
*Available at Schnarr’s.

Clear water light in a drinking glass with clear and colored gems

Do you have a hanging candle lantern? I have one on my deck but I’m not allowed to burn real candles in it for safety reasons. Flameless submersible Water Lights powered by batteries are the answer! Try filling a drinking glass with a clear submersible Water Light, some colored glass or plasic gems mixed with the clear plastic and add water.

What kinds of color effects can you get if you mix colored glass, plastic gems and a color-changing Water Light? Try it and see! Try different combinations for your holiday parties!

Categories
Candles DIY Home Decor Lighting Outdoor Fun

Luminous Decor with Flameless Candles: Idea #2

Decorative LED Tea LightsLuminous Decor with Flameless Candles: Idea #2

What you’ll need:
*Terra cotta plant pots
Sturdy glass container
*Water Lights – special submersible flameless candles
Acrylic or glass gems, *clear or colored
*Available at Schnarr’s.


Color-changing Water Lights displayed in a small water garden.

Submersible Water Lights come in clear and color-changing versions. Try topping off a stack of plant pots in your water feature with a clear container. Add a color-changing Water Light plus the clear acrylic gems and fill the glass container with water.

Color changing water light displayed indoors on a stand.

Here is another way to display a clear container with a Water Light. I placed the vase in a large bowl on a stand in my living room and added rocks as an accent. I like the way it looks next to my lighted artificial tree!

Categories
Candles DIY Gardening Home Decor Lighting Outdoor Fun

Luminous Decor with Flameless Candles: Idea #1

Luminous Decor with Flameless Candles: Idea #1

Small outdoor water garden with flameless candle

Do you want to create a festive atmosphere for party guests, or just enjoy your own home or yard more? In this series I’ll share some easy and safe ways to add luminosity and beauty to almost any size water feature – pond, fountain, water garden, punch bowl or whatever water container you have!

What you’ll need for Idea #1:
*Terra cotta plant pots
*Flameless candles
Sturdy glass container
*Sand, gravel or lava rock
Optional – Water plants, real or artificial
*Available at Schnarr’s.

Idea #1:

Some types of flameless candles, such as the ones pictured below, are not meant to be submerged. Here is a way to display this type of candle in water. Simply create a stack of terra cotta plant pots in your water feature that is nearly to the water’s surface, but not quite. Top off the stack with a partially submerged glass container, and place a battery-powered flameless candle inside. The size and number of pots you use will depend on how deep your water feature is. Fill the top pot with gravel if necessary to hold the candle holder at the right level – lava rock is a good choice because it helps to filter the water. A sturdy, thick-walled container works best for the candle holder – it should be heavy enough not to float. I chose to use a glass vase that I made in college – here is an instance where my tendency to blow really thick-walled vessels turned out to be a good thing! Avoid using very valuable vessels in case your tower of pots gets knocked over by accident (such as by animals hunting for your pond fish!).

Indoor / Outdoor LED Votive Candles

Such an installation can be temporary or permanent. I recommend bringing the flameless candles inside when not in use so they don’t get damaged if the candle holders collect rainwater.

In my example shown in the photo, I’ve added some aquatic plants and placed potted plants around the edge to make it prettier and more inviting to human viewers and to make it a better habitat for the fish and for the birds who love to drink and bathe there. I also placed several sticks near the edge for birds to use as perches and to help them climb out should they happen to fall in.

A water feature of any size is a great addition to your outdoor living space. Just the sight or sound of water can help you feel cooler on a hot day and is mentally soothing as well. Water features can be enjoyed all year round. If your outdoor water feature is in view of a window, lighting it up will make your indoor holiday parties more festive. At Schnarr’s we carry pumps, heaters, mosquito dunks and other items to help keep your water feature healthy and enjoyable in any season. Water gardens are not restricted to your outdoor space – you might also enjoy my article “Create an Indoor Water Garden”.

Categories
DIY Home Decor Upcycling

Kitchen Backsplash Project Part III – Filling in the Tile “Murals”

Kitchen Backsplash Project Part III – Filling in the Tile “Murals”

It’s a good thing I make detailed notes as I work, because this kitchen backsplash project underwent a two and a half year hiatus! I didn’t really plan to neglect the project for that long, but in 2013 and 2014 I did a lot of art and craft shows and my studio space and time was necessarily diverted to that pursuit rather than home improvement projects. In 2015 I’m doing fewer shows and determined to finish some of what I started earlier!

Handmade stoneware tiles impressed with carved rubber stamps. These will be installed in tile murals in my kitchen.The next step in finishing my kitchen backsplash is to complete the tile work in four frames spaced at intervals above the strip. These are inspired by Spanish and Mexican tile murals in their shape and placement though they don’t attempt to depict any kind of representational scene. In the interim I had carved some new rubber stamps of ancient petroglyph designs and made some small stoneware tiles from them which I decided to include.

Using paper templates, I laid out my designs on trays in the studio, then transported them to the kitchen.
Tiles for tile mural on try ready to be installed

As you can see in this picture, since I last worked on the tile strip, I installed a narrow shelf above the back of the stove. This is made from a piece of recycled flooring. I painted it in a color harmonious with my intended future paint scheme and sanded the edges for a slightly distressed look. I used corner brackets to mount it to the wall, attached with screws so I can remove it when it’s time to paint the wall. It is meant for holding some of the small Southwestern-themed collectibles that I keep in the kitchen. Later on I’m going to install another shelf above this frame with hooks on the underside for displaying a favorite set of collectible coffee cups.

Tile mural frame partially filled with tiles

Here is the frame partially filled with tile. Using a pencil and ruler, I marked where the large tile in the middle would go then worked out from the middle and the edges. I dabbed a bit of tile cement on the back of each piece and pressed it in place. Normally with tile work a quantity of cement is spread out on the surface first before the tiles are placed, but my way of working is slow so I wanted to make sure the cement didn’t dry before I could finish an area.

Tile mural frame filled in and ready to be grouted

After the tiles are allowed a sufficient time to dry according to the directions on the tile cement bucket, the next step is to grout the tiles!

Categories
DIY Home Decor Upcycling

Kitchen Backsplash Project Part II – Beginning Work on the Walls

Kitchen Backsplash Project Part II – Tile Design and Beginning Work on the Walls

After absorbing inspiration and stockpiling tiles for my kitchen for three years, how did I begin the process of actually getting some tiles on the wall?

I’ve been intending since I moved in to my condo in 2004 to eventually repaint the kitchen. The paint in this room is rough, and even worse, it’s pink! So it has to go and until it’s repainted it doesn’t matter to me if I mark it up with pencil or tape.

To begin my designs I cleared everything off of the counter top and used a ruler and pencil to mark where I wanted strips of tile. This work would be too much to be completed in one work session. It being necessary to use the kitchen in between work sessions, I had to devise a way to design and install the strips in sections.

I decided on a repeating pattern that would appear at intervals, with more free-form arrangements in between. I measured where the repeating elements would go and decided how many I would need, then I went into my studio and designed one of the repeating sections. Then I made sure I had enough of those tiles to repeat the pattern the required number of times. Choosing the tiles from which to create the repeating patterns could have been an overwhelming task, given the number of tiles I had accumulated – I had been collecting them for multiple projects, not just the back splash. For help I referred to the swatch page I had made for my kitchen to help me keep in mind what look and feel I wanted for the room. I hung up the swatch page nearby and sorted out tiles that seemed to fit. That narrowed down the selection and from those I was able to come up with the repeating pattern. I laid each section out on a tray in my studio and carried it into the kitchen to install each section, then repeated until all the recurring sections were in place.

Final tile design of strip around sink in kitchen

After that was done, I filled in the spaces between the repeating segments, then added a strip in a terra cotta color above it.

Close up of tile design that includes handmade tiles, purchased tiles, and salvaged tiles.

A strip similar to this would be very easy to do with purchased or made to order tiles of a uniform size. Since I was including a lot of salvaged tiles however, I had to do a lot of piecing, cutting and nipping. I’m very pleased with the result and I think it was worth the extra effort – it would not be to everyone’s taste but is exactly the kind of look I wanted. There is no way anyone would be able to replicate this design exactly even if they wanted to!

While I had the tiles out, I decided to do a strip by the pantry as well.

Working out tile design in my studio before installing on the wall

I drew an outline of the area to be tiled on the paper that covers my studio table, then filled that in while working out my design. When I was satisfied, I placed some of the tiles on a tray, carried it to the kitchen, and installed the tiles one section at a time. I marked the wall with pencil lines before beginning so that I didn’t go out of the allotted spaces while installing.

While working on the tiles, I gave some thought to the future paint scheme of my kitchen and picked out color swatches. I put the swatches and some notes in my idea book and also marked in pencil what color goes where on the kitchen walls.

Read more:
Kitchen Backsplash Project Part I – Introduction
Kitchen Backsplash Project Part III – Filling in the Tile “Murals”