Categories
Gardening

Tim’s Tips – Successful planting and care of trees

Tim’s Tips – Successful planting and care of trees

by Tim Wittmaier

1. Make sure the tree you’re planting is suitable for the conditions.

Ask yourself:

  • Is this tree right for this zone?
  • How much sunlight does it need?
  • What is the mature size of the tree? Does it have enough room to grow?
  • Is the soil type suitable?
  • Can I provide the right amount of water?
  • Does the site have good drainage? If not, can this tree tolerate sitting in water?

2. Apply 2-4 inches of mulch or compost in at least a 3 foot in diameter circle around the tree. Keep mulch 4″ away from the bark and don’t make a mulch volcano – aim for a donut shape rather than a volcano shape. You can mulch all the way out to the drip line or beyond if you want to – this will reduce competition from grasses or other plants and help the tree grow faster.

3. When planting the tree, the top of the root ball should be planted 4″ above the ground, but no more. Dig the hole at least twice as wide as it is deep.

4. If the root ball is wrapped in burlap that has been treated to not decompose or is synthetic, remove the burlap. Otherwise loosen burlap from around the trunk, and spread out but do not remove. Cover burlap with soil or mulch so it does not wick moisture away.

5. Cut all ropes around the root ball, natural or synthetic.

6. When transporting a tree in the bed of a truck or trailer, cover it with a tarp so that it doesn’t get dried out. Don’t let the tree sit under a tarp in the sun for an extended time. Don’t grab the trunk to lift up the root ball.

7. If planting a tree susceptible to sun scald, protect it by wrapping the trunk with a light colored wrap or painting it white with latex paint.

8. Protect the trunks of small trees from rabbits and deer.

9. Don’t hit the trunk with weed eaters or lawn mowers. Mulch can help make sure machinery doesn’t get too close.

10. Be aware of what pests and diseases your tree is susceptible to and treat if necessary.

11. Get a soil test and feed your tree with fertilizer if necessary. Don’t use more chemical fertilizer than you need. An excess of organic fertilizer is unlikely to do any harm.

12. Don’t prune without a specific purpose in mind and follow the pruning timing and techniques best for the tree species you have. Pruning is not the same for all trees and every tree doesn’t necessarily need it. Do prune out dead wood and look for structural problems that need correcting – much easier to do when the tree is small.
Categories
Gardening

Bringing color into a shady spot

Bringing color into a shady spot

by Carolyn Hasenfratz

I recently had a client ask me how to get more color into his shady yard. If you have a lot of shade in your garden and want a lot of color, that’s a challenge. Most flowering shade plants don’t bloom as heavily as plants for sun. Here are some ideas to help you get some color even with this limitation.

Bright colored foliage
In a shady garden, foliage that is golden in color (in reality more like lime green) or variegated with gold, cream, silver, pink or red is a great advantage. You wouldn’t want to use such bright foliage in the whole garden but an accent here and there looks fantastic. Some plants that do well in shade such as Hosta, Coleus, Lamium, Heuchera and Caladium feature many great foliage colors. There are groundcovers with beautifully colored foliage too.

Annuals for shade
Annuals tend to bloom for longer periods of time than perennials because they are trying to make as many seeds as possible to compensate for their shorter life. If constant color is a high priority try to include a lot of annuals in your design. Of course some of the plants we grow as annuals are actually perennials in warmer areas. Plant families to take a look at include Begonia, Nicotiana, Coleus, Torenia and Viola. Impatiens used to be my favorite shade annual but they are not recommended right now due to Impatiens Downey Mildew (IDM). Until a cure is found, you are likely wasting your money and possibly helping spread the disease if you buy Impatiens.

Perennials for shade
This is the category that I have the most personal experience growing. The main disadvantage to focusing on perennials is that they usually bloom only for short periods of time so much of the year you’ll just be looking at foliage. With careful planning using succession plantings and companion plants you can enjoy their brief period of color and let other plants be the focus at other times. In the perennials category you will have many more plant choices than with annuals. For maximum interest try to choose shade perennials that also have attractive or evergreen foliage.

In my part-shade conditions, the following plants with colorful flowers are very reliable – Wild Sweet William, Bee Balm, Columbine, Astilbe, Spiderwort, Vinca, Cranesbill, Golden Ragwort, Barren Strawberry and Lobelia. Of the above, I think Astilbe would be best suited to a garden that has more of a manicured look than a “wild” or informal look. I have an Astilbe that is as least 8 years old and has never spread or multiplied. Of the above choices it has the best foliage also, in my opinion.

I periodically walk the shady spots at Missouri Botanical Garden to get ideas for what to plant in my own part shade conditions. While I haven’t tried to grow these personally, from seeing them in use I think Brunnera, Caltha, Dicentra, Helleborus, Ligularia and Pulmonaria would be good plants to consider.

Spring ephemerals
Spring ephemerals are plants that die back when spring is over and the weather starts to get hot. This is also when trees really leaf out, so spring ephemerals are used to getting sun while they can and storing up their food for the next year early. You won’t get color all year with these, but since the foliage dies down for summer, they won’t be taking up space above ground while other plants are dominant. They are a good addition if your shade comes from trees – perhaps not so great if you have building shade. Examples of spring ephemerals are Mertensia, Chionodoxa, Narcissus and Scilla.

A touch of white
So far in this article I have focused on flowers that are a color and not white. Shade plants with white flowers are common so my focus here is to direct people to colors. However, I’ve found that in garden designs or any other kind of design, a touch of white here and there does add some pizazz. Don’t be afraid to try a little white to help your other colors “pop”.

The plants above are recommended for people who live in the St. Louis area, who have shade and whose highest priority is color. You may have other criteria that are just as important – Missouri native, food for wildlife, low-maintenance, deer-resistant, likes water, tolerates drought, etc. Try the MOBOT plant finder to narrow down your choices and learn about new possibilities – Plant Finder

Categories
Gardening Lawns Sustainability

MSD’s Project Clear and Our Local Water Issues

MSD’s Project Clear and Our Local Water Issues

by Carolyn Hasenfratz

The Metropolitan Sewer District has been working hard on outreach to inform the public about Project Clear. In their own words, Project Clear is the “planning, design and construction of MSD’s initiative to improve water quality and alleviate many wastewater concerns in the St. Louis region.” MSD operates in both St. Louis City and County.

What are some examples of wastewater concerns in our region? Flooding, erosion, water pollution and sewer backups are some issues that affect many of our neighbors if not ourselves. MSD deals with both stormwater, which is intended to discharge directly into the natural environment, and wastewater, which needs to be treated at a wastewater treatment plant before release. MSD is undertaking large scale projects right now that are estimated to take 23 years to complete.

The budget for this work is 4.7 billion – the largest infrastructure investment so far in the history of our region. For official information about the project and about your own flood risk, see these resources:

The first sewers in the St. Louis region were built in the 1850s. The amount of development present now is of course much greater than then and there are a lot more impermeable surfaces generating runoff. The existing system cannot cope with the demands being placed on it. MSD conducted a pilot program to test the effects of green infrastructure and came to the conclusion that the conversion of 400 acres from impermeable to permeable surfaces is equal to a 2 billion dollar savings in spending on wastewater infrastructure. Greenscaping has many other benefits – more oxygen, more pleasant and healthful surroundings, crime reduction, noise abatement, habitat for wildlife, temperature regulation – the benefits go way beyond just financial.

MSD is requesting help from the public with the wastewater issues they are working on. It’s in all of our best interests to do what we can to assist because the MSD projects are going to take decades to complete. Even if our own property is properly insured against damage, we will pay for water damage all over the region one way or the other in fees and taxes. In addition, cleaning up after a water disaster is no fun. It’s stinky, messy and time-consuming.

Some water management challenges are inevitable because of the geography and geology of where we live, but we all have the power to mitigate these problems by a small amount. If we each do a little bit we can help each other save money. What can we as individuals do to prevent erosion, flooding, water pollution and sewer backups?

  • If your residential downspout is connected to your wastewater sewer line, disconnect it and direct the stormwater from the downspout elsewhere. My understanding is that this is going to be mandatory soon if it isn’t already so you might as well get started now. MSD will inspect your property on request to see if your downspout is improperly hooked up. Call (314) 768-6260 for assistance. MSD will pay the cost of disconnecting your downspout from the wastewater line. If you’ve ever thought that a rain garden or rain barrel was an intriguing idea, there has never been a better time to put one in! A rain barrel will help cut down on your water bill if you use it to water your garden, and natural rainwater sans chlorine and chloramines is better for your plants. Redirecting this water reduces the overload
    on wastewater lines and prevents sewer backups. I suspect some of the downspouts at my condo are hooked up wrong and I know my neighbor whose unit is lower in elevation than mine has had a sewer backup before – so I find what MSD is saying about this credible.
  • Utilize rainscaping improvements on your property such as making surfaces water-permeable and protecting erosion-prone areas. There are rainscaping small grants available for residents in certain areas. Rainscaping has many benefits – prevents flood damage and erosion, improves water quality and recharges underground aquifers.
  • Explore opportunities to re-use some of your gray water. This may also cut your costs because in some places you are charged for how much water goes out of your household through the sewers as well as for how much comes in – my understanding is that’s the case where I live. My water bill is included in my condo fee so I don’t see it but that’s what I’ve been told.
  • Keep fats, oils and grease out of the sewer system by disposing in the trash and not down the drain. To help you remember here is a catchphrase – COOL it, CAN it, TRASH it. Improper disposal can cause sewer backups and water
    quality problems.
  • Don’t use the sink or toilet to dispose of garbage.
  • Use compost as much as you can in your landscape – compost absorbs water and slows velocity.
  • Join a grass-roots effort to encourage the adoption of greenscaping and rainscaping practices.
  • Join a stream cleanup sponsored by the Open Space Council,
    River Des Peres Watershed Coalition, and others.
  • Join a volunteer storm drain marking project.
  • Join a Stream Team.

Additional water management resources:

Categories
Gardening Sustainability Upcycling

Do you have discarded woody plant material? Try making a Bonsai!

Do you have discarded woody plant material? Try making a Bonsai!

by Carolyn Hasenfratz

When I was in college studying art, I took printmaking and ceramics classes. Some of the finest printmaking and ceramics in the world come from Japan and our professors exposed me to many beautiful examples and concepts. I made sketches at the Japanese Garden and turned some of them into prints. Several of my friends from ceramics class and I went on a multi-year Japanese kick. We made tea bowls and sake sets and acquired a taste for the appropriate beverages. We learned the Raku firing method. We started attending the Japanese Festival at Missouri Botanical Garden every year and bought all of the Japanese-influenced objects d’art and books that we could afford on our student budgets.

We greatly admired Bonsai and made lots and lots of Bonsai planters, many of which we sold at our pottery sales. I kept several for myself to experiment with Bonsai growing. I killed four Bonsai trees in a row before giving up. A college student schedule and lifestyle just doesn’t lend itself very well to Bonsai care I guess – my cacti collection had a much better survival rate! I still like making ceramic planters that would work for Bonsai – it’s a shape I just kind of naturally go to while wheel throwing though in recent years if I didn’t sell the planters I mainly just used them for dish garden type plantings.

Bonsai are not a particular species of tree – they are plants, usually woody, that are trained to grow at diminutive sizes but in the proportions of mature plants to create the illusion of a natural scene. Woody plants can be trained by wire and selective pruning to assume the shape of a craggy, aged and venerable tree, a popular style influenced by Japan’s natural mountainous terrain. This training takes a long time – decades, perhaps even longer than a human lifetime to achieve the desired effect. Any gardener has to learn patience but Bonsai gardening is a particularly good example of how Japanese culture promotes the long view of things. In my ceramics class we learned about how to age clay for better handling. We were taught how to speed up the process. To emphasize the benefits of aging clay we were taught about how Japanese potters made clay for the next generation while making use of clay that the precious generation had made for them. That’s an impressive attitude. If I make a Bonsai I’m pleased at the thought that future generations might enjoy it but I also want to get some enjoyment out of it in my own lifetime! One way to shorten the amount of training time required is to choose plant stock that features unusually thickened or distorted trunks or branches.

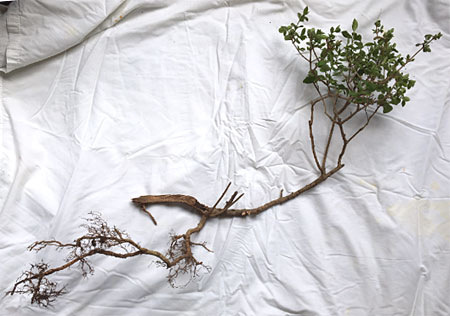
Sometimes plants that don’t look right for their intended purpose can be suitable for Bonsai. For example, this Privet bush (Ligustrum vulgare ‘Cheyenne’) was removed and replaced because it didn’t look right in the hedge where it had been growing. Back in the day I had read my Bonsai book so many times that I still remember some of the criteria for selecting good Bonsai stock.

Privet bush with bonsai potential

This plant looks bad in a hedge but in my opinion it would make a great Bonsai!

When I saw this bush I thought of three things:

  • Craggy, twisted shape – check
  • Woody plant – check
  • Small leaves – check

This plant has Bonsai potential! It was going to be discarded, so it’s not a big loss if I kill it. I’m going to try not to though!

Try making a Bonsai

My Bonsai experiment

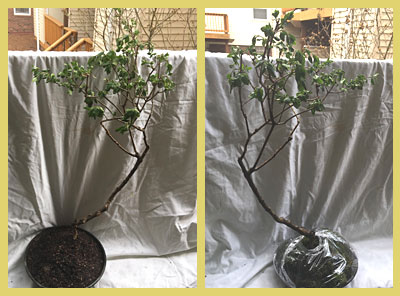
Here are the results of my attempting to turn a twisted looking, stunted privet bush into a Bonsai. I looked through my Bonsai book to decide what style of Bonsai was best suited to my plant material. There may be as many Bonsai styles as there are varieties of Koi, with corresponding Japanese names that I don’t know. I decided that since my bush had a long, prominent root system, the rock-clasping style would be appropriate. I read several articles online about rock-clasping Bonsai, and there seemed to be as many different ways of doing it as there were articles. In the rock-clasping style, roots are trained to grow exposed over a rock and become a major focus of the planting. One recommendation that came up more than once was to pack sand or some other substrate around both root and rock and put plastic wrap around the base, then remove the plastic and the sand from around the root and rock in a year or two to give it a chance to develop the thickness that will make the tree look old.

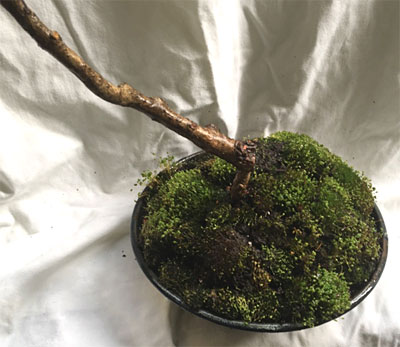
Since I also had some moss that I had collected from a site where it was being eradicated, I decided to use soil over my root and rock and overplant with moss. Both moss and Bonsai like frequent watering. Then after a couple of years I’ll remove the moss and replant it elsewhere and see how my root is doing under the soil.

I studied the shape of my bush and held it up to different rocks to see which would complement the shape of the bush. I refined the shape by pruning and held the bush roots on the rock with strips of old cut up fabric – these should rot away in time after the roots have grown enough to hold the bush in place.

Each article I read had a different recommendation for a soil mixture so I just decided to look at what I had on hand and do my best to make a well-draining and nutritious mixture. I used 1/3 potting soil, 1/3 earthworm castings, and 1/3 Flourite, a type of fired clay ground into small chips that is meant to give plants better drainage and supply them with iron. It’s usually used with aquatic plants. I don’t know if it’s common to use it for terrestrial plants but I didn’t have any sand or Turface on hand (a clay product that is great for improving soil drainage) so I decided to try it.

After I packed the soil around the rock and roots, I put the moss on top and wrapped it in plastic for a week, similar to what is done to keep new cuttings moist. If all goes well, I’ll see the rock again in a couple of years when I check to see what my roots look like!

Moss around base of Bonsai