Categories
Gardening

Strategies for Maintaining My Garden Through the Winter

Strategies for Maintaining My Garden Through the Winter

by Carolyn Hasenfratz

What do I normally do to prepare my garden for winter? I panic the night before a frost is predicted. I lay old towels on the floor to protect it from dirt and dampness and bring inside all the container plants that are not hardy. When I get time I then stick the plants where I can make some room in my condo which is for the most part not very well-lit. Some of my plants survive this kind of laissez-faire treatment for years but many of them although alive don’t look as good as they could. I think some planning is called for if I want to do better than have hit-or-miss results this year.

Strategy #1 – Saving seeds
Most of my garden plants are hardy perennials and need little or no help from me to survive the winter. However there are a few plants I grow as annuals that I replant every year from seed or just let them reseed themselves – for example Texas Sage and Flowering Tobacco.

Would you like to try saving some of your plants as seeds this year? Here are some tips on seed saving and seed starting:

Strategy #2 – Overwintering as cuttings
I love the sweet potato vines I planted in containers this year. The whole plants are too large for me to bring inside as is so I’m going to grow a couple as cuttings indoors and overwinter the rest as tubers (see Strategy #3).

Here is the method for starting cuttings that I learned in my Master Gardener class. One of my practice plants from the training program is still alive, so give it a try!

  • Prepare a tray full of sterile seed starting medium.
  • Use a sharp clean knife such as a craft knife to cut a 3-4 inch shoot from the stem tip.
  • Remove the bottom few leaves from the cut segment.
  • Dip cut end in rooting hormone.
  • Place cutting in medium and water in well, then let drain.
  • Put tray in a plastic bag or cover with plastic wrap for about a week.
  • Place cuttings in a well-lit location that is 75 to 80 degrees F if possible and keep evenly watered.
  • Gradually harden off cuttings to prepare for planting.

Strategy #3 – Overwintering as dormant bulbs
I grew Cannas and Sweet Potato vines in containers this summer and I’m going to need to bring them in for the winter. Here is how to store non-hardy bulbs.

  • Dig up bulbs, divide and clean them.
  • Let the bulbs dry in an area with good air circulation for a week or two.
  • Dust with sulfur powder to prevent rot.
  • Pack them in a box with peat moss, wood shavings or shredded paper and store in a dark, dry, cool location. Keep packing medium slightly moist and inspect monthly for rot. Make sure this location is away from stored fruits and vegetables.
  • Replant outside in the spring after the last frost.

For tender bulb plants that do not go dormant, repot in a container. Trim off any old foliage but leave the good foliage. Keep evenly moist in a well-lit warm environment.

Strategy #4 – Overwintering as a house plant
For cacti, succulents and tropical plants that are small enough to just leave in their containers and bring in, they will get the following treatment:

  • Provide as much light as possible.
  • Reduce the amount of watering.
  • Refrain from fertilizing.
  • Provide humidity tray for plants that like humidity.
  • Inspect for pests and treat if necessary.
  • Sprinkle BT on soil to reduce fungus gnats breeding in the soil.

Strategy #5 – What’s going to go in my containers during the winter?
This past year I made more use of container plantings in my outdoor garden than I ever have. They added so tremendously to my enjoyment of the garden and I got so many nice comments on them from neighbors that I’m going to try to keep at least one of my containers going all winter. Some of my containers are too fragile to ride out the freeze-thaw cycle so I will store them empty indoors, but there are one or two that I think can withstand the temperature variations as long as they have good drainage. Pretty soon I will have to decide what to put in them. I have decided to plant Pansies around the edges and Winter Scouring Rush in the center. The rush should stay green all winter. Winter Scouring Rush can become invasive but it has some good qualities – it’s an interesting “living fossil” that reproduces with spores and rhizomes. It can grow in soil or in standing water. I have some in my water garden also.

Many people wait until late winter or early spring to plant Pansies but you can plant them in fall – they may not look great all winter but planting them in the fall gives them a head start and you will get a better and earlier show in the spring. If I decide I need a third layer to add interest between my low plant and my tall plant, I think I will try putting some trimmed evergreen boughs in water containers set into the soil. If your winter planters need a little help, dried plants, artificial plants, lights and seasonal decorations can be good additions. As you’re planting your container in the fall, you can also add winter hardy bulbs for an extra surprise in the spring!

Strategy #6 – Keeping track of my perennials
Parts of my garden need a major makeover. Depending on what is going to be done, sometimes winter is an excellent time to perform some of the required tasks. Winter is also the time when many of my perennial plants are dormant and can’t be seen above the soil surface. I may risk damaging them if I make major changes in their spot. Some of my native plants like Wild Sweet William and Indian Pink I have tried for years to establish before success – I don’t want to risk losing
those plants now that I’ve finally gotten them in a place they like. They should not be trod on, accidentally dug up or smothered. I need to know where these plants are at all times so before they die back to the ground I will make drawings of my garden and put tags in the ground to mark the plants.

Strategy #7 – Protecting plants in situ
The growing season for some crops can be extended with row covers. Some plants such as strawberries, mums and roses need mulching for the winter and just about any plant will benefit from it even if it will survive without mulch. Mulch stabilizes the ground temperature, prevents frost heaving and can help keep soil from drying out too much. If you have any newly planted broadleaf evergreens such as azaleas, boxwood and hollies, place a burlap screen around them for winter wind protection. Paint the trunks of young fruit trees with diluted white latex paint to prevent winter sun scald.
Categories
Gardening Sustainability

Fall Garden Cleanup

Fall Garden Cleanup

In my previous article “Make a Garden Sign Out of a Recycled Produce Crate” I explained that I wanted signs to let the groundskeepers at my condo complex know that I did not want them to remove the fall leaves from my garden, especially with leaf blowers, or trim or spray the plants. The condo management has agreed to let me manage fall garden cleanup myself this year as an experiment and has let the landscaping company know to leave my garden alone. Here are the reasons why I think this will improve my garden:

  • When the leafblowers remove the leaves, they also knock over my plants, blow away plant tags, blow away fertilizer, blow my mulch into the lawn and blow seeds out into the lawn which makes the lawn weedy and my plants less likely to reseed themselves.
  • Trimming the plants in the fall destroys hibernating beneficial insects and removes winter food and cover for birds from the garden.
  • The resulting bare soil is more likely to erode and I lose plants over the winter due to the soil drying out and freezing more deeply than it would with a natural cover.
  • I have to water more often to compensate for the lost moisture and that costs the condo complex money.
  • My gardening space is all part shade and shade plants are adapted to living under tree litter for the most part rather than bare soil so it’s difficult to get things to grow.
  • The groundskeepers don’t necessarily know which plants I want and which ones I don’t and they often spray the wrong ones with herbicide. I can’t label them because the leaf blowers blow the markers away. Even if they always sprayed the right ones, I don’t want poison around my home. I’d rather pull the weeds and compost them or smother them with lasagna gardening.

So how do I propose to handle garden cleanup this fall?

One of the first gardening books I bought after moving into my condo was “Making the Most of Shade” by Larry Hodgson since I was new to shade gardening at the time. I haven’t reviewed it for awhile so I got it out to see if it had anything helpful about managing leaves.

Here is some of what Hodgson has to say about removing leaves and dead plant material in the fall:

“It doesn’t help the plants in any way, and it removes the organic matter that would have decomposed on the spot to feed the plants… …I find the less I disturb plants, the better they grow.”

The kind of fall cleanup I’d like to do is none at all. Will that work? I know the groundskeepers will need to remove leaves from the lawn, because the lawn will die if they are not removed or chopped up on the spot. My garden will be a nuisance if leaves blow off of it onto the lawn and I don’t want to cause problems. I plan to toss some wood chip mulch over the leaves periodically to keep the leaves in place. If the resulting leaf/mulch piles threaten to exceed 8 inches in depth (if you go over that you may harm tree roots) then I plan to remove some of the leaves and either chop them and return them to the garden or use them in one of the other two gardens I help manage. My perennial plants if left alone should do some of the work of holding leaves in place also.

The trees around my condo are almost all oaks and I’ve read that oak leaves may form a mat which keeps water from getting through to the ground and they are also slow to break down. Nitrogen helps dead leaves break down faster, so whenever I apply wood chip mulch I will also add some high-nitrogen organic fertilizer.

I’m also going to experiment with growing oats as a cover crop over the leaves in spots. I’m already having some success with growing oats in leaf mounds with no soil added in a client’s garden. If I have the same results in my garden the oats should be helpful. I hope that the oats will perform four tasks for me:

  1. Help hold leaves in place.
  2. Pierce leaves with their roots so that water can get through.
  3. Feed small birds with their seed heads.
  4. Decompose after they die and eventually feed my other plants.

The oats die off in winter so they should not become weedy. Schnarr’s can special order some oats for you so you can try this in your own garden if you’re interested in cover crops.

Stay tuned for a report on the results of my experiments!

Categories
Gardening Sustainability

Lasagna Gardening

Lasagna Gardening

What is Lasagna gardening? No, it’s not growing delicious tomatoes and herbs that you can put in your lasagna, though you may eventually be able to do just that depending on your conditions. Lasagna gardening, also known as sheet composting, is an organic gardening method that entails covering the ground with layers of materials of organic origin and allowing them to naturally break down over time. The benefits of this method are less time and labor spent weeding and tilling, creating healthy soil for healthier plants, and reaping the many benefits of compostable materials instead of wasting them.

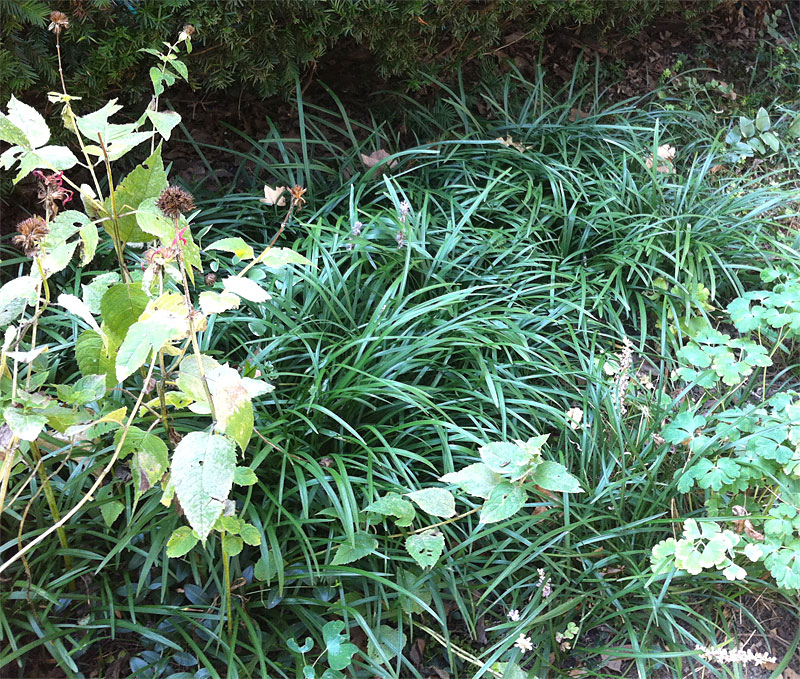
If you are thinking of starting a new garden bed next spring, fall is a good time to begin it and lasagna gardening is a good method to use if your chosen ground is covered with vegetation that you want to kill off. I’m demonstrating with a section of a shade garden that is covered with liriope. I like it but I have too much of it so I want to get a section ready to put in something new later. If you’ve ever tried to dig up lirope you can imagine how much time I will save by just smothering it! This method works for grassy areas also or any piece of ground covered with unwanted vegetation. Here is what my section of garden looked like before I started.

Liriope that I want to smother with lasagna gardening.
Ironically, the Liriope that I want to smother with lasagna gardening is the best looking plant in this section right now. The Bee Balm on the left and the Columbine on the right are not at their best in late summer. Next spring they will be gorgeous!

First gather up all the compostable materials that you can. The first layer consists of cardboard, paper, newspapers and other recyclable paper based products. I have been saving for a couple of months so there is more than enough for this section.

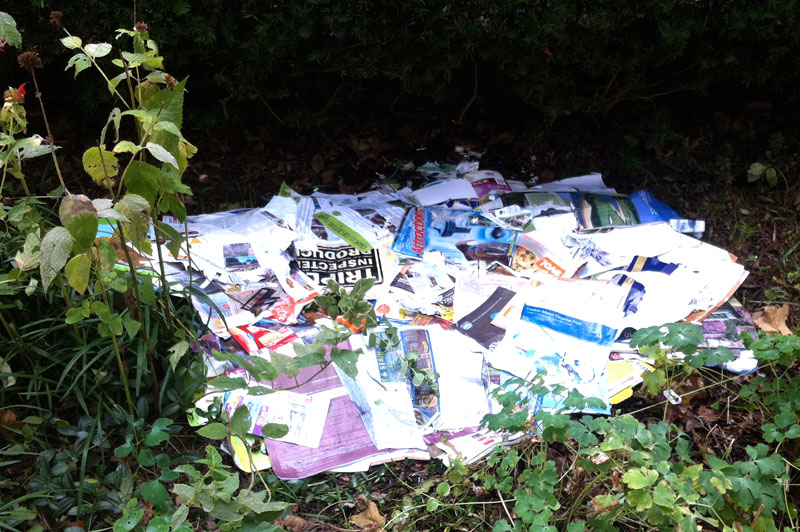
Mark off the space that will become your garden. You can transplant the vegetation already on the spot if you need it elsewhere. If it’s ok to kill it, just cover the area with several layers of cardboard and paper without leaving gaps in between. If it’s windy, wet the paper as you go – I dunked mine in a bin of water before applying. The paper will block the light and kill the vegetation underneath which will decompose and eventually become plant food.

Lasagna gardening helped me get some good use out of junk mail, product packaging, and other unwanted paper products.
Lasagna gardening helped me get some good use out of junk mail, product packaging, and other unwanted paper products. This is about five grocery bags full.

Wet the layer after you’re done applying it if it’s not already wet. This helps jump start the decomposition process.

Build subsequent layers by alternating green and brown compostable materials. Examples of brown materials are dried leaves, shredded paper, and dried dead plant materials. Green materials are grass clippings and fruit and vegetable scraps from your kitchen. Layering the green in between the brown helps to break the pile down faster, but it will eventually break down even if you have a small amount of green materials in comparison to brown. Add in whatever else you would normally put in the compost – eggshells, coffee grounds, and the like. In my case since I live in a condo community where people walk their dogs nearby, I didn’t want interesting odors to attract them to my garden so I left out the kitchen scraps and used only paper and cardboard.

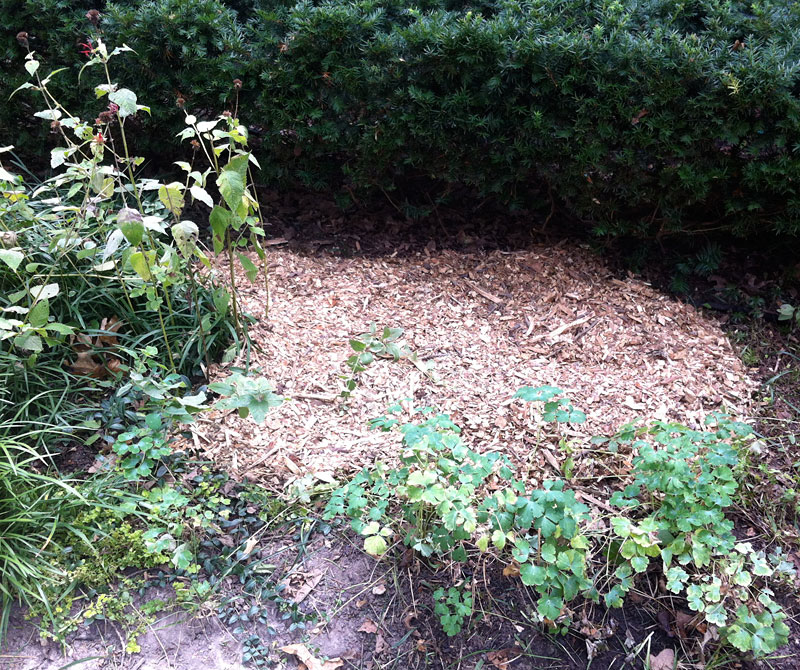
If you want to do some fall planting, you can put soil and fertilizer on top of your compostables and plant now. If you are planting on top of tree roots, don’t make your layer more than 8 inches thick as anything deeper may kill tree roots, according to the book “Making the Most of Shade” by Larry Hodgson. If there are no tree roots to damage, you can make the lasagna 12 inches thick. I don’t know what I’m going to plant yet or whether I’m going to plant in spring or fall, so I topped off mine with wood chip mulch.

Wood chip mulch protects the lasagna gardening area until I'm ready to plant.
Wood chip mulch protects the lasagna gardening area until I’m ready to plant.

When I’m ready to plant I plan to just add soil on top of the mulch, because my lasagna is nowhere near 8 inches thick yet and it won’t hurt to make the new bed deeper. I’ll add nitrogen-rich organic fertilizer at the time to accelerate the breakdown of the wood chips.