Stencil a Wood Garden Sign
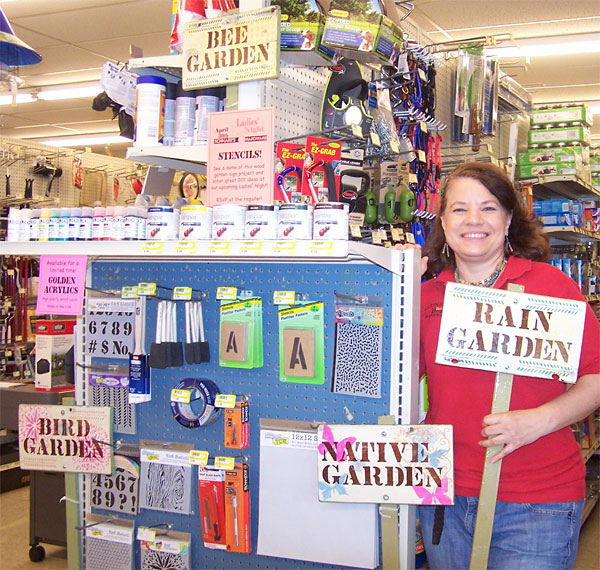
How would you like a practical and decorative wood garden sign? Stencils are handy for such a project because they are available in letters, numbers and lots of fun decorative designs.
Here are the tools and materials you will need:
| Pencil Paper Ruler Tracing paper Letter or number stencils Decorative stencils Wood Acrylic or latex paint Bristle paintbrush(es) Water container for paint brushes Rags Sandpaper Dust mask Freezer paper Drop cloth Wide painter’s tape or low-tack masking tape Small disposable plastic cups |
Wooden stake Sponge brushes or sponge pieces (at least one for each color) Plastic lids from food containers Large water container (preferably shallow and flat) Optional – hair dryer or heat tool Old toothbrush Outdoor wood varnish with sun protection Paint thinner for cleaning brushes if using brush-on varnish Drill Drill bit 2 bolts 2 nuts 2 washers (optional) |
The first step in making such a sign is to decide how big it should be. If you have some scrap wood available, you could let the size of the wood pieces you have on hand determine your design. In my case, I had some used, distressed long boards that were 7 1/4 inches wide. I got out some stencil letters and decided how long my wood piece should be to fit the lettering I wanted on the sign. I worked out some lettering samples on tracing paper and taped these to a piece of paper to determine my final sign size – 7 1/4 x 16 1/2 inches.
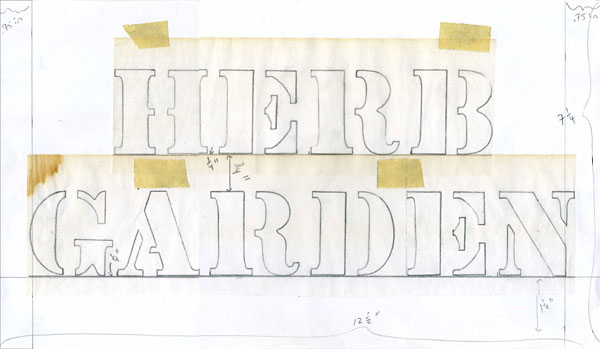
If you don’t have scrap wood to start out with, you can just make your design any size you want and get your wood cut to order. Work out your design ahead of time using pencil, paper and tracing paper, then go get your wood cut or cut it to size yourself. I recommend using wood of a 3/4 to 1/2 inch thickness. If you buy a board at Schnarr’s we will cut it to length.
After the wood is cut, sand it smooth. I recommend you wear a dust mask while sanding. Wipe off the dust with a damp rag.
The next step is to decide on a base or ground color for your sign. For this project I am using all acrylic or latex water-based paints (except for the varnish layer). You can use a dark color as base and stencil on it later with light colors, or make your ground color light with darker colors stenciled on later. If you like the distressed look that I am so fond of, you can put an additional color under the ground color and let some of it show through by sanding on the corners and other strategic places on the sign. You can make the back and sides a different color like I did in my sample or make it all one color. Freezer paper or drop cloths are handy for protecting your work surface while you paint.
Since I was starting with distressed wood with some paint already on it, I let the existing color influence my other color choices. My scrap wood had previously been painted white over a light green. Some of the green showed through the white as I was sanding. There were a few spots where the paint had peeled away entirely showing dark wood underneath. I wanted to tone down these areas but not cover them up entirely so I decided to paint the front of my sign with an off-white wash to preserve some of the distressed look and create a more even ground for the subsequent design. After the off-white wash was dry I painted the back and sides of my sign green.
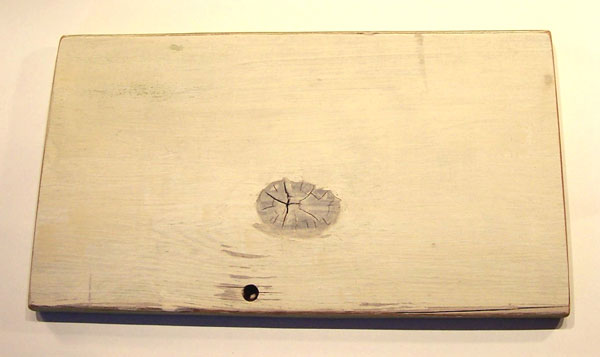
For a vertical post to use for mounting my sign, I chose a wood stake available at Schnarr’s. I sanded it smooth then painted it green.
After the paint is dry, sand the edges on the sign and post to make them look distressed and wipe both with a damp cloth to get all of the dust off.
Now it’s time to actually start stenciling. Get your work area ready by placing your paints, stencils, tape, small brushes for mixing, water container, rags, small plastic cup, sponge brushes or sponges, and plastic lid where you can reach them. At your feet or on the table if there is enough room, place a large flat container filled with water. This is for placing your stencils and other tools in to soak when you are done using them. This can be a messy process so wear old clothes.
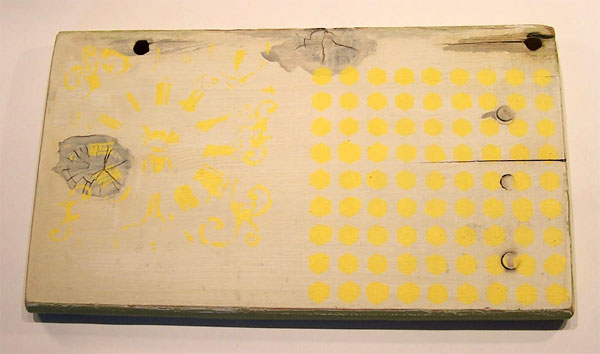
The next step is to apply some background design in a light color. I wanted to add a little interest to the background and edges without detracting too much from the lettering that would be applied later, so I chose a light yellow paint for my sample.
Choose a stencil and tape it in place on your wood sign.
Mix some light yellow paint in a little plastic cup. Do not mix any water into the paint. Dab some paint onto a plastic lid. If you don’t have a plastic lid, a little square of freezer paper taped to your work surface will serve as a disposable palette. Press your sponge or sponge brush into the paint and dab it onto the lid a few times to distribute the paint. You want a light application of paint to start out. If you are new to stenciling, you most likely will overestimate the amount of paint you need and use too much, so start with less than you think you need – you can always add more but if your paint application is too heavy it could bleed under the stencil.
Start pressing the sponge lightly into the stencil openings. Dab very gently at first and increase pressure gradually until all the open areas are filled with paint. When you are satisfied, lift the stencil.
If you are finished with that particular stencil, put it in the large container of water to soak. If you are going to use the stencil again on another part of the sign, move it and continue stenciling until you are finished, then soak it.
When you are finished with a color, put the sponge and plastic lid in the water container for cleaning later. Do not attempt to clean the sponge or sponge brush and use it immediately for a new color – you will have to start with a clean dry sponge for the next color because water makes the paint too runny and it will bleed under the stencil.
Acrylic paint dries quickly. It won’t take long for your first layer of paint to be dry enough to work on the next layer, but if you need to speed up the drying you can hit it with a hair dryer or heat tool. Repeat the above steps with each new color until your sign is complete.
If you are using letters or numbers on your sign, you can draw a line with pencil or ruler to help you apply them in a straight line, then erase the pencil line later after the paint is dry.
 Wood garden sign in progress with two paint colors in place. |
 Antique brass stencils with the lettering they made on my sign. |
To clean your stencils and tools, swirl them around in the water to get out as much paint as possible. Squeeze all the paint you can out of the sponges and brushes. If needed clean with soap. Rinse and let them dry on a rag. Dump out the paint water and replace with fresh. Scrub your paint lids and stencils with a toothbrush to get the remaining paint off. Acrylic paint doesn’t have much of an affinity for sticking on plastic especially if soaked, but if allowed to dry prior to soaking some spots might be stubborn. If all the paint doesn’t come off it won’t affect future use so don’t worry about it. Remove as much paint as you can, rinse off stencils and lids and let dry.
When your sign is completely dry, if you are going for the distressed look rough up the design in a few spots with sandpaper. Wipe off dust.
Coat both sign and post with outdoor weatherproof wood varnish, preferably one with sunlight protection to help keep your paint colors from fading. Follow the safety directions on the container for both varnish and paint thinner as they can be dangerous if not handled properly. Do not use a sponge brush for the varnish, it will dissolve. You can avoid the hassle of dealing with brushes and rags and paint thinner by using a spray varnish instead of a brush-on product. I used a brush-on varnish because it’s more economical and I think I get a thicker coat by using a brush. Ultimately, you can make your varnish choice based on your personal application preference.
When varnish is dry, drill two holes in both sign and post to accommodate the bolts that will hold the sign together.
Connect sign to post with nuts and bolts. Place a washer behind the bolt head for a more finished look. Bolts are preferred over nails for this project so you can easily replace the post if it rots over time.
Install your sign where you want it by hammering it into the ground.
If you would like to read about how to cut your own stencils, see my article Fun with Stencils.
If you are interested in attending our Ladies’ Night on April 30, 2015 remember to RSVP (on Facebook and via email [melissa@schnarrs.com]).


5 replies on “Stencil a Wood Garden Sign”
[…] Read more on the Schnarr’s Blog – Stencil a Wood Garden Sign […]
[…] a previous article I described stenciling with paint on a wood garden sign. That works great if you don’t want a […]
[…] a previous article I described stenciling with paint on a wood garden sign. That works great if you don’t want a […]
[…] 9. Decorate the top of your house and the sides of the supports with decorative stencils. I did not decorate the board edges with stenciling in my sample but you can if you want to. If you are new to stenciling on wood, see this article for tips – Stencil a Wood Garden Sign. […]
[…] project was made from the same stash of distressed wood that I used for the previous project Stencil a Wood Garden Sign. I kept aside a couple of intact large planks so I could make some interesting shelving. The wood […]