Categories
Good Eating

Collards Taste Great in Quiche

Collards Taste Great in Quiche

by Carolyn Hasenfratz Winkelmann

Moog's Musical Eatery Cookbook
“Moog’s Musical Eatery” Cookbook

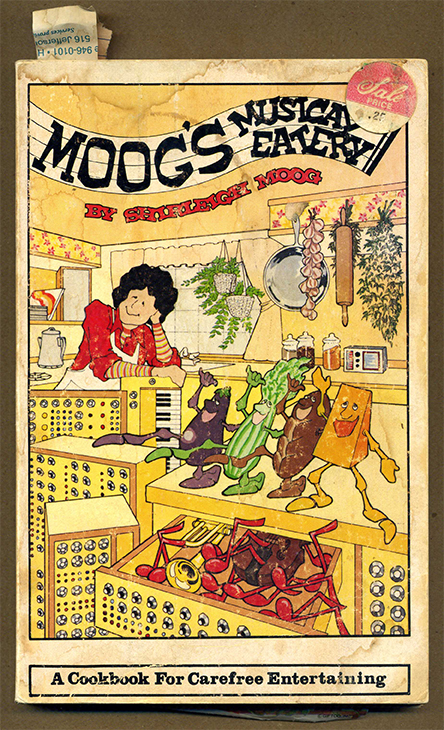
My Mom was a prize-winning cook and I grew up in a house with an extensive cookbook and recipe collection. “Moog’s Musical Eatery”, the cookbook pictured at the right, was the first cookbook I remember purchasing for myself. I found it at the college bookstore and by then it had been on the shelf long enough to be on sale for $0.25. The main reason I bought it was to get-delicious sounding recipes for a low price. It was an even better deal than I knew because upon reading it I learned that it has a lot of good tips on entertaining, menu planning and getting the most out of ingredients by learning how to choose and evaluate them. The author, Shirleigh Moog, wrote the book based on entertaining the friends and colleagues of herself and her husband, who was the inventor of the Moog synthesizer. First published in 1978 and purchased by me in the second half of the 1980s, it was one of my first introductions to some flavors that are well-known now in our culture but fairly exotic at the time, such as Tahini, Sangria, or Gazpacho. This book has been out of print a long time but there are still a few pre-owned copies available for sale online. My copy is well-used as you can see!

The recipe in this book that I have probably made the most times is the Onion Quiche. I have varied the filling ingredients a lot over the years and have never found a reason to look for another base quiche recipe. Currently I have an abundance of collards coming from my garden. A couple of times this summer I included them as one of my Quiche ingredients with wonderful results. First I’m going to describe how I harvest and cook the collards to get them ready to use as Quiche filling, then I’m going to provide Shirleigh Moog’s Quiche recipe with added notations where I normally change things up. Moog’s version included a crust recipe that I’m not going to post here because I’ve always used pre-made crusts to save time and I don’t think I’ve ever made it with scratch crust.

Harvesting and Preparing the Collards

Collard leaves and container of frozen broth

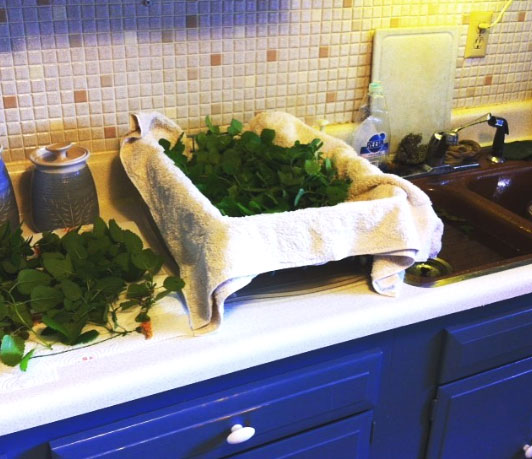
Before I go out to harvest collards or any kind of greens, I get out a large lightweight bowl that I use as my collecting bowl. I keep a container of homemade broth in the freezer to use when I want to simmer something in broth, cook rice or grains with broth, make soup, or something of that nature. I needed a half cup or so of broth to simmer the greens in, so I set my broth container out to thaw while I worked on other preparations.

When I fill the bowl with produce from the garden, I get a colander ready for draining. I let the bowl with produce fill with water as I clean and shake off the leaves before transferring to the colander to drain. Since I’m an organic gardener and don’t use pesticides, there are sometimes a few “bugs” on the leaves. Letting the leaves soak as I clean and inspect makes most invertebrates, if there are any, float out for easy removal. If they are pests, I feed them to my pet starlings who are always eager to consume such a nutritious tidbit. If they are beneficial insects, I put them back outside. I only found one “bug” in this bowl so that was not bad.

Close up of underside of leaf with caterpillar.

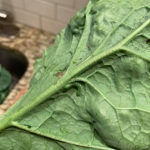
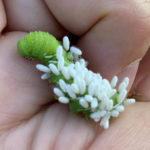
Right below one of the ribs on the underside of this collard leaf was a little green caterpillar. When you harvest leafy greens like this be sure to look at the underside and look for caterpillars near the leaf ribs or stems. They like to tuck themselves there to blend in and avoid predators. Some of them are very good at disguising themselves as another stem or rib!

If any parts of the leaves are yellowed or too chewed up, I put those parts in the compost bin. I cut out any thick stems that might be too tough and compost them also.


Chiffonade cut collards
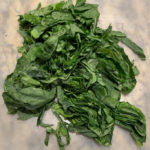
When the leaves are cleaned and drained, I roll them tightly into a quasi-cylinder shape and diagonally slice them thinly. This is called the chiffonade cut.

My husband requires a relatively low-salt diet and I’ve been cooking with minimal added salt for many years so that I become accustomed to less salt just in case! One way I get flavor into foods so that they don’t need added salt is to cook them in pan juices from something else. Even if I don’t plan to use meats in the recipe I’m about to make, I often like to add flavor and some salt by cooking things like ham, turkey bacon or turkey kielbasa (as shown here) in the pan first, with a little grapeseed oil or olive oil. Processed and cured meats will have some salt in them but cooking and caramelizing some of these ingredients adds enough flavor that it’s usually plenty of salt for the whole recipe.

Cooking collards in pan juices from meat and onions.
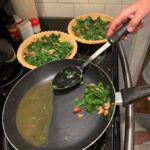
I then set the meat aside then cook some onions in the pan juices until they are caramelized. Any onions I have on hand I’ll use, but it’s hard to beat sweet yellow onions. I set the onions aside then cook the collards in what pan juices are left over plus a little broth to simmer them in and keep them from burning. At this point I have pre-heated the oven and am filling the pie shells with the cooked collards, also adding in some of the cooked turkey kielbasa and onions. As you can see there are some delicious pan juices left over. The pan juices were strained out and added to my broth bowl for other uses. Too many juices in the quiches might make them watery.

You will notice that the recipe from Shirleigh Moog that I’m going to reproduce here was originally written to make one quiche. I have found that if I loosely fill two pie shells to the top with vegetables and meat tidbits, the recipe makes two quiches from two pre-made shells.


Onion Quiche
From “Moog’s Musical Eatery”, page 88. Copyright 1978 by Shirleigh Moog. My additional notes are in italics.

6 slices bacon (as noted above, sometimes I substitute ham, turkey bacon, or turkey kielbasa.)
3 onions, sliced thin
4 eggs
1 tall can evaporated milk (1 2/3 cups) or heavy cream
2/3 cup water (I have substituted my homemade broth also with great results)
3/4 t salt (I rarely need this)
1 t dry mustard
a dash of Tabasco sauce
1/2 t Hungarian paprika (smoked paprika good too)
1 t soy sauce
1 cup grated cheddar cheese
1 clove garlic, minced (If I’m putting in garlic, I cook it at the stage where I cook the collards with broth so that the garlic pieces don’t burn, I find them too bitter if burned)
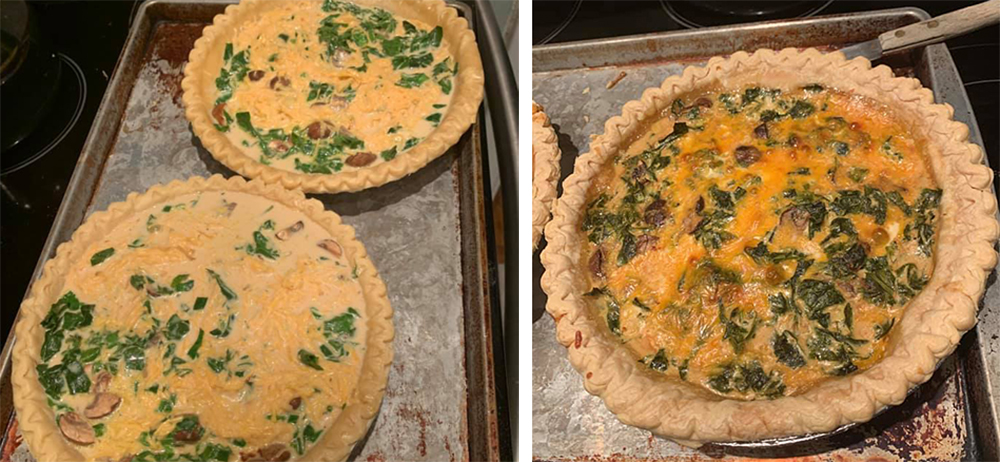
1 9″ pie shell (as noted above, I use 2 pre-made pie shells because I normally add vegetables, such as collards, spinach, broccoli, mushrooms, bell pepper, dandelion greens, etc.)

  1. Cook the bacon and, when there is plenty of bacon fat in the pan, add the onion and garlic. Cook until the bacon is done and the onions are golden. Crumble the bacon.
  2. Combine the eggs, evaporated milk, water, salt, dry mustard, soy sauce, Tabasco and paprika. Beat with a rotary beater just long enough to mix thoroughly. (I normally just use a whisk with good results.)
  3. Sprinkle the pie shell with the crumbled bacon, the onion, garlic, Cheddar cheese and any remaining bacon grease. Sauteed mushrooms and bits of ham may also be added. Pour the egg and milk mixture in also.
  4. Bake in a preheated oven at 325 degrees F for one hour, or until the point of a knife inserted in the center of the quiche comes out clean. (I like to put the pie shells on old baking pans to prevent bubbling over, which normally does not happen. The baking time and temperature Moog suggests is spot on – I like to set the alarm for 45 minutes, check just in case, put back in, and the knife comes out clean at the one hour mark with the crust perfectly golden and flaky. I would hate to burn it or undercook it though, so I do the 45 minute test each time as a precaution.)

Unbaked and baked quiche


Categories
Backyard Wildlife Gardening Good Eating Sustainability

What is Eating My Mustard Greens?

What is Eating My Mustard Greens?

by Carolyn Hasenfratz Winkelmann

At my old garden, I was only allowed to grow vegetables on my small deck – I lived in a condo. My deck was in part shade so between lack of space and lack of sun I could only manage to grow a small amount of cherry tomatoes and a sad number of potatoes. Otherwise I stuck to ornamentals, herbs and wildflowers which I could get away with planting in the ground while enjoying a reasonable selection of plants that would grow in part shade.

When I got married and moved into a house in 2018, I started collecting vegetable seeds at seed swaps for my new garden which has plenty of sun. I had to do a lot of planting in a hurry so I just planted the seeds I had in the hopes that I would get a few vegetables and save a few seeds for the following year.

Lots of cherry tomatoes 
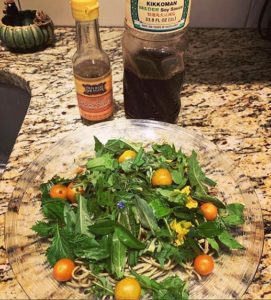
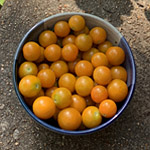
I’ve been having really good luck again with cherry tomatoes and I’m now addicted to growing leafy green vegetables so I can have fresh tasty salads that I pick myself. A few of the plants have really been chewed on by pests which is not a surprise because I don’t use pesticides. In my haste I made no effort to try companion planting to chase some of the pests away. Most herbs are not bothered much by pests so since I’m pretty new to growing vegetables I’m seeing a lot of creatures that I haven’t seen before.

Fresh picked salad with cherry tomatoes, dill, arugula, chives, romaine, mustard greens, edible flowers and wild greens.
Fresh picked salad from the backyard with cherry tomatoes, dill, arugula, chives, romaine, mustard greens, edible flowers and wild greens.

I had some Evergestis rimosalis (Cross-striped cabbageworm) on my mustard greens and some Pieris rapae (Imported cabbageworm) on my collards. I’m interested in invertebrate conservation and providing food to wild birds, so in the quest to get some vegetables I can eat I’m not going to apply poisons. I might start an additional bed of these vegetables in my fall garden and protect them with a row cover and some companion planting.

Hornworm caterpillar with parasitic wasp cocoons.I’m familiar with these little white blobs on this tomato or tobacco hornworm – those are the cocoons of tiny parasitic wasps that feed on caterpillars. The lifestyle of some of these tiny wasps is pretty horrific, and I’m saying that as a big fan of invertebrates in general! Some of them use plants as a host and some use other insects. Tiny parasitic wasps lay eggs on the bodies of caterpillars. When the tiny wasp larvae hatch, they feed on the caterpillar while it’s still alive. When they emerge they weave white cocoons where they stay until they hatch into adult wasps. The caterpillar they have been feeding on is eventually doomed though it might not die right away.

Even though their lifestyle kind of turns my stomach, these wasps are beneficial so I’m going to put this caterpillar back out in the garden. When the adults emerge they can continue their work of preying on garden pests. If you are going to destroy any caterpillars, it’s recommended that you leave the parasite-infested ones in the garden to add to nature’s arsenal of natural controls. The adult wasps of this type are not social and they do not sting. Some of the adults are so small I’m not even sure what kind I have in the garden. I have swarms of tiny and medium sized insects all over my masses of herbs that are in flower, such as Dill, Garlic Chives, Peppermint, Bronze Fennel and more. Herbs that get clusters of small flowers are worth growing just to get into your garden all the beneficial insects that are attracted to them.

Categories
Good Eating

Recipe: Kombucha Cocktail

Recipe: Kombucha Cocktail

Kombucha Cocktail
Kombucha is a fermented tea drink that contains a lot of probiotics. I attended a lecture on fermented foods recently and decided it sounded interesting. The lecturers recommended trying small amounts of Kombucha at first until your digestive system gets used to it. Here is a really refreshing drink to try.

Pour in layers into a glass filled with ice:
1/3 Kombucha
1/3 Sparkling Cucumber flavored water
1/3 Chilled herbal tea

Optional: garnish with fresh herbs or edible flowers from the garden.

Are you interested in brewing your own Kombucha? What interesting flavors could you make from your tea herb harvest? Here are a couple of articles to help you get started.

Categories
Gardening Good Eating

How to Harvest and Dry Herbs

How to Harvest and Dry Herbs

by Carolyn Hasenfratz

Lemon Balm - Melissa officinalis
Lemon Balm – Melissa officinalis

Here are the methods I use for drying and storing herbs. These procedures come partly from the book “Growing and Using Herbs Successfully” by Betty E.M. Jacobs plus years of trial and error. In order to get the optimal flavor and fragrance from herbs, the best time to harvest them is between the time the first flower buds appear and before the flowers open. If possible, lightly spray the herbs with water the day before you plan to harvest, that way you can save a step by not having to wash them after cutting. It’s ideal to harvest on a sunny day after the dew has dried on the leaves but before the day has reached its hottest point. As you harvest, you can remove all but 4 inches of the stem on annual herbs. On perennial herbs, you can take 1/3 of the plant. Proper identification of your plants before harvesting for consumption is critical because some plants are toxic.

Different herbs will be at their best time for harvesting at varying points during the season. You may be able to get two or three cuts from some plants. If you miss the optimum time, you will still get some benefit from the herbs but you may have to use more. Some of my herbs (like most members of the mint family) need to be trimmed and thinned regularly anyway to keep them from taking over the garden.

Dad's garden in early October
Dad’s garden in early October – lots of Lemon Balm and Peppermint around the fence

There are some exceptions, but most herbs can be stored and used in the dry form. It’s most common to dry herb leaves, though with some herbs you might use different parts of the plant such as the flowers or roots. I’ll demonstrate an easy way to dry leafy herbs with some Lemon Balm (Melissa officinalis) from my Dad’s garden. These plants (and all the Lemon Balm plants in my own garden) are descendants from a specimen I purchased a the Webster Groves Herb Society Sale in 2003 when I first started herb gardening.

If your herbs are already clean from spraying with water the previous day, you can put them right in the drying bag. Take a paper grocery bag and write on it the species you are harvesting and the date. Cut the herbs and loosely let them fall into the bag as you cut (cut the parts you want rather than pull off as pulling may damage the roots). Put the bag in a dry, dark area for one month. To save space, I hang my bags with clothespins from a chain in a closet. The herbs should be dry after a month has passed. The next step is to strip and store the herb leaves.

Stripping the leaves from the stems is very easy but a little messy. You might want to do this task outdoors if possible but if the weather is not favorable you’ll have to do this inside. Spread a towel over your work area to catch plant bits. Place a container to one side to catch stems. Take each herb stem from the bag and hold it over a large bowl. Starting from the top of the stem and working down, pull off the leaves with your hand. If the herbs are fully dried the leaves should come right off with no effort. There are a few herbs that cause some irritation to my nose during this step so if you are concerned about allergies you could try wearing a dust mask.

Store the stripped leaves in a labeled glass jar or in a paper bag, away from moisture or sunlight. Keep the leaves intact if possible before using, in case crumbling them ahead of time releases some of the potency. If you later notice any condensation in the jar, the herbs were not dry enough, so take them out and let them dry some more in a paper bag so they don’t get moldy. You can discard the stems in the compost or try to find a creative way to use them – depending on the herb the stems may have some fragrance or flavor in them. I’ve been known to put them in sachet bags, grind them up to make fragrance pastilles, burn them in a grilling fire or campfire, heat them in water in potpourri crock pot or use them to make flavored vinegar. When it’s time to use the herb leaves, they will probably crumble just fine with your fingers but you could use a grinder or mortar and pestle to help get a finer grind if needed.

If you need to wash the herbs after picking, here is an easy way to do it. Clean your kitchen sink and fill it with cool water. Take a handful of herb stems with leaves and shake – this helps dislodge any bugs or dirt. If any leaves fall off on their own accord, discard those. Quickly dunk the herbs in the water, shake again and let drip dry on a towel. Inspect each stem for chewed up or discolored leaves and remove those. Place herbs on another dry towel and let dry. If you need to speed up the drying, you can run a fan over them. Turn the herbs while drying and place them on a fresh dry towel. Usually after about a day the herbs are dry to the touch and ready to put in a labeled bag and left for a month in a dark dry place to dry completely. If you have larger quantities of herbs to handle and you have space you can set up special drying areas with racks but if you want to keep it simple just harvest as much as you have room to process at one time.

Herb washing and drying station
Herb washing and drying station in Dad’s kitchen

The preceding instructions will work for most herbs but if you need guidance with things like fruits, seeds, fleshy roots or other special cases just do a search for “how to harvest + name of herb”.

Ideas for herbal tea blends:
Make Your Own Herbal Teas

Directory of useful herbs
Directory of Culinary and Medicinal Herbs

Some ways I’ve experimented with my harvested herbs:
Fun With Food
Melt and Pour Soap Recipes and Other Personal Care Products – making soap is what inspired me to start growing herbs in the first place!

Categories
Gardening Good Eating

Recipe: Herbed Up Melon Salad

Recipe: Herbed Up Melon Salad

by Carolyn Hasenfratz

This will spice up your breakfast a bit!

Go the garden and pick a double handful mixed selection of whatever you have in your garden from this list:

Leaves:
Bee Balm (Monarda), Lemon Balm (Melissa), Peppermint (Mentha), Korean Hyssop (Agastache Rugosa), edible wild Violet (Viola), Basil, Borage (young leaves)

Flowers:
Edible Hibiscus, Dandelion (discard calyx), edible Roses, edible wild Violet (Viola), Borage

Chop a melon and put pieces in a bowl. Drizzle with lemon juice and agave nectar. Top with chopped herbs and flowers. If you have any discarded stems, use them to flavor your morning tea!

If you are interested you can read more of my recipes on my Fun With Food page.

Categories
Gardening Good Eating

Recipe: Carrot Soup With Herbs and Wild Greens

Recipe: Carrot Soup With Herbs and Wild Greens

by Carolyn Hasenfratz

I like carrots a lot but it gets kind of boring to eat them the same old way all the time. This recipe will liven up a bunch of carrots!

Ingredients:
1 bunch or bag of carrots
Vegetable broth
Colander full of fresh edible weed leaves and herbs from the garden – I used Dandelion, Violet, Asiatic Dayflower, Chives, Lemon Balm
4 garlic cloves
1 tsp dried basil
1/2 tsp salt
1/2 tsp ground ginger
1/4 tsp marjoram
1/4 tsp savory
1/4 tsp thyme
Cooking oil

Wash herbs and leaves and remove from stems. Discard stems. Heat a large pan or wok and stir fry herbs and leaves in cooking oil until wilted. Put greens in soup pot.

Chop carrots into discs or straws thin enough to cook easily. Add more oil to pan and stir fry carrots and garlic cloves until somewhat browned. You don’t have to cook them all the way, just brown some of the sides for caramelized flavor. Add to soup pot.

Add broth to cooking pan and heat long enough to mix in pan juices. Pour broth over vegetables in soup pot in a quantity enough to cover. Bring to a boil then turn down heat and simmer for 30 minutes. Add spices and salt while simmering.

Let soup cool enough to be safe to put in a blender. You may need to blend it in batches and add to a large bowl to mix batches together. Blend to a smooth consistency. Warm if needed and serve.

If you are interested you can read more of my recipes on my Fun With Food page.

Categories
Gardening Good Eating

A Couple of Quick and Easy Recipes

A Couple of Quick and Easy Recipes

by Carolyn Hasenfratz

fresh edibles from my garden
As a follow-up to my recent article on foraging for wild edibles, here are a couple more simple and easy ideas for getting interesting nutritious treats into your diet. It’s a lot of fun to go out in the garden and yard and decide “What looks good to eat today?” I also grow some things in my garden that could be fatal if I accidentally eat them so it’s critical to be able to identify what is in your foraging area.

Tuna Sandwiches With Wild Leaves

Ingredients:
Wild edible leaves
Fresh garden herbs
2 cans tuna
Chopped crunchy vegetables
Mayonnaise
Bread

Go out to the garden and pick some large edible leaves. Rinse and dry them. I used wild Violet, Dandelion and Asiatic Dayflower for my test. Set aside.

In addition pick some more conventional herbs if you have them that would taste good in tuna salad such as Sage, Garlic Chives and Lemon Balm. Wash and chop herbs, and put in mixing bowl. Add two cans of tuna and some chopped crunchy vegetables. I used the Healthy 8 mixture from Trader Joe’s. No I’m not on the Trader Joe’s payroll but I buy this mixture a lot because it’s really convenient to add to all kinds of recipes, both raw and cooked.

Mix mayonnaise into your tuna salad and toast your favorite bread. Put tuna mixture on bread and top with your foraged edible leaves in place of lettuce. Yummy!


Quick Weed Soup

Ingredients:
Wild edible leaves
Fresh garden herbs or greens
Broth or instant Miso soup packets
Kombu seaweed
Quick cooking vegetables such as edamame, mushrooms or sprouts
Optional – quick cooking proteins such as tofu cubes or small shrimp
Optional – wild Violet, Dandelion, Asiatic Dayflower or other edible flowers for garnish

Collect from your garden wild greens that taste good cooked such as Asiatic Dayflower, Dandelion and wild Violet. Be sure you are certain about identification, if not get help from an expert to avoid making mistakes with toxic plants. If you have other more conventional herbs from the garden that would taste good in an Asian-flavored soup, collect those too.

Wash herbs and leaves. Chop any herbs that need chopping.

Place herbs and leaves in a soup pot on the stove. Add your favorite broth or add water plus packets of instant Miso soup mix until the flavor is to your liking.

Cut sheets of Kombu seaweed into strips with a scissors and add to broth. Add quick cooking veggies and proteins if you are using any. Bring soup to a boil and check if the proteins are cooked through. Simmer for a few minutes more if needed, but if you used pre-cooked shrimp you probably won’t have to. If you have any edible flowers, sprinkle on top for garnish. If using Dandelion flowers, you should pull the petals out and discard the calyx to avoid bitterness. Enjoy!

In my opinion of the three wild leaves I used in my test, the Asiatic Dayflower was the most flavorful – it does taste like green beans as they say. The wild Violet and Dandelion are so nutritious I would not want to omit them but I would use them in smaller proportions for better overall flavor.

If you are interested you can read more of my recipes on my Fun With Food page.

Categories
Gardening Good Eating Outdoor Fun

You’d Be Happy Too If You Could Eat What Bugs You!

You’d Be Happy Too If You Could Eat What Bugs You!

by Carolyn Hasenfratz

You'd Be Happy Too If You Could Eat What Bugs You!

“You’d be happy too if you could eat what bugs you!” That’s what it says on a coffee cup that I bought for my Dad when I was a little kid. I chose the cup for Dad because the design was in his favorite colors, green and orange. I have to admit I liked that
it had a frog and a bug on it, two of my favorite things then and now!

I’m not yet at the point where I’m willing to experiment with eating bugs, but I’m intrigued by garden weeds that are edible. There is no doubt that gardeners are “bugged” by weeds but your attitude toward some of them might improve if you can harvest and eat them.

For example Dandelions, Wild Violets and Asiatic Dayflowers are common weeds in my garden and also delicious in a salad when young and tender. When I regularly pull the baby leaves, rinse and eat them I’m harvesting and enjoying a fresh and nutritious crop rather than dealing with something annoying. You should be very careful when foraging to make sure you’ve researched the wild plant you want to eat to make sure you have identified it correctly, are not confusing it with a poisonous look-alike and are picking it from an area that is free of toxins such as pesticides, herbicides or auto exhaust.

Unless you are extremely confident in your identification skills, my recommendation is to get some foraging instruction from an expert in person so you can actually see and taste the plants as you learn about them. To improve my skills in identifying edible wild plants, I attended a recent workshop at Litzinger Road Ecology Center given by Jan Phillips, author of Wild Edibles of Missouri. There must be a lot of interest in this topic because there were about 40 people there.

First we watched a slide presentation where we learned about some of the wild edibles available in Missouri. Did you know that you can eat Daylily buds, Plantain, Redbud flowers and Henbit? We learned about these and many more. When I was a kid my neighborhood friends and I used to eat the seed pods of the weed Yellow Wood Sorrel – we called them “pickles” because they have a tart taste. I thought we were just lucky not to be poisoned while experimenting, but it turns out that’s a well-known edible weed though some people can’t eat it because they are allergic to the oxalic acid it contains.

Foraging at Litzinger Road Ecology Center

After the slide show we split into groups and foraged over different areas of the property. My group picked a lot of Redbud flowers, Violets, Dandelions, Spring Beauty, Henbit and Plantain.

Eating the results

After foraging we brought our produce to the kitchen to wash and spin it. We then enjoyed some of it in salad. Chef Ryan Maher provided us with some delicious mushroom dressing to accompany the greens and flowers. Redbud and Dandelion flowers were cooked into pancakes for us to try. We enjoyed an array of other unusual treats that had been prepared ahead of time – teas brewed from things like Spicebush (that was my favorite), candied Peppermint leaves, Reindeer Lichen biscuits with Gooseberry jelly, wild nuts and more. Wild foraging is definitely a way to introduce some interesting new ingredients into your cooking!

Here is a salad recipe of mine that I like to mix with my “weed” greens.

Your favorite fresh greens from the garden
1 bulb fennel
1 cup mung bean sprouts
1 cup chopped kale (optional, if you need to boost the amount of greens)
1 cup broccoli slaw
Your favorite dressing (I mainly use vinegar and oil with a sprinkle of salt – edible weeds can be used to make flavored vinegars and tasty dressings also!)
Sprinkle dried cranberries and roasted pumpkin seeds on top

What chore sounds like more fun? Weeding, or picking some interesting food? Depending on what is growing in your garden, which task is awaiting might just depend on how you look at it!

Resources for more information on edible weeds and wild plants:
Link: Common Edible Weed Plants
Book: “Peterson Field Guide to Edible Wild Plants” by Lee Allen Peterson
Book: “Stalking the Wild Asparagus” by Euell Gibbons

Categories
DIY Gardening Good Eating

Impatient for home-grown greens? Try some sprouts!

Impatient for home-grown greens? Try some sprouts!

by Carolyn Hasenfratz

Seed Sprouter from Botanical Interests
There are a lot of health claims associated with eating sprouts. I know for sure that they taste great and can be ready to eat just a few days after starting so if you’re ready for something green and yummy to eat you won’t have long to wait. I purchased a Seed Sprouter from Schnarr’s and I’ll be giving it a try shortly. Schnarr’s carries some seeds from Botanical Interests that can be used for sprouting. We might not have everything listed on the Botanical Interests web site but we have some of them. You can also get seeds for sprouting from the Whole Foods bulk section.

Did you know you can let some of your seeds grow two or three weeks past the sprout stage and cut the tops off to use them in juices or smoothies? Wheat Grass and Oat Grass work well for this because they are easy to grow indoors and they germinate pretty quickly. When they are long enough you can use them in your favorite recipe. I sowed my seeds in seed starting potting mix, harvested a first cutting and got a second smaller cutting off of them later before turning them over to my pet birds. Apparently European Starlings don’t need to be told that sprouts are good for you! They rapidly ate the stems, leaves, roots, and still-attached seeds with gusto! I think I remember reading somewhere that if you observe birds pulling up young seedlings in your garden, they are not just engaging in wanton vandalism, they want the extra nutrition from the sprouts. My own birds’ instinctive behavior around sprouts would seem to reinforce that idea.


Oat Grass and Wheat Grass


The Oat Grass is mainly marketed for cats while the Wheat Grass is marketed for human consumption. Both are nutritious for humans but the fibers are not digestible for us. You can get some of the nutrients from wheat and oat grass in a smoothie by thoroughly chopping the grass in a blender with the liquid that is going to go into your smoothie. Then strain the grass pieces out of the liquid and discard the fibrous parts. (I left some pieces in one of my smoothies as a test and I did not notice any digestive upsets but some people might not react well to the fibers). I don’t have a juicer and I’m not familiar with how they work but Wheat Grass is more commonly known for use with juicers.

According to the website WebMD, Wheat Grass contains vitamins A, C and E, iron, calcium, magnesium and amino acids. WebMD states that there is not enough evidence to support most health effects other than nutrition although people do attempt to treat some health conditions with it and rates it LIKELY SAFE consumed in food amounts. WebMD has no listing for Oat Grass but other web sites I looked at state that it is also nutritious for people though perhaps not as much as Wheat Grass.

Here is a delicious smoothie recipe to try.

1/2 cup milk (any kind)
Handful of cut wheat and/or oat grass
1 frozen banana
1 cup frozen cucumber pieces
1 scoop Vanilla Flavored Whey Protein powder*
1 heaping TBSP Matcha Green Tea Latte powder*
*available at Trader Joe’s

Directions:
Blend milk and grass pieces together in blender until well chopped. Strain grass pieces out of milk with a fine strainer. Return milk (now with a green tint) to blender and add all other ingredients. Mix well until smooth. Enjoy!