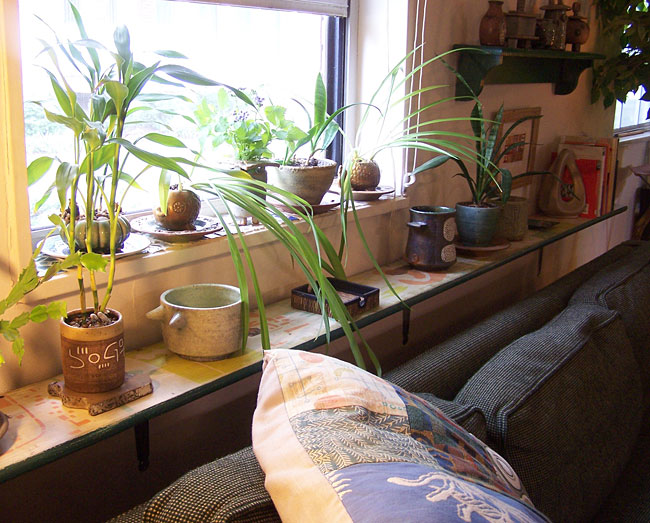
Stencil a Sofa Shelf Made From Distressed Wood
This project was made from the same stash of distressed wood that I used for the previous project Stencil a Wood Garden Sign. I kept aside a couple of intact large planks so I could make some interesting shelving. The wood was bare on one side and had partially peeling white paint over green on the other side. I decided to use the white side as a ground for some stencils I cut that were inspired by a mid-century modern building I saw on vacation last summer.
Tools and Supplies
* indicates items that are available at Schnarr’s
Distressed wood plank the length of your sofa
Sandpaper*
Dust mask*
Drop cloth for work surface*
Water based paint* for large areas
Acrylic craft paints for stenciling
Decorative stencils
Water based clear satin wood varnish*
Rags*
Paintbrush*
Assorted size old food containers for mixing paint and varnish
Sponges*
Old food container lids to use as palette while stenciling
Masking tape or painters tape*
Shelf brackets*
Screws*
Instructions
1. Put on a dust mask and sand your wood plank to remove rough edges and peeling paint. It’s always a good idea to wear a dust mask to keep from breathing small particles but I think it is even more important when working with old salvaged wood. You don’t know what that wood was treated with, what is in the old paint and it could be moldy as well. After sanding, wipe off the dust with a damp rag.
2. My wood plank already had a satisfactory ground color, white, on what would become the top surface. If your plank does not already have a ground color that you like, you can apply one. House or wall paint is a good choice. One technique that is really effective with the distressed look is to paint a contrasting color under the ground color. Some random sanding here and there later to expose the different layers of paint will simulate the effect of an old piece of wood that has been painted multiple times.
3. Apply a contrasting color to the sides and bottom of the board. As you can see, when you paint surfaces where two colors come together at a corner, it’s easy to slop a little paint over where you don’t want it. One reason that I love the distressed look so much is that when you sand off paint to conceal your mistakes, it looks like part of the design. If you are trying to paint precise corners or lines they don’t look good unless they are perfect, but with a distressed effect you can be a little sloppy!
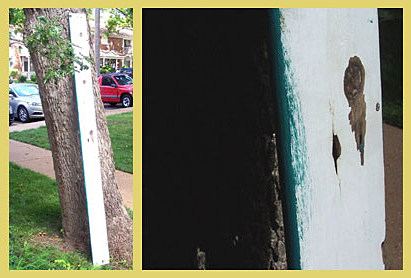
4. Next put your dust mask on again and sand the corners and edges of your board to expose the wood in those places. Then check to see if any paint is beyond the corner where it is supposed to be, such my example below on the left.

Sand away any paint that is in the wrong place, such as the excess paint that I removed from the top of the board. As I sanded the excess paint off, I exposed some of the wood grain on the front of the board and some of the green paint that is under the white paint. If you are using a really beat up piece of wood like I did in my sample, you can make some artistic decisions about sanding other areas. If there was a rough spot that I found pleasing, such as wood grain, I sanded such spots to enhance the texture. If there were spots that were not pleasing, such as dirty spots or flaking paint, I sanded to remove those unwanted areas of paint.
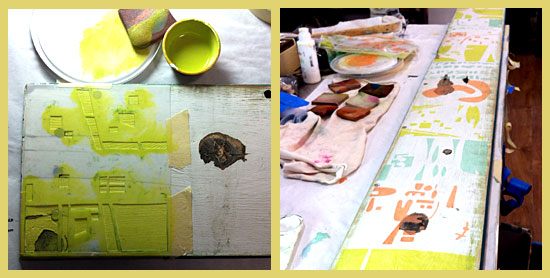
5. Decide what design you want to stencil on the top side of your shelf. I designed stencils specifically for this project but I have and will use them in lots of other projects as well. If you would like detailed information on how to cut your own stencils, see my article Fun With Stencils.
6. Apply craft paint through your chosen stencils in the colors of your choice. If you are new to stenciling on wood, please see my article Stencil a Wood Garden Sign for detailed instructions.
7. When stenciled paint is dry, to further enhance the distressed look mix up a paint/varnish/water mixture. Here is how – in a small container, mix some paint until you get a shade of dark brown that you like. In another larger container, mix a half and half solution of water and satin finish water based wood varnish. Gradually mix in some of the brown paint until you get a stain that you like – test by brushing on an inconspicuous spot. It should be dark enough to tone down your design a little bit and give it a weathered look, but not so dark that it obscures it. When the mix is right, stain/varnish your whole board and let dry.
8. Attach brackets of your choice to the wall behind your sofa, and set shelf in place. You’re done!
2 replies on “Stencil a Sofa Shelf Made From Distressed Wood”
[…] Read about it on the Schnarr’s Hardware blog: Stencil a Sofa Shelf Made From Distressed Wood […]
[…] There are some good painting tips for a distressed piece of wood in my previous article Stencil a Sofa Shelf Made From Distressed Wood. […]