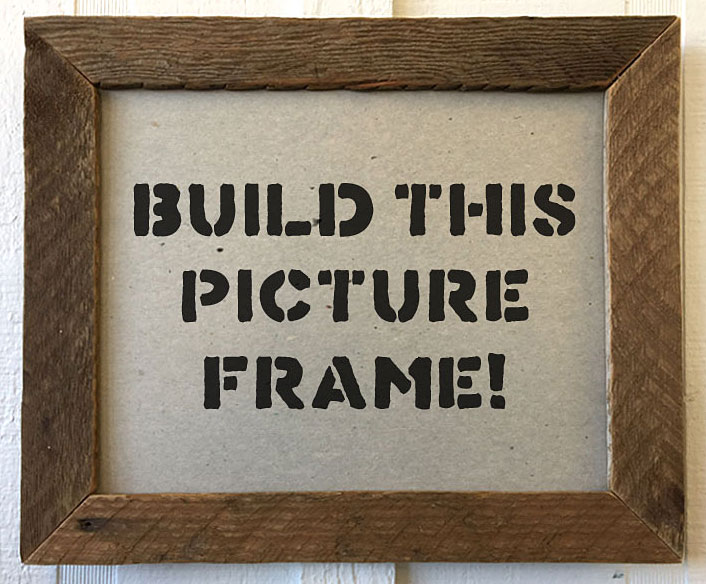
I hope you can join us for our first class at Schnarr’s Hardware in Webster Groves – Make a Picture Frame from Scrap Wood!
Schnarr’s employee Carolyn Hasenfratz will show you how to use reclaimed wood pieces to make a frame that fits an 8 1/2 x 11-inch picture. This size frame is a good size for award certificates and other common documents that you might want to display. Tools and materials will be provided. You will learn techniques that you can use to design and build your own frames from your choice of wood scraps. Save a ton of money by gaining skills you can use by making your own unique frames for your home decor while gaining the satisfaction of saving materials from the landfill.
Class with Carolyn Hasenfratz – Make a Picture Frame from Scrap Wood Date: February 22, 2018 Time: 5:30 pm – 7:30 pm Location: Schnarr’s Hardware in Webster Groves, 40 East Lockwood, St. Louis MO, 63144
What You Can Expect
Learn to build simple picture frames
Learn to design frames from reclaimed wood
Learn to fabricate hardware for the back of the frame using simple tools
Learn how to recycle wood pieces
Learn about sources of low cost reclaimed materials for your DIY projects
Starting on Friday, October 6th, Schnarr’s Hardware in Webster Groves in the Old Webster Business District will host artist and Schnarr’s employee Carolyn Hasenfratz during the Old Webster Fall Art Walk. You can see all different kinds of artwork in various businesses by taking a self-guided walking tour in the area.
On Saturday October 7 and Saturday October 14 from 12-4 pm, Carolyn will be at Schnarr’s in Webster demonstrating art projects you can do with items from a hardware store. On the 7th there will be a demonstration of Stamping and Printing with Found Objects and on the 14th Carolyn will make fall greeting cards while you watch. Carolyn’s display will be viewable when the store is open from October 6 through October 15. Stop by to see examples of things she has made from repurposed and recycled materials such as distressed wood, salvaged hardware, reclaimed ceramic tiles, scrap fabric and much more.
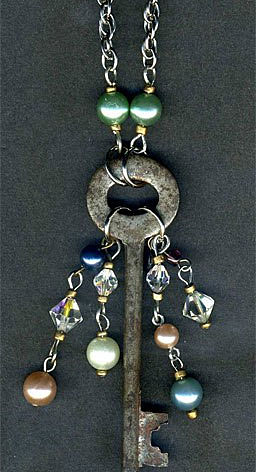
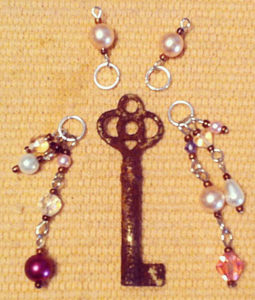
This necklace project is great for anyone who likes the vintage or upcycled look in jewelry.
Tools and materials * indicates items that are available at Schnarr’s
Skeleton key*
Vinegar* (optional)
Salt (optional)
Can of clear sealing spray* (could be acrylic or polyurethane)
Round nose pliers
Chain nose pliers (small long nose*, needle nose* or flat nose* pliers would also work)
Side cutters (When they’re sold as jewelry tools, these are called side cutters but the diagonal cut pliers* found at Schnarr’s are very similar. You can also buy long nose pliers that include a cutter. These aren’t as good for close in cutting as the side or diagonal cut pliers, but for this project they will probably be adequate. If you only want to buy one tool for this project and don’t care if your loops are perfectly round, you can get by with just the long nose pliers if they include a cutter. For perfectly round loops you will need round nose pliers in addition.)
Split ring pliers
An assortment of crystal, pearl and glass beads
Copper or gold colored seed beads
Headpins (6), eyepins (8), split rings (4) and large jump rings (4) in metal color or colors of your choice
1mm beading cord
Scissors*
Glue*
Crimping cord ends
Clasp
If you like, you can substitute metal craft chain* for the beading cord and then you would not need the cord ends.
Instructions
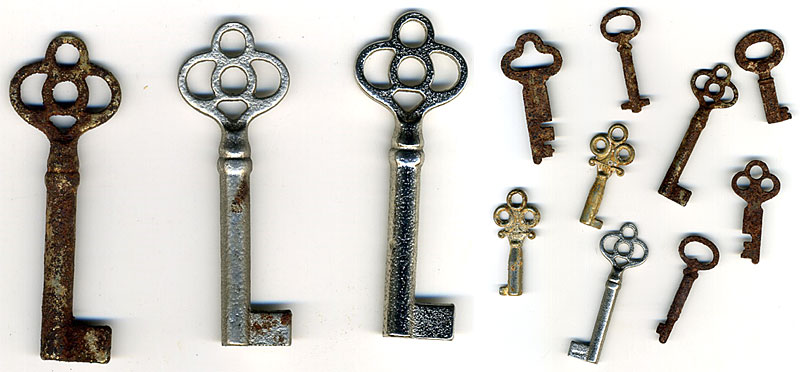
1. First select a skeleton key to be the focal point of your necklace. If you’re lucky you might find an antique key that looks just right. Vintage metal parts are in such demand that craft retailers sell a variety of replicas. You can also buy a brand new skeleton key from Schnarr’s. Decide if you want to simulate an antique patina. To artificially age your key soak it in a cup or so of vinegar with a teaspoon of salt added overnight. Let dry and rinse well with water. Let key dry thoroughly and spray with a clear coating.
On the left are three new skeleton keys from Schnarr’s. The rightmost key is new, the other two were left in the antiquing solution for varying amounts of time. The right picture is of a variety of keys, mostly genuinely older ones that I soaked in the vinegar and salt mixture. Mixing new and old keys together can help make a better patina on the new keys. If you don’t have any old keys to mix with the new, try soaking them with bits of rusty metal scraps.
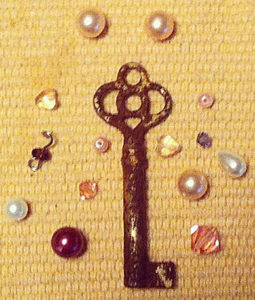
2. Put your key down on your work surface and select small beads that complement your key. Arrange beads around it to see if you like how they look and how you would like them to hang. You can also add charms if you have any.
Arrange beads around the key
3. Make dangles for each side of the key by stringing beads onto eyepins and headpins. Make some of your dangles longer by connecting headpin sections to eyepin sections. Use gold or copper colored seed beads as accents and spacers for the pearl, crystal and glass beads.
Thread beads onto headpins and eyepins and attach to key with jump rings
4. Attach dangles to the lower openings of the key on either side.
5. Select a large jump ring and attach it to the top loop of your key. Run a piece of chain through the jump ring to suspend the key as a pendant on the chain. Variation: if using beading cord, thread two additional pearl beads onto eyepins and use them as a transition from the jump rings at the top of the key to the beading cord.
6. Attach clasp to the chain ends with jump rings. If using beading cord, attach split rings to the pearl segments and attach a doubled piece of 1 mm cord to the split ring with a lark’s head knot.
7. If using beading cord, attach the clasp by crimping the cord ends with cord end findings, using a dot of glue to help hold them in place. Attach a split ring to each end then a clasp to one end. You’re done!
If you need a source for the jewelry supplies, try my online store or a local craft supply retailer.
This project was so easy that I worked on it up at the Schnarr’s cash register between customers!
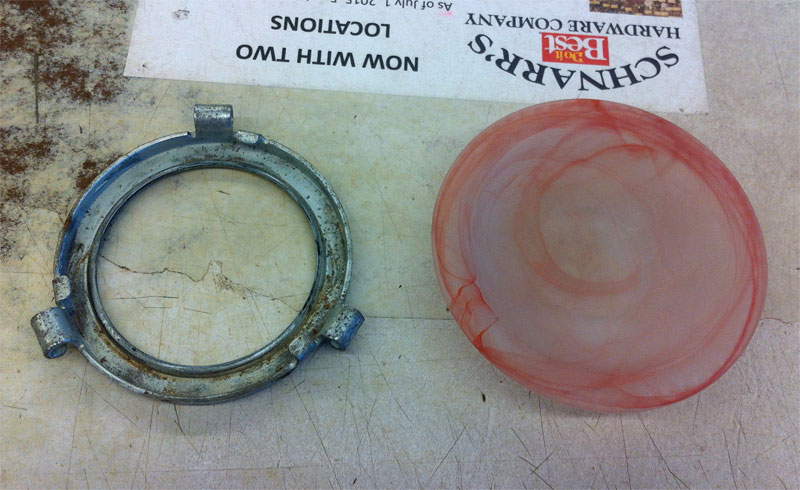
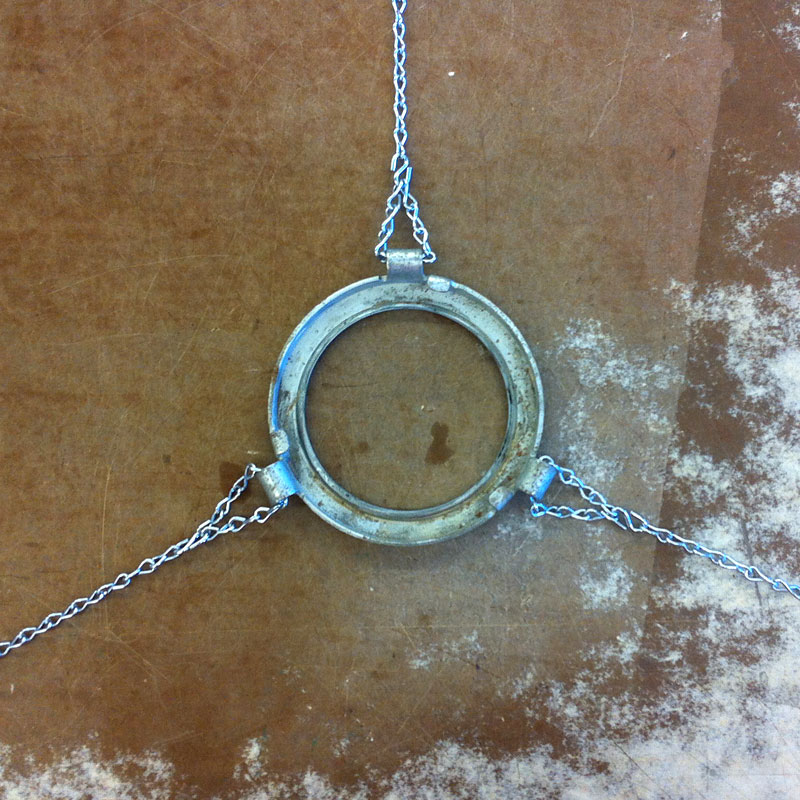
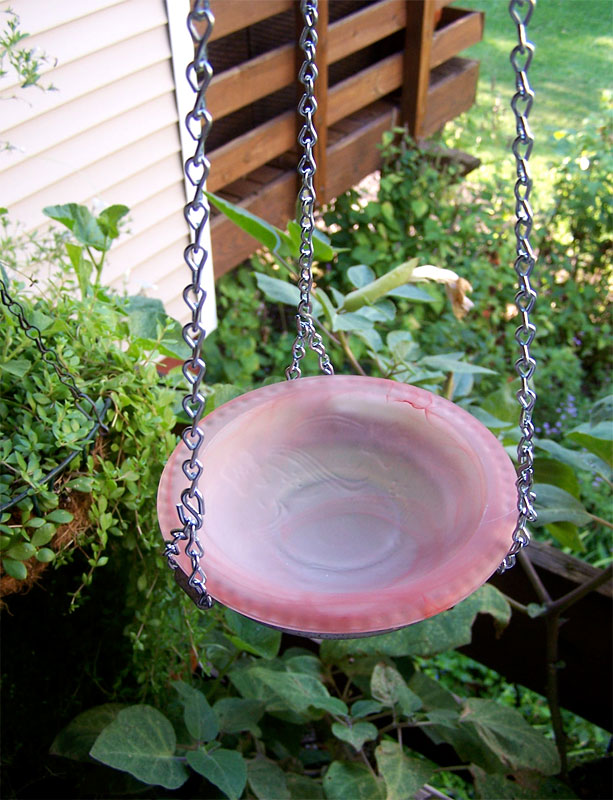
When I got a new dishwasher this spring, I decided to get rid of my broken garbage disposal rather than purchase a new one. When it was working, I rarely used it anyway since I composted almost anything that would normally go down it. In a way it’s kind of a bad habit because I already have more than enough stuff but I do enjoy saving odds and ends of things I might be able to re-use and seeing if I can make them into something useful. My Dad installed my new dishwasher for me and removed the old garbage disposal and he gave me several ringlike parts that he thought I might be able to use for something. One of them fits perfectly a glass part of a broken fountain/mister that someone else gave me.
Ring from garbage disposal and glass dish.
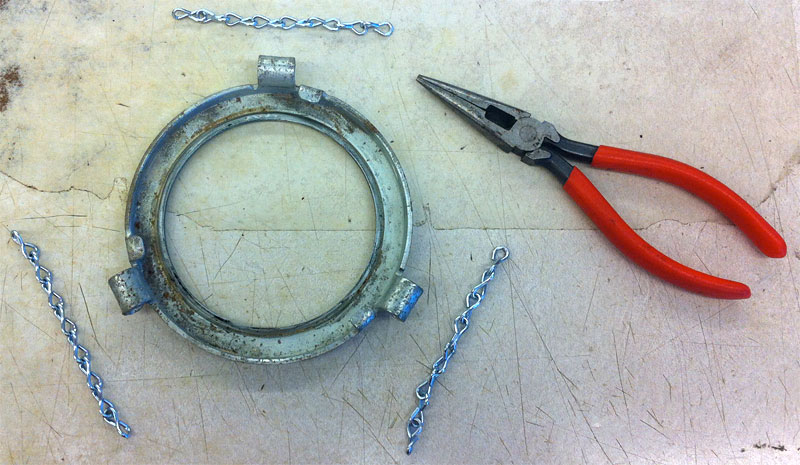
The glass bowl-like object rests nicely in the ring, so I decided to make a butterfly feeder out of it. The ring has three rolled tabs protruding around the outside edge. It was an easy matter to thread some chain through these tabs to suspend the feeder. From Schnarr’s I purchased some chain of a suitable guage and some small s-hooks to link the chain pieces together.
First I made three short equal lengths of chain. I pulled chain links apart with pliers to separate.
Short lengths of chain.
Next I threaded the small chain pieces through the rolled tabs to make loops, securing each with a small s-hook that I pinched closed.
Connecting chain pieces to ring tabs with s-hooks.
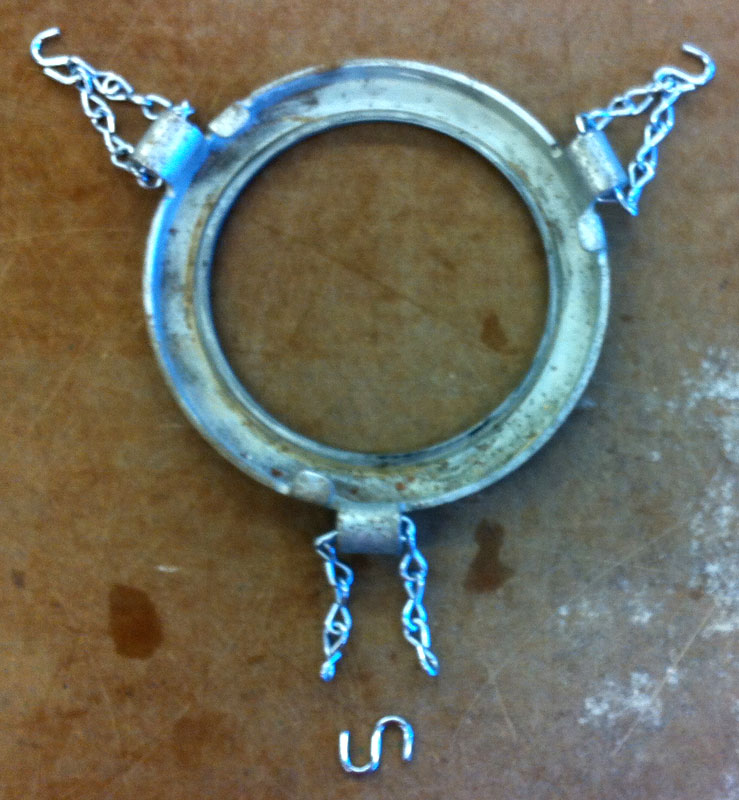
Next I cut three equal longer lengths of chain and secured them to each small loop by pinching closed the other end of each s-hook. Then I gathered the three chain lengths together and the top and secured them with another s-hook which can be used to suspend the feeder from a beam, tree branch or stand.
With longer pieces of chain added for hanging.Finished butterfly feeder hanging from a beam above my deck.
At right is how the finished butterfly feeder turned out.
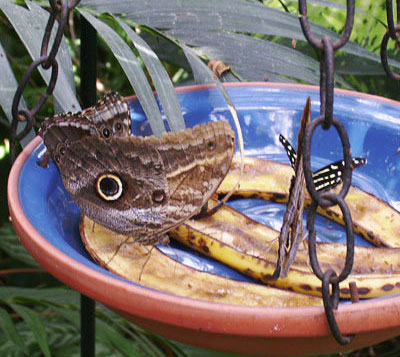
What food should one put in a butterfly feeder? If you have visited the Sophia M. Sachs Butterfly House in Faust Park you have probably seen plate feeders stocked with fruit in the conservatory. Butterflies like to sip juices from the fruit and according to Sally Roth, author of one of my all-time favorite gardening books “Attracting Butterflies & Hummingbirds to Your Backyard”, they like it even better if it’s fermenting. That’s a good way to get use out of fruit that has gone bad.
Butterflies feeding on overripe bananas at the Sophia M. Sachs Butterfly House.
Other foods that Roth suggests offering in butterfly feeders:
A clean chemical-free sponge or kitchen scrubber soaked in sugar water
Meat and fish scraps – especially if they are juicy
Fungi – if you don’t like to leave the fungal growths that pop up spontaneously in the garden in place, you could add them to the butterfly feeder – the butterflies will appreciate it!
It is evident that some foods that butterflies like are not attractive to humans. What you choose to add to the feeder may depend on your tolerance for odors or the possibility of attracting other wildlife. If you do not want other insects such as wasps and bees to access the food, you can make a cover from window screen or wire mesh that will allow the butterflies to poke their long proboscises through the screen into the food while excluding other insects.
I’m writing this toward the end of summer so there is not a whole lot of time this year for butterflies to make use of my new feeder. When the weather gets too cold for butterflies I’ll hang the feeder from a ceiling hook near a window in my home and use it as a plant hanger! In the fall I can always use extra space for plants when it’s time to bring them inside – they have a way of multiplying in the warm months, don’t they? I’ll put the feeder back out in late winter, perhaps even before flowers are in bloom, so that early-emerging butterflies can get something to eat if they need it.
In a previous article I described stenciling with paint on a wood garden sign. That works great if you don’t want a lot of small words but I found myself in need of some new garden signs that would require a lot of text on them. I decided to find a way to computer generate the text and put it on a weatherproof sign. In the past I had purchased produce from a co-op and had saved a couple of the thin wood crates thinking they would be useful for garden markers of some kind. I decided to make small signs from this wood and print out my text on clear acetate and attach that to the signs with brads.
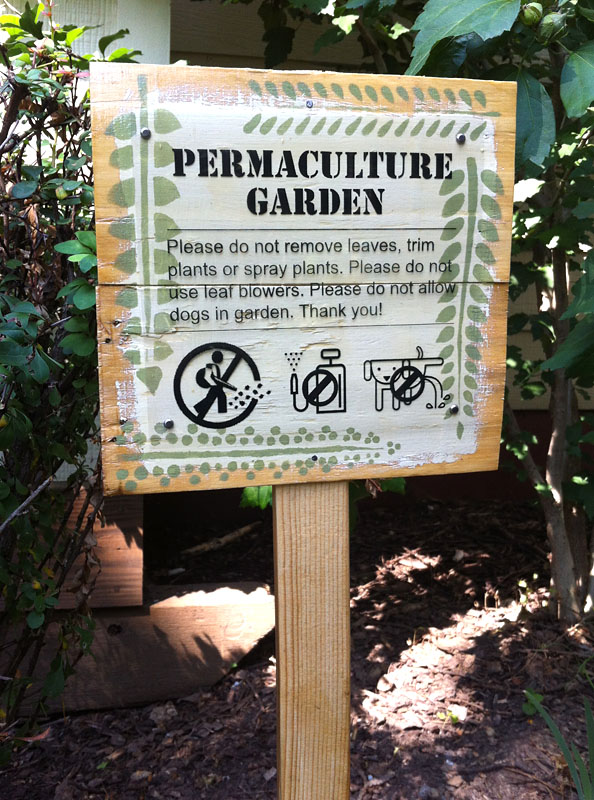
I have some special gardening challenges where I live. I want to have a Permaculture garden. Different people will define Permaculture slightly different ways but the easiest way I can explain it is that I want to manage my garden in a way that works with nature instead of fighting it in order to save both labor and money. Surrounding my condo are large Oak trees which deposit mass quantities of leaves each season. The types of plants that thrive under trees are adapted to grow in the conditions created by a yearly deposit of leaf litter which is not removed but left to decay in place. However since I live in a condo, the leaves are removed by the groundskeepers which causes a lot of problems. I have mostly perennial plants which are not intended to be replaced each year. The leaf blowers make the plants look bent and bedraggled, as if they’d just been power-washed. The plants need the winter protection provided by leaves, so I have more die-off than I should. Leaf litter helps soil retain moisture and most shade-adapted plants like moist soil. When the naturally provided soil protection is stripped off, the soil dries out too much. I can see why a plant seller would be happy about this, but I’m a plant consumer and I’d rather keep the ones I have rather than keep buying new ones! To keep plants alive I have to water more which costs the condo complex money. I can and do put down mulch, but the leaf blowers blow a lot of it into the lawn which doesn’t help either my garden or the lawn to look it’s best.
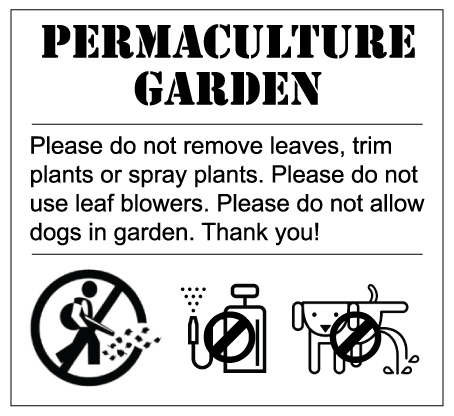
I think my garden would look a lot better and be healthier and require less maintenance if the groundskeepers would leave it alone. I have explained the situation to the condo management and they have agreed to let me deal with the leaves myself this season and keep the leaf blowers away as an experiment. Getting the agreement is one major step forward, getting the groundskeepers to comply will be another challenge. I don’t expect the groundskeepers to remember which is my garden, there are around 1,500 units where I live. So I obtained permission to install six signs to place around my garden which would read: “PERMACULTURE GARDEN. Please do not remove leaves, trim plants, or spray plants. Please do not use leaf blowers. Please do not allow dogs in garden. Thank you!” I worked this text out in computer graphics software and for good measure added icons to represent no leaf blowers, no spray and no peeing dogs. I looked online for the graphics and was amused by how many choices of “No leaf blowers” icons there are! I must not be the only person who finds they interfere with my gardening techniques.
Computer generated content for signs.
These signs will have to be somewhat prominent to be seen, so I tried to make them as attractive as possible and harmonious with my gardening style. First I pried apart the salvaged wood produce crates to get the wood pieces, then I cut them into 8 inch long sections. For each sign I placed two pieces together and held them together in the back with a piece of wide masking tape. This created a roughly square sign (8 x 7.5 inches).
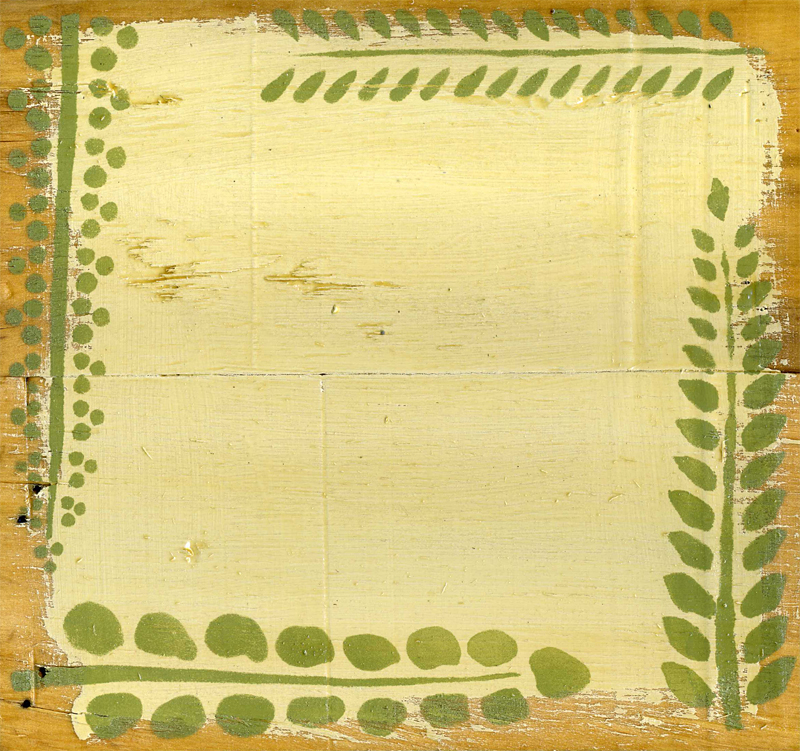
I painted a rough square of off-white paint in the middle of each sign, treating the edges very loosely for a rustic look. Then I used some medium avocado-green paint to stencil botanical designs around the edges. See my previous article Stencil a Wood Garden Sign for detailed information on how to stencil on wood. Then I painted the backs and fronts with several coats of weatherproof varnish.
Sign ground after painting, stenciling and varnishing.
Then I took my computer generated text to a copy shop and got six copies printed in reverse on clear tranparencies. The reason for printing in reverse is that I think the ink will hold up better to the weather if it’s on the back of the clear film.
Next I punched four holes in the corners of the pieces of film and drilled four corresponding holes in each sign. Then I attached the film to the wood with brads.
I purchased six wooden stakes from Schnarr’s, sanded them and varnished those as well. Then I nailed the signs to the stakes and installed them.
Finished garden sign.
Here is one of the six finished signs! If all goes well and I actually get the opportunity, I will write about how I chose to deal with the fall leaves and what the results were.
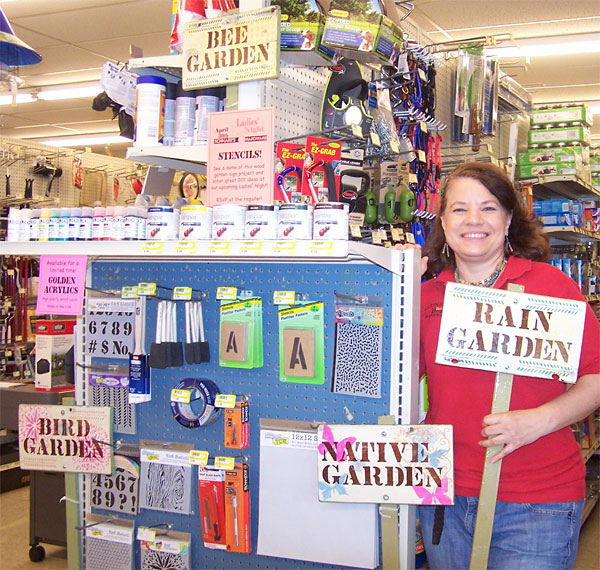
Schnarr’s employee Carolyn with several finished wood garden signs and a selection of supplies you can use to make one. Carolyn will be demonstrating stenciling at our Ladies’ Night on April 30, 2015.
How would you like a practical and decorative wood garden sign? Stencils are handy for such a project because they are available in letters, numbers and lots of fun decorative designs.
Wooden stake
Sponge brushes or sponge pieces (at least one for each color)
Plastic lids from food containers
Large water container (preferably shallow and flat)
Optional – hair dryer or heat tool
Old toothbrush Outdoor wood varnish with sun protection
Paint thinner for cleaning brushes if using brush-on varnish
Drill
Drill bit
2 bolts
2 nuts
2 washers (optional)
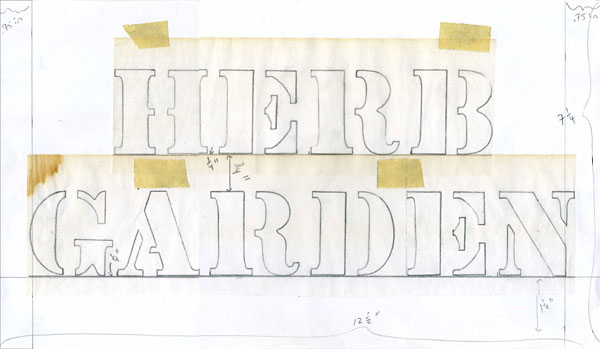
The first step in making such a sign is to decide how big it should be. If you have some scrap wood available, you could let the size of the wood pieces you have on hand determine your design. In my case, I had some used, distressed long boards that were 7 1/4 inches wide. I got out some stencil letters and decided how long my wood piece should be to fit the lettering I wanted on the sign. I worked out some lettering samples on tracing paper and taped these to a piece of paper to determine my final sign size – 7 1/4 x 16 1/2 inches.
Working out my stencil design on paper.
If you don’t have scrap wood to start out with, you can just make your design any size you want and get your wood cut to order. Work out your design ahead of time using pencil, paper and tracing paper, then go get your wood cut or cut it to size yourself. I recommend using wood of a 3/4 to 1/2 inch thickness. If you buy a board at Schnarr’s we will cut it to length.
After the wood is cut, sand it smooth. I recommend you wear a dust mask while sanding. Wipe off the dust with a damp rag.
The next step is to decide on a base or ground color for your sign. For this project I am using all acrylic or latex water-based paints (except for the varnish layer). You can use a dark color as base and stencil on it later with light colors, or make your ground color light with darker colors stenciled on later. If you like the distressed look that I am so fond of, you can put an additional color under the ground color and let some of it show through by sanding on the corners and other strategic places on the sign. You can make the back and sides a different color like I did in my sample or make it all one color. Freezer paper or drop cloths are handy for protecting your work surface while you paint.
Since I was starting with distressed wood with some paint already on it, I let the existing color influence my other color choices. My scrap wood had previously been painted white over a light green. Some of the green showed through the white as I was sanding. There were a few spots where the paint had peeled away entirely showing dark wood underneath. I wanted to tone down these areas but not cover them up entirely so I decided to paint the front of my sign with an off-white wash to preserve some of the distressed look and create a more even ground for the subsequent design. After the off-white wash was dry I painted the back and sides of my sign green.
Distressed wood cut to size, painted, sanded and read for stenciling.
For a vertical post to use for mounting my sign, I chose a wood stake available at Schnarr’s. I sanded it smooth then painted it green.
After the paint is dry, sand the edges on the sign and post to make them look distressed and wipe both with a damp cloth to get all of the dust off.
Now it’s time to actually start stenciling. Get your work area ready by placing your paints, stencils, tape, small brushes for mixing, water container, rags, small plastic cup, sponge brushes or sponges, and plastic lid where you can reach them. At your feet or on the table if there is enough room, place a large flat container filled with water. This is for placing your stencils and other tools in to soak when you are done using them. This can be a messy process so wear old clothes.
The next step is to apply some background design in a light color. I wanted to add a little interest to the background and edges without detracting too much from the lettering that would be applied later, so I chose a light yellow paint for my sample.
Choose a stencil and tape it in place on your wood sign.
Mix some light yellow paint in a little plastic cup. Do not mix any water into the paint. Dab some paint onto a plastic lid. If you don’t have a plastic lid, a little square of freezer paper taped to your work surface will serve as a disposable palette. Press your sponge or sponge brush into the paint and dab it onto the lid a few times to distribute the paint. You want a light application of paint to start out. If you are new to stenciling, you most likely will overestimate the amount of paint you need and use too much, so start with less than you think you need – you can always add more but if your paint application is too heavy it could bleed under the stencil.
Start pressing the sponge lightly into the stencil openings. Dab very gently at first and increase pressure gradually until all the open areas are filled with paint. When you are satisfied, lift the stencil.
Starting to develop the stencil design with some yellow in the background.
If you are finished with that particular stencil, put it in the large container of water to soak. If you are going to use the stencil again on another part of the sign, move it and continue stenciling until you are finished, then soak it.
When you are finished with a color, put the sponge and plastic lid in the water container for cleaning later. Do not attempt to clean the sponge or sponge brush and use it immediately for a new color – you will have to start with a clean dry sponge for the next color because water makes the paint too runny and it will bleed under the stencil.
Acrylic paint dries quickly. It won’t take long for your first layer of paint to be dry enough to work on the next layer, but if you need to speed up the drying you can hit it with a hair dryer or heat tool. Repeat the above steps with each new color until your sign is complete.
If you are using letters or numbers on your sign, you can draw a line with pencil or ruler to help you apply them in a straight line, then erase the pencil line later after the paint is dry.
Wood garden sign in progress with two paint colors in place.
Antique brass stencils with the lettering they made on my sign.
To clean your stencils and tools, swirl them around in the water to get out as much paint as possible. Squeeze all the paint you can out of the sponges and brushes. If needed clean with soap. Rinse and let them dry on a rag. Dump out the paint water and replace with fresh. Scrub your paint lids and stencils with a toothbrush to get the remaining paint off. Acrylic paint doesn’t have much of an affinity for sticking on plastic especially if soaked, but if allowed to dry prior to soaking some spots might be stubborn. If all the paint doesn’t come off it won’t affect future use so don’t worry about it. Remove as much paint as you can, rinse off stencils and lids and let dry.
When your sign is completely dry, if you are going for the distressed look rough up the design in a few spots with sandpaper. Wipe off dust.
Coat both sign and post with outdoor weatherproof wood varnish, preferably one with sunlight protection to help keep your paint colors from fading. Follow the safety directions on the container for both varnish and paint thinner as they can be dangerous if not handled properly. Do not use a sponge brush for the varnish, it will dissolve. You can avoid the hassle of dealing with brushes and rags and paint thinner by using a spray varnish instead of a brush-on product. I used a brush-on varnish because it’s more economical and I think I get a thicker coat by using a brush. Ultimately, you can make your varnish choice based on your personal application preference.
When varnish is dry, drill two holes in both sign and post to accommodate the bolts that will hold the sign together.
Connect sign to post with nuts and bolts. Place a washer behind the bolt head for a more finished look. Bolts are preferred over nails for this project so you can easily replace the post if it rots over time.
Install your sign where you want it by hammering it into the ground.
If you would like to read about how to cut your own stencils, see my article Fun with Stencils.
If you are interested in attending our Ladies’ Night on April 30, 2015 remember to RSVP (on Facebook and via email [[email protected]]).
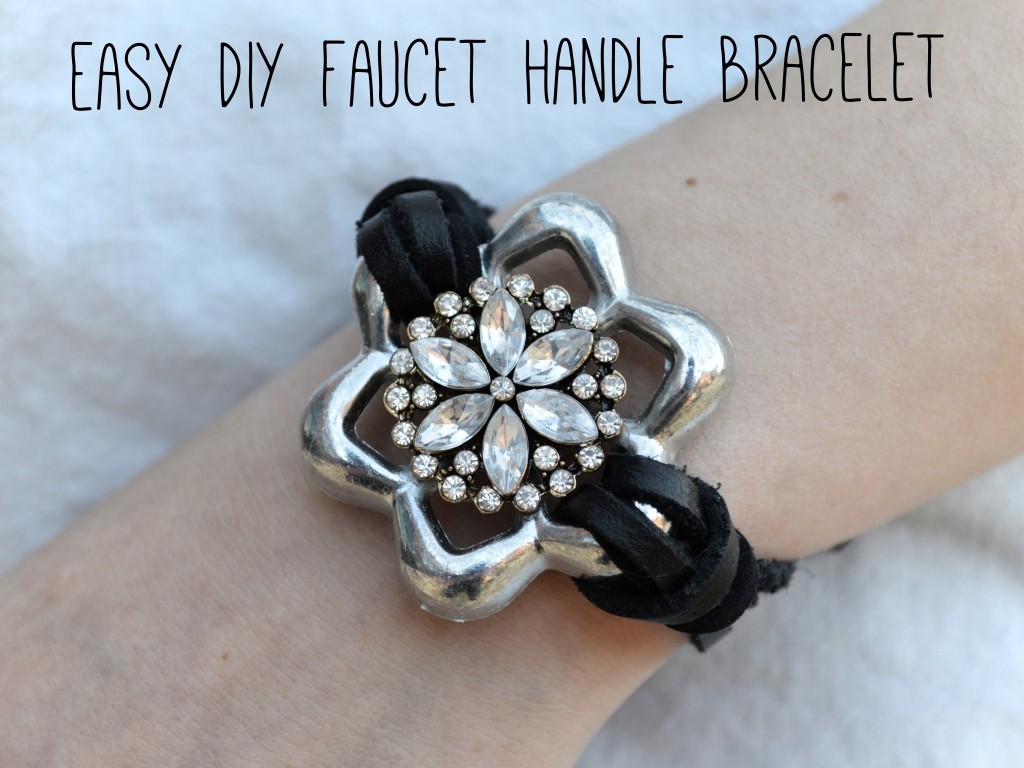
Julia Christensen will be one of the guest DIY bloggers at our upcoming Ladies’ Night on April 30, 2015. Come enjoy demos of fun projects, plus discounts, door prizes, refreshments and more! One of the projects Julia will be sharing is a faucet handle bracelet. Read her bracelet tutorial on her blog, Oh, Julia Ann.
Faucet Handle Bracelet TutorialLadies’ Night at Schnarr’s Hardware on April 30
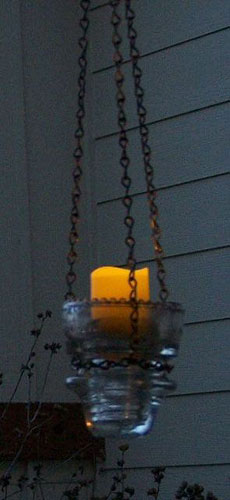
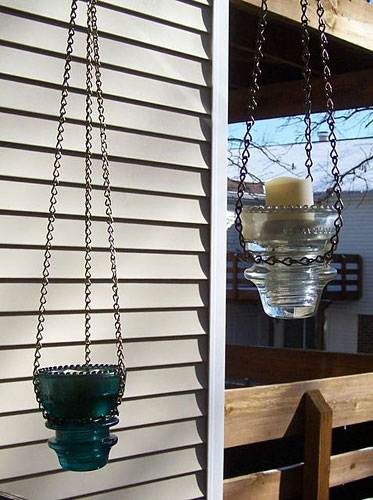
Do you collect glass insulators? I often see them for sale in antique shops and there are several web sites with information for insulator collectors. I’ve always found them attractive looking and I thought they’d be even more interesting if made into something functional. Flameless votive candles are a lot of fun (and safe) to incorporate into your decor. In this project I’ll show you how to make a glass insulator into a flameless candle lantern.
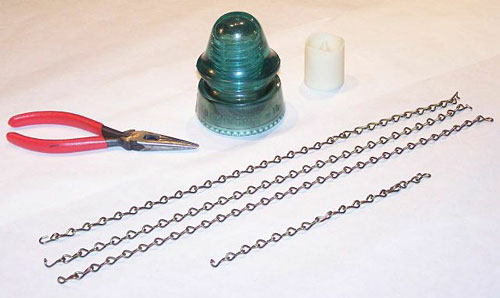
What you’ll need:
Glass insulator
Chain
Strong long-nosed pliers
Flameless votive candles – we sell LED battery powered votive candles that include a 4 hour timer
S-hook
Choosing the right chain for this project is important – it should be sturdy enough for the links to support the weight of the insulator, but not so strong that you can’t bend the links with pliers. At Schnarr’s the weight rating of each chain is indicated on the spool.
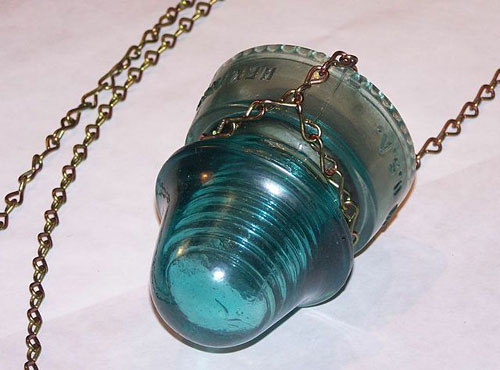
1. Select a length of chain just long enough to fit around the “waist” of the insulator. Don’t worry about cutting the chain to size – just pull a link open with the pliers to separate. The links will last longer and close more neatly if you open and close them with a side-to-side motion. With the weight of chain I chose I was able to hold a link on one hand and open with pliers held in the other hand, but if this is difficult try gripping the chain with pliers in each hand as you open and close the links.
2. Wrap the chain around the “waist” of the insulator and link together, re-closing the link to fasten the chain in place.
Attach chain to insulator
3. Decide at what level you’ll want your lantern to hang and prepare three pieces of chain of suitable and equal length. Attach one chain to a link anywhere on the “waist” piece.
4. To figure out where to attach the other two pieces of chain so that they are spaced evenly, count the chain links around the “waist” and divide that number by three. Attach the other two pieces that many links away from your first piece. For example, if your “waist” chain has 15 links, attach the hanging chain pieces every five links.
5. Link all three pieces together at the top by stringing the last link of each onto an S-hook. If you buy an open S-hook, you can let gravity hold the chains in place, but if you want extra security you can squeeze the S-hook closed with your pliers. If you buy a closed S-hook, just open and close with a side to side motion the way you did with the chain links.
Insulator lantern with light
6. Now it’s time to decide how to hang your lantern. If you want it to hang straight from the ceiling, you can use a ceiling screw hook, toggle bolt, hanging kit, swag hook or decorative bracket of the type commonly used for hanging plant pots. Weigh your insulator lantern to make sure you don’t exceed the weight limits of your chosen hanging hardware. If you want to hang your lantern outside, some of the hanging hardware previously mentioned may help or another option is to drape an additional length of chain over a rafter or tree branch and link the lantern to it with an S-hook.
7. Switch on your candle and place it in the lantern. The style and size of the insulator will affect how deeply the candle sets into it. If you have trouble stabilizing the candle, try some Stick-Um candle adhesive.