Categories
Gardening Outdoor Fun

Start Your Garden Now For Health

We are often told that gardening is good for our health both mentally and physically. It is widely believed that spending time with nature, having house plants, access to windows with views of natural scenes, real and facsimile floral arrangements in our living and working spaces and even pictures of plants and flowers have the power to make people feel better. I was gifted five books on horticultural therapy for Christmas, and I now have the proof right in my hands (if I needed it) that all of these assertions are true!

Some of the physical benefits of participating in indoor or outdoor horticultural activities, and in some cases merely viewing plants or landscapes, include improved mobility, coordination, endurance, muscle conditioning, blood pressure, heart rates and respiration (Doherty 21-22, 27-28). The mind and it’s functions also respond positively to horticultural activities and subjects. Clients of horticultural therapy and people exposed to plants and aesthetic representations of plants have been known to show improvements in memory, social development, psychological development, cognitive development, relaxation and positive attitudes (Doherty 21-22, 27-28).

As I work my way through this new mini library I have been fortunate to acquire, I will learn more about why horticulture benefits us in so many ways and how to leverage the effects to the best of my ability in my own gardens, and any others that I may be asked to work on in the future. I’m currently in graduate school for Advertising and Marketing Communications at Webster University while I work part-time for Schnarr’s and don’t know what direction my life will take when the course of study is done. What I do know is that gardening will be part of my life as long as I have sufficient life in me and that any human being can benefit greatly from activities involving horticulture and plants (Doherty 24).

Seed starting display at Schnarr's Hardware.
Seed starting display at Schnarr’s Hardware on January 20, 2021.

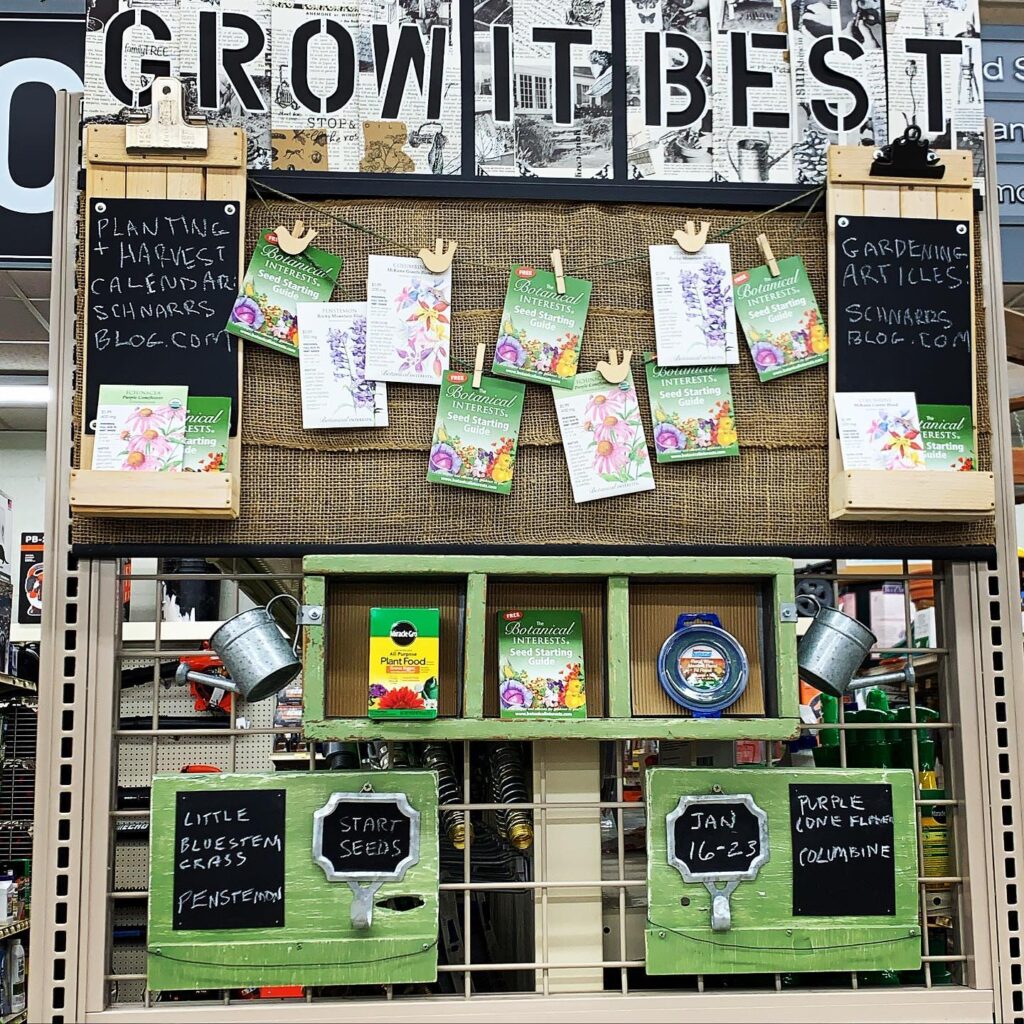
In our Lawn and Garden department at Schnarr’s Webster, we’ve endeavored to make it a little easier to start your garden this year by suggesting plants that you can start from seed, and later in the season transplant and harvest, right at the time you visit the store. Each week as I change the display I hope you enjoy the new information.

You can also view the calendar we have provided on this blog that includes St. Louis area based suggestions for seed starting, transplanting outdoors and harvesting dates for various popular plants. In addition, when we hear about educational classes and events that we think sound worthwhile and have the potential to increase the value you get from your garden, we will include those on the calendar also.


Works Cited and Bibliography

Doherty, Janice Hoetker. A Calendar Year of Horticultural Therapy. Lilyflower Publishing, Inc., 2009.

Marcus, Clare Cooper and Naomi A. Sachs. Therapeutic Landscapes: An Evidence-Based Approach to Designing Healing Gardens and Restorative Outdoor Spaces. Wiley, 2014.

Simson, Sharon P, PhD and Marha C. Strauss, HTM, Editors. Horticulture as Therapy: Principles and Practice. CRC Press, 1998.

Wells, Suzanne E. MS, Editor. Horticultural Therapy and the Older Adult Population. The Haworth Press, Inc., 1997.

Winterbottom, Daniel and Amy Wagenfeld. Therapeutic Gardens: Design for Healing Spaces. Timber Press, 2015.

Categories
Gardening

Gardening Suggestions for Late March and Dividing Perennials


Gardening Suggestions for Late March and Dividing Perennials

by Don Stuewe

Now is the time to start many outdoor plants from seed in indoor containers. The seed packets should tell you how long before the average last frost date to start germinating your seeds. In Missouri that date is approximately April 15. I’m going to be trying many colors and sizes of Sunflower varieties this year in test dirt plots in my backyard. The price is right – seeds are very inexpensive! Another resource for St. Louis area planting times is the calendar on the Schnarr’s blog.

Garden centers are not as busy right now with servicing customers… take the opportunity to ask questions of employees before the spring rush.

Dividing mature perennial plants

As plants mature they increase in diameter and quantity of leaves. There is a quick rhyme that explains this concept for perennial plants – sleep, creep, and leap. Here is an explanation of the rhyme.

  • First year in the soil, the plant sleeps (just maintains – does not improve)
  • Second year the plant creeps (improves a little bit)
  • The third year is leap (a very noticeable improvement)

Editor’s note: having noticed many of my perennials flowering for the first time in the third year, this rhyme makes a lot of sense to me!

Five to ten years after initial planting, the plant often looks overgrown or encroaches onto adjacent plant “space”. This is noticeable on commercial properties and public land near roads and highways.

My introduction to dividing plants was happenstance. I had a lot of time on my hands. For inquiring minds, I was laid off from my job – the company moved out of state. The previous owner of our residential property had many Hostas in various locations. The variety was Lancifollia (very common – everybody’s grandma has a ton of them). I divided them up and put them in new places. If there was failure, I would not mind because of the many plants remaining. The success rate was very high even in dividing in the “not recommended” months. This was the beginning of my “hands on” horticulture interest. It is fun to divide plants and share with other people (accumulating positive karma in the horticulture world). And you still have the remainder of the original plant to enjoy.

When dividing plants, try making different size portions. You will learn by trial and error the minimum size of root mass to succeed in growing a new division. If you take off a large portion because you want the new division in a new location to look robust right from the beginning you will have to water more.

I have divided good size clumps of grasses in Missouri’s July and August heat while watering aggressively with a garden hose. Editor’s note: I too have transplanted in the “wrong” months and have often gotten away with it by watering a lot.

NOTE: For scale, the following pictures include two 12 oz cans of pop, a one inch wide silver yardstick on a 36 inch two by six wood piece, and a yellow carpenter’s framing square that is 16 inches on the short leg by 24 inches on the long leg.


Name of Image


I used “moderately beefy” stakes…


Name of Image


… and green coated electrician’s wire (blends in with green grass color) to support the tall grasses after planting. You can also buy green twine at Schnarr’s.


Name of Image


NOTE: The two previous pictures are same plant. I did this in an obscure corner in the back yard (if there was marginal results – the grass would not be in a prominent location) and the results were excellent. The next year’s growth should be “creep” (from the rhyme).

NOTE: Some root systems are dense and very “anchored” in the soil. I have used a six foot digging shovel and jumped on the shovel (to create more force) to shear through the root system. People have used a wood axe and a chain saw to cut through roots. A Sawz-all power tool, with a pruning blade available at Schnarr’s, also known as reciprocating saw, is a good choice.


Clump of grass


Another way to explain root system density is that it is similar to root bound plants in containers. It is important to cut away very dense excess root growth that develops when the roots follow the shape of a container instead of spreading outward like they are supposed to.

Gardener’s Mantra… dig a hole… roots go in first. That is all people need to know! Don’t let the Master Gardener’s detailed instructions intimidate you! Experiment – have fun with it – enjoy the warming weather!

Categories
Gardening

Start Some of Your Spring Planting Right Now! Part 3

Start Some of Your Spring Planting Right Now! Part 3

by Carolyn Hasenfratz

*Indicates items available at Schnarr’s

Once you have enticed some seeds to sprout indoors, how should you care for them? In our Master Gardener lecture on Propagation we learned to start fertilizing 3-4 weeks after the seeds sprouted with a water soluble fertilizer at 1/2 strength.

Prevention of Damping Off

Keeping your containers* clean and using sterile potting mix*, recommended in our previous article Start Some of Your Spring Planting Right Now! Part 2 are practices intended to prevent damping off – a fungal disease that kills young seedlings by infecting them at the soil line.

If you want to add a further preventative or possibly kill fungus if it appears despite your precautions, you can spray your seedlings with chamomile tea. An article in Mother Earth News recommends putting a chamomile tea bag into 4 cups of boiling water and letting it sit for 24 hours. Then put the tea into a plant mister* and spray the seedlings at each watering. I’m also experimenting with spraying my edible sprouts* with the chamomile tea and am having success!

Other additional preventive practices against fungus on seedlings are maintaining good air circulation around the plants and watering them from the bottom.

Transplanting the Seedlings

You can transplant the seedlings after the first “true” leaves are present. “True” leaves look like the actual plant leaves and not like the Cotyledons, also known as “seed leaves” which are first to appear. If you have planted your seedling in a peat pot* or pellet*, you don’t have to transplant it, just move it to a larger container surrounded by more potting soil.

If you do need to transplant seedlings, the recommended procedure is to create a hole in the medium large enough for the root system. Gently loosen the medium around the root system, and if any medium clings to the roots leave it there. Pick up the seedling by the leaves, not the stem, and place into the hole. Gently fill in any gaps with medium but don’t pack down. Water well (you can water from the top this time so the water settles the soil around the roots) and put it in a growing environment appropriate for the plant. You will get the most healthy seedlings if you can place them in strong light and if you can get the nighttime temperature around 60-65 degrees and 10-15 degrees warmer during the day.

Hardening Off

Your seedlings should be hardened off for a couple of weeks before moving them outside permanently. On mild days you can start leaving them outdoors in a shady area that is sheltered from strong breezes. Wait awhile before moving them into the sun or leaving them out overnight. You can consult our Calendar for suggestions on when to move many popular plants outside!

Categories
Gardening

Start Some of Your Spring Planting Right Now! Part 2

Start Some of Your Spring Planting Right Now! Part 2

by Carolyn Hasenfratz

The following seed starting tips come from my Master Gardener class and are general for a wide variety of seed starting. Some of the information you may need to germinate seeds is specific to the type of plant you are trying to grow. Check the seed packet or other resource to find out if there are any specific instructions for that particular seed.


Seed Starting Mix

1. Choose a seed starting mix that is loose or lightweight, porous, fine-textured, holds water, and is free of pathogens or weeds. It can contain fertilizer but doesn’t necessarily have to. Pre-made mixes like the Miracle Gro Seed Starting Potting Mix* are easy to use. You could also make your own blend containing some or all of the following – peat moss*, perlite*, vermiculite*, compost and bark. Do not use field soil or sand. Peat pellets* can also be used in place of loose medium.


Seed Starting Kit

2. Next select a container. It can be a plastic container with drain holes* in the bottom or a plant able pot* made of biodegradable material. If you have used the container before it’s a good idea to soak it in a 10% bleach* plus water solution and scrub it to make sure it doesn’t harbor pathogens.


Boot Tray

3. Fill the container to the top with planting medium without packing it down. Set the container in a tray* of water and let the water soak through from the bottom up. The reason for watering from the bottom is to avoid packing down the planting medium. If you are using peat pellets soak them in water until they expand.


4. Dig little holes or trenches in the medium at the proper depth for that particular seed. If you are not sure plant it at about twice as deep as the diameter of the seed (3-5 times outdoors). Cover seeds with medium.

5. If the container comes with a clear plastic cover, put the cover on. If you don’t have a cover, use a clear plastic bag and seal the bag to keep in moisture. You shouldn’t need to water for at least a week or so, unless you see the medium looking light colored and dry around the edges. When you do water the seeds, do a thorough job.

6. Place the seeds in a warm spot or on a seedling heat mat* until they sprout. 75 to 80 degrees is a good temperature range unless your seeds have other requirements. After that you can remove them from the heat source and remove the plastic covering. Keep seedlings away from a draft or heat vent.

7. Some seeds need light to germinate but for other seeds you can wait until they sprout to put them under lights. Some light from a window is helpful but it won’t be enough by itself. Artificial light can be either fluorescent or incandescent but you might prefer the fluorescent because it does not give off as much heat. The lights need to be very close to the plants and there is less danger of overheating the plants if you use a light that doesn’t get too hot.

Warm and cool also can refer to light color and that is important to mention here. Plants use both red and blue light wavelengths for photosynthesis so you can use either warm or cool light or both together if you want. You don’t need special grow lights but if you see any that are meant to simulate a daylight spectrum those are a good choice. The brightness of the light, or lumens is more important than the color of the light, or kelvins. We have a wide selection of bulbs at Schnarr’s – talk to us about your lighting needs and we’ll help you select the right product.

8. 3-4 weeks after seeds have sprouted, you can start adding liquid fertilizer* at 1/2 strength.

* available at Schnarr’s.

Check the Schnarr’s Calendar for suggested St. Louis area planting times, we have many plants listed on there. Stay tuned for future tips for transplanting the seedlings!

Categories
Gardening

Start Some of Your Spring Planting Right Now! Part 1

Start Some of Your Spring Planting Right Now! Part 1

by Carolyn Hasenfratz

I live in a condo and space is very limited. As a result I haven’t done much experimenting with starting seeds indoors so far. Over the last year I’ve been updating the Calendar on the Schnarr’s Blog with planting times of some of the seeds that we sell in the store and a few others that I grow. My source for these planting times, indoor or outdoor, is using the average first and last frost dates for the St. Louis area as a guide along with the When to Plant App published by Mother Earth News. It’s amazing how early some of these dates are. This year I want to see what kind of success I can have actually following the schedule and not just throwing some seeds in the ground when I have time!

Since I collect and save seeds from year to year, first I took inventory of what I have and used the Calendar as a guide to see when to start the seeds. Three of the seeds in my stash, Yucca filamentosa, Purple Coneflower and Columbine will be ready to plant indoors in mid-January. I refreshed my memory about starting seeds by reading some articles on the Dave’s Garden web site.

I have some work to do before I’m ready to plant but I am making sure I have on hand the following:

Seeds*
Covered growing containers with a clear lid*
Peat pellets*
Sterile seed starting soil*
Spray bottle for watering*
Plant markers*
A source of light for the seeds*
A source of heat for the seeds
Gardening journal for notes
*Available at Schnarr’s


When I get ready to plant, I’m going to make a page in my journal about each plant I’m attempting to sprout and make notes about what conditions the seeds require, then I will do my best to meet those requirements. I’m planning to make use of an aquarium that is currently empty to house some of the seeds. The aquarium light will act as both a light and heat source and the lid will help hold in moisture to create a mini-greenhouse. As an experiment, in an atrium in a building where I am renting a studio, I’m going to put some covered seed starter trays with some of the same species of seeds to see where they do better. I already have some of my house plants over there. Gardening involves a lot of trial and error – I will take good notes so in the future I will know what worked and what didn’t.


Here are some examples of seed starting supplies you can pick up at Schnarr’s:


Miracle-Gro Seed Starting Mix

Miracle-Gro Seed Starting Mix

Garden Markers
Garden Markers

Jiffy Seed Starter Kit