Categories
Backyard Wildlife Gardening Good Eating Sustainability

What is Eating My Mustard Greens?

What is Eating My Mustard Greens?

by Carolyn Hasenfratz Winkelmann

At my old garden, I was only allowed to grow vegetables on my small deck – I lived in a condo. My deck was in part shade so between lack of space and lack of sun I could only manage to grow a small amount of cherry tomatoes and a sad number of potatoes. Otherwise I stuck to ornamentals, herbs and wildflowers which I could get away with planting in the ground while enjoying a reasonable selection of plants that would grow in part shade.

When I got married and moved into a house in 2018, I started collecting vegetable seeds at seed swaps for my new garden which has plenty of sun. I had to do a lot of planting in a hurry so I just planted the seeds I had in the hopes that I would get a few vegetables and save a few seeds for the following year.

Lots of cherry tomatoes 
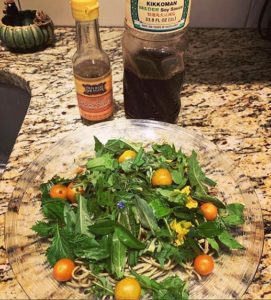
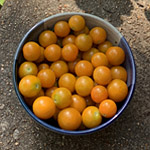
I’ve been having really good luck again with cherry tomatoes and I’m now addicted to growing leafy green vegetables so I can have fresh tasty salads that I pick myself. A few of the plants have really been chewed on by pests which is not a surprise because I don’t use pesticides. In my haste I made no effort to try companion planting to chase some of the pests away. Most herbs are not bothered much by pests so since I’m pretty new to growing vegetables I’m seeing a lot of creatures that I haven’t seen before.

Fresh picked salad with cherry tomatoes, dill, arugula, chives, romaine, mustard greens, edible flowers and wild greens.
Fresh picked salad from the backyard with cherry tomatoes, dill, arugula, chives, romaine, mustard greens, edible flowers and wild greens.

I had some Evergestis rimosalis (Cross-striped cabbageworm) on my mustard greens and some Pieris rapae (Imported cabbageworm) on my collards. I’m interested in invertebrate conservation and providing food to wild birds, so in the quest to get some vegetables I can eat I’m not going to apply poisons. I might start an additional bed of these vegetables in my fall garden and protect them with a row cover and some companion planting.

Hornworm caterpillar with parasitic wasp cocoons.
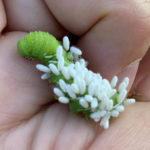
I’m familiar with these little white blobs on this tomato or tobacco hornworm – those are the cocoons of tiny parasitic wasps that feed on caterpillars. The lifestyle of some of these tiny wasps is pretty horrific, and I’m saying that as a big fan of invertebrates in general! Some of them use plants as a host and some use other insects. Tiny parasitic wasps lay eggs on the bodies of caterpillars. When the tiny wasp larvae hatch, they feed on the caterpillar while it’s still alive. When they emerge they weave white cocoons where they stay until they hatch into adult wasps. The caterpillar they have been feeding on is eventually doomed though it might not die right away.

Even though their lifestyle kind of turns my stomach, these wasps are beneficial so I’m going to put this caterpillar back out in the garden. When the adults emerge they can continue their work of preying on garden pests. If you are going to destroy any caterpillars, it’s recommended that you leave the parasite-infested ones in the garden to add to nature’s arsenal of natural controls. The adult wasps of this type are not social and they do not sting. Some of the adults are so small I’m not even sure what kind I have in the garden. I have swarms of tiny and medium sized insects all over my masses of herbs that are in flower, such as Dill, Garlic Chives, Peppermint, Bronze Fennel and more. Herbs that get clusters of small flowers are worth growing just to get into your garden all the beneficial insects that are attracted to them.

Categories
Gardening Sustainability

Fall Garden Cleanup

Fall Garden Cleanup

In my previous article “Make a Garden Sign Out of a Recycled Produce Crate” I explained that I wanted signs to let the groundskeepers at my condo complex know that I did not want them to remove the fall leaves from my garden, especially with leaf blowers, or trim or spray the plants. The condo management has agreed to let me manage fall garden cleanup myself this year as an experiment and has let the landscaping company know to leave my garden alone. Here are the reasons why I think this will improve my garden:

  • When the leafblowers remove the leaves, they also knock over my plants, blow away plant tags, blow away fertilizer, blow my mulch into the lawn and blow seeds out into the lawn which makes the lawn weedy and my plants less likely to reseed themselves.
  • Trimming the plants in the fall destroys hibernating beneficial insects and removes winter food and cover for birds from the garden.
  • The resulting bare soil is more likely to erode and I lose plants over the winter due to the soil drying out and freezing more deeply than it would with a natural cover.
  • I have to water more often to compensate for the lost moisture and that costs the condo complex money.
  • My gardening space is all part shade and shade plants are adapted to living under tree litter for the most part rather than bare soil so it’s difficult to get things to grow.
  • The groundskeepers don’t necessarily know which plants I want and which ones I don’t and they often spray the wrong ones with herbicide. I can’t label them because the leaf blowers blow the markers away. Even if they always sprayed the right ones, I don’t want poison around my home. I’d rather pull the weeds and compost them or smother them with lasagna gardening.

So how do I propose to handle garden cleanup this fall?

One of the first gardening books I bought after moving into my condo was “Making the Most of Shade” by Larry Hodgson since I was new to shade gardening at the time. I haven’t reviewed it for awhile so I got it out to see if it had anything helpful about managing leaves.

Here is some of what Hodgson has to say about removing leaves and dead plant material in the fall:

“It doesn’t help the plants in any way, and it removes the organic matter that would have decomposed on the spot to feed the plants… …I find the less I disturb plants, the better they grow.”

The kind of fall cleanup I’d like to do is none at all. Will that work? I know the groundskeepers will need to remove leaves from the lawn, because the lawn will die if they are not removed or chopped up on the spot. My garden will be a nuisance if leaves blow off of it onto the lawn and I don’t want to cause problems. I plan to toss some wood chip mulch over the leaves periodically to keep the leaves in place. If the resulting leaf/mulch piles threaten to exceed 8 inches in depth (if you go over that you may harm tree roots) then I plan to remove some of the leaves and either chop them and return them to the garden or use them in one of the other two gardens I help manage. My perennial plants if left alone should do some of the work of holding leaves in place also.

The trees around my condo are almost all oaks and I’ve read that oak leaves may form a mat which keeps water from getting through to the ground and they are also slow to break down. Nitrogen helps dead leaves break down faster, so whenever I apply wood chip mulch I will also add some high-nitrogen organic fertilizer.

I’m also going to experiment with growing oats as a cover crop over the leaves in spots. I’m already having some success with growing oats in leaf mounds with no soil added in a client’s garden. If I have the same results in my garden the oats should be helpful. I hope that the oats will perform four tasks for me:

  1. Help hold leaves in place.
  2. Pierce leaves with their roots so that water can get through.
  3. Feed small birds with their seed heads.
  4. Decompose after they die and eventually feed my other plants.

The oats die off in winter so they should not become weedy. Schnarr’s can special order some oats for you so you can try this in your own garden if you’re interested in cover crops.

Stay tuned for a report on the results of my experiments!

Categories
Gardening Sustainability

Lasagna Gardening

Lasagna Gardening

What is Lasagna gardening? No, it’s not growing delicious tomatoes and herbs that you can put in your lasagna, though you may eventually be able to do just that depending on your conditions. Lasagna gardening, also known as sheet composting, is an organic gardening method that entails covering the ground with layers of materials of organic origin and allowing them to naturally break down over time. The benefits of this method are less time and labor spent weeding and tilling, creating healthy soil for healthier plants, and reaping the many benefits of compostable materials instead of wasting them.

If you are thinking of starting a new garden bed next spring, fall is a good time to begin it and lasagna gardening is a good method to use if your chosen ground is covered with vegetation that you want to kill off. I’m demonstrating with a section of a shade garden that is covered with liriope. I like it but I have too much of it so I want to get a section ready to put in something new later. If you’ve ever tried to dig up lirope you can imagine how much time I will save by just smothering it! This method works for grassy areas also or any piece of ground covered with unwanted vegetation. Here is what my section of garden looked like before I started.

Liriope that I want to smother with lasagna gardening.
Ironically, the Liriope that I want to smother with lasagna gardening is the best looking plant in this section right now. The Bee Balm on the left and the Columbine on the right are not at their best in late summer. Next spring they will be gorgeous!

First gather up all the compostable materials that you can. The first layer consists of cardboard, paper, newspapers and other recyclable paper based products. I have been saving for a couple of months so there is more than enough for this section.

Mark off the space that will become your garden. You can transplant the vegetation already on the spot if you need it elsewhere. If it’s ok to kill it, just cover the area with several layers of cardboard and paper without leaving gaps in between. If it’s windy, wet the paper as you go – I dunked mine in a bin of water before applying. The paper will block the light and kill the vegetation underneath which will decompose and eventually become plant food.

Lasagna gardening helped me get some good use out of junk mail, product packaging, and other unwanted paper products.
Lasagna gardening helped me get some good use out of junk mail, product packaging, and other unwanted paper products. This is about five grocery bags full.

Wet the layer after you’re done applying it if it’s not already wet. This helps jump start the decomposition process.

Build subsequent layers by alternating green and brown compostable materials. Examples of brown materials are dried leaves, shredded paper, and dried dead plant materials. Green materials are grass clippings and fruit and vegetable scraps from your kitchen. Layering the green in between the brown helps to break the pile down faster, but it will eventually break down even if you have a small amount of green materials in comparison to brown. Add in whatever else you would normally put in the compost – eggshells, coffee grounds, and the like. In my case since I live in a condo community where people walk their dogs nearby, I didn’t want interesting odors to attract them to my garden so I left out the kitchen scraps and used only paper and cardboard.

If you want to do some fall planting, you can put soil and fertilizer on top of your compostables and plant now. If you are planting on top of tree roots, don’t make your layer more than 8 inches thick as anything deeper may kill tree roots, according to the book “Making the Most of Shade” by Larry Hodgson. If there are no tree roots to damage, you can make the lasagna 12 inches thick. I don’t know what I’m going to plant yet or whether I’m going to plant in spring or fall, so I topped off mine with wood chip mulch.

Wood chip mulch protects the lasagna gardening area until I'm ready to plant.
Wood chip mulch protects the lasagna gardening area until I’m ready to plant.

When I’m ready to plant I plan to just add soil on top of the mulch, because my lasagna is nowhere near 8 inches thick yet and it won’t hurt to make the new bed deeper. I’ll add nitrogen-rich organic fertilizer at the time to accelerate the breakdown of the wood chips.

Categories
DIY Gardening Sustainability Upcycling Ways With Wood

Make a Garden Sign Out of a Recycled Produce Crate

Make a Garden Sign Out of a Recycled Produce Crate

What you’ll need:

Thin wood produce crate
Sturdy screwdriver or pry tool*
Saw*
Wide masking tape*
Paint*
Paintbrush*
Decorative stencils
Optional: Letter and number stencils*
Sponge or sponge brushes*
Temporary palette (freezer paper* or old plastic lid)
Drill*
Hammer*
Outdoor varnish*
Nails*
Brads*

*Available at Schnarr’s

In a previous article I described stenciling with paint on a wood garden sign. That works great if you don’t want a lot of small words but I found myself in need of some new garden signs that would require a lot of text on them. I decided to find a way to computer generate the text and put it on a weatherproof sign. In the past I had purchased produce from a co-op and had saved a couple of the thin wood crates thinking they would be useful for garden markers of some kind. I decided to make small signs from this wood and print out my text on clear acetate and attach that to the signs with brads.

I have some special gardening challenges where I live. I want to have a Permaculture garden. Different people will define Permaculture slightly different ways but the easiest way I can explain it is that I want to manage my garden in a way that works with nature instead of fighting it in order to save both labor and money. Surrounding my condo are large Oak trees which deposit mass quantities of leaves each season. The types of plants that thrive under trees are adapted to grow in the conditions created by a yearly deposit of leaf litter which is not removed but left to decay in place. However since I live in a condo, the leaves are removed by the groundskeepers which causes a lot of problems. I have mostly perennial plants which are not intended to be replaced each year. The leaf blowers make the plants look bent and bedraggled, as if they’d just been power-washed. The plants need the winter protection provided by leaves, so I have more die-off than I should. Leaf litter helps soil retain moisture and most shade-adapted plants like moist soil. When the naturally provided soil protection is stripped off, the soil dries out too much. I can see why a plant seller would be happy about this, but I’m a plant consumer and I’d rather keep the ones I have rather than keep buying new ones! To keep plants alive I have to water more which costs the condo complex money. I can and do put down mulch, but the leaf blowers blow a lot of it into the lawn which doesn’t help either my garden or the lawn to look it’s best.

I think my garden would look a lot better and be healthier and require less maintenance if the groundskeepers would leave it alone. I have explained the situation to the condo management and they have agreed to let me deal with the leaves myself this season and keep the leaf blowers away as an experiment. Getting the agreement is one major step forward, getting the groundskeepers to comply will be another challenge. I don’t expect the groundskeepers to remember which is my garden, there are around 1,500 units where I live. So I obtained permission to install six signs to place around my garden which would read: “PERMACULTURE GARDEN. Please do not remove leaves, trim plants, or spray plants. Please do not use leaf blowers. Please do not allow dogs in garden. Thank you!” I worked this text out in computer graphics software and for good measure added icons to represent no leaf blowers, no spray and no peeing dogs. I looked online for the graphics and was amused by how many choices of “No leaf blowers” icons there are! I must not be the only person who finds they interfere with my gardening techniques.

Computer generated content for signs.

These signs will have to be somewhat prominent to be seen, so I tried to make them as attractive as possible and harmonious with my gardening style. First I pried apart the salvaged wood produce crates to get the wood pieces, then I cut them into 8 inch long sections. For each sign I placed two pieces together and held them together in the back with a piece of wide masking tape. This created a roughly square sign (8 x 7.5 inches).

I painted a rough square of off-white paint in the middle of each sign, treating the edges very loosely for a rustic look. Then I used some medium avocado-green paint to stencil botanical designs around the edges. See my previous article Stencil a Wood Garden Sign for detailed information on how to stencil on wood. Then I painted the backs and fronts with several coats of weatherproof varnish.

Sign ground after painting, stenciling and varnishing.

Then I took my computer generated text to a copy shop and got six copies printed in reverse on clear tranparencies. The reason for printing in reverse is that I think the ink will hold up better to the weather if it’s on the back of the clear film.

Next I punched four holes in the corners of the pieces of film and drilled four corresponding holes in each sign. Then I attached the film to the wood with brads.

I purchased six wooden stakes from Schnarr’s, sanded them and varnished those as well. Then I nailed the signs to the stakes and installed them.

Finished garden sign.

Here is one of the six finished signs! If all goes well and I actually get the opportunity, I will write about how I chose to deal with the fall leaves and what the results were.