It’s going to take years to complete the decor in my condominium – if I ever complete it. My timetable won’t work for everybody but it’s ok for me – decorating is a satisfying hobby activity and I enjoy doing as much as I can myself, for example even to the point of designing rubber stamps that I use to make ceramic tiles to incorporate into tile work.
It’s not easy to focus on my original vision when working on such a long-term project. To help out, I have made a book to help me organize my ideas and color schemes. If you would like to make a similar book, here is what you’ll need.
3-ring binder that holds 8.5 x 11 paper
8.5 x 11 paper or cardstock
8.5 x 11 chipboard or cardboard
Tab divider inserts
3-hole punch
3-hole folder inserts
Scissors
Clear tape
Glue
1. Get some blank 8.5 x 11 paper and/or card stock and punch holes in one edge with the three hole punch. You may choose to use lined or unlined paper – the unlined is easier to draw on if you want to sketch out ideas. Open the rings and place the paper in your binder.
2. If you want to work on ideas for more than one room, make sections by placing one tab divider insert and one folder insert at the beginning of each room section. Label the section according to the room. The pockets are handy for collecting things in to mount on a page later if you’re pressed for time.
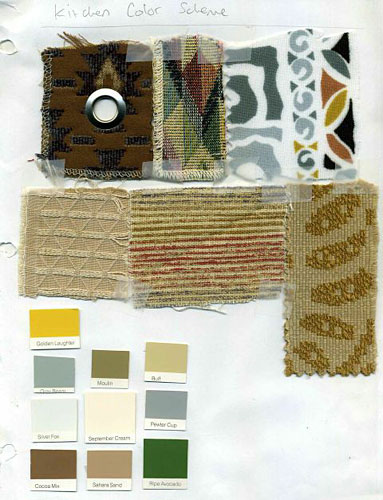
Fabric and paint swatches for my kitchen
3. In each section, start collecting ideas and swatches that pertain to the corresponding room. Examples of things you can include are fabric swatches, paint swatches and magazine clippings with ideas or products you like. Lightweight items can be taped down to paper. You could staple fabric swatches to cardstock and glue tile samples to chipboard or cardboard. Take notes or make sketches as you develop your ideas. You can continually add new pages as needed.
4. Eventually you may find yourself creating or purchasing things like plans, templates, instructions and stencils. If size allows these can be stored in binder folders so they are always handy or have holes punched in them to store in the binder.
5. If you’re a Pinterest user, you can create corresponding Pinterest boards to supplement your pool of ideas. From time to time it might be helpful to print out some of the pictures and instructions you find online and display them in your book. Be sure to check out Schnarr’s Pinterest offerings!
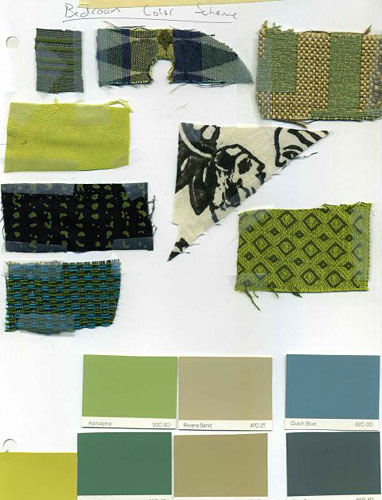
Fabric and paint swatches for my bedroom
If I’m designing something for a particular room, typically I’ll put the paint and fabric swatch pages up on a wall in my creative space to keep my overall scheme and feel for the room in mind as I work. I rarely require things to “match”, but I do like them to “fit”. For example my office and bedroom are heavily Mid-Century Modern, the living room is Mid-Century Modern plus Beachy, while I’m trying to give my kitchen a Santa Fe look. I don’t know what to call my in-progress bathroom – “Venice Cafe Modern” maybe, since the look I’m going for is Boho meets 1970s? Whatever you call it, putting the samples up on the wall helps remind me of what my vision is for the space.
The unusually wet weather we’ve been having in the St. Louis area is causing my garden to flourish like never before – for now. In periods of heavy rain you should check your garden and yard for possible detrimental effects. Here are some things to look for.
1. Check and see if your mulch is washing away. If it is, replace it quickly so that the next rainstorm doesn’t wash your soil away.
2. Make sure plant roots haven’t been exposed. Replace the soil around them if that’s the case.
3. Heavy rains can wash away fertilizer – reapply compost and organic fertilizer. The reason I recommend organic fertilizer is that chemical fertilizer is likely to wash away and harm bodies of water that storm runoff washes into. Also if you are not sure how much fertilizer is needed to make up the loss, plants can’t be harmed as easily by excess organic fertilizer as by excess chemical fertilizer, so there is less chance of problems caused by over-feeding.
Here is some more information if you would like to learn more about organic fertilizers:
4. Do any plants need staking? Since I garden in part shade, it’s not uncommon for some of my plants to lean a bit because they are reaching for more sun, but some are leaning far too much due to being beaten down by storms and need some help. Stakes are not the most attractive things but green stakes and green twine, available at Schnarr’s, help the appearance considerably. Organic fertilizers build stronger plants, according the article “Benefits of Organic Fertilizers: An Overview” on the Dave’s Garden web site, so that is one way to prevent having to do so much staking in the future.
5. Wet weather plus a crowded garden is a recipe for possible fungus problems on your plants. Inspect your plants for signs of fungus and treat the problem if you have to. You might consider thinning plants out or moving container plants farther apart until things dry a bit to facilitate air circulation. Wet weather is kind to transplants, so if you want to do some thinning and start a new bed with the excess plants or give them away to a gardening friend, wet times could be a good opportunity.
6. Is your mulch becoming a growing medium for mushrooms and other fungi? Since I use a lot of wood chip mulch, I frequently encounter interesting fungal growths in my garden and with wet weather we are likely to see more than usual. When I see one, I try to find out what it is before I decide if it needs to be controlled. My favorite mycology reference site is Tom Volk’s Fungi.
If the fungus doesn’t need to be controlled, my usual practice is to leave it alone since I find the variety of fungi fascinating and beautiful. If you have pets or children, health concerns, or a fungus that is harmful to plants, you may decide control is necessary. While I’m a fan of eating wild foods if I am sure of what it is, I have never eaten a mushroom from my garden no matter how delicious it looks. I am not a mycologist or skilled forager – I recommend only harvesting mushrooms or any wild foods with expert help since the consequences of making a mistake can be catastrophic.
7. Are any spots in your yard becoming a breeding ground for mosquitoes? Check saucers, bird baths, containers, wheelbarrows and anything in your yard that can collect water. You can dump the water, treat it with a mosquito dunk, add a bubbler (mosquitoes prefer still water) or add fish to eat the larvae if that’s feasible. Bats and dragonflies are excellent mosquito predators. Making your yard more hospitable to those species is a great way to increase mosquito defense.
8. Do you see any drainage problems in your yard? Heavy rain can reveal opportunities to improve how water flows across your property. Since I live in a condo, I only have the ability to address small-scale issues – if you have a large-scale problem come into Schnarr’s to talk to our knowledgeable staff. If we can’t address the problem we can recommend an expert to consult. Small-scale problems in my own garden usually consist of spots where excess erosion happens or water tends to puddle due to how rainfall drains off my building. If you are interested in adding a butterfly puddling area, bog garden, rain garden or water feature to your yard, a spot that already collects water is a great place to consider building it. Most of those options are not available to me because of where I live, so I like to control erosion and puddling by digging small trenches to interrupt the water flow and filling them in with lava rock. You can use any kind of gravel for this, but I like lava rock because it fertilizes the soil as it breaks down and the porous nature of the rock provides some natural water filtering capacity. I can extend the trenches to reach areas that I want to get more water and if I cover them up with mulch or plant over them the appearance is harmonious with the rest of the garden.
Such trenches can also become a decorative feature, like these two examples:
One puddling problem I had a few years ago was caused by a leak in my soaker hose. The resulting puddle was threatening my neighbor’s air conditioner so I fixed the issue with a gravel filled-trench – that was a quicker solution than digging up the whole hose out of the trench it was in and it bought me time to address the leaking soaker hose later.
Be sure to consult the Missouri One Call system before doing any digging!
I don’t know if a rain chain is particularly functional, but if it adds to your enjoyment of the rainfall why not make one? Creative DIY Rain Chains
9. If water is puddling around plants and those plants are not of a type that can tolerate such conditions, you can create holes around them with a garden fork to help the water drain away so the roots don’t rot.
If you have a problem area that needs a long-term solution and you don’t want some kind of water-loving garden feature there, you can try moving the plants and building a raised bed in the spot. Fill it with soil that contains a lot of organic matter and soil amendments that facilitate drainage, such as sand or ground up lava rock. Apply organic matter to the surface as well – that will attract earthworms whose burrows will help the water drain. See how much water your new bed tends to accumulate then plant appropriately. The Missouri Botanical Garden plant finder is a great tool for helping to find appropriate plants for special conditions.
Excess rain can be aggravating and destructive, but wet conditions can also be an opportunity to make improvements or add new interesting features. Walk your garden
and yard, observe the effects of rain and see if you get any good ideas!
You can make a plain terra cotta planter more interesting with ceramic tile pieces!
What You’ll Need
Terra Cotta planter
Disposable latex or vinyl gloves
Paintbrush
Black oil-based waterproof enamel paint or color of your choice
Paint thinner
Liquid soap in a pump-top dispenser
Rags (you’ll need several)
Tile cement
Small putty knife
Old plastic lid
Small plastic tray
Eye goggles
Broken up ceramic pieces or tiles
Tile grout
Heavy leather gloves
Hammer
Optional – tile nippers
Optional – abrasive sponge
Optional – dust mask
Optional – cement pigment
Tile and grout sealer
Small bucket of water
1. Whether your terra cotta planter is new or you’re upcycling an old one, be sure it is thoroughly clean and dry.
2. Put on disposable gloves and paint the planter inside and out. You will probably need two coats to cover completely. The reason for painting the planter is to keep water from seeping through the wall of the planter and weakening the applied tile pieces. Normally the porous nature of terra cotta is desirable but in this case it would harm the durability of the tile work so we’re sealing the surface. If you need a refresher on how to clean up oil-based paint and care for your brushes, here are some tips:
If you want to avoid having to clean up oil-based paint, you can substitute water-based paint. Your finished project might be less durable but if you choose a good quality high-gloss water-based enamel paint that should help. I used black paint in my samples because I wanted it to match the black tile grout that I used in my demo. You can choose different paint and grout colors if you want. Painting the pot in sections and letting it dry while resting on the unpainted portion helps you do a neater job. You’ll need to let the paint dry between coats.
Terra cotta pot painted with black enamel
3. While you are waiting for the paint to dry, you can start getting your tiles ready. What are some good sources of tiles?
Break up old broken ceramic items into smaller pieces. One way is to wrap pieces in an old towel and smash them with a hammer. Wear leather gloves and goggles when you do this to protect yourself from sharp pieces. For more refined shaping of small pieces, you can cut them with tile nippers. The broken edges can and will cut you if mishandled so be careful! If any pieces are unacceptably sharp, you can try filing them or smoothing them on a grinding wheel.
A teacher/artist resource recycling center – a lot of the tiles I’ve accumulated for my projects came from Leftover’s, Etc. (http://www.leftoversetc.com/)
Commission a local ceramic artist to make some tiles for you.
By far the most convenient and quick way to get tiles is to purchase them from a craft or tile dealer. Craft dealers also sometimes have glass tiles and faux seaglass which is well worth some experimentation.
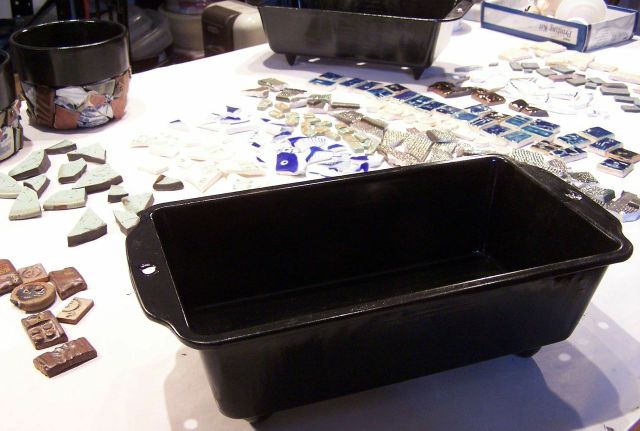
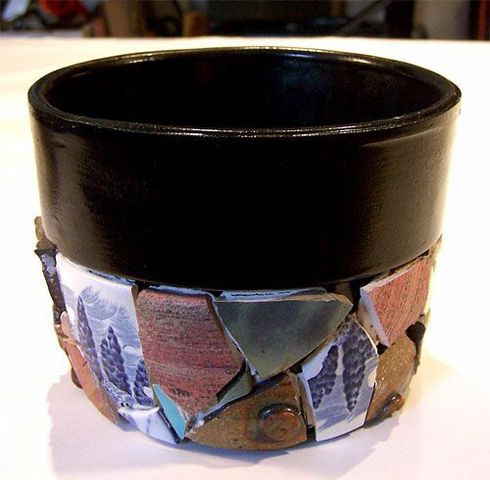
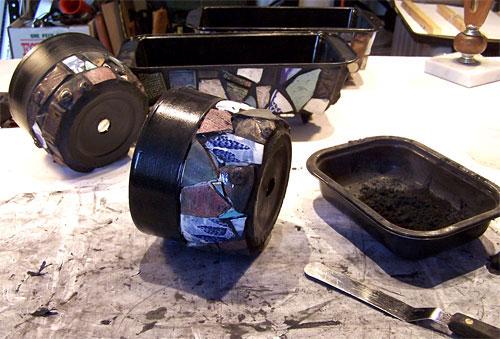
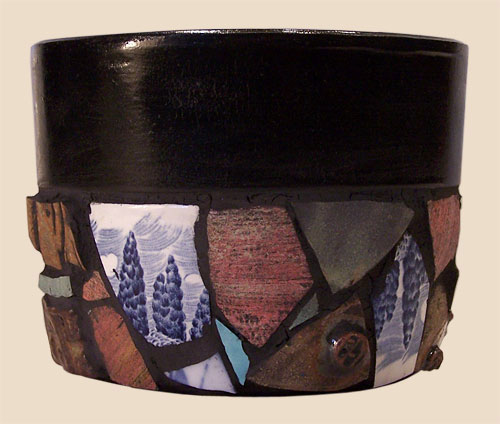
Broken ceramic pieces ready to install on plant potPainted bread pan with tiles ready to install
This photo shows more prepared tile pieces along with some metal bread pans painted and ready for tile application. The bread pans were rusty and/or afflicted with peeling non-stick coating so I decided to upcycle them. I sanded and cleaned them thoroughly before applying paint to make sure the paint would stick. You can try this with a variety of old metal containers – I’ve made a mosaic tile planter out of an old metal roasting pan as well.
4. Cover the lower portion of the planter with tile pieces. You can attempt to follow a planned design or use a random arrangement like I did in my samples. On an old lid, put out a small portion of tile cement, about as much as you can use in 15 minutes. Put a small dab on the back of each tile and press in place. If you are using pieces of varying thicknesses as I am, it will be easier to grout later if you try to even up the tile height by putting more cement on the thinner pieces.
Plant pot before applying grout
5. Let the tile cement dry thoroughly – see instructions on the package for how much time this is.
6. When it’s dry you’re ready to apply grout. I chose to use black grout to match the black paint on the pot. You can use any color of grout that you want, but it will probably look better if the grout and paint colors match. If you don’t find grout in your preferred color, it’s possible to tint grout with cement pigments. If you decide to do this wear a dust mask while mixing. Be sure to mix up a large enough batch to complete the whole project because it might be difficult to mix the exact same color twice unless you measure the materials very carefully. Grouting is very messy, especially with dark colors. I recommend you wear old clothes and protect your work surface and floor. Have plenty of clean rags on hand and a small bucket of water for cleanup. Don’t be surprised if you need a bath when you’re done!
7. Put some grout in a small plastic tray, such as one left over from a microwave dinner. Add water until it’s about the consistency of soft cream cheese – a little at a time to make sure you don’t add too much. Stir it with your putty knife as you add the water. Try to only mix up small amounts at a time so it does not start to set up before you’ve applied it.
Put on your disposable gloves, and use a rag to pick up a portion of tile cement. Smear it around to fill the cracks between tiles. The rags will help protect your hands from sharp pieces so always make sure there is a rag between your hand and the pot. The thin disposable gloves will protect your hands from being irritated, dried out or discolored by the grout, but alone they will not protect you from cuts.
Applying tile grout.
After one section of the pot is grouted, go back over it with a succession of fresh rags to remove the grout from the surface of the tiles. Dampen the rag with a little water toward the end to get them really cleaned off if needed. If you can’t get them all the way clean with rags only, try an abrasive sponge. This step takes a lot of patience, you will probably have to wipe each section several times, especially when using a dark grout color like I did in my sample. It’s also a rewarding step, because you can start to see how your design will turn out!
Repeat this process until the whole pot is grouted and cleaned.
Be careful not to dispose of any grout in your sink – it could clog the drain. Dispose of any rags that are really soaked with grout – I put mine in the compost. If some are only slightly dirty, you may be able to re-use them by rinsing them in a bucket of water. If you do that, dump the dirty water out in the yard, don’t put it down the drain.
7. Let the grout dry, then apply tile and grout sealer. You’re done!
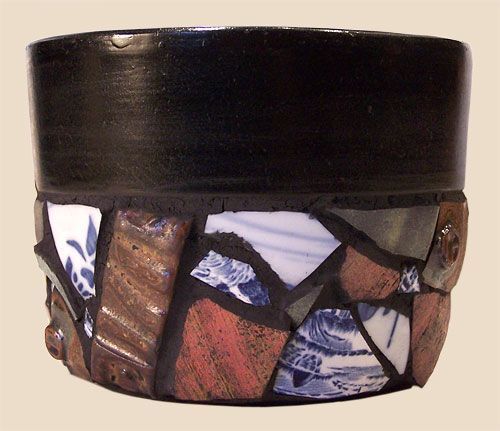
Finished mosaic terra cotta planter
I recommend bringing this type of planter inside for the winter if you use it outdoors, subjecting it to the freeze-thaw cycle is probably not good for durability.
I’m going to be completely honest, I find astrology to be very interesting. So when City in a Jar combined DIY and zodiac constellations to create this awesome decor piece I was stoked. I think it turned out pretty stellar, check out her blog for other cool ideas.
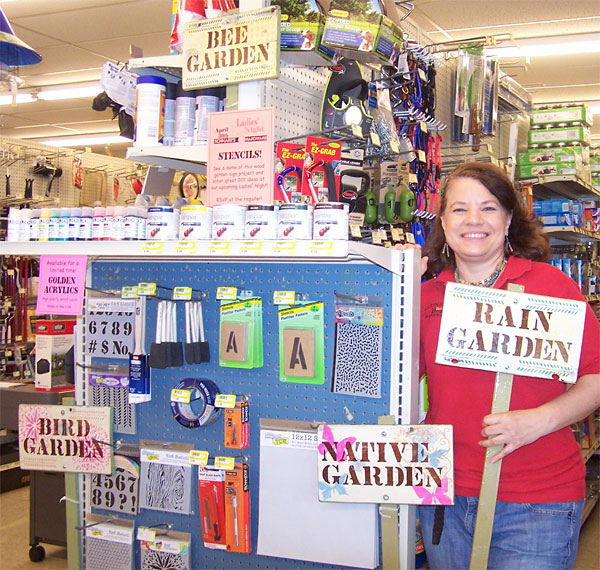
Schnarr’s employee Carolyn with several finished wood garden signs and a selection of supplies you can use to make one. Carolyn will be demonstrating stenciling at our Ladies’ Night on April 30, 2015.
How would you like a practical and decorative wood garden sign? Stencils are handy for such a project because they are available in letters, numbers and lots of fun decorative designs.
Wooden stake
Sponge brushes or sponge pieces (at least one for each color)
Plastic lids from food containers
Large water container (preferably shallow and flat)
Optional – hair dryer or heat tool
Old toothbrush Outdoor wood varnish with sun protection
Paint thinner for cleaning brushes if using brush-on varnish
Drill
Drill bit
2 bolts
2 nuts
2 washers (optional)
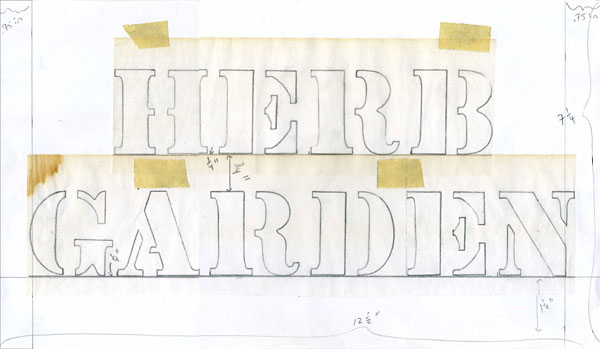
The first step in making such a sign is to decide how big it should be. If you have some scrap wood available, you could let the size of the wood pieces you have on hand determine your design. In my case, I had some used, distressed long boards that were 7 1/4 inches wide. I got out some stencil letters and decided how long my wood piece should be to fit the lettering I wanted on the sign. I worked out some lettering samples on tracing paper and taped these to a piece of paper to determine my final sign size – 7 1/4 x 16 1/2 inches.
Working out my stencil design on paper.
If you don’t have scrap wood to start out with, you can just make your design any size you want and get your wood cut to order. Work out your design ahead of time using pencil, paper and tracing paper, then go get your wood cut or cut it to size yourself. I recommend using wood of a 3/4 to 1/2 inch thickness. If you buy a board at Schnarr’s we will cut it to length.
After the wood is cut, sand it smooth. I recommend you wear a dust mask while sanding. Wipe off the dust with a damp rag.
The next step is to decide on a base or ground color for your sign. For this project I am using all acrylic or latex water-based paints (except for the varnish layer). You can use a dark color as base and stencil on it later with light colors, or make your ground color light with darker colors stenciled on later. If you like the distressed look that I am so fond of, you can put an additional color under the ground color and let some of it show through by sanding on the corners and other strategic places on the sign. You can make the back and sides a different color like I did in my sample or make it all one color. Freezer paper or drop cloths are handy for protecting your work surface while you paint.
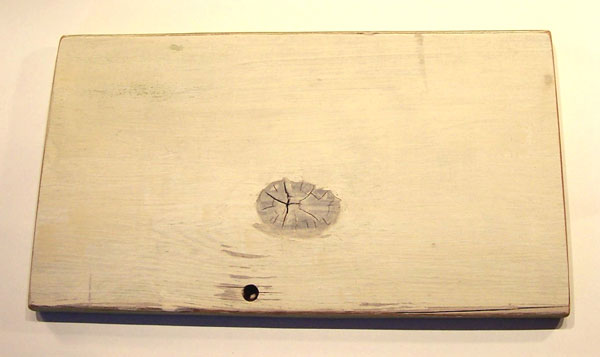
Since I was starting with distressed wood with some paint already on it, I let the existing color influence my other color choices. My scrap wood had previously been painted white over a light green. Some of the green showed through the white as I was sanding. There were a few spots where the paint had peeled away entirely showing dark wood underneath. I wanted to tone down these areas but not cover them up entirely so I decided to paint the front of my sign with an off-white wash to preserve some of the distressed look and create a more even ground for the subsequent design. After the off-white wash was dry I painted the back and sides of my sign green.
Distressed wood cut to size, painted, sanded and read for stenciling.
For a vertical post to use for mounting my sign, I chose a wood stake available at Schnarr’s. I sanded it smooth then painted it green.
After the paint is dry, sand the edges on the sign and post to make them look distressed and wipe both with a damp cloth to get all of the dust off.
Now it’s time to actually start stenciling. Get your work area ready by placing your paints, stencils, tape, small brushes for mixing, water container, rags, small plastic cup, sponge brushes or sponges, and plastic lid where you can reach them. At your feet or on the table if there is enough room, place a large flat container filled with water. This is for placing your stencils and other tools in to soak when you are done using them. This can be a messy process so wear old clothes.
The next step is to apply some background design in a light color. I wanted to add a little interest to the background and edges without detracting too much from the lettering that would be applied later, so I chose a light yellow paint for my sample.
Choose a stencil and tape it in place on your wood sign.
Mix some light yellow paint in a little plastic cup. Do not mix any water into the paint. Dab some paint onto a plastic lid. If you don’t have a plastic lid, a little square of freezer paper taped to your work surface will serve as a disposable palette. Press your sponge or sponge brush into the paint and dab it onto the lid a few times to distribute the paint. You want a light application of paint to start out. If you are new to stenciling, you most likely will overestimate the amount of paint you need and use too much, so start with less than you think you need – you can always add more but if your paint application is too heavy it could bleed under the stencil.
Start pressing the sponge lightly into the stencil openings. Dab very gently at first and increase pressure gradually until all the open areas are filled with paint. When you are satisfied, lift the stencil.
Starting to develop the stencil design with some yellow in the background.
If you are finished with that particular stencil, put it in the large container of water to soak. If you are going to use the stencil again on another part of the sign, move it and continue stenciling until you are finished, then soak it.
When you are finished with a color, put the sponge and plastic lid in the water container for cleaning later. Do not attempt to clean the sponge or sponge brush and use it immediately for a new color – you will have to start with a clean dry sponge for the next color because water makes the paint too runny and it will bleed under the stencil.
Acrylic paint dries quickly. It won’t take long for your first layer of paint to be dry enough to work on the next layer, but if you need to speed up the drying you can hit it with a hair dryer or heat tool. Repeat the above steps with each new color until your sign is complete.
If you are using letters or numbers on your sign, you can draw a line with pencil or ruler to help you apply them in a straight line, then erase the pencil line later after the paint is dry.
Wood garden sign in progress with two paint colors in place.
Antique brass stencils with the lettering they made on my sign.
To clean your stencils and tools, swirl them around in the water to get out as much paint as possible. Squeeze all the paint you can out of the sponges and brushes. If needed clean with soap. Rinse and let them dry on a rag. Dump out the paint water and replace with fresh. Scrub your paint lids and stencils with a toothbrush to get the remaining paint off. Acrylic paint doesn’t have much of an affinity for sticking on plastic especially if soaked, but if allowed to dry prior to soaking some spots might be stubborn. If all the paint doesn’t come off it won’t affect future use so don’t worry about it. Remove as much paint as you can, rinse off stencils and lids and let dry.
When your sign is completely dry, if you are going for the distressed look rough up the design in a few spots with sandpaper. Wipe off dust.
Coat both sign and post with outdoor weatherproof wood varnish, preferably one with sunlight protection to help keep your paint colors from fading. Follow the safety directions on the container for both varnish and paint thinner as they can be dangerous if not handled properly. Do not use a sponge brush for the varnish, it will dissolve. You can avoid the hassle of dealing with brushes and rags and paint thinner by using a spray varnish instead of a brush-on product. I used a brush-on varnish because it’s more economical and I think I get a thicker coat by using a brush. Ultimately, you can make your varnish choice based on your personal application preference.
When varnish is dry, drill two holes in both sign and post to accommodate the bolts that will hold the sign together.
Connect sign to post with nuts and bolts. Place a washer behind the bolt head for a more finished look. Bolts are preferred over nails for this project so you can easily replace the post if it rots over time.
Install your sign where you want it by hammering it into the ground.
If you would like to read about how to cut your own stencils, see my article Fun with Stencils.
If you are interested in attending our Ladies’ Night on April 30, 2015 remember to RSVP (on Facebook and via email [[email protected]]).
Julia Christensen will be one of the guest DIY bloggers at our upcoming Ladies’ Night on April 30, 2015. Come enjoy demos of fun projects, plus discounts, door prizes, refreshments and more! One of the projects Julia will be sharing is a faucet handle bracelet. Read her bracelet tutorial on her blog, Oh, Julia Ann.
Faucet Handle Bracelet TutorialLadies’ Night at Schnarr’s Hardware on April 30
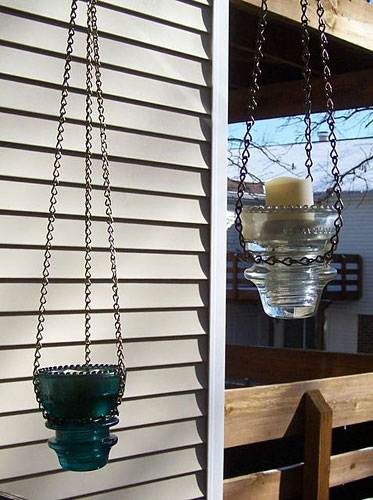
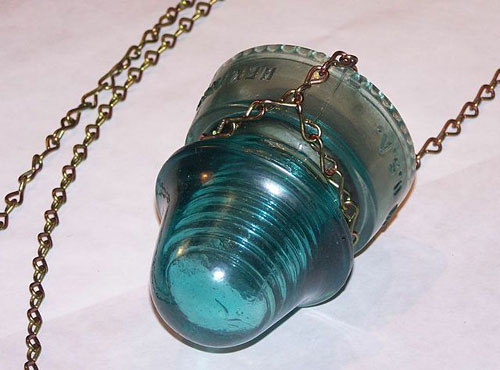
Do you collect glass insulators? I often see them for sale in antique shops and there are several web sites with information for insulator collectors. I’ve always found them attractive looking and I thought they’d be even more interesting if made into something functional. Flameless votive candles are a lot of fun (and safe) to incorporate into your decor. In this project I’ll show you how to make a glass insulator into a flameless candle lantern.
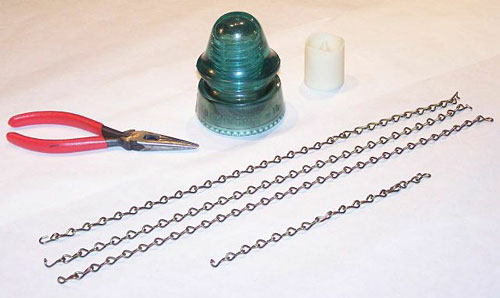
What you’ll need:
Glass insulator
Chain
Strong long-nosed pliers
Flameless votive candles – we sell LED battery powered votive candles that include a 4 hour timer
S-hook
Choosing the right chain for this project is important – it should be sturdy enough for the links to support the weight of the insulator, but not so strong that you can’t bend the links with pliers. At Schnarr’s the weight rating of each chain is indicated on the spool.
1. Select a length of chain just long enough to fit around the “waist” of the insulator. Don’t worry about cutting the chain to size – just pull a link open with the pliers to separate. The links will last longer and close more neatly if you open and close them with a side-to-side motion. With the weight of chain I chose I was able to hold a link on one hand and open with pliers held in the other hand, but if this is difficult try gripping the chain with pliers in each hand as you open and close the links.
2. Wrap the chain around the “waist” of the insulator and link together, re-closing the link to fasten the chain in place.
Attach chain to insulator
3. Decide at what level you’ll want your lantern to hang and prepare three pieces of chain of suitable and equal length. Attach one chain to a link anywhere on the “waist” piece.
4. To figure out where to attach the other two pieces of chain so that they are spaced evenly, count the chain links around the “waist” and divide that number by three. Attach the other two pieces that many links away from your first piece. For example, if your “waist” chain has 15 links, attach the hanging chain pieces every five links.
5. Link all three pieces together at the top by stringing the last link of each onto an S-hook. If you buy an open S-hook, you can let gravity hold the chains in place, but if you want extra security you can squeeze the S-hook closed with your pliers. If you buy a closed S-hook, just open and close with a side to side motion the way you did with the chain links.
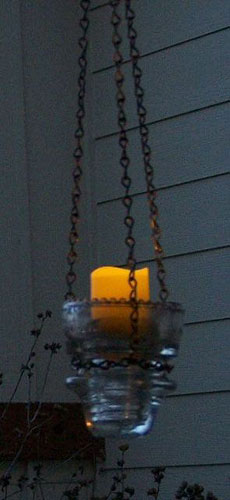
Insulator lantern with light
6. Now it’s time to decide how to hang your lantern. If you want it to hang straight from the ceiling, you can use a ceiling screw hook, toggle bolt, hanging kit, swag hook or decorative bracket of the type commonly used for hanging plant pots. Weigh your insulator lantern to make sure you don’t exceed the weight limits of your chosen hanging hardware. If you want to hang your lantern outside, some of the hanging hardware previously mentioned may help or another option is to drape an additional length of chain over a rafter or tree branch and link the lantern to it with an S-hook.
7. Switch on your candle and place it in the lantern. The style and size of the insulator will affect how deeply the candle sets into it. If you have trouble stabilizing the candle, try some Stick-Um candle adhesive.