To celebrate the Holiday season, here are instructions for making a table runner that uses some of the wired burlap ribbon that we sell in the gift wrap and decoration aisle at Schnarr’s Hardware in Ladue.
Tools and Materials *indicates items available at Schnarr’s
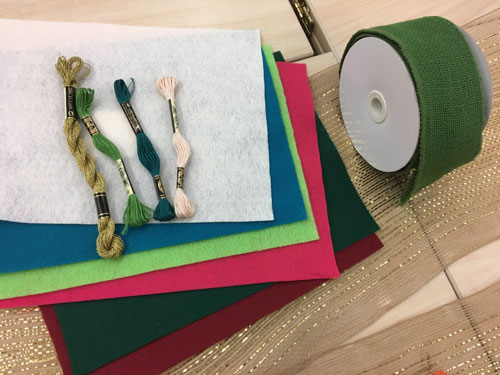
Wired burlap ribbon*
Several different colors of felt
Ball-point pen*
Several different colors of embroidery floss
Embroidery sewing needle
Fabric Scissors
Masking tape*
Pins
Sequins
Seed beads
Sewing needle small enough to go through seed beads while threaded
Sewing thread
Scrap chipboard
Fabric
Washable fabric marker (optional)
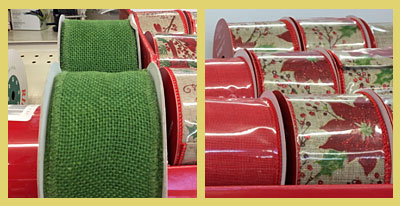
Rolls of wired burlap ribbon that are available at Schnarr’s Hardware in Ladue.
Cut a piece of wide burlap ribbon the length that you want for your table runner, plus about 4 extra inches for hemming. Before cutting, tape a piece of masking tape just inside where you plan to cut. The tape will help keep the ends of the ribbon from unraveling while you work.
Pin down the hems on the ends but don’t sew yet.
Fold wired burlap ribbon lengthwise and pin along the long sides of the wide ribbon.
Use a large needle and full thickness of one of your colors of embroidery thread to sew the ribbon in place with a running stitch just inside the wired edge.
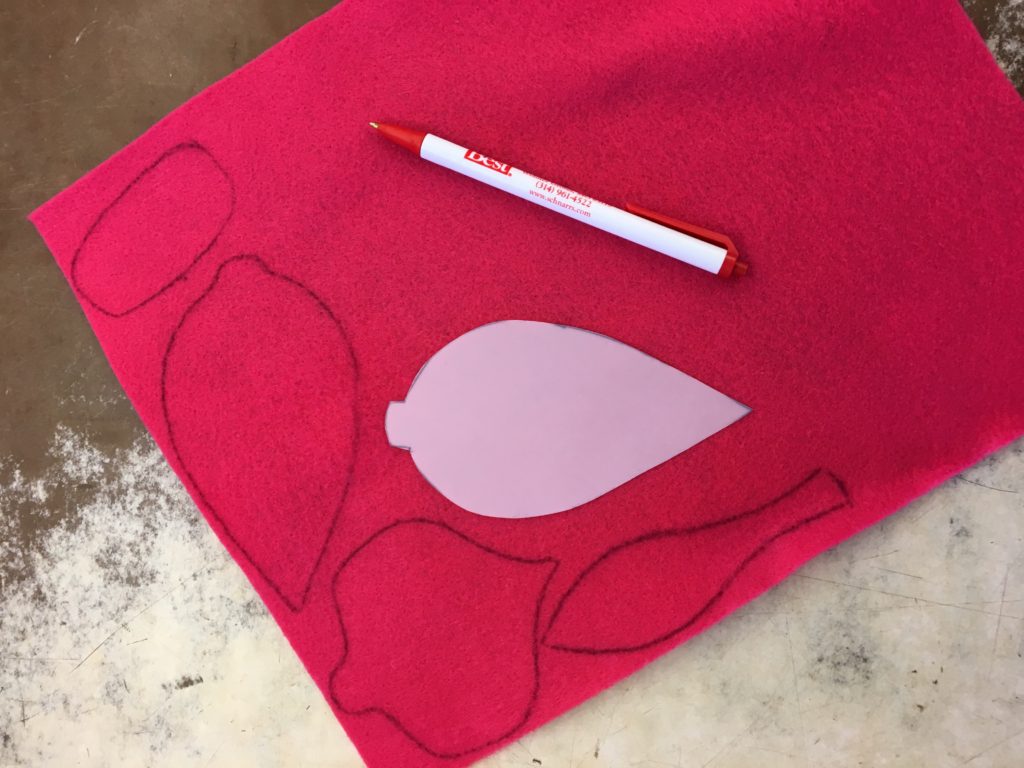
Draw simple ornament designs or other holiday designs of your choice onto scrap chipboard. Cookie cutters are a great source for simple holiday shapes. Depending on how long your table runner is, you could possibly need a lot of felt shapes, so that’s why I suggest preparing chipboard shape templates to trace around. It’s quicker and easier than tracing around a cookie cutter. If you have stencils with designs you like, you could also use those or cut your own custom stencils.
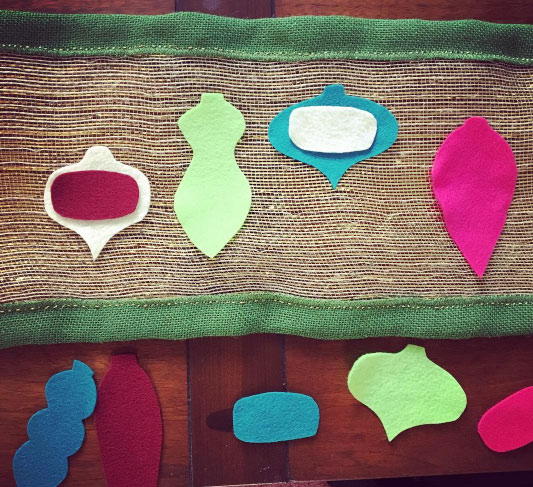
Using the ball-point pen, trace shapes onto the back of your felt pieces. Cut out shapes.
Place felt shapes on your runner in an arrangement that you like. Pin in place.
Sew a running stitch along the edges of the felt shapes, attaching them to the wide burlap ribbon.
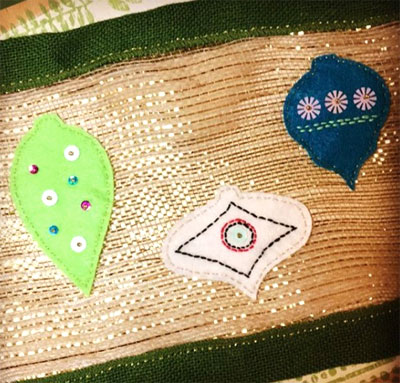
Stitch details to your shapes using a running stitch or other embroidery techniques of your choice with the various embroidery thread colors. If it helps to figure out where to sew details, you can draw the lines on the felt with a washable fabric marker. After you’re done sewing on the details, dab any washable marker marks that show with a damp cloth to get rid of them.
Accent the shapes with a few sequins. Hold the sequins on by bringing a thread from the back through a bead, around the side of the bead then back down through the sequin. Go back through each bead at least twice for durability. Sew a few beads by themselves among the sequins if you want to.
Pin and fold strips of fabric in a complementary color to the ends to cover up the raw edge of the ribbon. Sew in place with embroidery thread.
When the Holiday season is over, store your table runner rolled up so that the wire in the ribbon does not kink.
Let’s face it, our area is inherently challenging to gardeners. We have continentality which causes extreme variations in temperature and moisture, and we are in an area of the continent that is a transition zone for East, West, North and South. It’s difficult to keep all parts of our gardens looking good at the same time. With the recent dry spell we just had, many of us have spots in our gardens that look a little burned out. I have a lot of native plants which love our conditions, but even some of those look ragged and dried up in late summer.
The cactus in the middle is my oldest one – I’ve had it since I was five years old!
When choosing containers, first keep in mind what style of garden you have. You can break design “rules” but you will have more predictable success if you try to match the style of pots to the style of home and garden you have.
We have a client with a large Colonial Revival house and a lot of iron fencing and furniture in the backyard. When adding some container plantings we chose symmetrical numbers of faux cast iron urn style planters that harmonized with the existing architecture and garden. We filled them with traditional flowers in a limited color palette that went well with what was already planted in the yard and garden. The look we chose for that client would not be appropriate in my garden.
My own informal garden contains a lot of wildflowers and herbs mixed with ornamentals that grow in shade. Mixing and matching pots and using odd numbers of containers are design techniques that work well with an informal garden.
To prepare a place to set the pots, I gathered up an assortment of flat decorative sandstone pieces and made little stands for the pots. You can set pots right on the ground, but I think they look better raised a little bit. I used some extra thin pieces of rock as shims for any pots that did not look level.
Starting a new container grouping in a bare spot.
Finished container group with foliage plants.
Two of the pots you see here already had plants in them. Keeping in mind the colors, shapes and sizes of the other three pots I wanted to add to the grouping, I went plant shopping for part shade annuals. I chose Sweet Potato Vine, Ornamental Pepper ‘Black Pearl’, and Hypoestes. I couldn’t resist adding a Basil plant that was on sale. In large pots a good design formula is to mix tall, shorter, and trailing plants. In the largest pot I made the Basil the tall plant. I just love the smell of Basil and I’ll harvest it just before frost and cook with it. I know it’s a little late in the season to be planting annuals but these should last into October. If we’re lucky and we get an extra long growing season, maybe I’ll get more out of them. Containers small enough to move can be brought inside to avoid frosty nights and extend the life of the plants. I love the colors of the garden with bright fall leaves nestled among the plants so to me the extra effort of adding some more colorful foliage is worth it. I chose all foliage plants instead of flowering plants because two of my containers featured a mosaic design that I did and they were already very colorful on their own.
I made a design mistake in this second grouping. The Hypoestes in the tall pot does not contrast enough with the color of the ground cover that was already there. How would I fix this? One way would be to add some brightly colored trailing plants around the edge of the pot. Or if I had any faux flowers or foliage around I could stick some in. Or I could sink an empty narrow container that holds water like a test tube into the soil and put a colorful cutting in there for a temporary display that would still look natural. Or for a nighttime display I could add a tall narrow water container to the pot, fill it with acrylic or glass gems and put a battery powered water light in it and say “I meant to do that!”
As you can see, container gardening is a great addition to your existing garden. It provides a fun outlet for creativity and some instant gratification too!
Supplies
Candle scraps and stubs – such as taper candles, partially filled votive candles, old pillar candles Gulf Wax*
Candle holders – empty glass candle holders, Mason jars*
Votive candle wicks
Roll of wicking string
Metal washers* – if using wicking string
Essential oils – optional
Candle coloring dyes – optional
Tools Hot plate* or stove top
Shallow pan that can take heat from burner Cutting board*
Thin non-serrated sturdy knife – best if somewhat sharp but not extremely so for safety
Assorted sizes of foil pie plates
Pot holders and oven mitts Pyrex glass measuring cups* Jar lifter*
Pliers* Clothes pins*
Metal spoons Fire extinguisher*
Metal lid that fits over your melting setup
Trivets and hot pot pads Thermometer*
* indicates available at Schnarr’s
Before beginning, please read and heed these wax melting safety precautions:
1. Do not allow pets or young children around the wax melting area. If you choose to allow older children to participate, supervise them closely.
2. Keep a fire extinguisher and a metal lid that will fit over your melting setup nearby. In the unlikely event that a wax fire occurs, you can try to smother the fire with the lid and if that doesn’t work, use the fire extinguisher. Make sure you have read the instructions for an oil or grease fire beforehand because a wax fire is similar. You should not use water on a wax fire.
3. Do not leave the melting wax unattended. Do not allow the water pan to go dry.
4. Replace the water in the boiling pan when it gets lower. Pyrex glass measuring cups will withstand the infusion of cooler water without cracking but empty glass holders of unknown origin may not be able to take rapid temperature changes. To prevent cracking, remove non-heat resistant glass containers from the boiling pan when adding new cooler water.
5. A jar lifter is a good tool for lifting jars from the boiling pan safely, but some containers may be too small for the jar lifter tool. I’ve made do with pliers in a pinch. If you choose to pick up a glass container by the edge with pliers, be aware that thin glass containers may crack under the stress. This has not happened to me, but be ready just in case by holding the container away from you so you don’t get splashed with hot wax.
6. Observe normal cooking precautions. Keep long hair tied up and avoid loose clothing that could catch fire or things that may catch on pot handles and the like. If using an extension cord for a hot plate, tape it down and deal with any other tripping hazards you might find. Wax cools off rapidly but until it does it clings and can cause serious burns.
7. Protect your work surface from hot containers with trivets and hot pot pads.
8. Monitor the wax temperature with a thermometer and make sure the wax does not exceed 250 degrees F.
9. Wear old clothes because wax is difficult to get out of fabrics.
10. Do not leave burning candles unattended.
Ok, now that I’ve scared the heck out of you, it’s time to have some fun!
First I’ll demonstrate a couple of ways to refill votive candle holders.
A really easy way to refill a votive candle holder is to take an old taper candle or long tall candle and cut it into a section short enough to fit the candle holder. If there are any gaps between the candle and the sides of the container, melt some wax and pour it in between to fill it in. I don’t know what will happen if you attempt to mix soy wax with paraffin wax – the experiments in this article were all done with paraffin wax.
Tops of longer candles trimmed down to the height of a votive candle holder
This picture shows three tops of long tall pillar candles that have been cut down to votive candle height. After trimming these stubs, I cut up some chunks of Gulf Wax for melting. I was making these votives for a support group I belong to that has a member with allergies, so I chose unscented stubs and avoided adding fragrances or color to the melted portion.
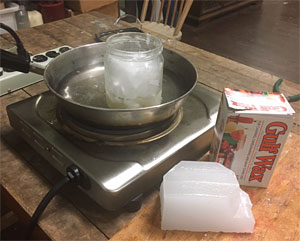
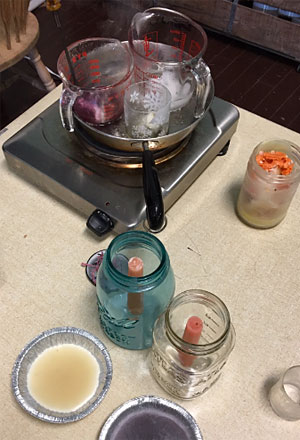
Here is one example of a double boiler setup at Perennial, a community studio where I do some of my work. Placing your melting container in water rather than directly on a burner decreases the risk of fire, produces more even heat and prevents scorching of the wax. I brought a pan of water to the simmering point with the glass jar of wax pieces in it. As you know from reading the safety precautions above, there is some risk in using a random jar and not a Pyrex measuring cup for this, but most of the time it will work if you don’t shock the glass with sudden temperature changes. I forgot to bring my Pyrex with me on this occasion so I made do with what was there.
Melting paraffin wax using the double-boiler method
When my wax was melted, I dipped the bottom end of the candle stub in wax and pressed it into the empty votive candle holder. This held the stub in place long enough to pour wax around it. To pour, I picked up the glass jar with a jar lifter tool, being careful to hold it away from me in case I dropped it or the glass broke.
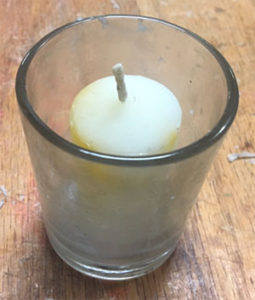
Here is a candle with some fresh new Gulf wax poured around it. I poured just up to where the wick emerges from the candle stub.
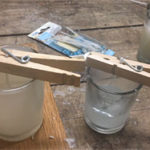
If you don’t have candle stubs available, you can refill votive candles with melted wax poured around purchased votive candle wicks, available at craft stores. Melt the wax as before and hold the wicks in place with clothespins as shown in the picture. Leave the clothespins in place until the wax is solid so that your wicks don’t migrate from the center. Your candles will burn better and more safely if the wick is centered.
I came back to Perennial later to make more candles, this time intending to experiment with fragrances and colors. I brought my Dad with me – he’s the one who had turned me on to candle burning when I was very young. We used to sit around the dinner table and watch pillar candles burn after eating. Dad used to let me put metallic crayons in them so I could watch the little mica flakes swirl around the base of the flame. Now I know that crayons are not good for candles because they clog the wick, but wow that was fun!
Dad and I brought to the workshop all the candle stubs and partially filled glass candle holders that we had lying around from our homes. Combined with a new package of Gulf Wax that I bought and the donated old candles and wax chunks available at Perennial, we had enough for hours of fun.
Dad had some tall glass candle holders he wanted to refill. To fill each candle, he tied a piece of wick to a washer to weigh it down and suspended the top of the wick over the mouth of the candle holder with a clothespin. He filled his candles with many layers of different colors in a sort of ombre effect. While he worked on that I experimented with colored chunks around taper candle pieces.
As you can see from the photo, I remembered to bring my Pyrex glass measuring cups this time. If you set the cups so that the handles are toward the outside edge of your pan, they may be cool enough to pick up with your bare hand but if they are not use a pot holder or oven mitt.
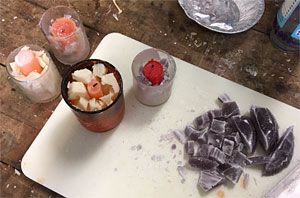
My first step was to get the wax out of a bunch of half melted container candles in glass. I set the partly filled containers in the double boiler before turning up the heat to avoid shocking the glass. When the wax was melted, I pulled out the old candle wick and metal pieces with pliers and then poured the wax into small pie plates. I kept the wax sorted by color and fragrance so that the colors and fragrances in my new candles could be coordinated and not clash too much. Perennial has a refrigerator so I put the wax into the freezer to speed up hardening so I could cut it later.
I had a few small glass container candles to fill so I repeated my technique of using sections of tapers cut down to the container height. Then I filled in around them with cut up wax chunks in preparation for filling in the spaces with a matrix of a contrasting wax color. The creamy white chunks shown had a fragrance already in them that was tobacco and vanilla. To my freshly poured wax portion I added Sweetgrass and Woodsmoke fragrances that I thought would blend well.
The purple chunks are from lavender scented candles, so to the matrix wax I added my own blend of relaxing essential oils that already includes lavender. For some of my favorite essential oil blends, see this web page of mine that contains a lot of information about my experiments with essential and fragrance oils.
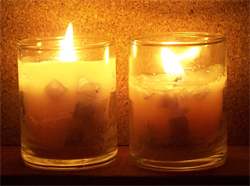
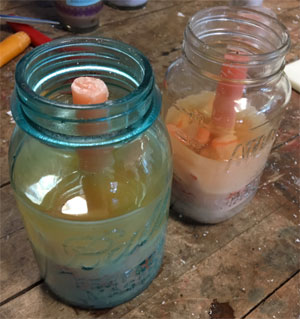
I decided to also make a couple of large candles out of old Mason jars to use as insect repelling candles outdoors. I dipped two taper candles cut to the right length in melted wax then pressed them into the bottoms of the Mason jars. I poured a little melted wax around the tapers for extra hold.
I un-molded more of my colored melted wax pieces and cut them into chunks. Then I distributed them between the two Mason jar candles around the central taper. I melted more wax and poured it to fill in between the chunks. Right before pouring, I added an insect-repelling essential oil blend to the off white wax to make these into insect repelling candles for the patio or the summer camp site. As these candles burn down, the colored chunks will create a pleasing decorative effect. I didn’t add any additional dyes to the wax for the projects shown, I just used what colors of scrap wax were on hand, but if you want to add colors use candle wax dye colors purchased from a craft store.
To clean out your containers, pour the extra wax out into one of your pie plates, then wipe out with a rag or paper towel. Discard rag or paper towel. Clean containers with alcohol if a more thorough cleaning is needed.
If you’d rather buy ready-made candles, Colonial Candles are sold at Schnarr’s Hardware in Webster Groves!
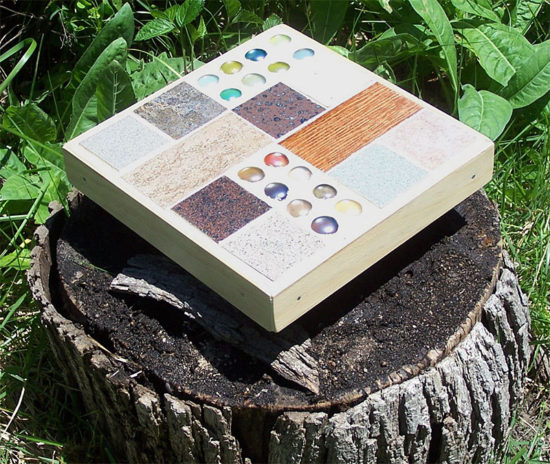
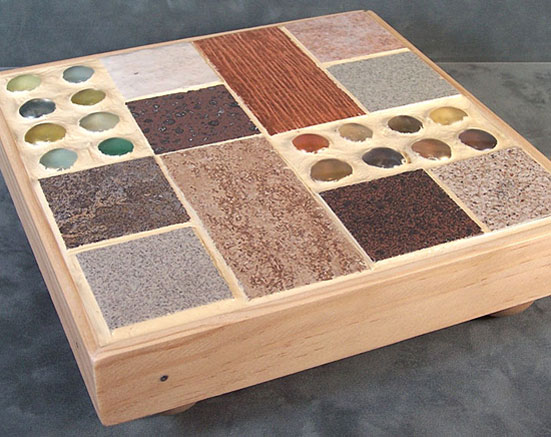
In this article I’ll show you how to make a stand to show off a special container plant. Raising a planter off of its surface can really enhance the appearance of a single specimen or help you create an attractive container plant grouping by providing elevation to some containers. Such a stand may also help protect the surface underneath by allowing air circulation under the pot so the surface can dry out between waterings. This stand is designed for both indoor and outdoor use. It is designed to let water from the plants run off, rather than catching it. This stand can also be used as a sturdy trivet indoors or outdoors.
Tools and Supplies * indicates items that are available at Schnarr’s
8 x 8″ x 1/2″ board*
Lattice wood strips 1 1/4″ wide*
Saw*
Miter saw*
Sandpaper*
Dust mask*
Pencil or pen
Ruler*
Hot glue gun*
Wood hot glue sticks
Drill*
Tiny drill bit*
Nails*
Hammer*
Wooden ball knobs or drawer pulls with 3/16″ holes to use as feet (Wood drawer pulls are available at Schnarr’s Webster Groves store)
Wood glue*
3/16″ drill bit*
3/16″ dowel rod*
An assortment of ceramic tiles and/or glass pieces that are about 1/4″ thick
Palette knife or putty knife*
Ceramic tile cement*
Old plastic lid
Tile grout*
Water container*
Mixing container for grout (can be an old food container)
Rags*
Disposable gloves*
Bucket* of water for cleanup
Tile and grout sealer*
Instructions
1. Cut an 8 x 8″ square out of 1/2″ thick plywood.
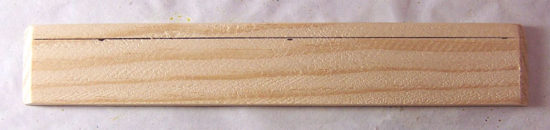
2. Cut four 8 1/4″ lengths out of a piece of 1 1/4″ wide lattice wood. Miter the corners at a 45 degree angle as you cut.
3. Put on dust mask and sand the rough edges off of your wood pieces.
4. On the inside edge of each mitered piece draw a line 1/4″ from the top.
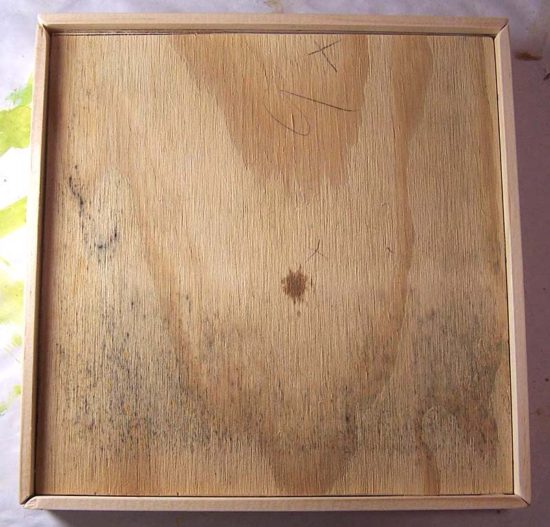
5. Glue mitered pieces to the edges of the 8 x 8″ block using hot glue as the adhesive and your drawn line as a guide to help line them up. You should end up with a 1/4″ lip all the way around, creating a tray that will hold your tile pieces.
6. As a reinforcement to the glue, drill a couple of small pilot holes on each side of the tray and hammer nails in for a strong hold.
7. Choose four wooden ball knobs or wooden drawer pulls with 3/16″ holes. Place them in the corners of the bottom of your tray. Draw around the base of each with pencil to indicate where their footprint will be. Set knobs aside.
8. Switch to a 3/16″ drill bit and drill a hole in the center of each drawn circle. Try not to go all the way through the wood but if you accidentally do it’s no big problem.
9. Cut short segments (about 1″) from a 3/16″ in diameter piece of wooden dowel rod to make pegs. Insert pegs into holes in wood and thread knobs onto pegs to make sure they are not too long and that there is no gap between the knob and the bottom of the tray. When satisfied, remove, dab wood glue onto each end of each peg, and re-insert into holes. Place knobs over pegs and press in place. Let wood glue dry. I left the wood unpainted in my sample but if you want to you can paint or stain the wood and give a waterproof clear coating like spar varnish.
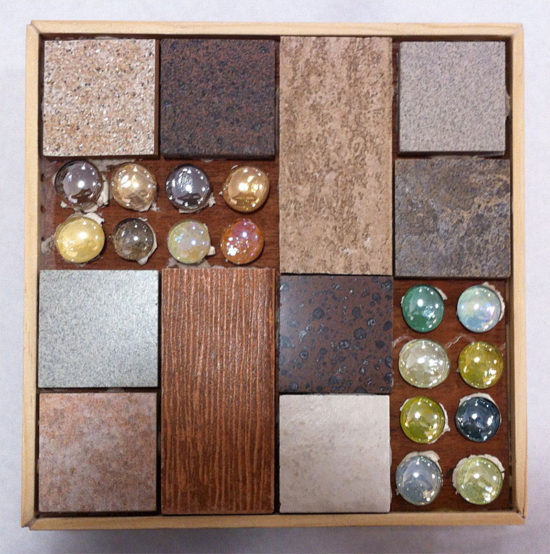
10. Get out your tiles and arrange in the tray to make an arrangement that is pleasing to you. For my sample I used tiles I salvaged from Leftovers, Etc. and some translucent glass blobs which were backed with colored paper. Try to leave a litte bit of space between each piece.
11. Once you have decided on an arrangement, scoop a small quantity of ceramic tile cement out of the container and place on an old plastic lid. Keep container closed so the rest of your cement doesn’t dry out. Use palette knife or putty knife to apply cement to the back of each pice and press in place. If any tile pieces are thinner than the others, you can put some extra cement on the back to build up the height. Let cement dry for the time period indicated on the container.
12. When cement is dry you’re ready to apply grout. Grouting is very messy – I recommend you wear old clothes and protect your work surface and floor. Have plenty of clean rags on hand and a small bucket of water for cleanup. Don’t be surprised if you need a bath when you’re done!
13. Put some grout in a small plastic tray, such as one left over from a microwave dinner. Add water until it’s about the consistency of soft cream cheese – a little at a time to make sure you don’t add too much. Stir it with your putty knife as you add the water. Try to only mix up small amounts at a time so it does not start to set up before you’ve applied it.
14. Put on your disposable gloves, and use a rag to pick up a portion of tile cement. Smear it around to fill the cracks between tiles. The rags will help protect your hands from sharp pieces if there are any. The thin disposable gloves will protect your hands from being irritated, dried out or discolored by the grout, but alone they will not protect you from cuts.
After the tray is grouted, go back over it with a succession of fresh rags to remove the grout from the surface of the tiles. Dampen the rag with a little water toward the end to get them really cleaned off if needed. Be careful not to dispose of any grout in your sink – it could clog the drain. Dispose of any rags that are really soaked with grout – I put mine in the compost. If some are only slightly dirty, you may be able to re-use them by rinsing them in a bucket of water. If you do that, dump the dirty water out in the yard, don’t put it down the drain.
15. Let the grout dry, then apply tile and grout sealer. You’re done!
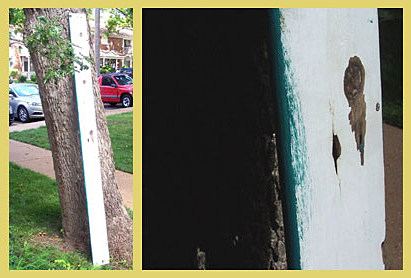
This project was made from the same stash of distressed wood that I used for the previous project Stencil a Wood Garden Sign. I kept aside a couple of intact large planks so I could make some interesting shelving. The wood was bare on one side and had partially peeling white paint over green on the other side. I decided to use the white side as a ground for some stencils I cut that were inspired by a mid-century modern building I saw on vacation last summer.
Tools and Supplies * indicates items that are available at Schnarr’s
Distressed wood plank the length of your sofa
Sandpaper*
Dust mask*
Drop cloth for work surface*
Water based paint* for large areas Acrylic craft paints for stenciling Decorative stencils
Water based clear satin wood varnish*
Rags*
Paintbrush*
Assorted size old food containers for mixing paint and varnish
Sponges*
Old food container lids to use as palette while stenciling
Masking tape or painters tape*
Shelf brackets*
Screws*
Instructions
1. Put on a dust mask and sand your wood plank to remove rough edges and peeling paint. It’s always a good idea to wear a dust mask to keep from breathing small particles but I think it is even more important when working with old salvaged wood. You don’t know what that wood was treated with, what is in the old paint and it could be moldy as well. After sanding, wipe off the dust with a damp rag.
2. My wood plank already had a satisfactory ground color, white, on what would become the top surface. If your plank does not already have a ground color that you like, you can apply one. House or wall paint is a good choice. One technique that is really effective with the distressed look is to paint a contrasting color under the ground color. Some random sanding here and there later to expose the different layers of paint will simulate the effect of an old piece of wood that has been painted multiple times.
3. Apply a contrasting color to the sides and bottom of the board. As you can see, when you paint surfaces where two colors come together at a corner, it’s easy to slop a little paint over where you don’t want it. One reason that I love the distressed look so much is that when you sand off paint to conceal your mistakes, it looks like part of the design. If you are trying to paint precise corners or lines they don’t look good unless they are perfect, but with a distressed effect you can be a little sloppy!
4. Next put your dust mask on again and sand the corners and edges of your board to expose the wood in those places. Then check to see if any paint is beyond the corner where it is supposed to be, such my example below on the left.
Sand away any paint that is in the wrong place, such as the excess paint that I removed from the top of the board. As I sanded the excess paint off, I exposed some of the wood grain on the front of the board and some of the green paint that is under the white paint. If you are using a really beat up piece of wood like I did in my sample, you can make some artistic decisions about sanding other areas. If there was a rough spot that I found pleasing, such as wood grain, I sanded such spots to enhance the texture. If there were spots that were not pleasing, such as dirty spots or flaking paint, I sanded to remove those unwanted areas of paint.
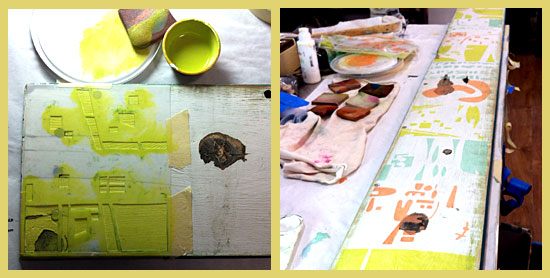
5. Decide what design you want to stencil on the top side of your shelf. I designed stencils specifically for this project but I have and will use them in lots of other projects as well. If you would like detailed information on how to cut your own stencils, see my article Fun With Stencils.
6. Apply craft paint through your chosen stencils in the colors of your choice. If you are new to stenciling on wood, please see my article Stencil a Wood Garden Sign for detailed instructions.
7. When stenciled paint is dry, to further enhance the distressed look mix up a paint/varnish/water mixture. Here is how – in a small container, mix some paint until you get a shade of dark brown that you like. In another larger container, mix a half and half solution of water and satin finish water based wood varnish. Gradually mix in some of the brown paint until you get a stain that you like – test by brushing on an inconspicuous spot. It should be dark enough to tone down your design a little bit and give it a weathered look, but not so dark that it obscures it. When the mix is right, stain/varnish your whole board and let dry.
8. Attach brackets of your choice to the wall behind your sofa, and set shelf in place. You’re done!
Supplies and Materials *Indicates items available at Schnarr’s
Terra cotta pot*
Acrylic paint*
Water-based varnish or sealer*
Small containers for mixing paint (can be disposable cleaned food containers)
Rags for cleanup*
Paintbrushes*
Water container*
Sponges* Decorative stencils
Letter and number stencils*
Palette knife for paint mixing
Palette (could be a proper artists palette or a temporary one made from freezer paper*)
Sandpaper* (optional) Memory Essentials Get Rollin’ tool Memory Essentials Bits and Pieces
Optional – heat tool for speeding up drying between steps if you need to
Masking tape*
Optional – disposable plastic gloves* if you want to keep paint off your hands
Drop cloth* for work surface
Painting and stenciling terra-cotta pots is a fun and inexpensive way to enhance your patio or garden decor. Younger and older crafters alike can join in. Small decorated pots can be used as party favors. Medium-sized pots might provide the base for a table centerpiece. A large pot could function as a gift basket that you can fill with items for a loved one who likes gardening. Gardeners can always use extra small items such as gloves* (they tend to wear out with regularity), seeds*, bulbs*, bug repellent*, gardener’s soap, hand lotion*, sunscreen*, lip balm* and plant tags*. You can also throw in a gift card* so they can get exactly what they want!
You can use either a brand-new terra cotta pot or a used one. I kind of like a used one for this project because I’m going for an artificially aged or distressed look and and that’s easier to achieve if the pot already features some stains from being used. A brand new pot will work also.
Directions
1. Clean and dry your pot.
2.Using your acrylic paints, mix a terra cotta color that is lighter than your pot. Good colors to use in the mix are white, brown, orange and maybe red.
3. Put some water-based varnish in a small container and mix in some of the light terra cotta color. Brush some inside your pot to see how translucent it is. I used a stiff brush that was about 1″ wide. You should be adding a light, translucent haze of color in which you can see some brush strokes. Paint the whole inside of the pot and let dry. This step achieves two objectives – it seals the inside of the pot and tests your mixture to make sure it’s right – not too opaque and not too transparent. Normally one of the benefits of a terra cotta plant pot is the porosity, but since we’re applying paint to ours we don’t want water seeping through and wearing off the design over time. Set aside the remainder of the paint/varnish mixture to use later.
4. On your palette, squeeze out some green, yellow and white paint. Use a sponge to blend these colors in random ways and lightly sponge paint onto your pot in random areas. This is to simulate lime scaling and moss or algae that would normally appear on a terra cotta pot over time as it’s in use. After this paint is dry, if you need to tone it down any you can sand it lightly or sponge a litte of your translucent light terra cotta color over it.
5. The next step is to apply a loose vertical texture to the rim of the pot to accentuate it. I used a Memory Essentials Get Rollin’ tool with rubber bands on it from the set Memory Essentials Bits and Pieces. This is one of my favorite textures of all time and I’ve used it in paper crafts, fabric surface design and all kinds of random projects over the years. If you don’t have these tools you can create a similar texture tool by wrapping rubber bands or string around a wood block. Spread some cream-colored paint on your palette and run or press your tool in it then apply to the rim to make the texture. Let dry.
6. Select a stencil or stencils for applying a design to the side of your pot. You might want to use letter or number stencils to create names, initials, words or house numbers. In my examples I used decorative stencils in garden-related designs. Temporarily tape the stencils to the side of the pot with masking tape. Put some cream-colored paint on your palete (do not thin with water) and apply paint through the stencil with a dry sponge. When you’re done, pull off stencil and either wash paint from stencil immediately or put in a container of water to wash later. If your design requires more than one color, use a clean dry sponge for each color – a moist sponge will make your paint run under the stencil and mar the design. While you’re working, if you don’t want to pause and go to the sink to wash paint from your stencils, brushes and sponges at each step, throw them in the container of water until you’re ready to do cleanup at the end. Let stenciled paint dry on pot.
7. Take a look at your pot and see if you like the appearance the way it is or if you want to make it a little more distressed. Randomly hit some areas with sandpaper if you want to “age” it a bit more. Wipe off dust with a slightly damp rag.
8. Paint outside of pot with your translucent light terra cotta / varnish mixture. Let some brush marks show, but smooth them out a bit if you think they are too prominent. Turn pot over and paint the bottom to seal it. Let dry. You’re done!
For more information on stenciling, here are some of my other articles:
If you want to take the idea of using a decorated pot as table decor or a party favor a little further, here is an idea you might like from my personal blog. Make a bouquet out of seed packets with free templates that I provided for download and display it in one of your decorated pots. Make a Seed Packet Bouquet
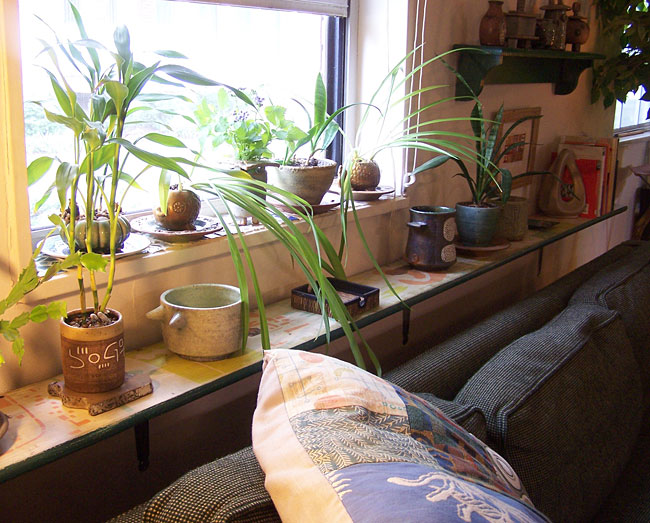
My home contains multiple aquariums and house plants and I have a humidifier, so you’d think I have plenty of moisture in the house but even I would like a little more humidity to help my dry skin and other irritations that only happen in the winter. Many of our house plants, if they are not succulents or cacti for example, come from humid tropical climates and if you have those type of plants you might want to increase the humidity in their environment. Adding moisture to the whole home has some benefits but if you add too much you could have condensation issues. The house I grew up in always had rivers of condensation coming off the windows in winter (or blocks of ice). We did what we could to soak up the moisture with towels if it was excessive but those kind of conditions can be destructive to the area around your windows and cause mold to grow.
One way to help your plants without making the whole house into a rain forest is to create a tiny microclimate by filling a waterproof tray with gravel, moistening the gravel and setting your humidity loving house plants in it. Keep the bottoms of the pots above the water level so they don’t sit in water. Moisture will come up from the tray and if you group the humidity-loving plants together they will help keep each other moist with their transpiration. A boot tray from Schnarr’s is a great size and shape for a plant tray. We also have some small bags of decorative rock if you need some.
What you’ll need:
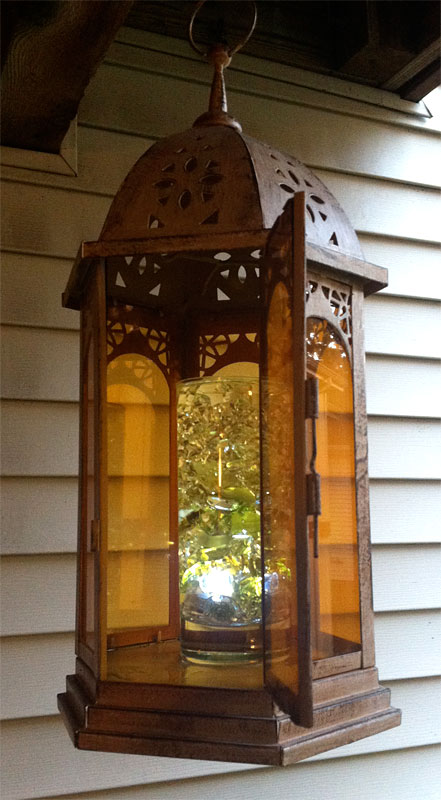
Candle lantern*
Glass container
*Water Lights – special submersible flameless candles
Acrylic or glass gems, *clear or colored *Available at Schnarr’s.
Do you have a hanging candle lantern? I have one on my deck but I’m not allowed to burn real candles in it for safety reasons. Flameless submersible Water Lights powered by batteries are the answer! Try filling a drinking glass with a clear submersible Water Light, some colored glass or plasic gems mixed with the clear plastic and add water.
What kinds of color effects can you get if you mix colored glass, plastic gems and a color-changing Water Light? Try it and see! Try different combinations for your holiday parties!
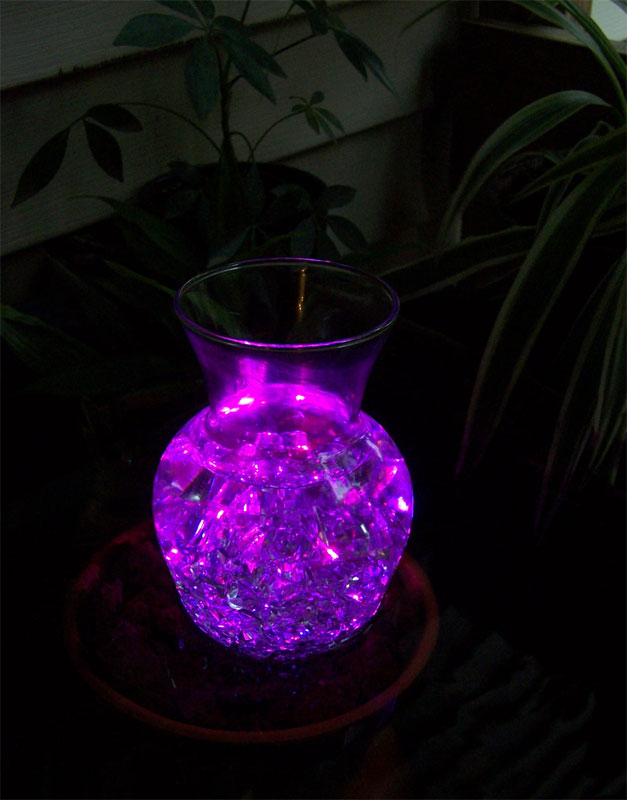
What you’ll need: *Terra cotta plant pots
Sturdy glass container
*Water Lights – special submersible flameless candles
Acrylic or glass gems, *clear or colored *Available at Schnarr’s.
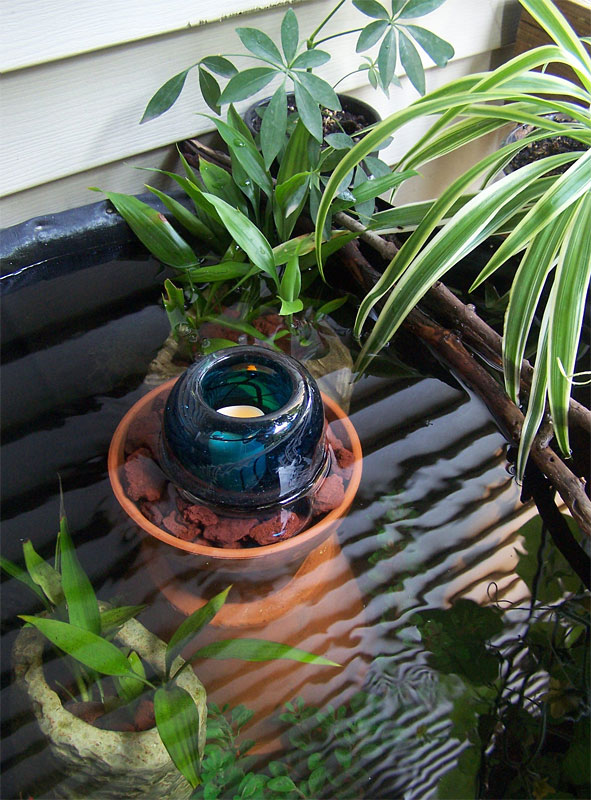
Color-changing Water Lights displayed in a small water garden.
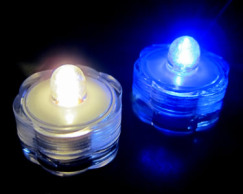
Submersible Water Lights come in clear and color-changing versions. Try topping off a stack of plant pots in your water feature with a clear container. Add a color-changing Water Light plus the clear acrylic gems and fill the glass container with water.
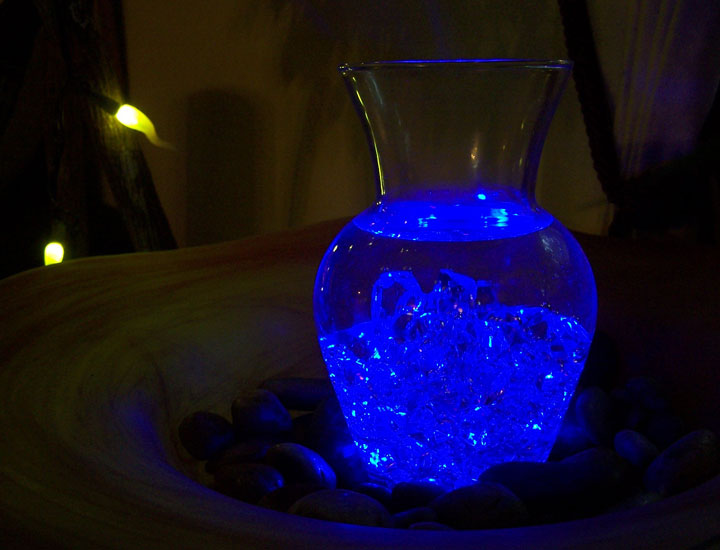
Color changing water light displayed indoors on a stand.
Here is another way to display a clear container with a Water Light. I placed the vase in a large bowl on a stand in my living room and added rocks as an accent. I like the way it looks next to my lighted artificial tree!
Do you want to create a festive atmosphere for party guests, or just enjoy your own home or yard more? In this series I’ll share some easy and safe ways to add luminosity and beauty to almost any size water feature – pond, fountain, water garden, punch bowl or whatever water container you have!
What you’ll need for Idea #1: *Terra cotta plant pots
*Flameless candles
Sturdy glass container
*Sand, gravel or lava rock
Optional – Water plants, real or artificial *Available at Schnarr’s.
Idea #1:
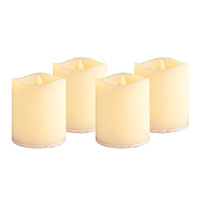
Some types of flameless candles, such as the ones pictured below, are not meant to be submerged. Here is a way to display this type of candle in water. Simply create a stack of terra cotta plant pots in your water feature that is nearly to the water’s surface, but not quite. Top off the stack with a partially submerged glass container, and place a battery-powered flameless candle inside. The size and number of pots you use will depend on how deep your water feature is. Fill the top pot with gravel if necessary to hold the candle holder at the right level – lava rock is a good choice because it helps to filter the water. A sturdy, thick-walled container works best for the candle holder – it should be heavy enough not to float. I chose to use a glass vase that I made in college – here is an instance where my tendency to blow really thick-walled vessels turned out to be a good thing! Avoid using very valuable vessels in case your tower of pots gets knocked over by accident (such as by animals hunting for your pond fish!).
Indoor / Outdoor LED Votive Candles
Such an installation can be temporary or permanent. I recommend bringing the flameless candles inside when not in use so they don’t get damaged if the candle holders collect rainwater.
In my example shown in the photo, I’ve added some aquatic plants and placed potted plants around the edge to make it prettier and more inviting to human viewers and to make it a better habitat for the fish and for the birds who love to drink and bathe there. I also placed several sticks near the edge for birds to use as perches and to help them climb out should they happen to fall in.
A water feature of any size is a great addition to your outdoor living space. Just the sight or sound of water can help you feel cooler on a hot day and is mentally soothing as well. Water features can be enjoyed all year round. If your outdoor water feature is in view of a window, lighting it up will make your indoor holiday parties more festive. At Schnarr’s we carry pumps, heaters, mosquito dunks and other items to help keep your water feature healthy and enjoyable in any season. Water gardens are not restricted to your outdoor space – you might also enjoy my article “Create an Indoor Water Garden”.


 We have a client with a large Colonial Revival house and a lot of iron fencing and furniture in the backyard. When adding some container plantings we chose symmetrical numbers of faux cast iron urn style planters that harmonized with the existing architecture and garden. We filled them with traditional flowers in a limited color palette that went well with what was already planted in the yard and garden. The look we chose for that client would not be appropriate in my garden.

 I made a design mistake in this second grouping. The Hypoestes in the tall pot does not contrast enough with the color of the ground cover that was already there. How would I fix this? One way would be to add some brightly colored trailing plants around the edge of the pot. Or if I had any faux flowers or foliage around I could stick some in. Or I could sink an empty narrow container that holds water like a test tube into the soil and put a colorful cutting in there for a temporary display that would still look natural. Or for a nighttime display I could add a tall narrow water container to the pot, fill it with acrylic or glass gems and put a