I live in a condo and space is very limited. As a result I haven’t done much experimenting with starting seeds indoors so far. Over the last year I’ve been updating the Calendar on the Schnarr’s Blog with planting times of some of the seeds that we sell in the store and a few others that I grow. My source for these planting times, indoor or outdoor, is using the average first and last frost dates for the St. Louis area as a guide along with the When to Plant App published by Mother Earth News. It’s amazing how early some of these dates are. This year I want to see what kind of success I can have actually following the schedule and not just throwing some seeds in the ground when I have time!
Since I collect and save seeds from year to year, first I took inventory of what I have and used the Calendar as a guide to see when to start the seeds. Three of the seeds in my stash, Yucca filamentosa, Purple Coneflower and Columbine will be ready to plant indoors in mid-January. I refreshed my memory about starting seeds by reading some articles on the Dave’s Garden web site.
I have some work to do before I’m ready to plant but I am making sure I have on hand the following:
Seeds*
Covered growing containers with a clear lid*
Peat pellets*
Sterile seed starting soil*
Spray bottle for watering*
Plant markers*
A source of light for the seeds*
A source of heat for the seeds
Gardening journal for notes
*Available at Schnarr’s
When I get ready to plant, I’m going to make a page in my journal about each plant I’m attempting to sprout and make notes about what conditions the seeds require, then I will do my best to meet those requirements. I’m planning to make use of an aquarium that is currently empty to house some of the seeds. The aquarium light will act as both a light and heat source and the lid will help hold in moisture to create a mini-greenhouse. As an experiment, in an atrium in a building where I am renting a studio, I’m going to put some covered seed starter trays with some of the same species of seeds to see where they do better. I already have some of my house plants over there. Gardening involves a lot of trial and error – I will take good notes so in the future I will know what worked and what didn’t.
Here are some examples of seed starting supplies you can pick up at Schnarr’s:
Schnarr’s Hardware is launching a new gardening newsletter
Our bi-weekly email will include lawn and garden ideas and fun projects with an emphasis on seasonal tips to help you enjoy your garden all year round.
If you would like to receive our new gardening email newsletter, “Garden Notes from Schnarr’s”, please click the button below and fill out the short form.
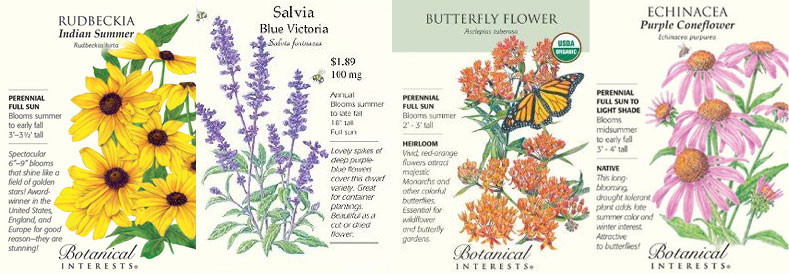
Some of the native plant seeds available at Schnarr’s
In my recent article, Gardening for the Birds I suggested planting more native plants in your yard and garden to attract a more robust population of birds. Schnarr’s has several varieties of native seeds in stock and fall is a good time to plant many perennials. Next year you should be enjoying more birds if you plant some of these seeds now:
You can purchase the following native plant seeds now for planting in the spring – see our Calendar for planting times tailored to the St. Louis area. Seeds make a great holiday gift for the bird lover or gardener in your life! Great for party favors too!
Do you want to create a festive atmosphere for party guests, or just enjoy your own home or yard more? In this series I’ll share some easy and safe ways to add luminosity and beauty to almost any size water feature – pond, fountain, water garden, punch bowl or whatever water container you have!
What you’ll need for Idea #1: *Terra cotta plant pots
*Flameless candles
Sturdy glass container
*Sand, gravel or lava rock
Optional – Water plants, real or artificial *Available at Schnarr’s.
Idea #1:
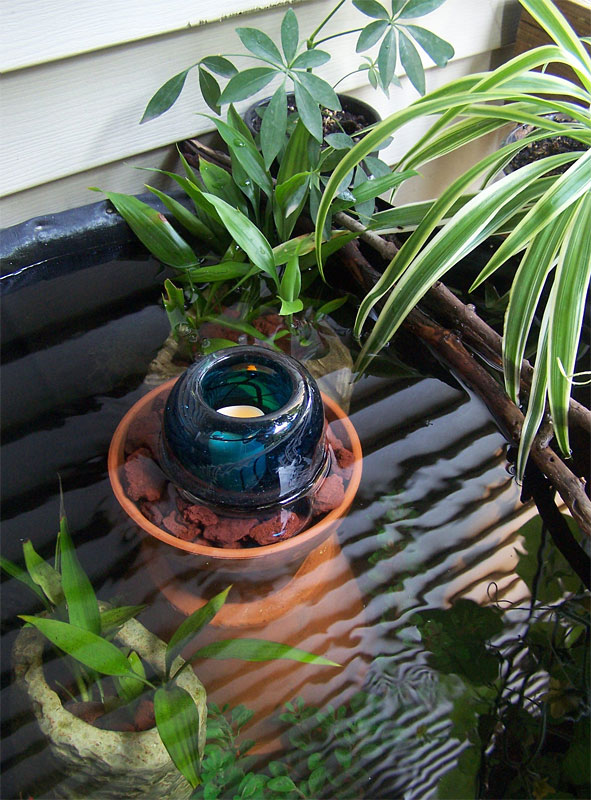
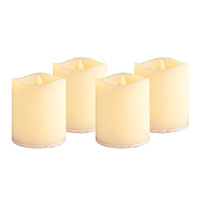
Some types of flameless candles, such as the ones pictured below, are not meant to be submerged. Here is a way to display this type of candle in water. Simply create a stack of terra cotta plant pots in your water feature that is nearly to the water’s surface, but not quite. Top off the stack with a partially submerged glass container, and place a battery-powered flameless candle inside. The size and number of pots you use will depend on how deep your water feature is. Fill the top pot with gravel if necessary to hold the candle holder at the right level – lava rock is a good choice because it helps to filter the water. A sturdy, thick-walled container works best for the candle holder – it should be heavy enough not to float. I chose to use a glass vase that I made in college – here is an instance where my tendency to blow really thick-walled vessels turned out to be a good thing! Avoid using very valuable vessels in case your tower of pots gets knocked over by accident (such as by animals hunting for your pond fish!).
Indoor / Outdoor LED Votive Candles
Such an installation can be temporary or permanent. I recommend bringing the flameless candles inside when not in use so they don’t get damaged if the candle holders collect rainwater.
In my example shown in the photo, I’ve added some aquatic plants and placed potted plants around the edge to make it prettier and more inviting to human viewers and to make it a better habitat for the fish and for the birds who love to drink and bathe there. I also placed several sticks near the edge for birds to use as perches and to help them climb out should they happen to fall in.
A water feature of any size is a great addition to your outdoor living space. Just the sight or sound of water can help you feel cooler on a hot day and is mentally soothing as well. Water features can be enjoyed all year round. If your outdoor water feature is in view of a window, lighting it up will make your indoor holiday parties more festive. At Schnarr’s we carry pumps, heaters, mosquito dunks and other items to help keep your water feature healthy and enjoyable in any season. Water gardens are not restricted to your outdoor space – you might also enjoy my article “Create an Indoor Water Garden”.
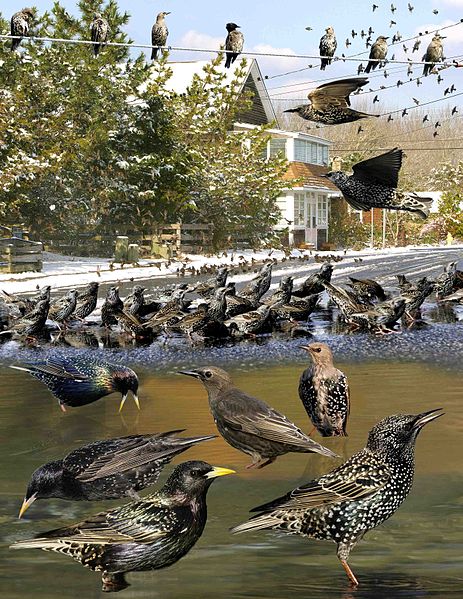
I was eating dinner outside in downtown St. Louis recently and observed a large flock of European Starlings (Sturnus vulgaris), known as a murmuration, select a group of trees in a nearby park for their nightly roosting spot. This is the time of year that Starlings finish raising their families and start living a more communal lifestyle, which will persist until the next spring breeding season.
A popular topic with customers at the store last winter was how to keep flocks of Starlings from eating all the food put out for the other backyard birds. This is a problem I WISH I had – I know that sounds strange. Starlings are my favorite bird, because I rescued a nestling nearly six years ago and raised her and adopted another one two years later. My Starlings Attila and Pooky are my beloved pets (as I’m writing this I have one my arm and one on my shoulder) and because of them I’ve done lot of reading about Starlings. I like to observe wild ones whenever I get the chance to see how their behavior and vocalizations are like or unlike my tame pair.
Unfortunately if a flock of Starlings descends in my yard, if I go to the window to watch them they immediately take off. So that is my first idea about how to keep Starlings away from your feeders – try putting the feeders within view of a window where there is human activity. Some birds are more tolerant of people, for example on my deck Carolina Wrens, Robins and Song Sparrows will not only tolerate me looking at them through the window but will sometimes accept my presence with them on the deck as well.
Another idea is to serve food that Starlings don’t like – that is difficult to do, since they eat almost anything. They cannot open the shells of sunflower seeds, so you might try feeding sunflower seeds with the shells on.
Another tactic I’ve seen recommended on other web sites is to remove perches on your feeders so that other birds can access the seeds but Starlings cannot because they say Starlings need a perch. Based on my own observations, I’m skeptical about this, but who knows, it might work on small feeders. I’ve seen Starlings cling to surfaces with no perch just fine, they even spread their short tails out like a woodpecker does to use as a prop, but the absence of a perch on a small tube feeder where there is not enough room to prop the tail might deter them. Another idea is to smear suet on a pine cone and hang it, allowing small clinging birds to access the suet but making it difficult for the Starlings. Others recommend putting wire mesh around the feeder that allows small birds in but excludes Starlings. That should work but of course will exclude all larger birds.
A squirrel baffle over a feeder is said to deter Starlings because they don’t like going under a cover. This I can believe – my two Starlings hate it when I pass a hand or arm over them, so I try not to do that. I also don’t cover their cage at night because it frightens them. They are also said not to like feeding while hanging upside down, so any feeder that makes the bird feed this way will probably not be attractive to them.
If you like Starlings but just wish they would give the other birds a chance too, you might also try providing a separate feeding area that appeals to Starlings more than other birds. A platform feeder stocked with cat food is perfect for Starlings. You could augment the cat food with vegetable and culinary herb scraps left over from your cooking if you have any, my two Starlings love vegetables, greens and herbs, both cooked and raw. Just leave out the avocados, onions and garlic – they are toxic to birds. There is a risk in this strategy, Starling flocks can be big enough to take over ALL the feeders if they are in the area – also you’ll get other animals – but it might be worth trying as a temporary measure to give your other backyard birds a break. If this type of feeder accidentally attracts crows and ravens, that can be a good thing, they will help drive off predatory hawks and falcons with their mobbing behavior.
You don’t have to rely only on feeders to attract birds. I’m not allowed to put out bird food where I live, so I provide a water feature that gives the birds filtered, and in the winter heated water for drinking and bathing. This attracts quite a few birds. I also have a lot of bird-attracting plants in my garden and when I’m able I leave the seed-heads standing all winter to provide food. Rose of Sharon, Purple Coneflower and Korean Hyssop seem to be particularly attractive to small birds such as finches. Woody plants like the Rose of Sharon will support the Starlings’ weight while feeding but many of the herbaceous plants won’t so the smaller birds can get a good chance at the seed. Starlings are imported to our continent – a greater proportion of native plants in your yard may bring an increase in native birds to give the starlings some competition. Areas of leaf litter also attract birds for invertebrate foraging – this is worth trying if you have an area of your yard that you don’t mind leaving in a more natural state. You can even include a dust bath area if you want to, since Starlings adore water baths and some other birds would rather have a dust bath.
Starlings have been doing what they do for 20 million years, and stopping them will not be easy. If it makes you feel any better, the fact that there are Starlings in the vicinity means that you will have fewer lawn grubs, tent caterpillars, Japanese beetles, stink bugs and other insect pests. Starlings are perfect eating machines for lawn grubs – their beaks have more force in the opening than the closing, and are suited for prying in the dirt and grass and exposing invertebrate prey – watch this great video to see this action from an insect’s point of view!
It might prove more productive to enjoy Starlings rather than try to fight them. Whichever way you want to go, it’s helpful to understand more about them. I recommend the following resources for learning more about Starlings.
I’ve been gardening partly to benefit birds for over 10 years now. I’m not allowed to have bird feeders where I live, but I can provide a water feature and plants that help provide food, shelter and nest materials. I also have permission from the Condo Association for a nest box, which was used by Carolina Wrens this past summer. I refrain from using pesticides to help ensure that the bugs in my garden are safe for birds to eat. Like a lot of people, I am also interested in invertebrate conservation, so I have planted several species of plants specifically to be used as host plants for butterflies and as habitat for beneficial insects.
One of the factors that helps birds to successfully raise young is the ability to find food. Seeds and nectar feeders are great for feeding adult birds, but most wild baby birds need lots of animal protein. One amazing statistic that Mr. Leachman shared with us is that it takes the equivalent of 6-9,000 caterpillars to raise one brood of chickadees! That’s a staggering amount of invertebrates. Hummingbirds don’t feed nectar to their young – they feed tiny caterpillars, wasps, bees, gnats and spiders. Clearly one of the best ways to help birds is to learn more about how to co-exist with invertebrates. Some of them don’t need to be controlled and of those that do, there are ways to manage them that minimize harm to other species.
Most of us have been raised to think of all invertebrates as something that must be eliminated from our environment, but if you think of them as bird food, some of them might be acceptable in your yard or garden. “Bird-friendly means insect-friendly”, stated Mr. Leachman. Caterpillars are often tolerated by people better than other insects because they grow into beautiful butterflies and moths. They can be very attractive in their own right. Caterpillars are also excellent bird nutrition – they are soft and have a very high protein content. You can grow caterpillars in your garden with non-native plants as I do with Queen Anne’s lace and Rue, but you’ll get more caterpillars if you plant native plants. Fall is a great time to plant trees, shrubs and perennial plants – if you choose native plants that are used as host plants by moths and butterflies, you will help feed a lot of birds.
Native plants have had more time to evolve with our native butterflies and moths. Therefore, as Mr. Leachman pointed out, native plants can be utilized as host plants by many, many more species of butterflies and moths. To name a couple of extreme examples, Oaks are used by 518 species and Hostas are used by none (yes slugs eat them but no larvae of butterflies or moths use them as a host plant). Large trees, understory trees, shrubs, herbaceous plants and ground covers can all be good host plants, and native plants are available in all of those categories for all growing conditions. Native plants are available at some nurseries – don’t try to take them from the wild because many native plants are endangered along with native birds.
Besides choosing native plants as host plants, here are some other things you can do to make your garden produce more bird food:
Do less tidying up in the garden – removing plant debris destroys many cocoons and overwintering creatures. If you can’t let leaves, dead plants and other natural materials alone in your whole garden without getting grief from your Homeowners Association or neighbors, try experimenting with an out-of-the-way section to conserve some of the insects.
Plant fruiting plants that bear at varying times of the year.
Plant a good variety of species – if plant diversity is low, insect diversity is low.
Plant large bunches of host plants so they are easier to find rather than scattered individual specimens.
Care for the total ecology of your garden or yard – the whole food web will be healthier and more productive.
Many common birds in Missouri are in decline – several have lost 60-70% of their numbers in the last 40 years. Feeding and watching birds is the second most popular hobby in the USA after gardening. To make sure there is always a variety of birds to watch, you can make your part of the environment healthier for birds! And you can further help your local bird families with items we have at Schnarr’s, such as feeders, seed, suet, nest boxes and bird bath heaters!
In my previous article “Make a Garden Sign Out of a Recycled Produce Crate” I explained that I wanted signs to let the groundskeepers at my condo complex know that I did not want them to remove the fall leaves from my garden, especially with leaf blowers, or trim or spray the plants. The condo management has agreed to let me manage fall garden cleanup myself this year as an experiment and has let the landscaping company know to leave my garden alone. Here are the reasons why I think this will improve my garden:
When the leafblowers remove the leaves, they also knock over my plants, blow away plant tags, blow away fertilizer, blow my mulch into the lawn and blow seeds out into the lawn which makes the lawn weedy and my plants less likely to reseed themselves.
Trimming the plants in the fall destroys hibernating beneficial insects and removes winter food and cover for birds from the garden.
The resulting bare soil is more likely to erode and I lose plants over the winter due to the soil drying out and freezing more deeply than it would with a natural cover.
I have to water more often to compensate for the lost moisture and that costs the condo complex money.
My gardening space is all part shade and shade plants are adapted to living under tree litter for the most part rather than bare soil so it’s difficult to get things to grow.
The groundskeepers don’t necessarily know which plants I want and which ones I don’t and they often spray the wrong ones with herbicide. I can’t label them because the leaf blowers blow the markers away. Even if they always sprayed the right ones, I don’t want poison around my home. I’d rather pull the weeds and compost them or smother them with lasagna gardening.
So how do I propose to handle garden cleanup this fall?
One of the first gardening books I bought after moving into my condo was “Making the Most of Shade” by Larry Hodgson since I was new to shade gardening at the time. I haven’t reviewed it for awhile so I got it out to see if it had anything helpful about managing leaves.
Here is some of what Hodgson has to say about removing leaves and dead plant material in the fall:
“It doesn’t help the plants in any way, and it removes the organic matter that would have decomposed on the spot to feed the plants… …I find the less I disturb plants, the better they grow.”
The kind of fall cleanup I’d like to do is none at all. Will that work? I know the groundskeepers will need to remove leaves from the lawn, because the lawn will die if they are not removed or chopped up on the spot. My garden will be a nuisance if leaves blow off of it onto the lawn and I don’t want to cause problems. I plan to toss some wood chip mulch over the leaves periodically to keep the leaves in place. If the resulting leaf/mulch piles threaten to exceed 8 inches in depth (if you go over that you may harm tree roots) then I plan to remove some of the leaves and either chop them and return them to the garden or use them in one of the other two gardens I help manage. My perennial plants if left alone should do some of the work of holding leaves in place also.
The trees around my condo are almost all oaks and I’ve read that oak leaves may form a mat which keeps water from getting through to the ground and they are also slow to break down. Nitrogen helps dead leaves break down faster, so whenever I apply wood chip mulch I will also add some high-nitrogen organic fertilizer.
I’m also going to experiment with growing oats as a cover crop over the leaves in spots. I’m already having some success with growing oats in leaf mounds with no soil added in a client’s garden. If I have the same results in my garden the oats should be helpful. I hope that the oats will perform four tasks for me:
Help hold leaves in place.
Pierce leaves with their roots so that water can get through.
Feed small birds with their seed heads.
Decompose after they die and eventually feed my other plants.
The oats die off in winter so they should not become weedy. Schnarr’s can special order some oats for you so you can try this in your own garden if you’re interested in cover crops.
Stay tuned for a report on the results of my experiments!
What is Lasagna gardening? No, it’s not growing delicious tomatoes and herbs that you can put in your lasagna, though you may eventually be able to do just that depending on your conditions. Lasagna gardening, also known as sheet composting, is an organic gardening method that entails covering the ground with layers of materials of organic origin and allowing them to naturally break down over time. The benefits of this method are less time and labor spent weeding and tilling, creating healthy soil for healthier plants, and reaping the many benefits of compostable materials instead of wasting them.
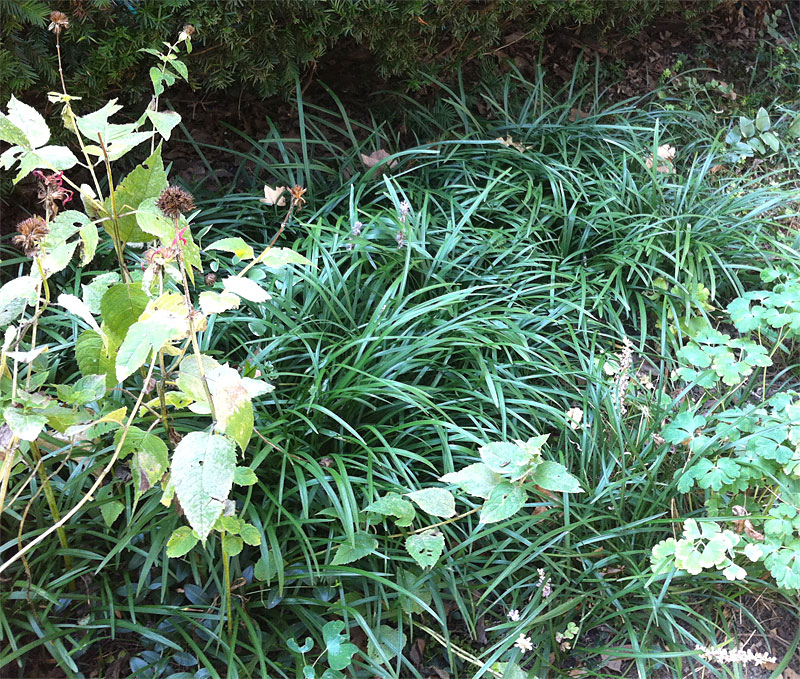
If you are thinking of starting a new garden bed next spring, fall is a good time to begin it and lasagna gardening is a good method to use if your chosen ground is covered with vegetation that you want to kill off. I’m demonstrating with a section of a shade garden that is covered with liriope. I like it but I have too much of it so I want to get a section ready to put in something new later. If you’ve ever tried to dig up lirope you can imagine how much time I will save by just smothering it! This method works for grassy areas also or any piece of ground covered with unwanted vegetation. Here is what my section of garden looked like before I started.
Ironically, the Liriope that I want to smother with lasagna gardening is the best looking plant in this section right now. The Bee Balm on the left and the Columbine on the right are not at their best in late summer. Next spring they will be gorgeous!
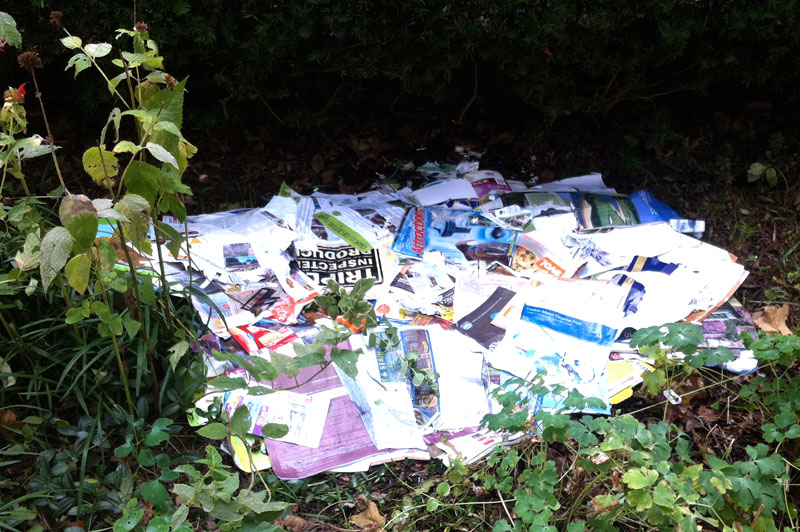
First gather up all the compostable materials that you can. The first layer consists of cardboard, paper, newspapers and other recyclable paper based products. I have been saving for a couple of months so there is more than enough for this section.
Mark off the space that will become your garden. You can transplant the vegetation already on the spot if you need it elsewhere. If it’s ok to kill it, just cover the area with several layers of cardboard and paper without leaving gaps in between. If it’s windy, wet the paper as you go – I dunked mine in a bin of water before applying. The paper will block the light and kill the vegetation underneath which will decompose and eventually become plant food.
Lasagna gardening helped me get some good use out of junk mail, product packaging, and other unwanted paper products. This is about five grocery bags full.
Wet the layer after you’re done applying it if it’s not already wet. This helps jump start the decomposition process.
Build subsequent layers by alternating green and brown compostable materials. Examples of brown materials are dried leaves, shredded paper, and dried dead plant materials. Green materials are grass clippings and fruit and vegetable scraps from your kitchen. Layering the green in between the brown helps to break the pile down faster, but it will eventually break down even if you have a small amount of green materials in comparison to brown. Add in whatever else you would normally put in the compost – eggshells, coffee grounds, and the like. In my case since I live in a condo community where people walk their dogs nearby, I didn’t want interesting odors to attract them to my garden so I left out the kitchen scraps and used only paper and cardboard.
If you want to do some fall planting, you can put soil and fertilizer on top of your compostables and plant now. If you are planting on top of tree roots, don’t make your layer more than 8 inches thick as anything deeper may kill tree roots, according to the book “Making the Most of Shade” by Larry Hodgson. If there are no tree roots to damage, you can make the lasagna 12 inches thick. I don’t know what I’m going to plant yet or whether I’m going to plant in spring or fall, so I topped off mine with wood chip mulch.
Wood chip mulch protects the lasagna gardening area until I’m ready to plant.
When I’m ready to plant I plan to just add soil on top of the mulch, because my lasagna is nowhere near 8 inches thick yet and it won’t hurt to make the new bed deeper. I’ll add nitrogen-rich organic fertilizer at the time to accelerate the breakdown of the wood chips.
This project was so easy that I worked on it up at the Schnarr’s cash register between customers!
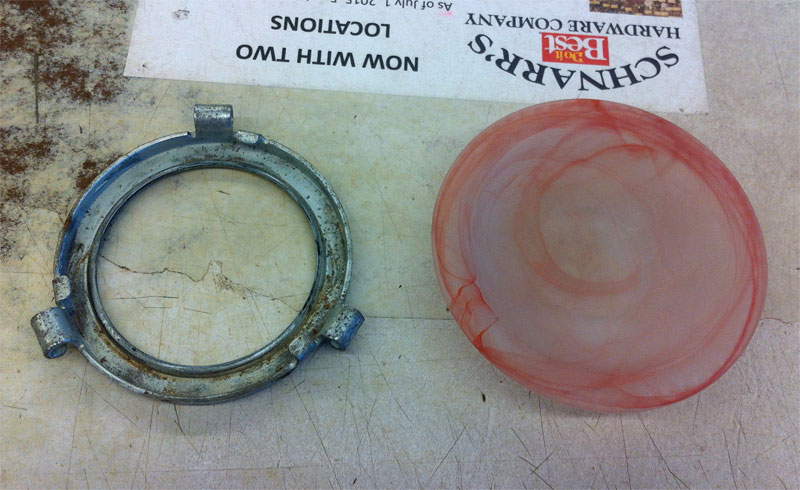
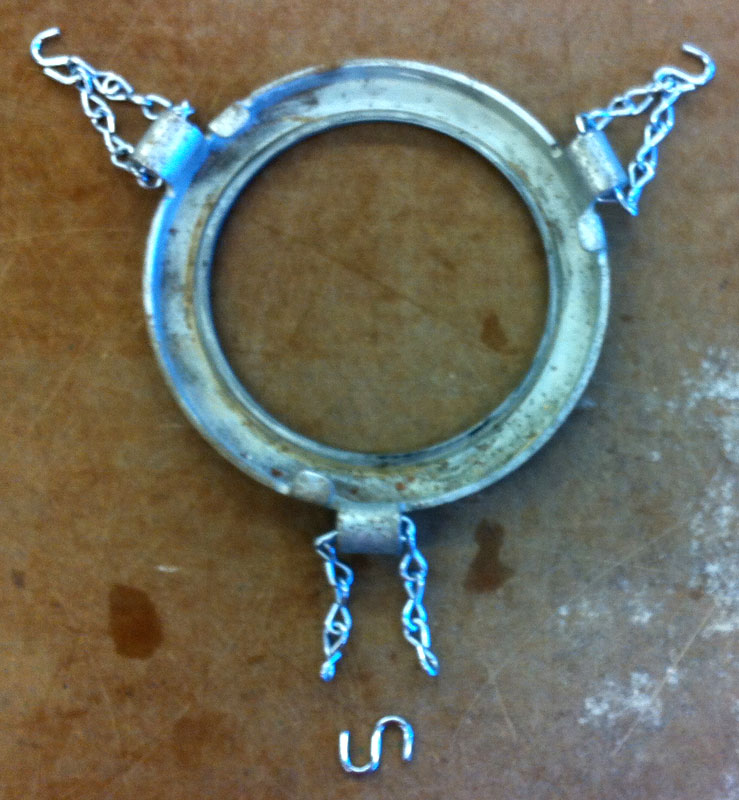
When I got a new dishwasher this spring, I decided to get rid of my broken garbage disposal rather than purchase a new one. When it was working, I rarely used it anyway since I composted almost anything that would normally go down it. In a way it’s kind of a bad habit because I already have more than enough stuff but I do enjoy saving odds and ends of things I might be able to re-use and seeing if I can make them into something useful. My Dad installed my new dishwasher for me and removed the old garbage disposal and he gave me several ringlike parts that he thought I might be able to use for something. One of them fits perfectly a glass part of a broken fountain/mister that someone else gave me.
Ring from garbage disposal and glass dish.
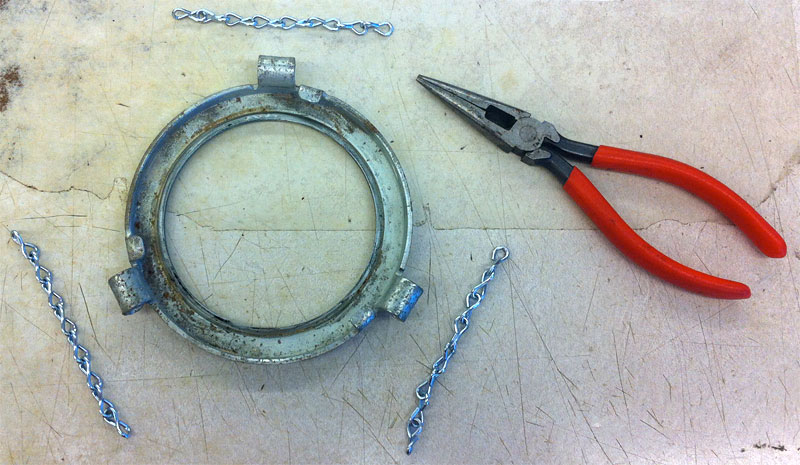
The glass bowl-like object rests nicely in the ring, so I decided to make a butterfly feeder out of it. The ring has three rolled tabs protruding around the outside edge. It was an easy matter to thread some chain through these tabs to suspend the feeder. From Schnarr’s I purchased some chain of a suitable guage and some small s-hooks to link the chain pieces together.
First I made three short equal lengths of chain. I pulled chain links apart with pliers to separate.
Short lengths of chain.
Next I threaded the small chain pieces through the rolled tabs to make loops, securing each with a small s-hook that I pinched closed.
Connecting chain pieces to ring tabs with s-hooks.
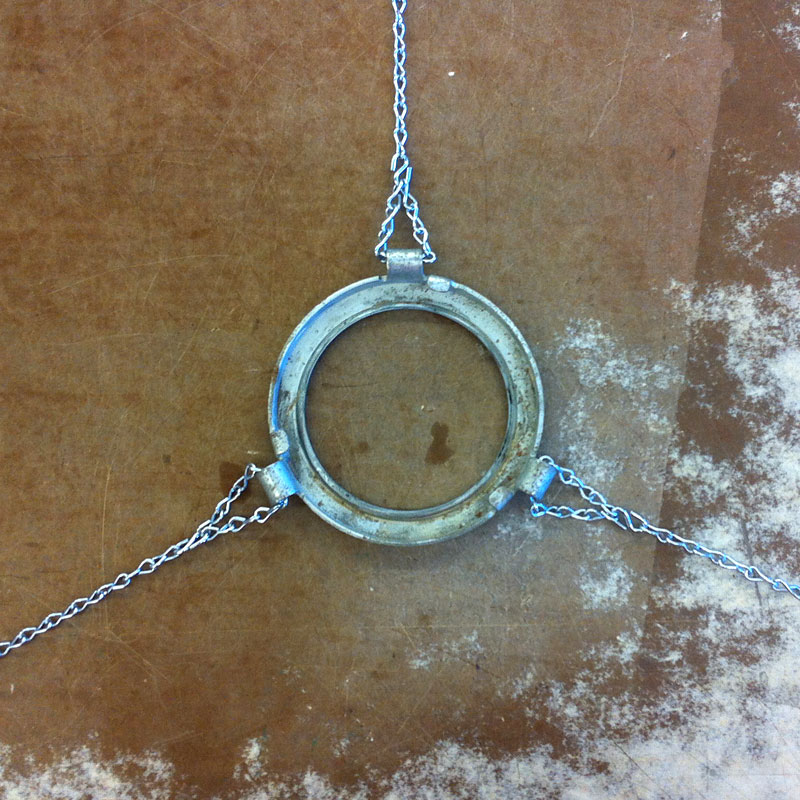
Next I cut three equal longer lengths of chain and secured them to each small loop by pinching closed the other end of each s-hook. Then I gathered the three chain lengths together and the top and secured them with another s-hook which can be used to suspend the feeder from a beam, tree branch or stand.
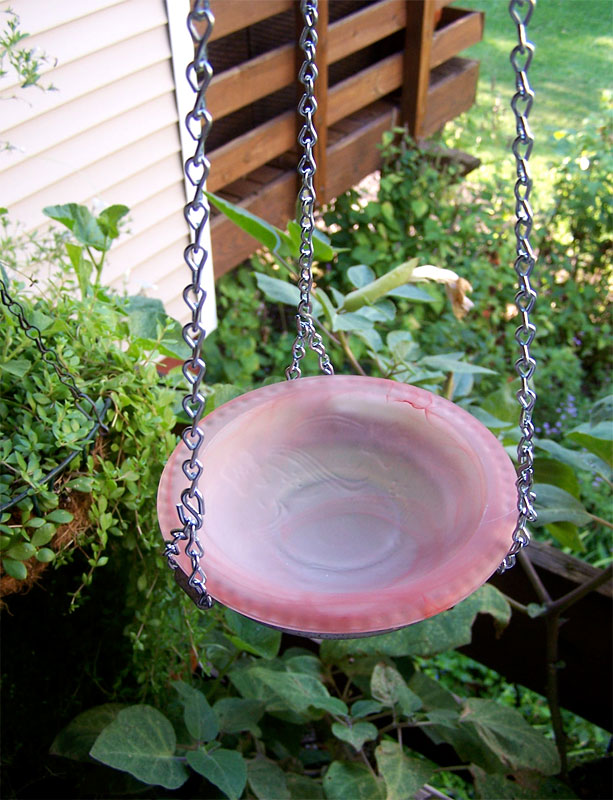
With longer pieces of chain added for hanging.Finished butterfly feeder hanging from a beam above my deck.
At right is how the finished butterfly feeder turned out.
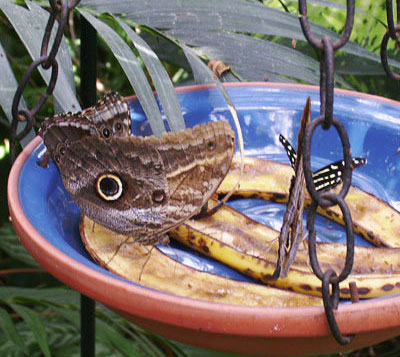
What food should one put in a butterfly feeder? If you have visited the Sophia M. Sachs Butterfly House in Faust Park you have probably seen plate feeders stocked with fruit in the conservatory. Butterflies like to sip juices from the fruit and according to Sally Roth, author of one of my all-time favorite gardening books “Attracting Butterflies & Hummingbirds to Your Backyard”, they like it even better if it’s fermenting. That’s a good way to get use out of fruit that has gone bad.
Butterflies feeding on overripe bananas at the Sophia M. Sachs Butterfly House.
Other foods that Roth suggests offering in butterfly feeders:
A clean chemical-free sponge or kitchen scrubber soaked in sugar water
Meat and fish scraps – especially if they are juicy
Fungi – if you don’t like to leave the fungal growths that pop up spontaneously in the garden in place, you could add them to the butterfly feeder – the butterflies will appreciate it!
It is evident that some foods that butterflies like are not attractive to humans. What you choose to add to the feeder may depend on your tolerance for odors or the possibility of attracting other wildlife. If you do not want other insects such as wasps and bees to access the food, you can make a cover from window screen or wire mesh that will allow the butterflies to poke their long proboscises through the screen into the food while excluding other insects.
I’m writing this toward the end of summer so there is not a whole lot of time this year for butterflies to make use of my new feeder. When the weather gets too cold for butterflies I’ll hang the feeder from a ceiling hook near a window in my home and use it as a plant hanger! In the fall I can always use extra space for plants when it’s time to bring them inside – they have a way of multiplying in the warm months, don’t they? I’ll put the feeder back out in late winter, perhaps even before flowers are in bloom, so that early-emerging butterflies can get something to eat if they need it.
In a previous article I described stenciling with paint on a wood garden sign. That works great if you don’t want a lot of small words but I found myself in need of some new garden signs that would require a lot of text on them. I decided to find a way to computer generate the text and put it on a weatherproof sign. In the past I had purchased produce from a co-op and had saved a couple of the thin wood crates thinking they would be useful for garden markers of some kind. I decided to make small signs from this wood and print out my text on clear acetate and attach that to the signs with brads.
I have some special gardening challenges where I live. I want to have a Permaculture garden. Different people will define Permaculture slightly different ways but the easiest way I can explain it is that I want to manage my garden in a way that works with nature instead of fighting it in order to save both labor and money. Surrounding my condo are large Oak trees which deposit mass quantities of leaves each season. The types of plants that thrive under trees are adapted to grow in the conditions created by a yearly deposit of leaf litter which is not removed but left to decay in place. However since I live in a condo, the leaves are removed by the groundskeepers which causes a lot of problems. I have mostly perennial plants which are not intended to be replaced each year. The leaf blowers make the plants look bent and bedraggled, as if they’d just been power-washed. The plants need the winter protection provided by leaves, so I have more die-off than I should. Leaf litter helps soil retain moisture and most shade-adapted plants like moist soil. When the naturally provided soil protection is stripped off, the soil dries out too much. I can see why a plant seller would be happy about this, but I’m a plant consumer and I’d rather keep the ones I have rather than keep buying new ones! To keep plants alive I have to water more which costs the condo complex money. I can and do put down mulch, but the leaf blowers blow a lot of it into the lawn which doesn’t help either my garden or the lawn to look it’s best.
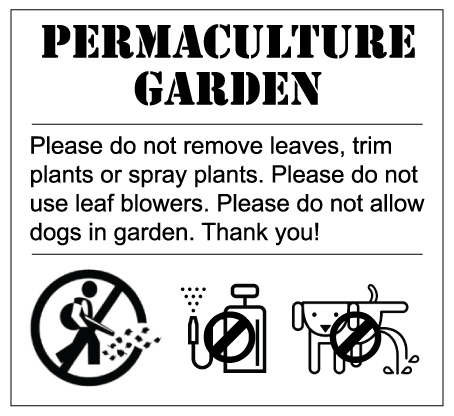
I think my garden would look a lot better and be healthier and require less maintenance if the groundskeepers would leave it alone. I have explained the situation to the condo management and they have agreed to let me deal with the leaves myself this season and keep the leaf blowers away as an experiment. Getting the agreement is one major step forward, getting the groundskeepers to comply will be another challenge. I don’t expect the groundskeepers to remember which is my garden, there are around 1,500 units where I live. So I obtained permission to install six signs to place around my garden which would read: “PERMACULTURE GARDEN. Please do not remove leaves, trim plants, or spray plants. Please do not use leaf blowers. Please do not allow dogs in garden. Thank you!” I worked this text out in computer graphics software and for good measure added icons to represent no leaf blowers, no spray and no peeing dogs. I looked online for the graphics and was amused by how many choices of “No leaf blowers” icons there are! I must not be the only person who finds they interfere with my gardening techniques.
Computer generated content for signs.
These signs will have to be somewhat prominent to be seen, so I tried to make them as attractive as possible and harmonious with my gardening style. First I pried apart the salvaged wood produce crates to get the wood pieces, then I cut them into 8 inch long sections. For each sign I placed two pieces together and held them together in the back with a piece of wide masking tape. This created a roughly square sign (8 x 7.5 inches).
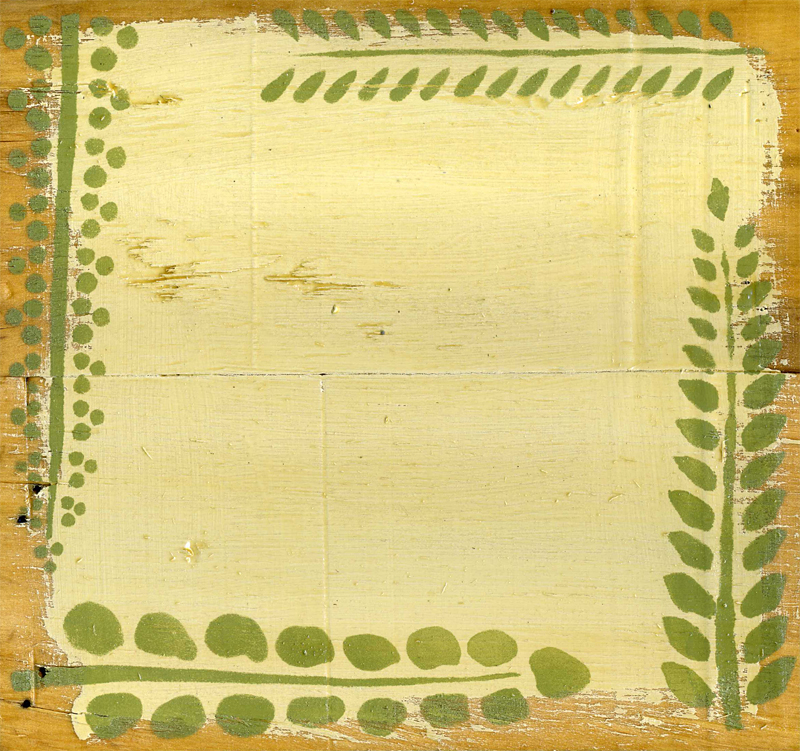
I painted a rough square of off-white paint in the middle of each sign, treating the edges very loosely for a rustic look. Then I used some medium avocado-green paint to stencil botanical designs around the edges. See my previous article Stencil a Wood Garden Sign for detailed information on how to stencil on wood. Then I painted the backs and fronts with several coats of weatherproof varnish.
Sign ground after painting, stenciling and varnishing.
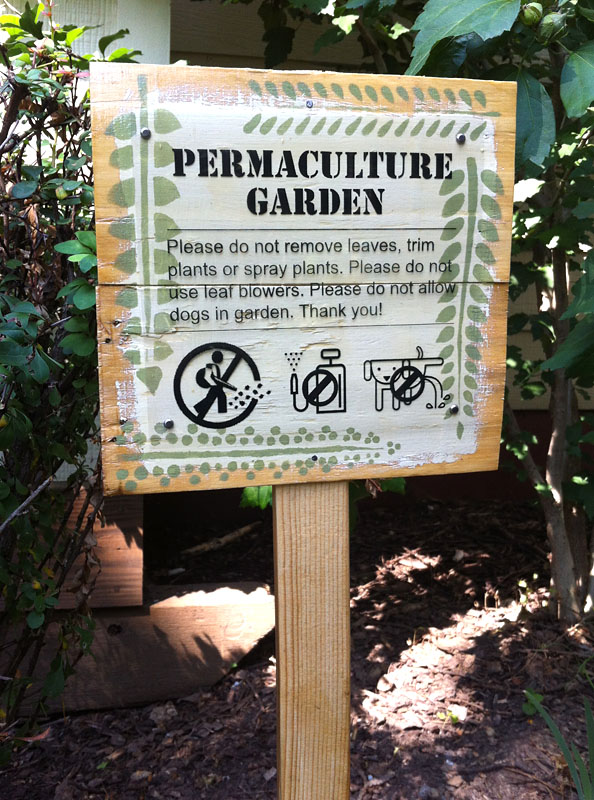
Then I took my computer generated text to a copy shop and got six copies printed in reverse on clear tranparencies. The reason for printing in reverse is that I think the ink will hold up better to the weather if it’s on the back of the clear film.
Next I punched four holes in the corners of the pieces of film and drilled four corresponding holes in each sign. Then I attached the film to the wood with brads.
I purchased six wooden stakes from Schnarr’s, sanded them and varnished those as well. Then I nailed the signs to the stakes and installed them.
Finished garden sign.
Here is one of the six finished signs! If all goes well and I actually get the opportunity, I will write about how I chose to deal with the fall leaves and what the results were.