Categories
DIY Gardening

Adventures in Buying Dirt

Adventures in Buying Dirt

by Carolyn Hasenfratz Winkelmann

Tom and I need a lot of dirt for the landscape design we’ve been working on. We need to regrade some areas and we need to add dirt to raised beds that I’m making. We’ve been buying a few bags of topsoil and potting soil here and there but to get the job done right we are going to have to order a truckload – or two?

In order to know how many cubic yards of dirt to order, I needed to calculate the area of several spots on the property where we wanted to add dirt. The more conventional way to do this is to use graph paper, tracing paper and special rulers to draw the areas to the right scale. Another way is to purchase a graphics kit such as this Patio and Outdoor Living Room Spacing Kit that I bought to experiment with. There is also landscaping computer software that is designed specifically for making landscape or home plans. I have a graphic design background and a subscription to the Adobe Creative Cloud so for our project I decided to start out with the tools I know best – my computer, a scanner, Abobe Illustrator and Adobe Photoshop.

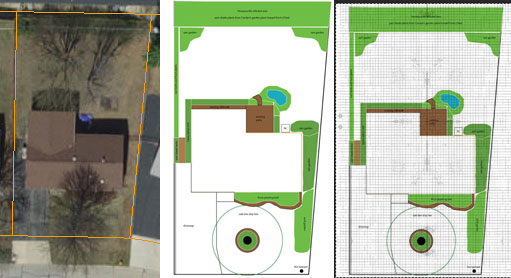
Last year to begin our landscape plan I went to the St. Louis County real estate lookup web page and did a search for our house. I took a screenshot of the aerial photo and edited the image in Adobe Photoshop to cut out the areas I didn’t need. I imported the image into Adobe Illustrator and drew over the photo to produce the rudimentary diagram shown in this article.

Measuring the whole house and yard by hand to figure out the square footage of areas where we want to add dirt was an option but not a very appealing one! So as a shortcut I took a piece of graph paper from the Patio and Outdoor Living Room Spacing Kit and scanned it. I made that a layer in Photoshop. Then I imported my diagram as another layer and measured a part of the property that was a nice even number. The porch is 8 ft wide. The scale of the graph paper was 1/4 inch (one square) = 1 foot. I shrunk the graph paper image so that 8 squares on the graph paper lined up with the length of the porch. I duplicated the layer enough times for the grid pattern to cover the whole diagram. Now to find out the length and width anywhere on the property all I have to do is count the squares on the graph paper layer.

Still in Photoshop, I drew transparent yellow blocks over the areas for which we need dirt. For each block, I figured the length and width and multiplied them to get the square footage. I made a list of each distinct area and its square footage. Then I used the cubic yardage calculator on the St. Louis Composting web site to convert my numbers into a quantity of cubic yardage for each section. The calculator doesn’t require that you calculate the square footage but I wrote those numbers down just in case I need the information later for some other purpose such as calculating fertilizer or seed.
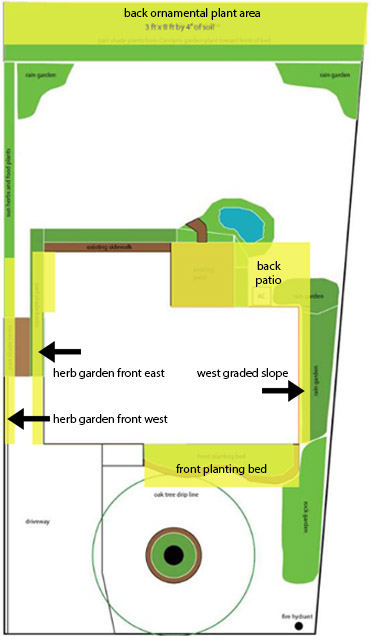
Here is an example:

Back Ornamental Plant Area:
8 ft x 73 ft = 584 square feet
4″ of soil = 10.81 cubic yards

I added up the cubic yardage for the entire project and came up with 28 cubic yards. St. Louis Composting’s dump truck (although quite large) only holds 13 cubic yards at a time so I ordered one truckload to start off. It was difficult for me to picture what 13 cubic yards of dirt looks like until I saw it – it turned out to be a good thing that they couldn’t haul all 28 yards at one time!

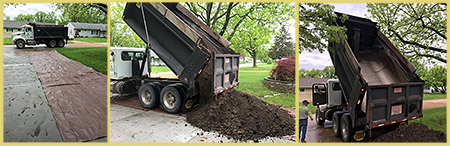
To prepare for the shipment I purchased a couple of 10 x 20 ft tarps from Schnarr’s and laid them on the driveway to receive the dirt. I covered the pile with other tarps I already owned and it was barely enough. It started raining about 10 minutes after the delivery and it’s taking us a couple of weeks to distribute this pile. We didn’t want our new dirt to get heavier than it needed to be or wash away in the rain so it was well worth the effort to cover it!

One of these days I’d like to learn the industry standard method of diagramming landscape plans. My goal is to do some practicing while I work on detail areas of our landscape plan. For now, I’m the only one who needs to understand this diagram but if you are handing off work to someone else you might need to hire a professional landscape designer to draw up a plan in the conventional way. Landscape design services might be included if you are getting work done. You can also hire a designer to draw up the plan for you to use with other firms doing the actual work or in the future.

Additional Resources

Here are some other applications that can help you out with measuring your property:

Categories
DIY Upcycling Ways With Wood

Tutorial – Image Transfers on Wood Jewelry

Tutorial – Image Transfers on Wood Jewelry

by Carolyn Hasenfratz Winkelmann

Materials

Thin wood scraps (about 1/8 – 1/4 inch thick)*
Gold acrylic paint*
White acrylic paint*
Large thin jump rings
Necklace chain with clasp
Cutout images from magazines or laser jet prints
Clear heavy-duty packing tape*
Scotch Magic Tape*
Clear-drying gel medium (several brands will work, including Modge Podge sold at the Schnarr’s Ladue store)
Paper towels*

Tools

Saw*
Drill with small drill bit*
Paint brushes*
Water container*
Sandpaper*
Clear plastic tote lid (or some other piece of rigid clear plastic like a piece of plexiglass)
Scissors*
Bone folder or burnisher
Basin for water*
Needle tool

* – indicates items sold at Schnarr’s

Instructions

1. Gather some thin wood scraps and cut them into pieces in the 3/4 inch to 2 3/4 inch range to make bases for wood pendants. Try different proportions and shapes so you can try out different design options.

2. Drill holes so the pendants can be strung onto a necklace later. You can also add extra holes for dangles if you want to. Sand the wood pieces smooth and wipe off with a damp rag.

3. Paint the wood pieces all over with gold acrylic paint. When the gold paint is dry, choose a spot on the front of your pendant and paint a white mark, such a stripe or a circle and let dry. When you start layering translucent images onto your pendant, the white spots will show through and help provide a focal point for your design. You can paint in a loose manner or make precise shapes or preferably experiment with both to see the effects.

4. Take some of your found images from magazines or laser prints and paint them with a layer of clear gel medium. Let dry, and apply a second coat with the brush strokes in the other direction. Let second layer dry, and apply a third coat in a diagonal direction. Let all layers dry for several hours.

5. Take strips of clear packing tape and use the Scotch Magic Tape to hold them down at the ends, sticky side up, on a rigid clear tote lid or piece of plexiglass. Cut or tear found images and press onto the tape pieces with the sides you want to show facing downward. As you layer on images, you can check your work by picking up the clear tote lid and peering from underneath to see what your work looks like.

The backs of packing tape pieces all filled with images.
The underside of the plastic lid showing tape pieces from the front.

6. After the tape is completely filled, remove from the lid and tape face down on a clean rigid surface like a desk top or table top. Rub well in several directions with a burnisher or bone folder.

Here are some tools you can use to burnish the images firmly onto the tape - bone folder, squeegee, French curve, old gift card.
Here are some tools you can use to burnish the images firmly onto the tape – bone folder, squeegee, French curve, old gift card.

7. After the tape strips are thoroughly burnished, soak them in water. Add the images that you coated with gel medium also. When the paper on the back gets soft, gently rub it until it peels away. You will probably have to change the water and rub multiple times to get all the paper off. When you are done, only the ink will be left on the tape. Dry the tape and gel pieces back/sticky side up on paper towels.

Tip – to avoid clogging your drain, dump the water with paper pulp in it outside instead of putting it down the drain.

8. Take one of your images on tape and hold it over your pendant piece until you find a composition you like. Loosely trim the tape piece and coat the front of the pendant with gel medium. Press the tape onto the front of your pendant and push any extra glue out and wipe off. Let dry, then trim around with a scissors. Use a crafting heat tool to speed the drying if necessary.

9. If your first image layer does not quite look finished as is, cut sections out of some of your gel-coated pieces and use the gel medium to glue them on top of your tape layer for extra interest. Top off with a final coat of gel medium and let dry.

10. Re-pierce your hole or holes with a needle tool, and put a jump ring in your hanging hole. If your pendant has multiple holes for dangles, put a jump ring in each hole and attach dangles to the jump rings. Run a jewelry chain with a clasp through the hanging jump ring. You are done!

More information

Here is another tutorial I wrote that makes use of image transfers:
Art Journaling With Stencils and Image Transfers

I have a Pinterest board for Image Transfer ideas and inspiration to help you explore further:
https://www.pinterest.com/chasenfratz/image-transfers/

If you would like to see what other classes and events I have coming up, please see this page on my blog:
http://www.chasenfratz.com/wp/about/classes-and-events/

Categories
Gardening

The Right Plant in the Right Place…

The Right Plant in the Right Place…

by Carolyn Hasenfratz Winkelmann

… is the advice you hear over and over again when you are learning about gardening. To help make both yours and my garden planning easier, I’ve made Pinterest boards on the Schnarr’s Pinterest site that go along with the rudimentary diagram I made for my garden planning last year. I have included plants I need to transplant now, plants that I am possibly interested in growing in the future and many other popular selections. You can use our boards as a starting point to make your own boards or photo galleries that correspond with the garden categories relevant to you.

We have boards with plant suggestions for:

Part Shade Vegetable/Food Garden

Full Sun Vegetable/Food Garden

Part Shade Rain Garden

Full Sun Rain Garden

Part Shade Rock Garden

Full Sun Rock Garden

Part Shade Ornamental Garden

Full Sun Ornamental Garden

Part Shade Herb Garden

Full Sun Herb Garden

Part Shade Water Garden

Full Sun Water Garden

Right now I’m managing two gardens, one at my condo and one at the house I have lived in with my husband since we got married in August. Last year I started transplanting some plants from the condo to the house as I work on the new garden. The process has been a lot slower than I expected but I’m back at work now and I’m overjoyed to be outside!

Decisions about where to put my transplants are much easier now – I just match them up to the correct category on my diagram. Some areas will need more detailed planning later but for now I’m getting the job done by putting the plants in the correct section and working with what I have. Stay tuned as I make slow but steady progress!

Categories
DIY Upcycling Ways With Wood

Class at Schnarr’s Hardware this Thursday – Image Transfers on Wood Jewelry

Class at Schnarr’s Hardware this Thursday – Image Transfers on Wood Jewelry

by Carolyn Hasenfratz Winkelmann

 Image Transfers on Wood Jewelry
Class by Carolyn Hasenfratz Winkelmann – Image Transfers on Wood Jewelry

Date:
April 25, 2019

Time:
5:30-7:30 PM

Place:
Schnarr’s Hardware, 40 East Lockwood, Webster Groves, MO 63119

Schnarr’s employee Carolyn Hasenfratz Winkelmann is teaching this class again for the first time in three years, and for the first time at Schnarr’s. Make amazing lightweight pendants by transferring found images onto wood. You will be supplied with the materials to make a necklace for wearing your pendants. You will learn the basics of transferring images with tape and gel medium and attaching a clasp to a cord necklace. I will have a selection of transferred images on hand for you to use at the beginning of the class, then while your pendant or pendants are drying, I’ll show you two different techniques for converting found images into beautiful embellishments to add to wood pendants and other art and craft items.

Each class attendee will receive a printout with a written tutorial for that class so if you forget anything we learned you can refer back to it later. Jewelry tools will be available to borrow during the class and some tools and supplies will be available to purchase if you want to continue working on your own.

At each class, there will be at least one door prize randomly awarded to an attendee – probably a craft supply item of some type that relates to the theme of the class. Past prizes have included a necklace kit, a polymer clay frame kit and a craft stencil. That’s my way of saying thank you for coming!

What to Bring
It’s not necessary to bring anything but it’s a good idea to wear old clothes in case there is a glue mishap. If you have found images on glossy papers like magazine or catalog cutouts, or laser printed copies, you can bring those as a source for images.

What’s Provided
I will provide wood pendant blanks, gel medium, images, packing tape, findings and parts for at least one necklace. I will have tools to borrow during class.

Only 20.00 per person!

LINK TO GET TICKETS:
https://dabble.co/rc/carolyn-hasenfratz-winkelmann

Categories
DIY Upcycling

Art Journaling With Stencils and Image Transfers

Art Journaling With Stencils and Image Transfers

by Carolyn Hasenfratz Winkelmann

Materials (* = items that are available at Schnarr’s)
Scrap mat board or chipboard
Book binding rings* available at Schnarr’s Webster Groves Location
Clean scrap paper
Tracing paper
Clear packing tape – wider strips are the most versatile
An assortment of found papers (pages from old books, magazine pictures, catalog pictures, laserprint copies, paint samples, etc.)
Assorted papers to use as pages – can be drawing papers, art papers or found papers from various sources.
Paper towels*

Tools
Paper cutter
Art stencils* available at Schnarr’s Webster Groves Location
Permanent* and other markers
Colored pencils
Gel pens
Glue sticks*
Hole punch
Scissors*
Pencil*
Ruler*
Masking tape* or painter’s tape* for holding papers and stencils in place while tracing and stenciling
Bone folder, burnishing tool or squeegee*
Basin* filled with water
Clear packing tape*

In case you missed my in-store demo during the Webster Groves Fall Art Walk in October 2018, this art journal book is what I was working on. I chose to work with a lot of abstract designs and random images to have fun with shapes and colors and not worry too much about content. When I was working on my demo, a customer asked what I was doing and I told him. He responded by saying, “I don’t have any kids”. Kids could do a book like this, but it’s fun for a person of any age who likes to experiment with visual media. I’m 51 and I can play with this stuff for hours! Coloring and playing is healthy for anyone to do.

Instructions:

To make the cover, cut two pieces of scrap mat board or chip board into 6″ by 6″ squares.

Punch two holes in each piece along one edge and link with binding rings.

From an assortment of your found papers, cut several pages 6″ x 6″. Using the cover piece as a template, trace circles on your inner pages to indicate where to punch the holes for the binding rings.

Here is a selection of potential pages cut from old books, posters and magazine ads.
Here is a selection of potential pages cut from old books, posters and magazine ads. You can use blank sheets of paper in your book, but it can be intimidating to start with a blank page. When you’re making altered art you can just build on what is there.

Using permanent markers, draw through some stencils to start some compositions on your pages. The stencils shown in the above sample are stencils that I cut myself. You can cut your own stencils or use pre-cut art stencils. It helps make your work more interesting if you vary the line weight of the markers. Add bits and pieces of collage papers if you are inspired to do so. Glue them down with a glue stick.

Here are a few more examples of two page spreads in progress.
Here are a few more examples of two page spreads in progress. I added paint sample strips to some of the pages to remind me to have fun with color.

Next start making some image transfers to add to your pages from packing tape. Use masking tape to hold strips of packing tape flat on your work surface, sticky side up. Start sticking papers you like to the tape, keeping in mind that the side that connects with the sticky side and faces down is the one that will show. The recommended sources of good papers for image transfers are glossy images from catalogs and magazines, and black and white or color images from a copier or laser printer. Areas that are white on the paper may turn out to be mostly clear or translucent depending on how much ink and clays and minerals are in the paper.

When you have covered the tape with images, turn the tape over and burnish well with a bone folder or squeegee. Burnish in at least three different directions and press hard to make sure all the paper areas make contact with the sticky tape. In the image below, the tape pieces in the center have had the paper removed already, and the strips on the sides still have the paper on the back.

After the tape strips are thoroughly burnished, soak them in water. When the paper on the back gets soft, gently rub it until it peels away. You will probably have to change the water and rub multiple times to get all the paper off. When you are done, only the ink will be left on the tape. Dry the tape pieces sticky side up on paper towels.

When your tape strips are dry, you can apply a glue stick to the sticky side and paste them in your book where you think they’ll harmonize with what you’ve already started. Continue to develop your pages further with coloring implements of your choice and more stenciling and collage if you choose. These little books make a great portable art activity if you carry them around with a selection of your favorite drawing and coloring tools. Here are some of my pages in various stages of completion.

Open the binding rings to insert your pages inside the covers in any order that you like. Decorate the book cover if you want. If you ever want to add new pages, you can just open the rings and insert them where you want them. I put a date on my pages when I consider them complete, and if I am really pleased with them I upload them to my Art Journaling Pinterest board. Have fun!

Categories
Gardening

How to Diagnose Plant Problems

How to Diagnose Plant Problems

by Carolyn Hasenfratz

If something is wrong with your plant, it could be a pest, a disease or something environmental. I sometimes get asked by Schnarr’s customers to help diagnose plant problems in the store so that they can select the right product to treat it. I can often be helpful, especially if the customer has time to allow me to look things up using my favorite online resources. There are way too many possibilities for any human being to remember them all! It’s extra helpful if the customer brings in a sample of the pest or affected plant part.

One of these is a plant disease and one is not

If you want to do a little research before shopping for products, here is my procedure.

1. First I go to images.google.com and do a descriptive search to see if any pictures come up that look like my problem.

Search tips:

The more you can identify the flora and fauna in your garden the more precise your initial searches will be. I’ve gotten a lot of joy during my whole life from the hobby of nature study and although I still have massive amounts to learn, being able to identify some common plants and animals in the area makes it easier to get started.

There are ways to identify plants and invertebrates that involve knowing the scientific terms for body parts or plant parts, but if you don’t want to get that detailed just describe what the specimen looks like and see what the image search reveals. Once when trying to identify a bug to find out whether it was beneficial or a pest, I did a search on the phrase “true bug wide lower legs” and I was presented with pictures of Leaf Footed bugs. That was my bug all right, and a pest. I learned what a Prometheus Moth that I saw on my deck was by searching for “huge brown moth Missouri” and comparing the pictures. Sometimes you have to add more detail. My first encounter with a Catalpa Worm in a state park was memorable because they are huge and beautiful. A search for “huge larva black and yellow Missouri” was too vague for a quick ID but a search for “huge larva black and yellow Missouri Catalpa” gives instantly good results. It helped that the Catalpa is a distinctive looking tree and I remembered what the larva was feeding on.

The cultivar of the plant is very helpful to know, if applicable. Some cultivars are either more resistant or more susceptible to certain plant maladies.

If you can identify the plant but not the pest or disease, try a search for “——- pest on Name of Plant” or “——- blight on Name of Plant” or “Symptom on Name of Plant.” For example recently I looked up “webs on burning bush” for a customer and narrowed it down to two possibilities. I found one product in the store that would treat both. Depending on the symptoms other common search terms you might try are things like “fungus”, “mildew” “rot”, “rust”, “disease” or “wilt”.

If you don’t know the plant name, describing the plant might help, for example “chew holes in vine” or “yellow spots on leaves small tree”.

2. Consult reference materials.

With a name of a plant or pest or disease in hand, I start to go to my favorite online horticultural resources to refine the identification as much as possible and look for causes and treatments.

Missouri Botanical Garden
http://www.mobot.org

University of Missouri Extension
Horticulture-and-gardening

Missouri Department of Conservation
https://mdc.mo.gov/trees-plants

Missouri Wildflower Guide
http://missouriwildflowerguide.com/

A Systematic Approach to Diagnosing Plant Damage
http://horticulture.oregonstate.edu/system/files/onn130601.pdf

TurfFiles – help with identifying and diagnosing turf grasses
https://www.turffiles.ncsu.edu/

Dave’s Garden
https://davesgarden.com/

Mother Earth News
https://www.motherearthnews.com/

What’s That Bug
https://www.whatsthatbug.com/

Tom Volk’s Fungi
http://botit.botany.wisc.edu/toms_fungi/

Do It Best Articles, Buying Guides, and DIY How-tos
https://www.doitbest.com/pages/page-index

If I’m at home, my library of gardening books is helpful. Missouri Botanical Garden has a nice library that you can consult in the Kemper Center, along with computers for guest use. This reference area is quiet with soothing fountain sounds in the background and I like to sit there with my laptop and write sometimes.

3. Use as many relevant factors as you can to narrow down a diagnosis. For example, in the “webs on burning bush” search results, there were initially more than two possibilities, but two of the possibilities were listed as being common in hot dry weather. Since that happened to be our conditions at the time I went with those two possibilities over the others. In other words, different growing conditions, seasons or other factors may make one disease or another more likely.

4. Put a piece of white paper underneath the affected area and shake the plant. The white paper makes tiny pests or debris easier to see.

5. Many but not all plant diseases are host specific. If multiple plants of the same species are affected by the same problem but it does not affect other species, that’s a strong indicator to look for a pest or disease. If a problem affects more than one species or only a subset of the plants of one species in the area, look at issues other than pests or diseases first. Don’t forget to investigate cultural or environmental factors such as:

  • Too much or too little water
  • Soil compaction
  • Soil ph or fertility
  • Chemical “burns” from too much fertilizer or contamination from de-icing chemicals
  • Poor drainage
  • Root or bark damage
  • Accidental herbicide application
  • Amount of light getting to the plant
  • Sun scald
  • Improper planting depth
  • Root girdling
  • Exposure to extreme temperatures
  • If you are looking at turf, is the damage regular or irregular in appearance? Rigidly regular marks may indicate damage of human origin.

6. Sometimes you need to consult a specialist. The identification of “shield bug dung beetle gold and brown spots Ozarks Missouri feeds on dung” still eludes me. I should have taken a photo, then I could send it to the What’s That Bug web site or show a ranger the next time I go to a state park. If you can, take a photo or bring in a specimen to the expert you are consulting. Here is a link to the Missouri Botanical Garden Gardening Help options.

When you consult professionals for help, you may get recommendations for products that are not marketed to the home gardener. If you don’t see what you are looking for in our store, please ask us for help because there are many things we can order from the warehouse in addition to what is on the store shelves every day.

Categories
DIY Upcycling

Making Signage From Letter Stencils: Part 2

Making Signage From Letter Stencils: Part 2

by Carolyn Hasenfratz

Tools and Materials
*Indicates items available at Schnarr’s
Assorted scrap cardstock
X-Acto Knife and Blades
Self-healing cutting mat
*Letter stencils
*Pencil
*Acrylic paint
*Paintbrushes
Acrylic medium
Paint mixing containers
Foamcore
Architextures™ Parchment Rub-Ons by Canvas Corp – Build
Assorted decorative papers with hardware related motifs
Bone folder or burnisher
*Modge Podge (available at our Ladue store)
Scrap corrugated cardboard
*Burlap
Fabric scissors
Paper cutter
*Nuts and bolts
*Brads
*Washers
Old wood yardsticks
*Awl
Metal ruler
*Masking tape
*Mounting tape
*Wrenches

My design for in-store signage for use on an endcap at Schnarr’s Hardware store in Webster Groves, MO was influenced greatly by my love of stencils. I had recently used stencils to make signs for another store. I was happy with the results and eager to try similar lettering techniques with a different look.

I took a set of chipboard reusable letter stencils that I got from Schnarr’s and used them to trace letters for the words “DIY Classes” on pieces of scrap cardstock and thin chipboard. I cut out each letter by hand using an X-acto knife, metal ruler and self-healing cutting mat.

My next step was to give each letter piece a wash of white paint mixed with matte medium and water. After the paint was dry I used some rub-ons burnished with a bone folder to add hardware and building imagery over the white paint wash around the cutout letters. Then with a small brush I outlined the letters and edges with a painted-on line of non-watered down white paint.

I cut out pieces of black cardstock slightly larger than my letter pieces and placed one behind each to add a frame and make the letters stand out. With an awl I poked holes in the four corners of each letter piece and fastened the layers of paper together with brads, using a variety of washers from my stash here and there with some the brads for extra variety and interest.

After making my letters, I measured the space available for my sign and took stock of what materials I had on hand. I knew I wanted a lightweight sign that would harmonize with the vintage imagery in the rub-ons, look good with the store’s color scheme and suggest the types of mixed media techniques I teach in the DIY Classes I’m promoting.

I decided to decoupage paper imagery all over a piece of foamcore and paint over the paper pieces with a wash of red-brown paint so that the designs on the papers would show through and not be too dominant. Most of the paper I chose was by the company DCWV. I looked for paper designs with things on them like vintage letters and numbers, rulers, keys, hardware, aged wood and brick, clock faces, vintage machinery and the like. I used Modge Podge to glue the papers over the foamcore and I mixed matte medium with the paint to make a translucent wash.

The finished foamcore panel was a bit smaller than the space I needed to cover so I made a frame out of cardboard covered with burlap to mount it on. First I cut out 8 pieces of corrugated cardboard, 2 for each side of the frame for extra strength. I bound the pieces of cardboard together with masking tape then I covered the cardboard frame sides with burlap, securing the burlap with tape on the back side. I poked holes in the burlap covered pieces and in the front foamcore piece with an awl and I used nuts and bolts with washers to attach the layers together.

I laid out my letters on top of the cardboard/burlap/foamcore assembly and saw that the second line, “Classes” was a bit too wide to fit onto the foamcore and was going to have to overlap the burlap edges to fit. I decided to bolt on a couple of old yardsticks to provide a surface for attaching the second row of letters. This emergency adaptation turned out to be a happy accident because in my opinion the rulers added great interest to the design and looked terrific with the images and colors I was using.

My last step was to attach the letters to the sign with mounting tape. I love this stuff!

Stop by Schnarr’s Webster to see the finished sign. On the endcap below it you’ll find samples of projects for future classes I’ll be teaching along with assorted art and craft supplies, some offered at clearance prices!

Categories
DIY Home Decor Ways With Wood

Stenciled Letter Blocks

Tools and Materials
*indicates available at Schnarr’s
*Wood blocks – 5″ x 3.5″ x 1.5″
*Water based paint in assorted colors
Old lids from cleaned food containers
*Letter Stencils
*Sponge
Scrapbooking or decorative paper
*Scissors
*Modge Podge matte finish (available at the Ladue Schnarr’s store)
*Paintbrushes
*Water container
*Sandpaper
*Painter’s tape or masking tape
Squeegee tool
*Rags
*Pencil
Sharpie Markers

Optional if using metal letters:
*Metal letters
*Hammer
*Nails or tacks

Cut blocks of wood into 5″ x 3.5″ x 1.5″ pieces (two-by-fours cut into 5″ lengths). Make as many pieces as you want letters. For example, if you want to display someone’s initials, cut two or three blocks. To spell out the word “holiday” cut 7 blocks.

Paint all sides of the wood blocks with holiday colors, beachy colors, or any color scheme of your choice. Let dry.

Sand the blocks to bare the corners and get rid of any painting mistakes. I’m fond of the distressed look so I don’t mind the sanded spots giving an aged and worn appearance to the wood. The distressed look is even better if your wood pieces have bumps, knots or other flaws in them.

I worked on several blocks at a time so I wanted to experiment with different layering effects. One some of the darker colored sides, I stenciled a letter with white paint.

Cut some shapes out of decorative papers and use Modge Podge to adhere them to some of the painted wood surfaces. You might want to use shapes that are related to the theme of your project, such as ornament shapes or trees for Christmas, fish for beachy, trees or deer for woodsy, etc. Possible sources of shapes to trace are stencils or cookie cutters. Let dry. You can also cover an entire side of the block with paper if you want.

Since I was working on several blocks at a time, I labeled the backs of my paper pieces and the spots where I wanted to put them with corresponding letters so I could match them up later.

Here is the method I use to apply paper with Modge Podge or other glue without the paper wrinkling.

  1. Paint one side of the paper pieces you want to glue with Modge Podge and let dry.
  2. Paint the other side and let dry.
  3. When ready to apply, paint a thin (but not watered down) layer of Modge Podge on the back of the paper and on the surface you’re gluing it to.
  4. Press paper in place and burnish with the squeegee tool to get a flat seal and push out excess glue. Wipe glue away.

To help me decide where to place paper pieces, I outlined in pencil where my stenciled on and metal letters would go.

Here are the fronts and backs of my blocks with the paper pieces glued on.

Mix up some white or off-white paint with water to make a light wash. Paint your wood blocks with the wash and let dry.

Use painter’s tape or masking tape to hold a letter stencil where you want it on a wood block. Sponge paint through the stencil. Remove stencil and let block dry. Repeat for each block until all your letters are done.

If you think your letters need a little more emphasis, you can place your stencil over the letter again and use it as a guide to draw an outline with a Sharpie Marker. You’re done!

Categories
Gardening Sustainability

How Much is a Tree Worth?

How Much is a Tree Worth?

by Carolyn Hasenfratz

On a hot afternoon at our Ladue store a couple of weeks ago, we had a power outage that affected our store and a lot of the surrounding neighborhoods. The next afternoon at my condo my neighborhood had the first power outage I’ve experienced in my 14 years living there. According to updates from an Alderman in my city who was in contact with Ameren Missouri, there was extra load on some stations due to storm damage from a couple of days earlier. The combination of the extra demand with the heat was too much for some of the stations to handle. Someone more technical than me can probably explain it better or understand it better, but what I get from this is that hot temperatures can stress an already stressed system to the point of failure. This is a good time to reflect on a group of living things that often seem so permanent and indestructible that we sometimes don’t give them the respect and care that they deserve – trees!

When we are managing our landscapes or contracting for services, we have to make decisions about how much money to invest in trees. How much do we want to spend to buy the specimens? How much effort do we want to put in selecting, planting, establishing and maintaining the tree? Should we spend the money to get it pruned correctly by an expert or to treat a disease or pest? If we decide we don’t want it, how much will it cost to remove?

Those decisions will become easier to make if you know the actual economic benefit of your tree. According the Treekeepers Comprehensive Introductory Course handbook, “planted in the proper location, trees can reduce energy demand by as much as 50%”. The recent power outages I experienced occurred at approximately 3:15 pm and 5:30 pm respectively. Those are often very hot times of the day so it seems likely that air conditioning was one of the factors contributing to the high demand. You will notice that the air is noticeably cooler in the vicinity of trees – that is because water evaporates from the leaves of trees and the change from water to water vapor uses up heat energy from the air.

Just for fun, I ran a test on an oak tree that is at the corner of my condo to see what the value of it is in hard cash terms. I used a really useful tool called i-Tree Design. Here is a screenshot showing some of the benefits of this tree over a 10 year period.

Monetary value of a large oak tree

You can run tests using your own property as an example with different sizes and species of trees. The tool will even show you spots on your property where trees will have the most and least benefit. It’s lots of fun and very enlightening!

Out of curiosity I ran a calculation on the Rose of Sharon tree I planted near my deck. According to the i-Tree Design tool, the economic value of that tree is $174 over 10 years. Maybe that doesn’t sound impressive at first, but consider that the tree itself was free – it came from a seedling that I transplanted from my parents’ yard. I spent about five minutes planting it and when it was tiny I probably watered it a few extra times during the first couple of weeks. It has required little care since then – the only thing I remember doing with it is mulching it and weeding out it’s extra seedlings that I didn’t want. The tree is small enough that I could remove it myself for no cost if it came to that. Economic benefits are not even the reason I planted the tree in the first place – I wanted to look at the beautiful flowers and enjoy watching the wildlife that I knew would come to feed on the flowers and seeds. It attracts a steady parade of butterflies, hummingbirds, finches, other birds and various bee species for months on end. If I had PAID $174 for the tree I probably would consider it money well spent.

If you plant the right tree in the right place and care for it correctly, you will cut down your energy usage. You also may help reduce the demand on electrical equipment in your neighborhood and prevent power outages. A power outage is often just a minor inconvenience, but under certain circumstances and to vulnerable people an outage can be costly and dangerous. If you plant trees and invest in their establishment and care, it is possible for your tree investment to pay for itself and make life better for your community at the same time. All you need is the right information – I hope the resources I’m sharing will help you to get it.

iTree Design Application
http://design.itreetools.org/

Forest ReLeaf of Missouri
http://moreleaf.org/

Missouri Community Forestry Council Tree Care Blog
http://www.mocommunitytrees.org/blog1/

Missouri Department of Conservation Tree Care Videos and Documents
https://mdc.mo.gov/trees-plants/tree-care

Categories
DIY Home Decor Ways With Wood

Upcoming DIY Class at Schnarr’s – Stenciled Letter Blocks July 19, 2018

Upcoming DIY Class at Schnarr’s – Stenciled Letter Blocks July 19, 2018

Stenciled Letter Blocks – $20.00 Class

Join us at Schnarr’s Hardware in Webster Groves to decorate wood blocks with paint, stencils and mixed media to create fun home decor. Spell out words, make initial blocks. house numbers or dates to enhance a festive occasion. All supplies included.

CLASS DETAILS
Thursday, Jul 19 2018
05:30:00 PM
Price: $20.00

For More Class information or to Sign Up – Click here